


1.需要注意以下三点
*使用自定义的导航样式,首先需要把原生的顶部的导航方式给隐藏掉("navigationStyle": "custom")
*手机顶部手机状态栏的高度
*微信小程序中胶囊的位置信息存储(使用store存储)
2.导航布局
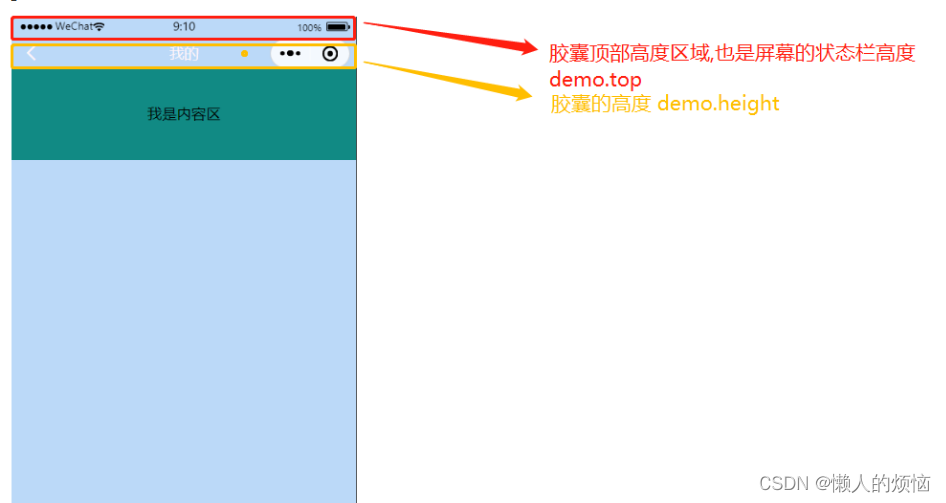
*由于微信小程序中带有导航胶囊,所以需要根据胶囊去获取一定的参数信息
-
在微信小程序中,我们只需要获取胶囊的位置参数即可,详细如下(App和小程序自定义顶部): 注: 微信小程序围绕胶囊布局即可
须知:获取胶囊信息的Api
uni.getSystemInfo() ----->使用这个是为了算rpx--->px的换算系数 (返回值可去uniapp官方文档里查看)

小程序默认把可使用窗口宽度分为750rpx,首先需要计算出不同机型rpx和px之间的换算比率
使用方法
uni.getSystemInfo({

    success: (res) => {

        const proportion = 750 / res.windowWidth(单位是px) // 换算比率

    }

})
uni.getMenuButtonBoundingClientRect() ----->这个返回的才是胶囊信息
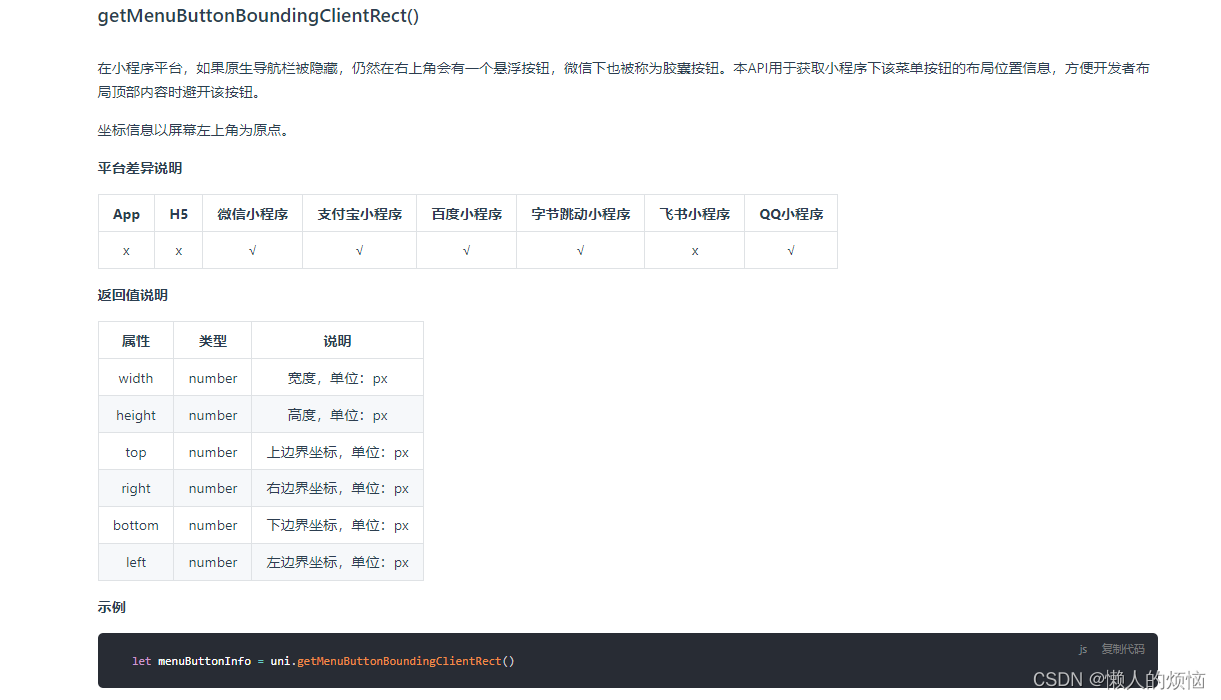
// 使用方法
const demo = uni.getMenuButtonBoundingClientRect()
参考:
3.具体实现
1.首先需要获取我们需要用到的数据信息,并将其存储
在uni-app项目store文件夹下创建如下结构(没有的可自行创建,并在main.is中引用store,这里就不多说了)

phoneInfo.js
const state = {
// 顶部导航参数
phoneInfo: {},
}
const mutations = {
/* 胶囊参数信息 */
SET_PHONE_INFO(state, val){
state.phoneInfo= val
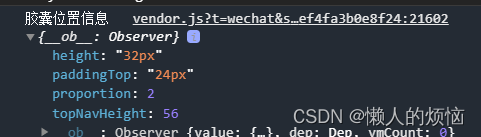
// 打印存储的信息
console.log("胶囊位置信息", state.phoneInfo);
}
}
const actions = {
getPhotoInfo({ commit }) {
/* 获取系统参数 */
uni.getSystemInfo({
success: (res) => {
const proportion = 750 / res.windowWidth // 比例
let height
let paddingTop
let topNavHeight
/* 微信小程序获取胶囊参数 */
// #ifdef MP-WEIXIN
const demo = uni.getMenuButtonBoundingClientRect()
// 小程序胶囊的高度
height = demo.height + "px"
// 小程序胶囊距离顶部的高度
paddingTop = demo.top + "px"
// 导航栏总高度
topNavHeight= demo.height + demo.top
// #endif
// #ifdef APP-PLUS
// 设备系统信息
let systemInfomations = uni.getSystemInfoSync()
console.log(systemInfomations);
// 机型适配比例系数
let scaleFactor = 750 / systemInfomations.windowWidth
// 当前机型-屏幕高度
let windowHeight = systemInfomations.windowHeight * scaleFactor //rpx
// 当前机型-屏幕宽度
let windowWidth = systemInfomations.windowWidth * scaleFactor //rpx
// 状态栏高度
let statusBarHeight = systemInfomations.statusBarHeight
height= 40 + "px" // App导航栏高度可自定义(根据需求定)
paddingTop = statusBarHeight + "px"// App状态栏高度
// 导航栏总高度
topNavHeight= 40 + statusBarHeight
// #endif
/* 写入到store */
commit('SET_PHONE_INFO', {height, paddingTop, topNavHeight, proportion})
}
})
}
}
export default {
// namespaced: true 的方式使其成为带命名空间的模块。保证在变量名一样的时候,添加一个父级名拼接。
namespaced: true,
state,
mutations,
actions
}getters.js
const getters = {
  phoneInfo: state => state.phoneInfo.phoneInfo
}
export default getters
index.js
import Vue from 'vue'
import Vuex from 'vuex'
import getters from './getters'
/* 单元 */
import phoneInfo from './modules/phoneInfo.js'
Vue.use(Vuex)
const store = new Vuex.Store({
modules:{
phoneInfo,
},
getters
})
export default store2.调用store的方法
只需要在App.vue文件中的onLaunch周期里调用即可
App.vue
<script>
    export default {
        // 当uni-app 初始化完成时触发(全局只触发一次)
        onLaunch: function() {
            // console.log('App Launch')
            // 获取系统参数
            this.$store.dispatch('phoneInfo/getPhotoInfo')
        },
        onShow: function() {
            // console.log('App Show')
        },
        onHide: function() {
            // console.log('App Hide')
        }
    }
</script>
获取之后打印我们存储的信息phoneInfo(这样页面在使用的时候直接取store的数据就行了)
2.使用
1.创建导航组件
在components文件夹下创建top-nav组件
top-nav.vue
<template>
<view class="top-content" :style="[{background},{paddingTop}]">
<view class="demo" :style="[{height}]">
<!-- 左侧按钮 " 此处图标使用的是 uni-ui图标 -->
<view class="item">
<uni-icons v-if="back" :type="iconType" :size="iconSize" :color="color" @click="onBack"></uni-icons>
</view>
<!-- 中间标题文字 -->
<view class="m-item" :style="[{fontSize},{color}]">
<text>{{title}}</text>
</view>
<!-- 右 占位布局 -->
<view class="item"></view>
</view>
</view>
</template>
<script>
export default {
name:"top-nav",
props:{
title: { // 标题文字(默认为空)
type: String,
default: ''
},
fontSize: { // 标题字号(默认为空)
type: String,
default: '32rpx'
},
color:{ // 标题和左侧按钮颜色(默认白色)
type:String,
default:'#fff'
},
iconSize: { // 左侧图标尺寸
type: String,
default: '24'
},
iconType: { // 左侧图标类型
type: String,
default: 'back'
},
//建议使用background 因为使用backgroundColor,会导致不识别渐变颜色
background:{ // 背景颜色(不传值默认透明)
type:String,
default:'transparent'
},
back:{ // 是否显示返回按钮(不传值默认不显示)
type: Boolean,
default: false
}
},
data() {
return {
// height: 0,
// paddingTop: 0,
}
},
computed: {
/* 微信小程序胶囊高度,即顶部导航高度 */
height() {
return this.$store.getters.phoneInfo.height
},
/* 微信小程序胶囊距离顶部边距,即顶部导航上方的区域 */
paddingTop(){
return this.$store.getters.phoneInfo.paddingTop
}
},
created() {
},
methods: {
/**
* 左侧按钮触发,目前默认返回上一页
*/
onBack() {
uni.navigateBack();
}
}
}
</script>
<style lang="scss" scoped>
.top-content {
position: fixed;
top: 0%;
width: 100%;
z-index: 99;
padding-bottom: 10rpx;
.demo {
margin: 0 20rpx;
display: flex;
align-items: center;
justify-content: center;
box-sizing: border-box;
.item{
width: 20%;
display: flex;
align-items: center;
}
.m-item{
width: 60%;
text-align: center;
font-weight: 500;
color: #FFFFFF;
}
}
}
</style>页面使用
例: index.vue(首页)
<template>
<view>
<!-- 自定义顶部 -->
<top-nav back color="#fff6fa" title="我的"></top-nav>
<view :style="{paddingTop}">
<view class="box">
我是内容区
</view>
</view>
</view>
</template>
<script>
export default {
data() {
return {
}
},
computed: {
paddingTop(){
return this.$store.getters.phoneInfo.topNavHeight * this.$store.getters.phoneInfo.proportion + 'rpx'
}
},
mounted() {
},
methods: {
}
}
</script>
<style scoped lang="scss">
.box{
width: 100%;
height: 200rpx;
display: flex;
justify-content: center;
align-items: center;
background-color: #118a84;
}
</style>效果:

基本实现就这些了, 希望可以帮助到你.
不喜勿喷 ! 记得点赞哦! 我是坐井观天阔的小青蛙
转载请说明出处!


 2万+
2万+


 被折叠的 条评论
为什么被折叠?
被折叠的 条评论
为什么被折叠?
 到【灌水乐园】发言


