


文章目录
需求是上传多张图片以及附件,支持复制粘贴上传,鼠标拖拽上传等
一、一次上传多张或单张(调用多次upload方法)
1.j-image-upload
<j-image-upload v-model="model.projectsPic" :number="10" :fileType="['png', 'jpg', 'jpeg']" :fileSize="2" multiple />
本来使用的是j-image-upload组件,但是发现我即使配置了multiple 支持多文件上传也仍旧是只支持单文件上传,经过查资料发现可能是组件内部写死了multiple: false,拒绝使用,所以现在改换使用另外的组件。
2. a-upload
使用 Ant Design Vue 原生的 a-upload 实现多图上传
              <a-upload list-type="picture-card" :multiple="true" :file-list="fileList" :before-upload="beforeUpload"
                @change="handleUploadChange" @preview="handlePreview" :action="uploadUrl" :headers="headers">
                <!-- 显示上传按钮(限制最大数量) -->
                <div v-if="fileList.length < 10">
                  <a-icon type="plus" />
                  <div class="ant-upload-text">上传图片</div>
                </div>
              </a-upload>

              <!-- 图片预览模态框 -->
              <a-modal :visible="previewVisible" :footer="null" @cancel="previewVisible = false">
                <img style="width: 100%" :src="previewImage" />
              </a-modal>
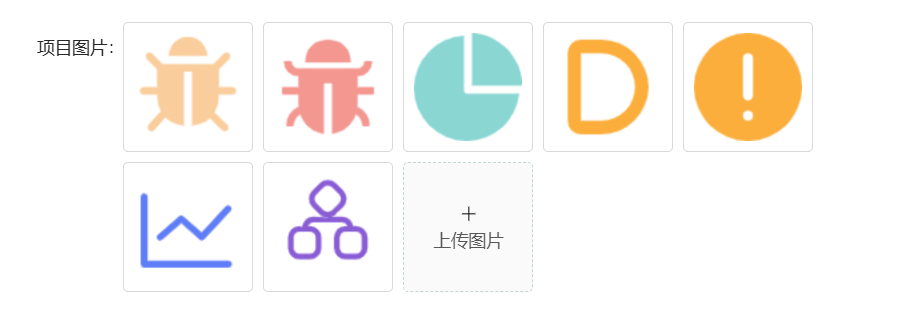
上传一张图片可以预览一张,效果如下图
注意:使用这个组件需要自定义请求头和上传地址
 data() {
    return {
      //多图片上传
      fileList: [],           // 存储已上传的文件
      previewVisible: false,   // 控制预览模态框
      previewImage: '',        // 当前预览的图片URL
      uploadUrl: `${window._CONFIG['domianURL']}/sys/common/upload`, // 上传接口
      headers: {
        'X-Access-Token': this.$store.getters.token, //请求头可自己更换
      },
  },
同时加上这些方法就可以使用啦
methods: {
    // 上传前的校验(文件类型、大小)
    beforeUpload(file) {
      const isImage = ['image/jpeg', 'image/png', 'image/jpg'].includes(file.type);
      const isLt2M = file.size / 1024 / 1024 < 2;

      if (!isImage) {
        this.$message.error('只能上传 JPG/PNG 格式的图片!');
      }
      if (!isLt2M) {
        this.$message.error('图片大小不能超过 2MB!');
      }
      return isImage && isLt2M;
    },

    // 处理上传状态变化
    handleUploadChange({ file, fileList }) {
      if (file.status === 'done') {
        this.$message.success(`${file.name} 上传成功!`);
        // 将上传成功的文件URL存入 model.projectsPic
        this.model.projectsPic = fileList
          .filter(f => f.status === 'done')
          .map(f => f.response?.result || f.response?.message);
      } else if (file.status === 'error') {
        this.$message.error(`${file.name} 上传失败!`);
      }
      this.fileList = fileList;
    },

    // 图片预览
    handlePreview(file) {
      this.previewImage = file.url || file.thumbUrl;
      this.previewVisible = true;
    },
},
二、给上传图片加前缀
一个项目不可能只有一个上传图片的地方,现在不同目录下的图片难以区分,
1.用户页面

因为这个使用的是jeecgboot的前端框架,应后端要求修改为/user,地址为src\components\jeecg\JImageUpload.vue
<a-upload
      name="file"
      listType="picture-card"
      :multiple="isMultiple"
      :action="uploadAction"
      :headers="headers"
      :data="{biz:bizPath}"  //这里控制的地址
      :fileList="fileList"
      :beforeUpload="beforeUpload"
      :disabled="disabled"
      :isMultiple="isMultiple"
  /*这个属性用于控制文件上传的业务路径*/
      bizPath:{
        type:String,
        required:false,
        default:"user"//改成为user
      },

2.项目页面
data() {
   return {
	  //多图片上传
      fileList: [],           // 存储已上传的文件
      previewVisible: false,   // 控制预览模态框
      previewImage: '',        // 当前预览的图片URL
      uploadUrl: `${window._CONFIG['domianURL']}/sys/common/upload`, // 上传接口
      headers: {
        'X-Access-Token': this.$store.getters.token, // Vuex 中的 Token
      },
      uploadData: {
        biz: 'project', // 业务标识
      },
  }
}
methods: {
// 上传前的校验(文件类型、大小)
    beforeUpload(file) {
      const isImage = file.type.includes('image/');

      if (!isImage) {
        this.$message.error('只能上传图片文件!');
        return false;
      }

      return true;
    },

    // 处理上传状态变化
    handleUploadChange({ file, fileList }) {
      if (file.status === 'done') {
        const response = file.response;
        if (response.success) {
          // JEECG-Boot标准响应格式处理
          const filePath = response.result || response.message;
          this.$message.success('上传成功');

          // 更新model中的图片路径(分号分隔多个文件)
          this.model.projectsPic = fileList
            .filter(f => f.status === 'done')
            .map(f => f.response?.result || f.response?.message)
            .join(';');
        } else {
          this.$message.error(response.message || '上传失败');
        }
      } else if (file.status === 'error') {
        this.$message.error('上传失败');
      }
      this.fileList = fileList;
    },

    // 初始化已上传文件列表
    initFileList(picStr) {
      if (!picStr) {
        this.fileList = [];
        return;
      }

      this.fileList = picStr.split(';').map(url => {
        // 补全URL(使用框架配置的域名)
        const fullUrl = url.startsWith('http') ? url
          : `${window._CONFIG['domianURL']}/sys/common/view/${url}`;

        return {
          uid: -Math.random(),
          name: url.split('/').pop(),
          status: 'done',
          url: fullUrl,
          response: { result: url }
        };
      });
    },

    // 图片预览
    handlePreview(file) {
      this.previewImage = file.url || file.thumbUrl;
      this.previewVisible = true;
    },
}
<a-upload list-type="picture-card" :multiple="true" :file-list="fileList" :before-upload="beforeUpload"
 @change="handleUploadChange"
 @preview="handlePreview"
 :action="uploadUrl"
 :headers="headers"
 :data="uploadData">
  <!-- 重点是加上这个:data="uploadData" -->
<!-- 显示上传按钮(限制最大数量) -->
 <div v-if="fileList.length < 10">
     <a-icon type="plus" />
 	 <div class="ant-upload-text">上传图片
	 </div>
</div>
</a-upload>

3.其他页面
第一步
//多图片上传
fileList: [],           // 存储已上传的文件
previewVisible: false,   // 控制预览模态框
uploadUrl: `${window._CONFIG['domianURL']}/sys/common/upload`, // 上传接口
headers: {
    'X-Access-Token': this.$store.getters.token, // Vuex 中的 Token
},
previewVisible: false,
currentPreviewUrl: '',
uploadData: {
    biz: 'demand', // 业务标识
},//其实就是在前面的基础上加个uploadData
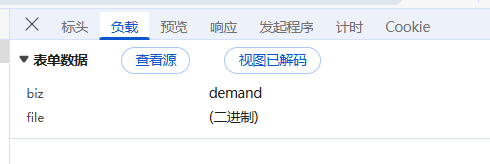
第二步
<a-upload list-type="picture-card" :multiple="true" :file-list="fileList"
    :before-upload="beforeUpload" @change="handleUploadChange" @preview="handlePreview"
    :action="uploadUrl" :headers="headers" :data="uploadData">
<!-- 在这里加上 :data="uploadData"-->
    <!-- 显示上传按钮(限制最大数量) -->
    <div v-if="fileList.length < 10">
        <a-icon type="plus" />
        <div class="ant-upload-text">上传图片</div>
    </div>
</a-upload>
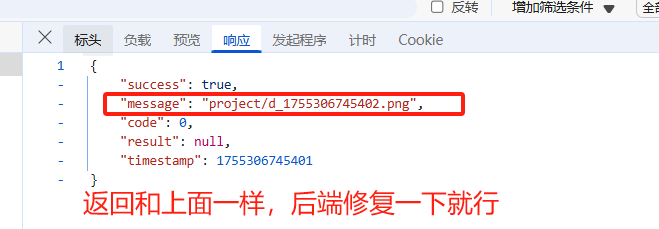
检查成功
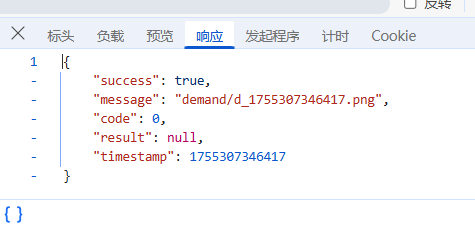
4.其他页面
这样写就可以
<a-upload list-type="picture-card" :multiple="true" :file-list="fileList"
    :before-upload="beforeUpload" @change="handleUploadChange" @preview="handlePreview"
    :action="uploadUrl" :headers="headers" :data="{ biz: 'demand' }">
<!-- 在这里加上 :data="{ biz: 'demand' }"-->
    <!-- 显示上传按钮(限制最大数量) -->
    <div v-if="fileList.length < 10">
        <a-icon type="plus" />
        <div class="ant-upload-text">上传图片</div>
    </div>
</a-upload>
三、图片预览
之前没有完整路径的时候,图片预览是个很麻烦的事情,前端要加上当前路径地址拼起来,现在因为后端返回的是全路径,只要直接显示就好了
四、图片和文件混合上传
效果图

<a-upload-dragger :action="uploadAction" :multiple="true" :file-list="allFileList" :headers="headers"  :data="getUploadData"
  @change="handleFileUpload" @beforeUpload="beforeFileUpload" class="margin-top">
  <span v-if="allFileList.length < 10">
    <p class="ant-upload-drag-icon">
      <a-icon type="cloud-upload" />
    </p>
    <p class="ant-upload-text">把文件或图片拖到此处或点击上传</p>
    <p class="ant-upload-hint">
      支持所有文件格式(图片会自动识别,最多上传10个文件)
    </p>
  </span>
  <span v-else>
    <p class="ant-upload-text">已达到最大上传数量(10个文件)</p>
  </span>
</a-upload-dragger>
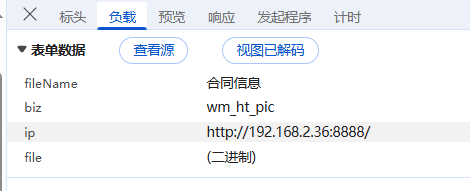
比较值得说的是这次请求是自己拼接的,如图所示
data(){
	// 上传相关配置
      headers: {},
      uploadAction: window._CONFIG['domianURL'] + 'sys/common/appUpload',
      uploadData: {
        fileName: '合同信息',
        biz: 'wm_ht_pic',
      },

      // 所有文件列表(包含图片和其他文件)
      allFileList: [],
      fileListAudio: [],
}
  computed: {
    // 使用计算属性确保每次获取最新的ip值
    getUploadData() {
      return {
        ...this.uploadData,
         ip: (window._CONFIG && window._CONFIG['domianURL']) || ''
      }
    }
  },
  created() {
    // 初始化上传头部信息
    const token = Vue.ls.get(ACCESS_TOKEN)
    this.headers = { 'X-Access-Token': token }
  },
	// 解析文件字符串为文件列表
    parseFileStrToFileList(fileStr, isImage) {
      if (!fileStr || typeof fileStr !== 'string' || fileStr.trim() === '') {
        return
      }

      const fileUrls = fileStr.split(',')
      const newFiles = fileUrls
        .map((url, index) => {
          if (!url || url.trim() === '') return null

          const fileName = url.split('|')[0] || url.split('/').pop() || '未知文件'
          const fileUrl = url.split('|')[1] || url

          return {
            uid: `${isImage ? 'img' : 'file'}-${index}-${Date.now()}`,
            name: fileName,
            status: 'done',
            url: fileUrl,
            isImage: isImage,  // 标记是否为图片
            response: {
              result: [url]
            }
          }
        })
        .filter(Boolean)

      // 将新文件添加到总列表
      this.allFileList = [...this.allFileList, ...newFiles]
    },

    // 上传前检查
    beforeFileUpload(file) {
      if (this.allFileList.length >= 10) {
        this.$message.warning('最多只能上传10个文件')
        return false
      }

      // 检查文件大小
      const maxSize = file.type.includes('image/') ? 10 : 20; // 图片最大10MB,其他文件20MB
      const isLtMaxSize = file.size / 1024 / 1024 < maxSize
      if (!isLtMaxSize) {
        this.$message.warning(`${file.type.includes('image/') ? '图片' : '文件'}大小不能超过${maxSize}MB`)
        return false
      }

      return true
    },

    // 处理文件上传变化
    handleFileUpload({ file, fileList }) {
      // 标记文件是否为图片
      file.isImage = this.isImageFile(file.name)

      // 确保文件列表不超过10个
      if (fileList.length > 10) {
        this.allFileList = fileList.slice(0, 10)
        this.$message.warning('最多只能上传10个文件')
      } else {
        this.allFileList = fileList.map(f => ({
          ...f,
          isImage: this.isImageFile(f.name)
        }))
      }

      // 处理上传错误
      if (file.status === 'error') {
        this.$message.error(`文件 ${file.name} 上传失败`)
      }
    },

    // 判断是否为图片文件
    isImageFile(fileName) {
      const ext = fileName.split('.').pop().toLowerCase()
      return ['jpg', 'jpeg', 'png', 'gif', 'bmp', 'webp'].includes(ext)
    },

    // 移除文件
    handleRemoveFile(file) {
      const index = this.allFileList.findIndex(item => item.uid === file.uid)
      if (index !== -1) {
        this.allFileList.splice(index, 1)
      }
    },

    // 根据文件名获取对应的图标
    getIconByFileName(fileName) {
      const ext = fileName.split('.').pop().toLowerCase()

      if (['jpg', 'jpeg', 'png', 'gif', 'bmp', 'webp'].includes(ext)) {
        return 'picture'
      } else if (ext === 'pdf') {
        return 'file-pdf'
      } else if (['doc', 'docx'].includes(ext)) {
        return 'file-word'
      } else if (['xls', 'xlsx'].includes(ext)) {
        return 'file-excel'
      } else if (['ppt', 'pptx'].includes(ext)) {
        return 'file-ppt'
      } else if (ext === 'txt') {
        return 'file-text'
      } else if (['zip', 'rar', '7z'].includes(ext)) {
        return 'file-zip'
      } else {
        return 'file'
      }
    },

    // 分别转换图片和文件列表为字符串
    convertFilesToString() {
      // 分离图片和其他文件
      const imageFiles = this.allFileList.filter(file => file.isImage && file.status === 'done' && file.response)
      const otherFiles = this.allFileList.filter(file => !file.isImage && file.status === 'done' && file.response)

      // 转换为字符串格式
      const picStr = imageFiles
        .map(file => file.response.result[0] || `${file.name}|${file.url}`)
        .join(',')

      const fileStr = otherFiles
        .map(file => file.response.result[0] || `${file.name}|${file.url}`)
        .join(',')

      return { picStr, fileStr }
    },


 735
735

 被折叠的 条评论
为什么被折叠?
被折叠的 条评论
为什么被折叠?
 到【灌水乐园】发言


