


目录
第一阶段
Statement缺陷引出PreparedStatement
第二阶段
第三阶段
第四阶段
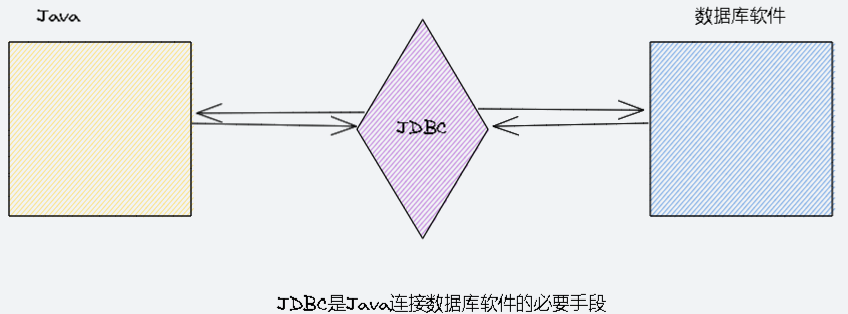
JDBC地位
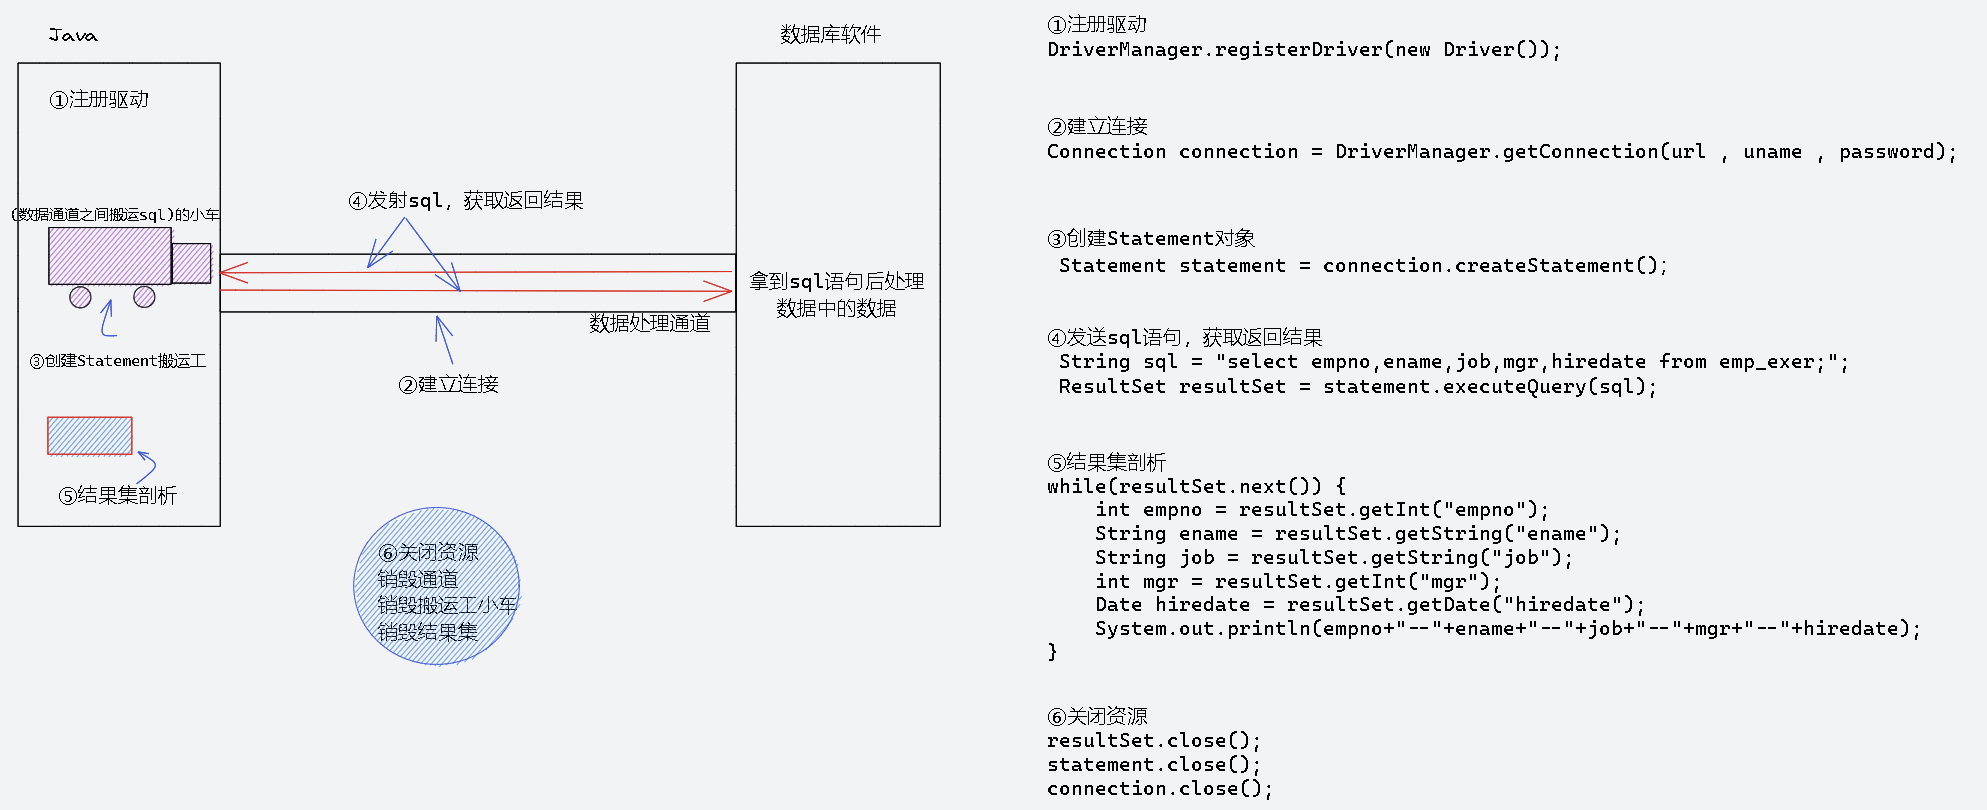
JDBC应用流程
- 注册驱动
- 建立连接
- 创建Statement对象
- 发射sql并取得返回结果
- 结果剖析
- 关闭资源
例如以下示例:
需求:建立java和数据库之间的连接,查询返回bxs_db_01数据库中的部分信息:
package com.shuai.api.statement;

import com.mysql.cj.jdbc.Driver;

import java.sql.*;

public class StatementQueryPart {
    public static void main(String[] args) throws SQLException {
        //注册驱动
        DriverManager.registerDriver(new Driver()); //SQL 8+版本导入带cj的驱动,5+导入不带cj的
        //获取连接
        /**
         * java程序连接数据库调用某个方法,需要填入连接数据库的基本信息:
         * 数据库的IP地址
         */
        /**
         * 参数1:url。固定语法:jdbc:数据库厂商名://ip地址:port(端口号)/数据库名
         */
        Connection connection = DriverManager.getConnection("jdbc:mysql://127.0.0.1:3306/bxs_db_01", "root", "********");
        //创建statement对象
        Statement statement = connection.createStatement();
        //发送sql语句,获取返回结果
        String sql = "select empno,ename,job,mgr,hiredate from emp_exer;";
        ResultSet resultSet = statement.executeQuery(sql);
        //结果集剖析
        //先看看有没有下一行数据
        while(resultSet.next()) {
            int empno = resultSet.getInt("empno");
            String ename = resultSet.getString("ename");
            String job = resultSet.getString("job");
            int mgr = resultSet.getInt("mgr");
            Date hiredate = resultSet.getDate("hiredate");
            System.out.println(empno+"--"+ename+"--"+job+"--"+mgr+"--"+hiredate);
        }
        //关闭资源
        resultSet.close();
        statement.close();
        connection.close();
    }
}
JDBC使用过程中的注意事项:
- 注册驱动时:sql8+以下的版本在传入参数时选择不带cj的Dirver;8+以上版本选择带cj的Dirver

- 获取连接时,url参数的填下按照以下固定语法:
jdbc:数据库厂商名://IP地址:port(端口号)/数据库名
例如上述例子中的url格式应为:"jdbc:mysql://127.0.0.1:3306/bxs_db_01" - 关闭资源时,按照后打开先关闭的原则进行。如上述例子应先关闭获取到的资源,再关闭创建的Statement对象,最后关闭通道连接connection
JDBC应用流程详解
- 注册驱动阶段
观察上面的驱动注册步骤:进入registerDriver()方法的源码可以发现进行了驱动的注册;再进入Driver类的内部可以发现有一个静态代码块,再次进行了驱动的注册(如下图),这样难免会造成性能的消耗。
- 解决方法:
不再调用DriverManage的registerDriver(new Drive()方法) 。使用其他方法加载一个Driver类中的静态代码块。
因此可以通过以下方法触发Driver类的加载,加载静态代码块注册驱动:- new 关键字
- 调用Driver类的静态方法
- 使用Driver的静态属性
- 反射
- 通过子类触发父类
- 程序的入口main
- 通过上述方法都可以触发Driver类中的静态代码块实现驱动的注册。最好的办法是使用反射加载Driver类的信息实现驱动的注册,这时反射中的参数为字符串,可以将其提取出来作为配置文件中的一项,以后即使切换了数据库软件,也不需要修改代码,只需要修改配置文件即可:

- 解决方法:
-
建立连接阶段
重载方法DriverManager.getConnection(...)的三种参数的组合及其使用的注意事项:-
DriverManager.getConnection(url, user, password):(三个参数)
url:有特定的语法- jdbc:数据库厂商名://IP地址:port(端口号)/数据库名
user:数据库的用户名
pawssword:数据库密码
🐻:url传参时,如果时本机上的数据库软件,也可以写为:
①"jdbc:mysql:///database_name"或者
②"jdbc:mysql://localhost:port/database_name" -
DriverManager.getConnection(url, Properties(info)):(两个参数)
url:和三个参数的url格式和用法一致
info:Properties配置文件类型的数据
例如:

-
DriverManager.getConnection(url):(一个参数)
url:特定的语法格式- "jdbc:mysql://IP地址:port(端口号)/数据库名?user=root&password=*********";
例如:
Connection connection = DriverManager.getConnection("jdbc:mysql://localhost:3306/bxs_db_01?user=root&password=******");
-
- 发送接收sql阶段
在此阶段常用的方法有:
statement.excuteUpdate( ):发送非DQL语句,返回一个整型值代表sql语句影响的行数。
statement.excuteQuery( ):发送DQL语句,返回一个查询到的结果集,这个结果集封装在ResultSet对象中。 - 结果集解析阶段(重点)
ResultSet对象的解析:
使用statement.executeQuery( )得到的的结果集返回了一个resultSet对象,查询到的所有内容可以抽象为一个类似sql视图的表结构,封装在这个对象中。查询这个类的说明,我们可以发现,它的对象有一个游标指向查询到的第一条数据的前一行。在进行结果集的解析时,可以使用ResultSet对象的next( )方法使得该游标向下移动,指向下一条数据,然后使用对应的get...( )方法取得该行实体数据的某一行数据;当next( )方法返回false时,说明当前表中的数据已经访问结束。
ResultSet对象中行数据获取的解析:A ResultSet object maintains a cursor pointing to its current row of data. Initially the cursor is positioned before the first row. The next method moves the cursor to the next row, and because it returns false when there are no more rows in the ResultSet object, it can be used in a while loop to iterate through the result set. //ResultSet对象保持光标指向其当前数据行。 //最初,光标位于第一行之前。 //next方法将光标移动到下一行, //因为当ResultSet对象中没有更多行时,它返回false, //所以可以在while循环中使用它来遍历结果集。
在ResultSet对象的中表的游标指向某一行数据时,可以通过这个对象的get[category](columnLabel:)(category根据数据库中的数据类型决定)获取对应行的数据,如果某一列的数据在查询时起了别名,则columnLabel填别名;也可以通过get[category](columnIndex:)来获取该行某一列的数据,值得注意的是,此时的columnIndex的索引从1开始。
基础应用:"验证用户的登录"功能
现有一张如下的表结构:
编写程序验证用户输入的账户和密码是否正确并给出是否登录成功的提示:
package com.shuai.api.statement;

import java.sql.*;
import java.util.Scanner;

public class StatementLoginVerify {
    public static void main(String[] args) throws ClassNotFoundException, SQLException {
        //接收用户输入的账号和密码
        Scanner scan = new Scanner(System.in);
        System.out.println("请输入账号:");
        String uName = scan.nextLine();
        System.out.println("请输入密码:");
        String pwd = scan.nextLine();
        //注册驱动
        Class.forName("com.mysql.cj.jdbc.Driver");//加载Driver类,触发类内部静态代码块的加载达到驱动加载的效果
        //建立连接,参数的固定格式:"jdbc:数据库厂商名://IP地址:port/数据库名"
        Connection connection = DriverManager.getConnection("jdbc:mysql://127.0.0.1:3306/bxs_db_01", "root", "*********");
        //创建Statement对象
        Statement statement = connection.createStatement();
        //发送sql语句,取得返回结果
        String sql = "select username,password from userInfo where username = '" + uName + "'and password = '" + pwd + "';";
        ResultSet resultSet = statement.executeQuery(sql);
        if (resultSet.next()) {
            System.out.println("登录成功!");
        } else {
            System.out.println("登录失败!");
        }
        //关闭资源
        resultSet.close();
        statement.close();
        connection.close();
    }
}
Statement缺陷引出PreparedStatement
在"基础应用:验证用户的登录"的部分,会存在以下问题:

明明数据库中没有这个用户和密码,为什么验证用户名和密码却成功了?😂
这是因为输入的【' or '1'='1】与sql语句的拼接出现了:
select username,password from userInfo where username = 'ergouzi'and password = '' or '1' = '1';显然where条件没有起作用😂而Statement发送sql消息时又不能检查出这种注入攻击的错误,这不是相当于查询了数据库中的全部数据?很显然这种致命性的查询错误是不能应用于业务中的。
除此之外,使用statement发送sql语句。还有以下缺陷:
- SQL语句需要字符串拼接,很麻烦
- 只能拼接字符串类型,其他的数据类型无法拼接
- 可能发生注入攻击(动态值充当了sql语句结构,影响了原有的查询结果)【上述问题】
PreparedStatement的出现解决了上述sql注入攻击的问题
PreparedStatement的使用流程:
- 使用PreparedStatement对象传递的sql语句中的动态值用'?'代替,也可以使用静态sql查询语句
- 通过Connection对象的preparedStatement(sql);方法得到PreparedStatement对象,并且传入sql语句
- 通过PreparedStatement对象的setObject(index,string);方法设置sql语句中的动态值,其中index为设置的'?'的标号,'?'在sql语句中从左到右,编号从一开始;string为待传入的动态值
- 使用PreparedStatement对象的executeQuery( )[发送DQL语句]或者executeUpdate()[发送非DQL语句]方法发送sql语句并取得返回结果,此时的方法参数不需要填写。
在实际开发过程中,不论静态还是动态sql语句,一般都使用PreparedStatement对象来发送接收sql查询信息,减少不必要的异常。
优化-"基础应用:验证用户的登录"功能
package com.shuai.api.preparedstatement;

import java.sql.*;
import java.util.Scanner;


public class PreparedStatementLoginVerify {
    public static void main(String[] args) throws ClassNotFoundException, SQLException {
        //接收用户输入
        Scanner scan = new Scanner(System.in);
        System.out.println("请输入账号:");
        String uName = scan.nextLine();
        System.out.println("请输入密码:");
        String pwd = scan.nextLine();
        //构建sql语句
        String sql = "select username,password from userInfo where username = ? and password = ?;";
        //注册驱动
        Class.forName("com.mysql.cj.jdbc.Driver");
        //创建Java和数据库之间的连接,语法格式:"jdbc:mysql://IP地址:port(端口号)/数据库名?user=root&password=*********"
        Connection connection = DriverManager.getConnection("jdbc:mysql://127.0.0.1:3306/bxs_db_01?user=root&password=BXS552ZXY");
        PreparedStatement preparedStatement = connection.prepareStatement(sql);
        //设置sql语句中的动态值
        preparedStatement.setObject(1, uName);
        preparedStatement.setObject(2, pwd);
        //发送sql语句并取得返回结果
        ResultSet resultSet = preparedStatement.executeQuery();
        //解析查询结果
        if(resultSet.next()) {
            System.out.println("登录成功!");
        } else {
            System.out.println("登录失败!");
        }
        //关闭资源
        resultSet.close();
        preparedStatement.close();
        connection.close();
    }
}
练习:操作数据库数据的增删改
import org.junit.jupiter.api.Test;

import java.sql.*;
import java.util.*;

public void testInsert() throws ClassNotFoundException, SQLException {
    //注册驱动
    Class.forName("com.mysql.cj.jdbc.Driver");
    //建立连接
    Connection connection = DriverManager.getConnection("jdbc:mysql://127.0.0.1:3306/bxs_db_01?user=root&password=******");
    //得到PrepareStatement对象
    String sql = "insert into userInfo values(?,?,?);";
    PreparedStatement preparedStatement = connection.prepareStatement(sql);
    preparedStatement.setObject(1, null);
    preparedStatement.setObject(2, "二狗子");
    preparedStatement.setObject(3, "ergouzi");
    //发送sql语句并得到返回结果
    int i = preparedStatement.executeUpdate();
    if (i > 0) {
        System.out.println("插入成功");
    } else {
        System.out.println("插入失败");
    }
    preparedStatement.close();
    connection.close();
}

@Test
public void testUpdate() throws ClassNotFoundException, SQLException {
    //注册驱动
    Class.forName("com.mysql.cj.jdbc.Driver");
    //建立连接
    Connection connection = DriverManager.getConnection("jdbc:mysql:///bxs_db_01?user=root&password=******");
    //得到PreparedStatement对象
    String sql = "update userInfo set username=? where id=?;";
    PreparedStatement preparedStatement = connection.prepareStatement(sql);
    //设置sql语句的动态值
    preparedStatement.setObject(1, "三狗子");
    preparedStatement.setObject(2, 3);
    //发送sql语句并得到返回结果
    int i = preparedStatement.executeUpdate();
    if (i > 0) {
        System.out.println("修改成功");
    } else {
        System.out.println("修改失败");
    }
    preparedStatement.close();
    connection.close();
}

@Test
public void testDelete() throws SQLException, ClassNotFoundException {
    //注册驱动
    Class.forName("com.mysql.cj.jdbc.Driver");
    //建立连接
    Connection connection = DriverManager.getConnection("jdbc:mysql://localhost:3306/bxs_db_01?user=root&password=*******");
    //创建PreparedStatement对象
    String sql = "delete from userInfo where id=?;";
    PreparedStatement preparedStatement = connection.prepareStatement(sql);
    //设置sql语句中的动态值
    preparedStatement.setObject(1, 1);
    //发送sql语句并得到返回结果
    int i = preparedStatement.executeUpdate();
    if (i > 0) {
        System.out.println("删除成功");
    } else {
        System.out.println("删除失败");
    }
    preparedStatement.close();
    connection.close();
}
练习:数据库查询
需求:使用ResultSet对象结果集有时候会复杂化查询结果的使用,因此现在查询数据库中表的数据,将查询到的数据封装在:List<Map>嵌套集合中。
import org.junit.jupiter.api.Test;

import java.sql.*;
import java.util.*;

public void testSelect() throws ClassNotFoundException, SQLException {
    //创建用于存放查询到的表中数据的嵌套集合
    List<Map> mapList = new ArrayList<>();
    //注册驱动
    Class.forName("com.mysql.cj.jdbc.Driver");
    //创建连接
    Connection connection = DriverManager.getConnection("jdbc:mysql:///bxs_db_01?user=root&password=********");
    //得到PreparedStatement对象
    String sql = "select * from userInfo";
    PreparedStatement preparedStatement = connection.prepareStatement(sql);
    //给sql语句赋动态值(这里没有)
    //发送sql语句并取得返回结果
    ResultSet resultSet = preparedStatement.executeQuery();
    while (resultSet.next()) {
//            将一行中的数据放入map集合中
        Map<String, String> map = new HashMap<>();
        map.put("id", resultSet.getString("id"));
        map.put("userName", resultSet.getString("username"));
        map.put("pwd", resultSet.getString("password"));

        //将map集合放入list集合中
        mapList.add(map);
    }
    System.out.println("查询完成");
    System.out.println("mapList = " + mapList);
}- 上述的写法可以满足需求,但是会发现有很多的缺陷:
- 如:查询的表中的label信息需要手动添加,这无疑增加了工作量,在需求变更时还需要修改代码
- 如:当查询数据的列数发生变化时,需要修改代码等等
- 于是,现在考虑能否优化map中的key值为自动获取为表中的label,表中label有别名的情况下可以自动获取到别名,同时当列书离开那个发生变化时,获取的列的数量也能自动发生变化?

解决这种写死方案的办法:
ResultSet对象中存放着查询结果相关的信息,该对象的中getMetaData( )方法可以得到一个包含查询到的数据的列的信息的对象,该列对象中有一个getColumnCount( )方法可以得到查询数据的列数;还有一个getColumnLabel(int column) 【column从1开始、该列在查询时起别名就以别名作为查询到的label名称】方法,该方法可以得到查询的列的label名称。
因此现在不妨边进行行标的的移动,在每一行数据信息上进行列标的移动,获得列标指向的label名称。将其作为map集合的key值即可,并将该位置的数据值存入value。此时便可以实现既自动获取列的label名称(有别名则获取别名),又可以在需求更改时自动完成功能的修改,“肾优哉”!
优化查询
以下是数据库查询的优化版本:
import org.junit.jupiter.api.Test;

import java.sql.*;
import java.util.*;

@Test
/**
 * 查询所有用户数据,将查询到的数据封装到List<Map>集合中
 */
public void testSelect() throws ClassNotFoundException, SQLException {
    //创建用于存放查询到的表中数据的嵌套集合
    List<Map> mapList = new ArrayList<>();
    //注册驱动
    Class.forName("com.mysql.cj.jdbc.Driver");
    //创建连接
    Connection connection = DriverManager.getConnection("jdbc:mysql:///bxs_db_01?user=root&password=********");
    //得到PreparedStatement对象
    String sql = "select * from userInfo";
    PreparedStatement preparedStatement = connection.prepareStatement(sql);
    //给sql语句赋动态值(这里没有)
    //发送sql语句并取得返回结果
    ResultSet resultSet = preparedStatement.executeQuery();
    ResultSetMetaData metaData = resultSet.getMetaData();   //获取查询到的数据的列的信息
    int columnCount = metaData.getColumnCount();    //查询到的信息的列数
    while (resultSet.next()) {
//            将一行中的数据放入map集合中
        Map<String, String> map = new HashMap<>();
        for (int i = 1; i <= columnCount; i++) {
            //得到第i列的label值,得到该行第i列的数据值,放入map集合中
            map.put(metaData.getColumnLabel(i),resultSet.getString(i));
        }
        //将map集合放入list集合中
        mapList.add(map);
    }
    System.out.println("查询完成");
    System.out.println("mapList = " + mapList);
}
主键回显(获取主键值)
在多表插入数据时,一般主表的主键都是自动生成的,在插入数据之前无法获得这个主键信息,但是从表在插入数据之前需要绑定主表的主键,这时就需要获得主表的主键。
所谓主键回显。简单来说就是在Java代码中获得数据库中某张表的主键信息。
那么如何或者主键信息?
获得主键信息分为三步操作:
- 首先在获得prepareStatement对象时通过传第二个参数(PreparedStatement.RETURN_GENERATED_KEYS)的方式告知这个在Java和数据库之间搬运sql数据的"搬运工",需要在到达数据库时带回某张表中的主键信息
- “搬运工”带主键回来时,与带回的sql数据一样,都装在一个ResultSet对象的“盒子”中,我们可以通过prepareStatement.getGeneratedKeys()方法得到装有主键信息的“箱子”。对这个“盒子”进行拆箱,即可以得到主键信息。
- 在打开“箱子”取完数据后,不要忘记礼貌的“关闭箱子”:generatedKeys.close()
基础应用:获得插入表的主键
需求描述:向userInfo表中插入一条数据,并带回该表中自增长的主键
import org.junit.jupiter.api.Test;

import java.sql.*;

public class PreparedStatementOtherParts {
    @Test
    public void returnPrimaryKey() throws ClassNotFoundException, SQLException {
        //注册驱动
        Class.forName("com.mysql.cj.jdbc.Driver");
        //建立连接
        Connection connection = DriverManager.getConnection("jdbc:mysql://localhost:3306/bxs_db_01?user=root&password=******");
        //创建sql语句
        String sql = "insert into userInfo(username,password) values(?,?);";
        //获得搬运对象,传入sql语句,
        // 并告知这个搬运工我需要你带回这张表的主键信息
        PreparedStatement preparedStatement = connection.prepareStatement(sql,PreparedStatement.RETURN_GENERATED_KEYS);
        //填写sql语句中的动态值
        preparedStatement.setObject(1,"打不死的小强");
        preparedStatement.setObject(2,"woshixiaoqiang");
        //发送sql语句
        int i = preparedStatement.executeUpdate();
        if(i > 0) {
            System.out.println("插入数据成功!");
            //取得返回集并解析
            ResultSet generatedKeys = preparedStatement.getGeneratedKeys();
            //对包含主键信息的结果集解析
            generatedKeys.next();
            int primaryKeyInfo = generatedKeys.getInt(1);
            System.out.println("该表的主键为 id = " + primaryKeyInfo);
            generatedKeys.close();
        }
        //关闭资源
        preparedStatement.close();
        connection.close();
    }
}
批量插入数据优化
当向数据库中插入的数据量比较大时,按照普通的插入方法,每完成一次sql语句动态值的赋值,就进行sql语句的传输插入,这样插入消耗了太多的时间在Java和数据库的连接上,下面对这种插入方式的效率进行测试:![]()
@Test
/**
 * 使用未优化前的插入操作
 */
public void insert() throws ClassNotFoundException, SQLException {
    //注册驱动
    Class.forName("com.mysql.cj.jdbc.Driver");
    //建立连接
    Connection connection = DriverManager.getConnection("jdbc:mysql://localhost:3306/bxs_db_01", "root", "*****");
    //创建sql语句
    String sql = "insert into userInfo(username,password) values(?,?);";
    //创建PreparedStatement对象
    PreparedStatement preparedStatement = connection.prepareStatement(sql);
    //给sql语句动态赋值
    //计时开始
    long start = System.currentTimeMillis();
    for (int i = 0; i < 10000; i++) {
        preparedStatement.setObject(1, "success");
        preparedStatement.setObject(2, "courageeffort");
        //发送sql语句
        preparedStatement.executeUpdate();
    }
    long end = System.currentTimeMillis();
    System.out.println("普通插入消耗的时间: " + (end - start));
    //关闭资源
    preparedStatement.close();
    connection.close();
}
插入一万条数据都需要这么久的是将,如果是十万呢?一百万呢?无法想象这种处理方法的效率😂
于是现在采用批量插入数据的方式,对上述插入数据的方式进行优化,会发现插入数据的效率将近提升了50多倍甚至更高!
批量插入数据的操作方式和注意事项:
- sql语句的末尾不能加分号(;),这是乌龟的腚——规定!no why!
- 在通过DriverManage.getConnection(url,uname,pwd)创建连接时,需要在url参数的后边加上 ?rewriteBatchedStatements=true
- 在每次sql语句动态赋值结束后调用preparedStatement.addBatch()方法将新的动态赋值的内容通过values(val,val...)的方式追加到sql语句的后边
- 内容追加完毕后,调用preparedStatement.executeBatch()方法完成sql数据到数据库的传输
- 别忘了关闭资源
采用批量插入来插入数据的效率测试:
/**
 * 使用批量插入的方式添加数据
 */
@Test
public void batchInsert() throws ClassNotFoundException, SQLException {
    //加载驱动
    Class.forName("com.mysql.cj.jdbc.Driver");
    //创建连接,在url参数的后边加上  ?rewriteBatchedStatements=true
    Connection connection = DriverManager.getConnection("jdbc:mysql://localhost:3306/bxs_db_01?rewriteBatchedStatements=true", "root", "******");
    //创建sql语句,注意此时的sql语句不能带结尾的 ;
    String sql = "insert into userInfo(username,password) values(?,?)";
    //得到PreparedStatement对象,传入sql语句
    PreparedStatement preparedStatement = connection.prepareStatement(sql);
    //循环sql语句的动态赋值,并调用preparedStatement.addBatch方法将 values(?,?)依次追加到原sql语句的末尾
    long start = System.currentTimeMillis();
    for (int i = 0; i < 10000; i++) {
        preparedStatement.setObject(1, "try");
        preparedStatement.setObject(2, "tryanddo");
        preparedStatement.addBatch();   //不执行sql语句,而是追加到sql语句的后边
    }
    preparedStatement.executeBatch();
    long end = System.currentTimeMillis();
    System.out.println("批量插入花费的时间:" + (end - start));
    //追加语句结束后,调用preparedStatement.executeBatch()统一批量执行sql语句
    //关闭资源
    preparedStatement.close();
    connection.close();
}
JDBC事务
通过转账服务引出事务的必要性:
在数据库中创建一张如下的表结构并插入数据: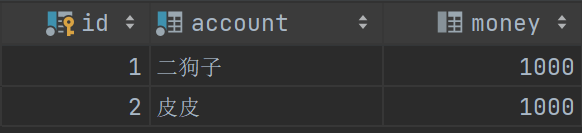

- 创建数据库处理对象AccountDoc类,负责与数据库之间的数据处理;
- 创建服务层类AccountService,调用AccountDoc层完成转账服务的处理:
import java.sql.SQLException;

/**
* 用于转账事务的服务层类
*/
public class AccountService {
    /**
     * 调用数据库操作对象类的方法完成转账事务
     * @param addAccount    转账接收方的账户
     * @param subAccount    转账转出方的账户
     * @param money 转账的金额
     */
    public void transfer(String addAccount,String subAccount,int money) throws SQLException, ClassNotFoundException {
        AccountDoc accountDoc = new AccountDoc();
        accountDoc.addAccount(addAccount,money);
        accountDoc.subAccount(subAccount,money);
    }
}


//------------------------------------------------------------------
/**
* 用于转账事务的数据库操作对象类
* 数据库操作对象 Database Access Object,类的命名一般为   表名DOC
*/
public class AccountDoc {
    /**
     * 向在指定账户加钱
     * @param account   加钱的账户
     * @param money 加钱的金额
     */
    public void addAccount(String account,int money) throws ClassNotFoundException, SQLException {
        Class.forName("com.mysql.cj.jdbc.Driver");
        Connection connection = DriverManager.getConnection("jdbc:mysql:///bxs_db_01?user=root&password=*******");
        String sql = "update account_bank set money=money-? where account=?;";
        PreparedStatement preparedStatement = connection.prepareStatement(sql);
        preparedStatement.setObject(1,money);
        preparedStatement.setObject(2,account);
        int i = preparedStatement.executeUpdate();
        preparedStatement.close();
        connection.close();
        System.out.println(account + "到账成功!");
    }

    /**
     * 减去指定账户的钱
     * @param account   捡钱的账户
     * @param money 减钱的金额
     */
    public void subAccount(String account,int money) throws ClassNotFoundException, SQLException {
        Class.forName("com.mysql.cj.jdbc.Driver");
        Connection connection = DriverManager.getConnection("jdbc:mysql:///bxs_db_01?user=root&password=********");
        String sql = "update account_bank set money=money+? where account=?;";
        PreparedStatement preparedStatement = connection.prepareStatement(sql);
        preparedStatement.setObject(1,money);
        preparedStatement.setObject(2,account);
        int i = preparedStatement.executeUpdate();
        preparedStatement.close();
        connection.close();
        System.out.println(account + "转出成功!");
    }
}
—— 现在我-二狗子向皮皮转账1000元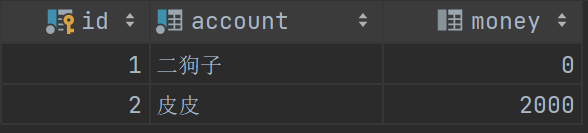
成功了,没错!
—— 现在我-二狗子再向皮皮转账1000元

没错,报异常了,二狗子我没钱了,但是...
没错,皮皮接收到了1000元的到账,但是这1000元哪里来呢?银行:我哭死🆒...
为什么发生了这种情况?这是因为转账和到账是在两个不同的连接中分开进行的,当转入到账后,转出却发生了异常没有扣款成功...
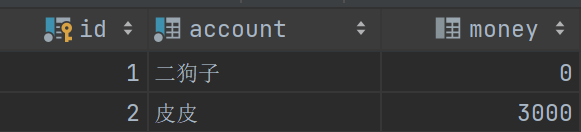
为了解决这种问题,我们考虑事务——将转出和转入放在一个连接中进行,当其中任何一方出错时,就进行回滚将各自的money退还给原账户;当转出和转入都正常时,就进行事务的提交,就i可以避免出现上面的情况:
现在在服务层加载驱动并且创建连接开启事务,让转出和转入在同一个事务中进行:
import java.sql.Connection;
import java.sql.DriverManager;
import java.sql.SQLException;

//服务层
public class AccountService {
    /**
     * 调用数据库操作对象类的方法完成转账事务
     * @param addAccount    转账接收方的账户
     * @param subAccount    转账转出方的账户
     * @param money 转账的金额
     */
    public void transfer(String addAccount,String subAccount,int money) throws SQLException, ClassNotFoundException {
        AccountDoc accountDoc = new AccountDoc();
        Class.forName("com.mysql.cj.jdbc.Driver");
        Connection connection = DriverManager.getConnection("jdbc:mysql:///bxs_db_01?user=root&password=BXS552ZXY");
        try {
            //开始该连接的事务。即关闭事务的自动提交
            connection.setAutoCommit(false);
            accountDoc.addAccount(addAccount,money,connection);
            accountDoc.subAccount(subAccount,money,connection);
            //没有异常,就提交事务
        } catch(Exception e) {
            //有异常,就会回滚事务
            connection.rollback();
            throw e;
        } finally {
            connection.close();
        }
    }
}

//----------------------------------------------------

import java.sql.Connection;
import java.sql.PreparedStatement;
import java.sql.SQLException;


//数据库处理对象层
public class AccountDoc {
    /**
     * 向在指定账户加钱
     * @param account   加钱的账户
     * @param money 加钱的金额
     */
    public void addAccount(String account,int money,Connection connection) throws ClassNotFoundException, SQLException {
        String sql = "update account_bank set money=money+? where account=?;";
        PreparedStatement preparedStatement = connection.prepareStatement(sql);
        preparedStatement.setObject(1,money);
        preparedStatement.setObject(2,account);
        int i = preparedStatement.executeUpdate();
        preparedStatement.close();
        System.out.println(account + "到账成功!");
    }

    /**
     * 减去指定账户的钱
     * @param account   捡钱的账户
     * @param money 减钱的金额
     */
    public void subAccount(String account,int money,Connection connection) throws ClassNotFoundException, SQLException {
        String sql = "update account_bank set money=money-? where account=?;";
        PreparedStatement preparedStatement = connection.prepareStatement(sql);
        preparedStatement.setObject(1,money);
        preparedStatement.setObject(2,account);
        int i = preparedStatement.executeUpdate();
        preparedStatement.close();
        System.out.println(account + "转出成功!");
    }
}
值得注意的是,事务一般都是在服务层开启的,每个服务对应属于自己的一个事务!
JDBC中的事务操作:
- 开启事务:
connection.setAutoCommit(false); - 事务提交
connection.commit(); - 事务回滚
connection.rollback();
国货之光——Druid连接池
Druid连接池的配置
- jar包下载地址
 https://repo1.maven.org/maven2/com/alibaba/druid/1.2.8/
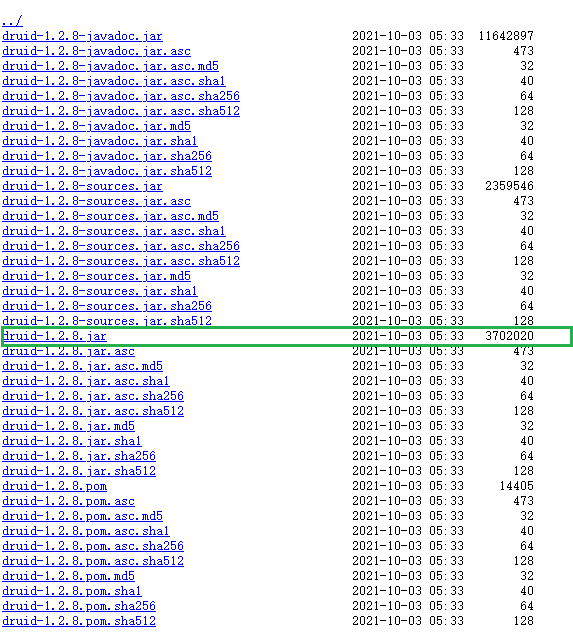
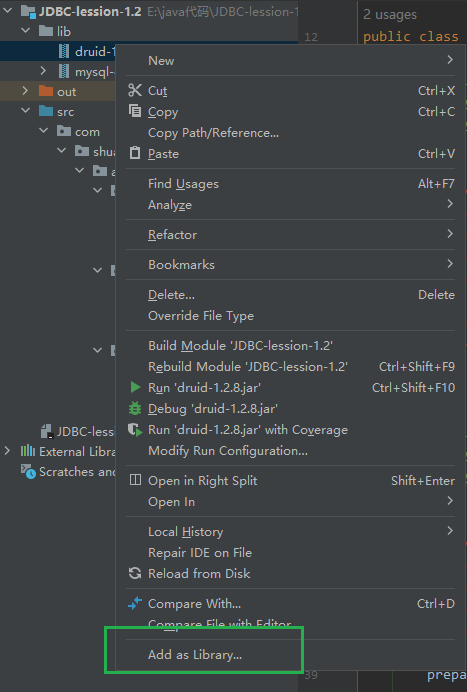
- 复制到idea中右键添加为依赖项
连接性能消耗问题引出Druid连接池
在我们不使用连接数据池的时候,每次使用完连接都进行连接的关闭,连接的利用率太低。连接池的出现很好的解决了这种问题。
所谓连接池,就是在程序一开始就创建多个连接放在指定的容器中,在使用时从容器中取得,使用结束后将其放回容器中,大大提高了连接的利用效率。当连接池中现有的连接使用完毕,name连接池可以向服务器申请新的连接,将新申请的连接放入连接池中。当池中所有的连接达到设置(或未设置的默认)的最大连接数,就不能继续申请新的连接了,没有拿到连接的用户只能等待
Java中有一个所有种类和版本连接池产品的规范接口-DataSource,所有的连接池产品都实现了这个接口。
Druid连接池的使用
连接池的使用分为硬编码和软编码两种使用方法。为了在需求变更时不更改源码,一般使用软编码的方式配置Druid连接池的参数。
- 所谓硬编码,即将Druid连接池的参数信息在源码中写死,当需要更换配置时,需要修改源码。
- 所谓软编码,即将Druid连接池的参数信息写在Properties配置文件中,通过读取配置文件达到配置连接池参数的功能,在需求变更时只需要修改配置文件而不需要修改源码,提高了程序的普适性。
Druid连接池的硬编码使用:
import com.alibaba.druid.pool.DruidDataSource;
import com.alibaba.druid.pool.DruidPooledConnection;
import org.junit.jupiter.api.Test;

import java.sql.PreparedStatement;
import java.sql.ResultSet;
import java.sql.ResultSetMetaData;
import java.sql.SQLException;

/**
 * 使用硬编码的方式配置连接池的参数信息
 */
    @Test
    public void hardCode() throws SQLException {
        //创建连接池对象
        DruidDataSource druidDataSource = new DruidDataSource();
        //设置连接池参数 -- 包含必须参数和非必须参数
        //必须参数
        druidDataSource.setDriverClassName("com.mysql.cj.jdbc.Driver");
        druidDataSource.setUrl("jdbc:mysql://127.0.0.1:3306/bxs_db_01");    //与哪里建立连接
        druidDataSource.setUsername("root");    //数据库用户名
        druidDataSource.setPassword("******");   //数据库密码
        //非必须参数
        druidDataSource.setInitialSize(5);  //初始连接的数量
        druidDataSource.setMaxActive(10);   //最大连接的数量
        //获取连接
        DruidPooledConnection connection = druidDataSource.getConnection();
        //进行数据库的crud
        //...
        String sql = "select username '用户名',password '用户密码' from userInfo where id = ?;";
        PreparedStatement preparedStatement = connection.prepareStatement(sql);
        preparedStatement.setObject(1,7);
        ResultSet resultSet = preparedStatement.executeQuery();
        ResultSetMetaData metaData = resultSet.getMetaData();   //包含查询的列数据信息
        int columnCount = metaData.getColumnCount();
        while(resultSet.next()) {
            for (int i = 1; i <= columnCount; i++) {
                System.out.print(metaData.getColumnLabel(i) + "=" + resultSet.getString(i) + "    ");
            }
            System.out.println();
        }
        //关闭资源
        resultSet.close();
        //回收连接,在连接池中,close方法被覆写,在这里与手动创建的连接不同,并不是关闭连接,而是将连接放回连接池
        connection.close();
        druidDataSource.close();
    }
Druid连接池软编码的使用:⭐⭐⭐
步骤:
- 创建Properties对象读取文件
- 获取当前类的类加载器,获取文件输入流
- Properties对象加载文件信息,自动配置连接池的参数
- 通过DruidDataSourceFactory.createDataSource(Properties p);拿到DataSource对象
- 通过DateSource对象获取连接
- 进行数据库的增删改查
- 【释放结果集】并回收连接
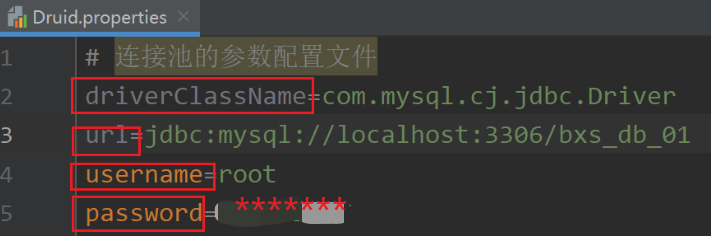
- 配置文件信息,其中文件左侧key值的写法是固定的,观看createDataSource方法的源码就能直到为什么了。如果要添加其他的配置信息,可以查询待配置信息的关键字,在配置文件中加上相应的字段就可以了。
import com.alibaba.druid.pool.DruidDataSource;
import com.alibaba.druid.pool.DruidDataSourceFactory;
import com.alibaba.druid.pool.DruidPooledConnection;
import org.junit.jupiter.api.Test;

import javax.sql.DataSource;
import java.io.InputStream;
import java.sql.*;
import java.util.Properties;


@Test
/**
 *    软编码配置数据库连接池的参数信息
 */
public void softCode() throws Exception {
    Properties properties = new Properties();
    InputStream resourceAsStream = DruidUsePart.class.getClassLoader().getResourceAsStream("./Druid.properties");
    properties.load(resourceAsStream);
    DataSource dataSource = DruidDataSourceFactory.createDataSource(properties);
    Connection connection = dataSource.getConnection();
    //进行数据库的crud
    String sql = "select *from userInfo where id = ?;";
    PreparedStatement preparedStatement = connection.prepareStatement(sql);
    preparedStatement.setObject(1,90);
    ResultSet resultSet = preparedStatement.executeQuery();
    resultSet.next();
    System.out.println(resultSet.getString("username") + "--" + resultSet.getString("password"));
    resultSet.close();
    //回收连接
    connection.close();
}
JDBC工具类封装
每次使用连接都需要手动创建连接池并获取连接,如此一来太过麻烦。现在我们采用软编码配置连接池的参数的方式将创建连接池的方法封装在一个工具类中,这个工具类对外提供获取链接和回收连接的方法。如此一来,在开发的过程中只需要修改配置文件并调用工具类就能创建连接池,不必每次都再去手动创建连接池了!
JdbcUtils连接工具类1.0版本
import com.alibaba.druid.pool.DruidDataSourceFactory;

import javax.sql.DataSource;
import java.io.IOException;
import java.io.InputStream;
import java.sql.Connection;
import java.sql.SQLException;
import java.util.Properties;

//导入mysql和druid的jar包
//配置文件放在根目录src的下面,名称为druid.properties
public class JdbcUtils{
    private static DataSource dataSource = null;    //连接池对象

    /**
     * 完成连接池对象的加载,连接池对象只加载一次
     */
    static {
        //初始化连接池对象
        Properties properties = new Properties();
        InputStream resourceAsStream = JdbcUtils.class.getClassLoader().getResourceAsStream("druid.properties");
        try {
            properties.load(resourceAsStream);
        } catch (IOException e) {
            throw new RuntimeException(e);
        }
        try {
            dataSource = DruidDataSourceFactory.createDataSource(properties);
        } catch (Exception e) {
            throw new RuntimeException(e);
        }
    }

    /**
     * 对外提供连接的方法
     * @return  返回的连接信息
     */
    public static Connection getConnection() throws SQLException {
        return dataSource.getConnection();
    }

    /**
     * 对外提供回收连接的方法
     * @param connection    待回收的连接
     * @throws SQLException sql异常信息
     */
    public static void freeConnection(Connection connection) throws SQLException {
        connection.close();
    }
}
JdbcUtils连接工具类2.0版本
上述的1.0版本的工具类有一个缺点:每次调用都会返回一个不同的连接。现在希望同一个线程多次调用工具类的获取连接的方法时得到的是同一个连接,那么应该如何解决这种问题呢?
这就需要用到Java中的本地线程变量(ThreadLocal)了。
ThreadLocal本地先测好难过变量对象常用方法:
- set(T):向对象中添加当前以当前线程为key值的value值
- get( ):获得当前线程对象的value值T
JdbcUtils工具类2.0版本:
import com.alibaba.druid.pool.DruidDataSourceFactory;

import javax.sql.DataSource;
import java.io.IOException;
import java.io.InputStream;
import java.sql.Connection;
import java.sql.SQLException;
import java.util.Properties;

public class JdbcUtilsV2 {
    private static DataSource dataSource = null;
    private static ThreadLocal<Connection> tl = new ThreadLocal<>();
    static {
        Properties properties = new Properties();
        InputStream resourceAsStream = JdbcUtilsV2.class.getClassLoader().getResourceAsStream("druid.properties");
        try {
            properties.load(resourceAsStream);
        } catch (IOException e) {
            throw new RuntimeException(e);
        }
        try {
            dataSource = DruidDataSourceFactory.createDataSource(properties);
        } catch (Exception e) {
            throw new RuntimeException(e);
        }
    }

    /**
     * 对外提供获取连接的方法,同一个线程得到的是同一个连接
     * @return  返回请求的连接对象
     * @throws SQLException
     */
    public static Connection getConnection() throws SQLException {
        Connection connection = tl.get();
        if(connection == null) {
            connection = dataSource.getConnection();
            tl.set(connection);
        }
        return connection;
    }


    /**
     * 向外界提供回收连接的方法
     * @throws SQLException
     */
    public static void freeConnection() throws SQLException {
        Connection connection = tl.get();
        if(connection != null) {
            connection.setAutoCommit(true); //恢复连接到默认状态
            connection.close(); //连接回归线程池
            tl.remove();    //从本地线程变量中移出这个Connection对象
        }
    }
}
JdbcUtils工具类2.0版本对转账服务的升级:
执行过程图: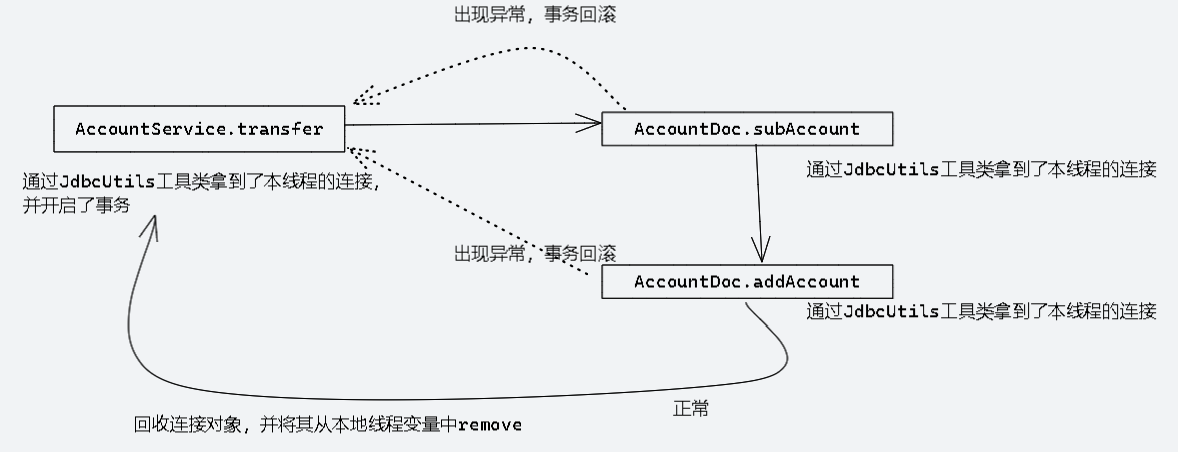
import com.shuai.api.utils.JdbcUtilsV2;

import java.sql.Connection;
import java.sql.PreparedStatement;
import java.sql.SQLException;

//DOC层
public class AccountDoc {
    /**
     * 完成加钱操作
     * @param account   转账接收方的账户信息
     * @param money 接收的钱数
     */
    public void addMoney(String account,int money) throws SQLException {
        Connection connection = JdbcUtilsV2.getConnection();
        String sql = "update account_bank set money = money + ? where account = ?;";
        PreparedStatement preparedStatement = connection.prepareStatement(sql);
        preparedStatement.setObject(1,money);
        preparedStatement.setObject(2,account);
        preparedStatement.executeUpdate();
        System.out.println(account + "到账成功!");
        preparedStatement.close();
    }

    /**
     * 完成减钱操作
     * @param account   转账发起方的账户信息
     * @param money 转账的金额
     */
    public void subMoney(String account,int money) throws SQLException {
        Connection connection = JdbcUtilsV2.getConnection();
        String sql = "update account_bank set money = money - ? where account = ?;";
        PreparedStatement preparedStatement = connection.prepareStatement(sql);
        preparedStatement.setObject(1,money);
        preparedStatement.setObject(2,account);
        preparedStatement.executeUpdate();
        System.out.println(account + "转出成功!");
        preparedStatement.close();
    }
}
import java.sql.Connection;
import java.sql.DriverManager;
import java.sql.SQLException;
//Service层,该层开启了事务
public class AccountService {
/**
* 调用数据库操作对象类的方法完成转账事务
* @param addAccount 转账接收方的账户
* @param subAccount 转账转出方的账户
* @param money 转账的金额
*/
public void transfer(String addAccount,String subAccount,int money) throws SQLException, ClassNotFoundException {
AccountDoc accountDoc = new AccountDoc();
Class.forName("com.mysql.cj.jdbc.Driver");
Connection connection = DriverManager.getConnection("jdbc:mysql:///bxs_db_01?user=root&password=BXS552ZXY");
try {
//开始该连接的事务。即关闭事务的自动提交
connection.setAutoCommit(false);
accountDoc.addAccount(addAccount,money,connection);
accountDoc.subAccount(subAccount,money,connection);
//没有异常,就提交事务
} catch(Exception e) {
//有异常,就会回滚事务
connection.rollback();
throw e;
} finally {
connection.close();
}
}
}JDBCDoc层工具类BaseDocUtils
我们知道,一个JDBC的完成流程包括如下图中的基本步骤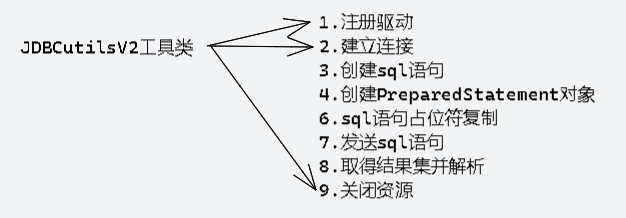 ,而JDBCUtilsV2工具类只对其中的三个部分进行了封装,其他步骤在书写起来仍然十分麻烦,这时候我们想将剩余部分的步骤也进行简化封装,如下图:
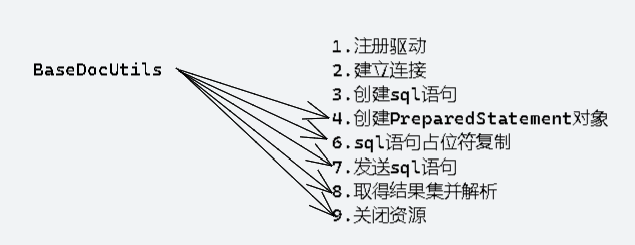
Doc层封装的做法: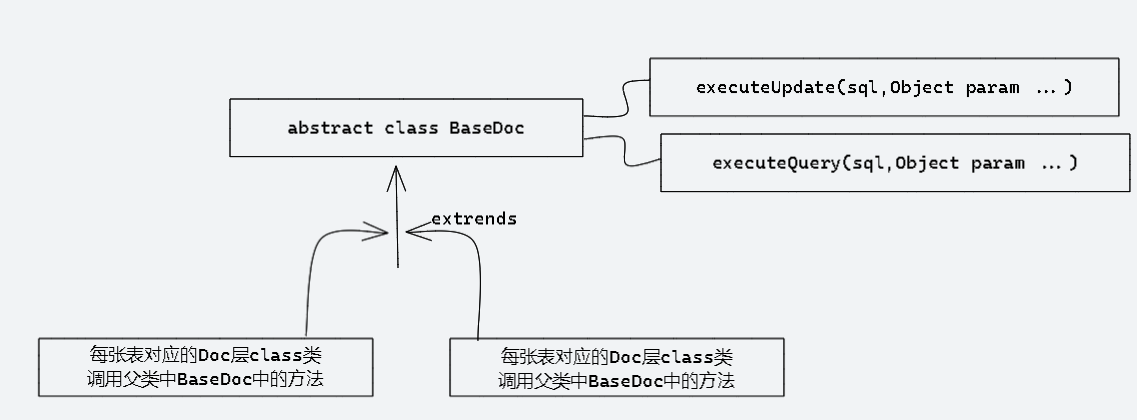
BaseDocUtils的源码:
import java.lang.reflect.Field;
import java.sql.*;
import java.util.ArrayList;
import java.util.List;

public abstract class BaseDocUtils {
    /**
     * 完成非DQL的Doc层封装
     * @param sql
     * @param params
     * @return
     * @throws SQLException
     */
    public int executeUpdate(String sql, Object... params) throws SQLException {
        Connection connection = JdbcUtilsV2.getConnection();
        PreparedStatement preparedStatement = connection.prepareStatement(sql);
        //设置sql语句中的占位符值
        for (int i = 0; i < params.length; i++) {
            preparedStatement.setObject(i + 1, params[i]);
        }
        int res = preparedStatement.executeUpdate();
        preparedStatement.close();
        //如果没有在服务层开启事务,就回收connection连接;否则交给服务层service层回收
        if (connection.getAutoCommit()) {    //说明没有开启事务
            JdbcUtilsV2.freeConnection();
        }
        return res;
    }

    /**
     * 完成DQL的Doc层封装
     * @param clazz
     * @param sql
     * @param params
     * @return  返回一个包含实体对象的list
     * @param <T>
     * @throws SQLException
     * @throws InstantiationException
     * @throws IllegalAccessException
     * @throws NoSuchFieldException
     */
    public <T> List<T> executeQuery(Class<T> clazz,String sql,Object... params) throws SQLException, InstantiationException, IllegalAccessException, NoSuchFieldException {
        List<T> list = new ArrayList<>();
        Connection connection = JdbcUtilsV2.getConnection();
        PreparedStatement preparedStatement = connection.prepareStatement(sql);
        System.out.println(sql);
        if(params != null && params.length != 0) {
            for (int i = 0; i < params.length; i++) {
                preparedStatement.setObject(i+1,params[i]);
            }
        }
        ResultSet resultSet = preparedStatement.executeQuery();
        ResultSetMetaData metaData = resultSet.getMetaData();
        int columnCount = metaData.getColumnCount();
        while(resultSet.next()) {
            T t = clazz.newInstance();
            for (int i = 1; i <= columnCount; i++) {
                Object value = resultSet.getObject(i);
                String columnLabel = metaData.getColumnLabel(i);
                Field declaredField = clazz.getDeclaredField(columnLabel);
                declaredField.setAccessible(true);
                declaredField.set(t,value);
            }
            list.add(t);
        }
        resultSet.close();
        preparedStatement.close();
        if(connection.getAutoCommit()) {
            JdbcUtilsV2.freeConnection();
        }
        return list;
    }
}


 429
429


 被折叠的 条评论
为什么被折叠?
被折叠的 条评论
为什么被折叠?
 到【灌水乐园】发言


