


MyBatis 是一个半自动化的 ORM 框架,所谓半自动化是指 MyBatis 只支持将数据库查出的数据映射到 POJO 实体类上,而实体到数据库的映射则需要我们自己编写 SQL 语句实现,相较于Hibernate 这种完全自动化的框架,Mybatis 更加灵活,我们可以根据自身的需求编写 sql 语句来实现复杂的数据库操作。
随着 Spring Boot 越来越流行,越来越多的被厂商及开发者所认可,MyBatis 也开发了一套基于 Spring Boot 模式的 starter:mybatis-spring-boot-starter。本节我们就介绍下如何在 Spring Boot 项目中整合 MyBatis。
引入依赖
Spring Boot 整合 MyBatis 的第一步,就是在项目的 pom.xml 中引入 mybatis-spring-boot-starter 的依赖,示例代码如下。
创建实体类
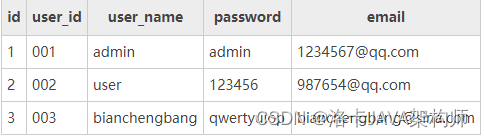
在指定的数据库内创建一个 user 表,并插入一些数据,如下表。
根据数据库 user 表,创建相应的实体类 User,代码如下。
package tangyu9880.bean;
public class User {
private Integer id;
private String userId;
private String userName;
private String password;
private String email;
public Integer getId() {
return id;
}
public void setId(Integer id) {
this.id = id;
}
public String getUserId() {
return userId;
}
public void setUserId(String userId) {
this.userId = userId == null ? null : userId.trim();
}
public String getUserName() {
return userName;
}
public void setUserName(String userName) {
this.userName = userName == null ? null : userName.trim();
}
public String getPassword() {
return password;
}
public void setPassword(String password) {
this.password = password == null ? null : password.trim();
}
public String getEmail() {
return email;
}
public void setEmail(String email) {
this.email = email == null ? null : email.trim();
}
}
创建 Mapper 接口
在 ntangyu9880.mapper 中创建一个 UserMapper 接口,并在该类上使用 @Mapper 注解,代码如下。
package tangyu9880.mapper;
import tangyu9880.bean.User;
import org.apache.ibatis.annotations.Mapper;
@Mapper
public interface UserMapper {
//通过用户名密码查询用户数据
User getByUserNameAndPassword(User user);
}
当 mapper 接口较多时,我们可以在 Spring Boot 主启动类上使用 @MapperScan 注解扫描指定包下的 mapper 接口,而不再需要在每个 mapper 接口上都标注 @Mapper 注解。
创建 Mapper 映射文件
在配置文件 application.properties/yml 通过 mybatis.mapper-locations 指定的位置中创建 UserMapper.xml,代码如下。
使用 Mapper 进行开发时,需要遵循以下规则:
mapper 映射文件中 namespace 必须与对应的 mapper 接口的完全限定名一致。
mapper 映射文件中 statement 的 id 必须与 mapper 接口中的方法的方法名一致
mapper 映射文件中 statement 的 parameterType 指定的类型必须与 mapper 接口中方法的参数类型一致。
mapper 映射文件中 statement 的 resultType 指定的类型必须与 mapper 接口中方法的返回值类型一致。
示例 1
-
在 spring-boot-adminex 项目中 tangyu9880.service 包中创建一个名为 UserService 的接口,代码如下。
package tangyu9880.service;
import tangyu9880.bean.User;
public interface UserService {
public User getByUserNameAndPassword(User user);
} -
在 tangyu9880.service.impl 包中创建 UserService 接口的实现类,并使用 @@Service 注解将其以组件的形式添加到容器中,代码如下。
package tangyu9880.service.impl;
import tangyu9880.bean.User;
import tangyu9880.mapper.UserMapper;
import tangyu9880.service.UserService;
import org.springframework.beans.factory.annotation.Autowired;
import org.springframework.stereotype.Service;
@Service(“userService”)
public class UserServiceImpl implements UserService {
@Autowired
UserMapper userMapper;
@Override
public User getByUserNameAndPassword(User user) {
User loginUser = userMapper.getByUserNameAndPassword(user);
return loginUser;
}
} -
修改 LoginController 中的 doLogin() 方法 ,代码如下。
package tangyu9880.controller;
import lombok.extern.slf4j.Slf4j;
import tangyu9880.bean.User;
import tangyu9880.service.UserService;
import org.springframework.beans.factory.annotation.Autowired;
import org.springframework.stereotype.Controller;
import org.springframework.web.bind.annotation.RequestMapping;
import javax.servlet.http.HttpSession;
import java.util.Map;
@Slf4j
@Controller
public class LoginController {
@Autowired
UserService userService;
@RequestMapping("/user/login")
public String doLogin(User user, Map<String, Object> map, HttpSession session) {
//从数据库中查询用户信息
User loginUser = userService.getByUserNameAndPassword(user);
if (loginUser != null) {
session.setAttribute(“loginUser”, loginUser);
log.info(“登陆成功,用户名:” + loginUser.getUserName());
//防止重复提交使用重定向
return “redirect:/main.html”;
} else {
map.put(“msg”, “用户名或密码错误”);
log.error(“登陆失败”);
return “login”;
}
}
} -
启动 Spring Boot,浏览器地址栏输入“http://localhost:8080/” ,访问 AdminEx 系统的登陆页面,分别输入用户名“user”和密码“123456”,结果下图。
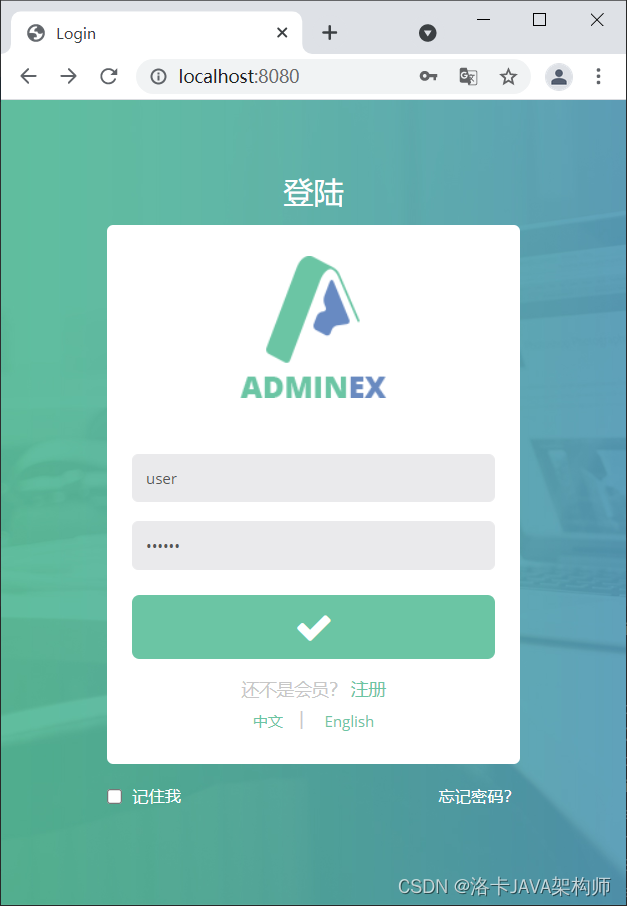
图1:登陆页
- 点击登陆按钮,结果如下图。

图2:登陆成功
注解方式
通过上面的学习,我们知道 mapper 映射文件其实就是一个 XML 配置文件,它存在 XML 配置文件的通病,即编写繁琐,容易出错。即使是一个十分简单项目,涉及的 SQL 语句也都十分简单,我们仍然需要花费一定的时间在mapper 映射文件的配置上。
为了解决这个问题,MyBatis 针对实际实际业务中使用最多的“增伤改查”操作,分别提供了以下注解来替换 mapper 映射文件,简化配置:
@Select
@Insert
@Update
@Delete
通过以上注解,基本可以满足我们对数据库的增删改查操作,示例代码如下。
package tangyu9880.mapper;
import tangyu9880.bean.User;
import org.apache.ibatis.annotations.*;
import java.util.List;
@Mapper
public interface UserMapper {
@Select(“select * from user where user_name = #{userName,jdbcType=VARCHAR} and password = #{password,jdbcType=VARCHAR}”)
List getByUserNameAndPassword(User user);
@Delete(“delete from user where id = #{id,jdbcType=INTEGER}”)
int deleteByPrimaryKey(Integer id);
@Insert(“insert into user ( user_id, user_name, password, email)” +
“values ( #{userId,jdbcType=VARCHAR}, #{userName,jdbcType=VARCHAR}, #{password,jdbcType=VARCHAR}, #{email,jdbcType=VARCHAR})”)
int insert(User record);
@Update(" update user" +
" set user_id = #{userId,jdbcType=VARCHAR},\n" +
" user_name = #{userName,jdbcType=VARCHAR},\n" +
" password = #{password,jdbcType=VARCHAR},\n" +
" email = #{email,jdbcType=VARCHAR}\n" +
" where id = #{id,jdbcType=INTEGER}")
int updateByPrimaryKey(User record);
}
注意事项
mapper 接口中的任何一个方法,都只能使用一种配置方式,即注解和 mapper 映射文件二选一,但不同方法之间,这两种方式则可以混合使用,例如方法 1 使用注解方式,方法 2 使用 mapper 映射文件方式。
我们可以根据 SQL 的复杂程度,选择不同的方式来提高开发效率。
如果没有复杂的连接查询,我们可以使用注解的方式来简化配置;
如果涉及的 sql 较为复杂时,则使用 XML (mapper 映射文件)的方式更好一些。


 9526
9526


 被折叠的 条评论
为什么被折叠?
被折叠的 条评论
为什么被折叠?
 到【灌水乐园】发言


