


目录
基于AOP的声明事务控制
Spring事务编程概述
- 事务是开发过程中必不可少的东西,使用JDBC开发时,我们使用connection对事务进行控制,使用MyBatis时,我们使用SqlSession对事物进行控制,缺点显而易见,当我们切换数据库访问技术时,事务控制的方法总会改变。Spring就在这些技术的基础上,提供了统一的控制事务接口。Spring的事务分为:编程式事务和声明式事务控制。
-
事务控制方式 解释 编程式事务控制 Spring提供了事务控制的类和方法,使用编程的方法对业务代码进行事务控制,事务控制代码和业务操作代码耦合在一起,开发中不使用 声明式事务 Spring将事务控制的代码封装起来,对外提供xml和注解的配置方式,通过配置的方式完成事务的控制,可以达到事务控制和业务操作代码的解耦,开发中推荐使用 -
Spring事务编程相关的类主要有以下三个
-
类名 功能 PlatformTransactionManager 平台事务管理器,抽象了不同的事务技术(如 JDBC、JTA)下的事务管理器。它定义了事务的开始、提交和回滚等操作接口,由具体实现提供相应的实现。Spring 提供了多种实现,不同持久层有不同实现方案,如 DataSourceTransactionManager、HibernateTransactionManager 和 JpaTransactionManager 等。 TransactionDefinition 事务定义,用于定义事务的隔离级别、超时时间等属性。Spring 定义了多种常量值,如 ISOLATION_DEFAULT、ISOLATION_READ_COMMITTED、ISOLATION_REPEATABLE_READ等隔离级别;TIMEOUT_DEFAULT、TIMEOUT_NONE等超时时间。TransactionStatus 事务状态,包括是否新事务、是否已完成、是否回滚等状态。将该状态对象传递给事务管理器的 commit()或rollback()方法可以控制事务的提交或回滚操作。 - 虽然编程式事务控制我们不学习,但是编程式事务控制对应的类我们需要理解一下,因为我们在通过配置的方式进行声明式事务控制时也会看到这些类的影子。
-
搭建测试环境
- 搭建转账的环境,dao层一个转出钱的方法,service是一个转账业务的方法,内部分别调用dao层转出钱和转入钱的方法,准备工作如下
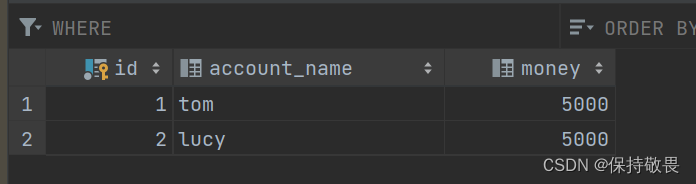
- 数据库准备一个账户表tb_account;
- dao层准备一个AccountMapper,包括incrMoney和decrMoney两个方法
-
package com.example.Mapper;

import org.apache.ibatis.annotations.Param;
import org.apache.ibatis.annotations.Update;
import org.springframework.stereotype.Repository;

@Repository("accountMapper")
public interface AccountMapper {
    @Update("update tb_account set money = money + #{money} where account_name=#{accountName}")
    public void incrMoney(@Param("accountName") String accountName, @Param("money") Integer money);

    @Update("update tb_account set money = money - #{money} where account_name=#{accountName}")

    public void decrMoney(@Param("accountName") String accountName, @Param("money") Integer money);
}
-
- service层(作为目标类,使用了注解的方式将其交给Spring容器管理,不需要再到xml配置文件中去配置)准备一个transferMoney方法,分别调用incrMoney和decrMoney方法
-
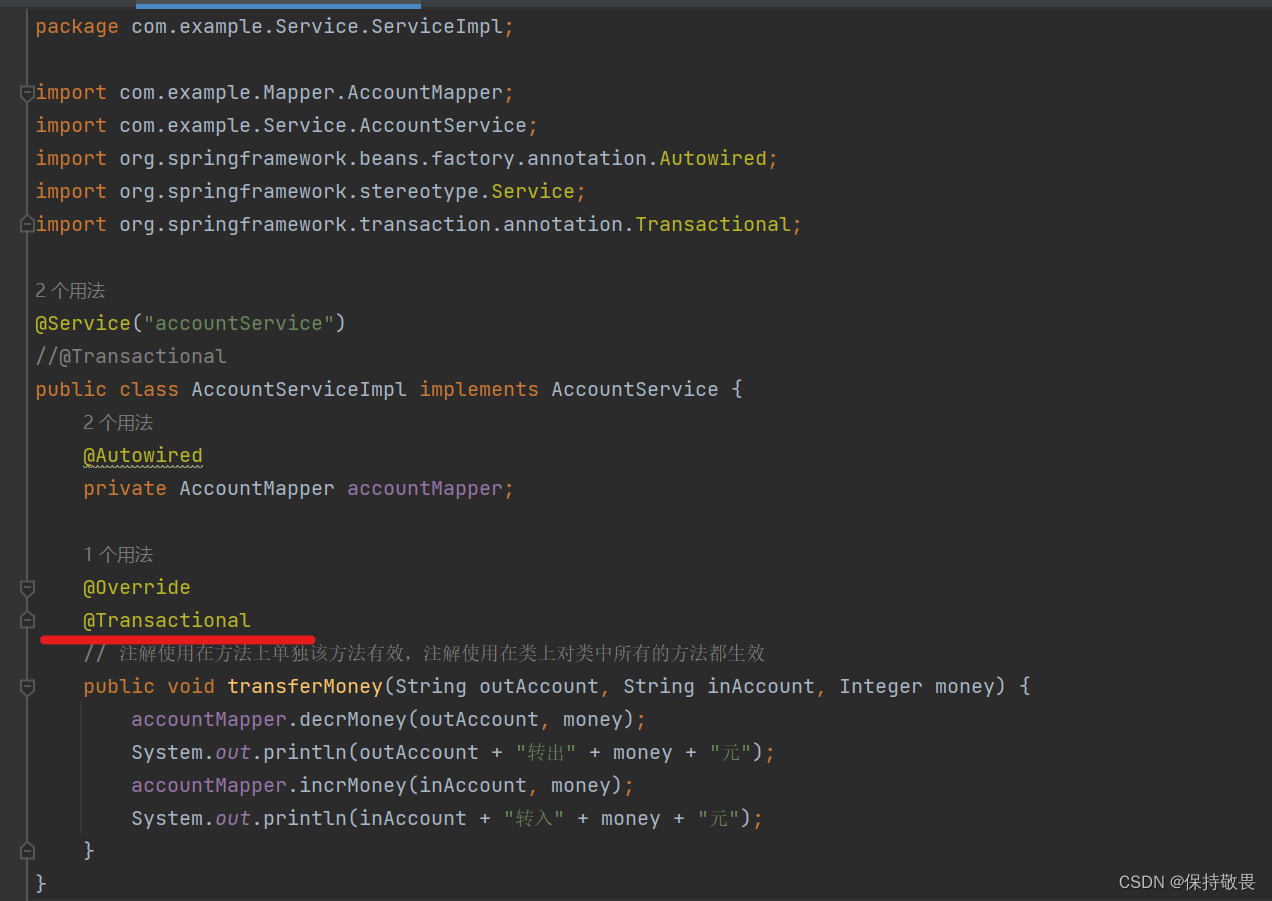
package com.example.Service.ServiceImpl;

import com.example.Mapper.AccountMapper;
import com.example.Service.AccountService;
import org.springframework.beans.factory.annotation.Autowired;
import org.springframework.stereotype.Service;

@Service("accountService")
public class AccountServiceImpl implements AccountService {
    @Autowired
    private AccountMapper accountMapper;

    @Override
    public void transferMoney(String outAccount, String inAccount, Integer money) {
        accountMapper.decrMoney(outAccount, money);
        System.out.println(outAccount + "转出" + money + "元");
        accountMapper.incrMoney(inAccount, money);
        System.out.println(inAccount + "转入" + money + "元");
    }
}
-
- 在applicationContext文件中进行Bean的管理配置
-
<?xml version="1.0" encoding="UTF-8"?>
<beans xmlns="http://www.springframework.org/schema/beans"
       xmlns:xsi="http://www.w3.org/2001/XMLSchema-instance"
       xmlns:context="http://www.springframework.org/schema/context"
       xmlns:aop="http://www.springframework.org/schema/aop"
       xmlns:tx="http://www.springframework.org/schema/tx"
       xsi:schemaLocation="http://www.springframework.org/schema/beans
        http://www.springframework.org/schema/beans/spring-beans.xsd
        http://www.springframework.org/schema/context
        http://www.springframework.org/schema/context/spring-context.xsd
        http://www.springframework.org/schema/aop
        http://www.springframework.org/schema/aop/spring-aop.xsd
        http://www.springframework.org/schema/tx
        http://www.springframework.org/schema/tx/spring-tx.xsd">

    <!--    指定Spring组件扫描范围-->
    <context:component-scan base-package="com.example"/>
    <!--配置数据源信息-->
    <bean id="dataSource" class="org.springframework.jdbc.datasource.DriverManagerDataSource">
        <property name="driverClassName" value="com.mysql.jdbc.Driver"/>
        <property name="url" value="jdbc:mysql://localhost:3306/db02"/>
        <property name="username" value="root"/>
        <property name="password" value="123456"/>
    </bean>

    <!--    配置SqlSessionFactoryBean,作用将SqlSessionFactoryBean存储到Spring容器中-->
    <bean class="org.mybatis.spring.SqlSessionFactoryBean">
        <property name="dataSource" ref="dataSource"/>
    </bean>

    <bean class="org.mybatis.spring.mapper.MapperScannerConfigurer">
        <property name="basePackage" value="com.example.Mapper"/>
    </bean>


</beans>
测试正常转账和异常转账
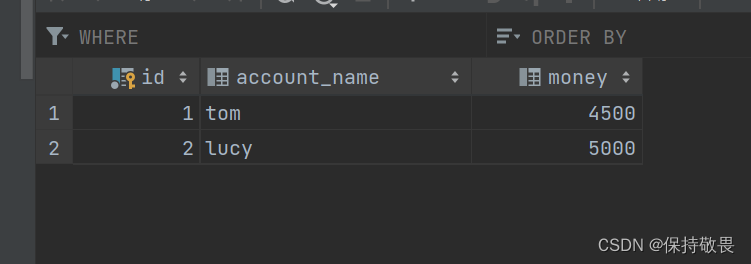
- 正常测试代码
-
package com.example.Test; //import com.example.Config.MyBatisConfig; import com.example.Service.AccountService; import org.springframework.context.ApplicationContext; import org.springframework.context.annotation.AnnotationConfigApplicationContext; import org.springframework.context.support.ClassPathXmlApplicationContext; public class TestAccount { public static void main(String[] args) { // ApplicationContext context = new AnnotationConfigApplicationContext(MyBatisConfig.class); ApplicationContext context = new ClassPathXmlApplicationContext("applicationContext.xml"); AccountService accountService = (AccountService) context.getBean("accountService"); accountService.transferMoney("tom", "lucy", 500); } } -
运行结果如下:
-
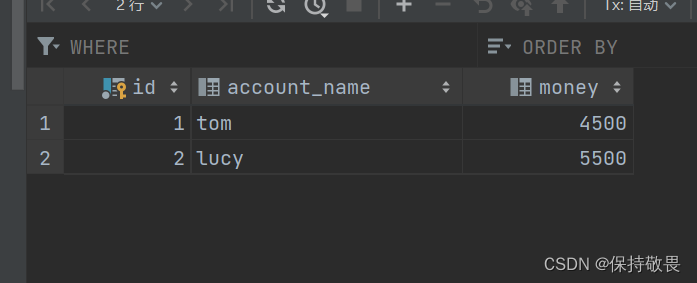
-

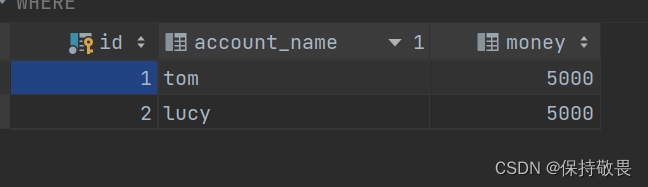
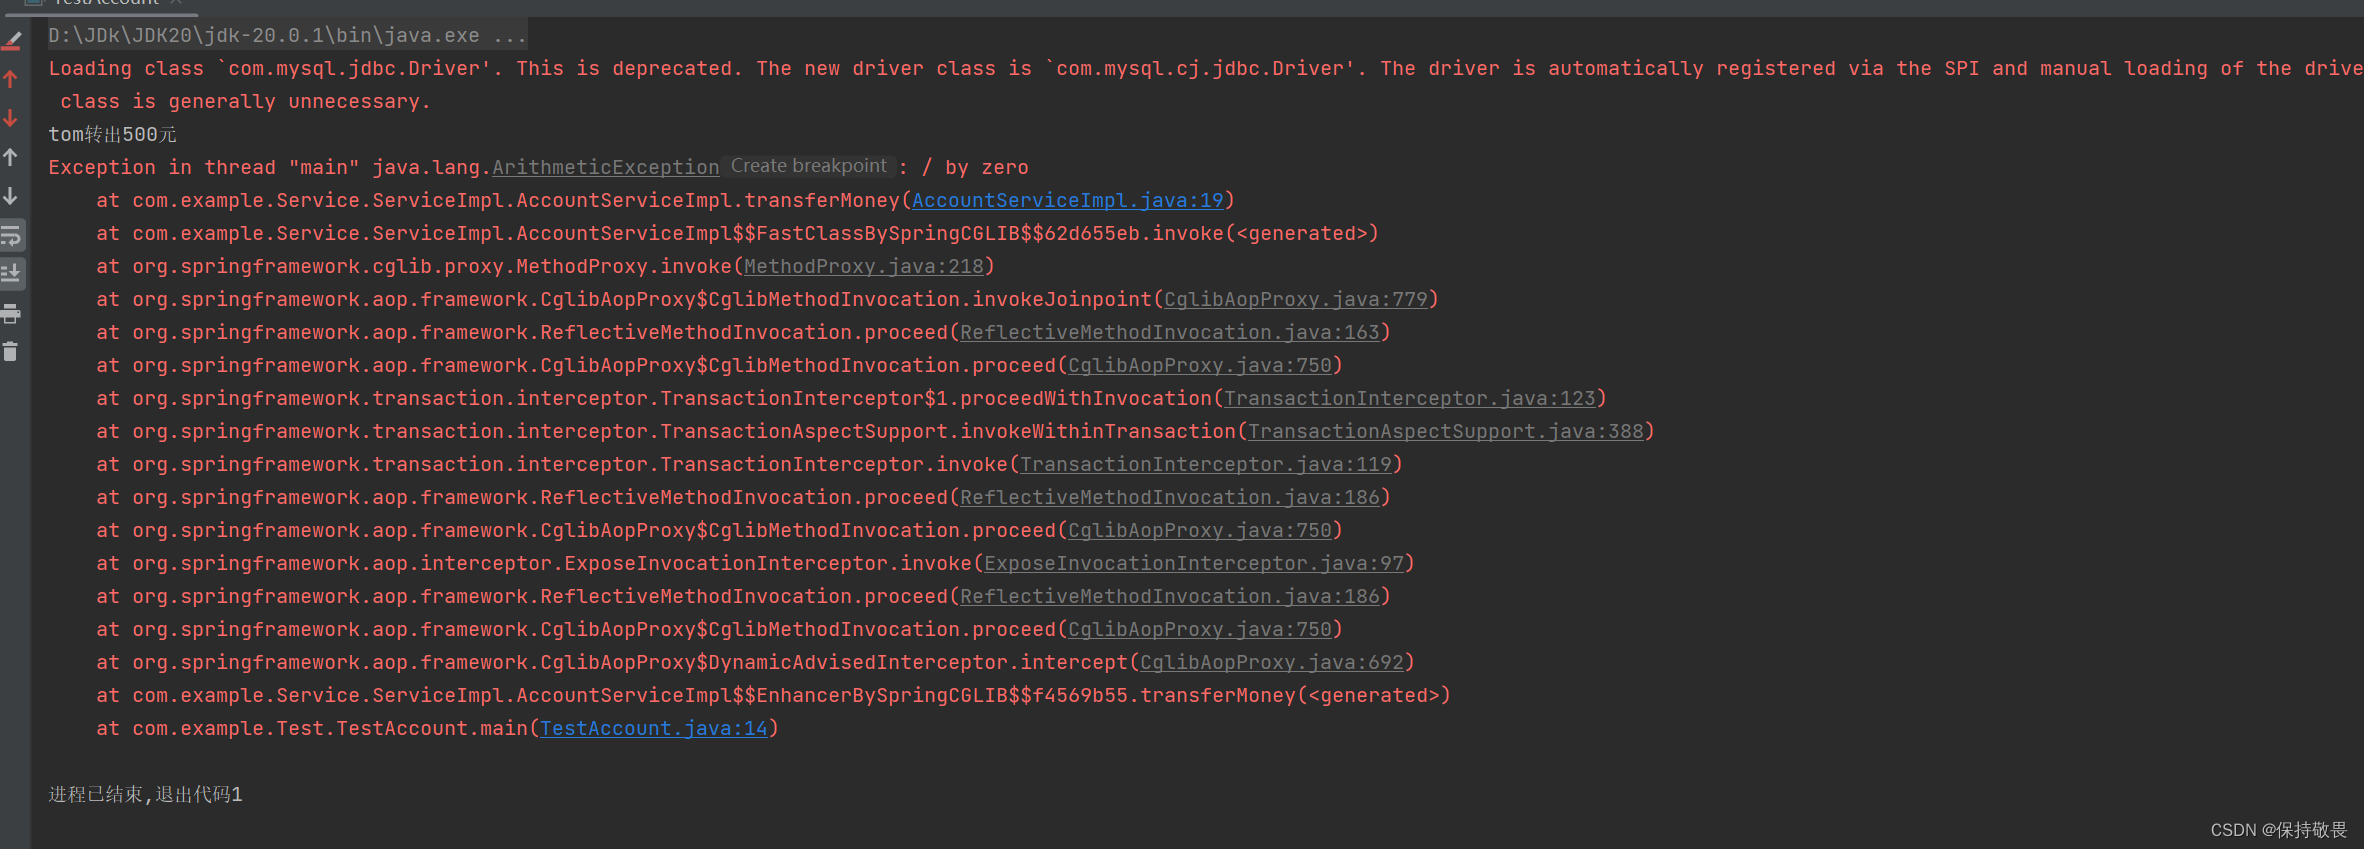
- 错误测试,在业务层中加入错误
-
package com.example.Service.ServiceImpl; import com.example.Mapper.AccountMapper; import com.example.Service.AccountService; import org.springframework.beans.factory.annotation.Autowired; import org.springframework.stereotype.Service; @Service("accountService") public class AccountServiceImpl implements AccountService { @Autowired private AccountMapper accountMapper; @Override public void transferMoney(String outAccount, String inAccount, Integer money) { accountMapper.decrMoney(outAccount, money); System.out.println(outAccount + "转出" + money + "元"); int i = 1 / 0; accountMapper.incrMoney(inAccount, money); System.out.println(inAccount + "转入" + money + "元"); } } -
同样运行上述测试代码
-
运行结果如下(出现数据无法对应)
-
-

-
- 数据库准备一个账户表tb_account;
基于xml声明式事务控制
- 综合我们上面学到的AOP技术,很容易想到,可以使用AOP对Service的方法进行事务增强
- 目标类:自定义的AccounServiceImpl,内部的方法是切点。不需要在xml配置文件中再次进行配置,已经使用注解方式,将其交给Spring容器管理。
- 通知类:Spring提供的,通知方法已经定义好,只需配置即可。
- 分析
- 通知类是Spring提供的,需要导入Spring事务相关的坐标
- 配置目标类AccountServiceImpl
- 使用advisor标签配置切面
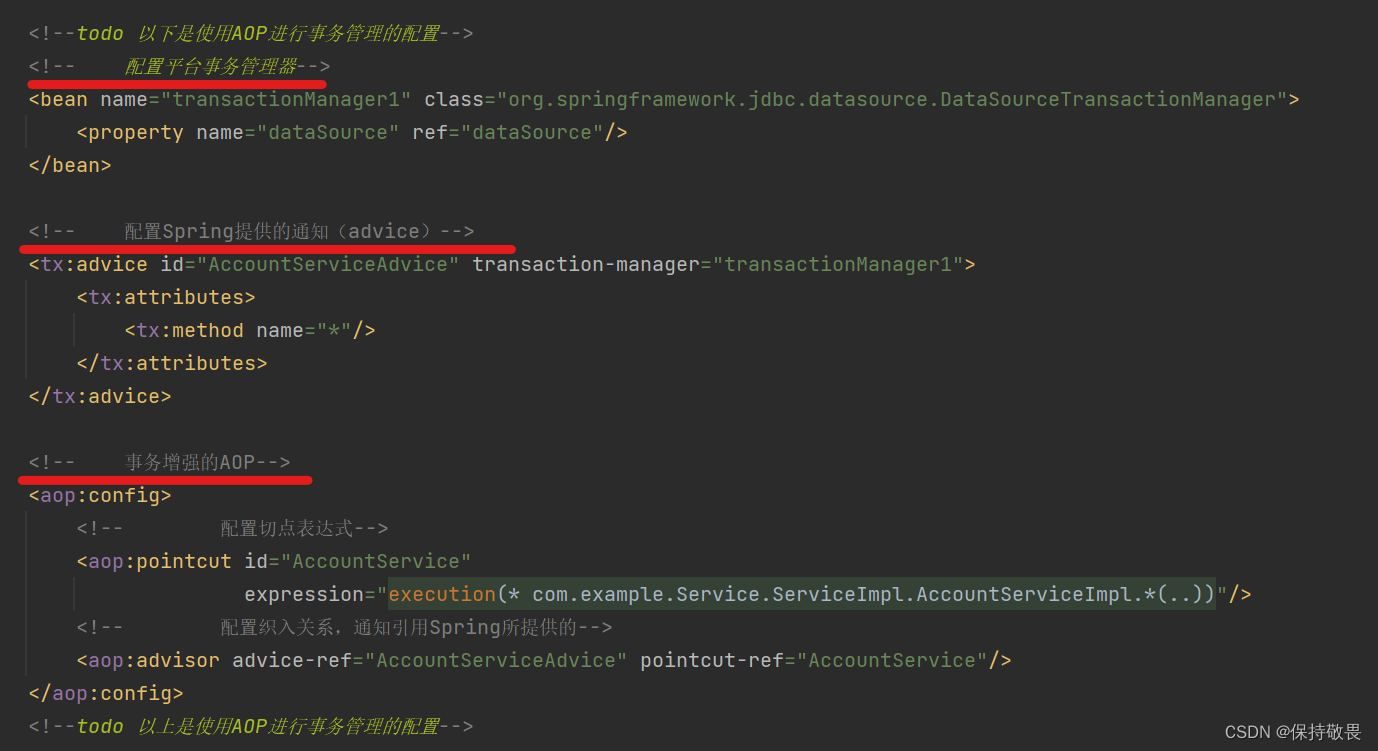
- 具体的配置文件如下
-
<?xml version="1.0" encoding="UTF-8"?>
<beans xmlns="http://www.springframework.org/schema/beans"
       xmlns:xsi="http://www.w3.org/2001/XMLSchema-instance"
       xmlns:context="http://www.springframework.org/schema/context"
       xmlns:aop="http://www.springframework.org/schema/aop"
       xmlns:tx="http://www.springframework.org/schema/tx"
       xsi:schemaLocation="http://www.springframework.org/schema/beans
        http://www.springframework.org/schema/beans/spring-beans.xsd
        http://www.springframework.org/schema/context
        http://www.springframework.org/schema/context/spring-context.xsd
        http://www.springframework.org/schema/aop
        http://www.springframework.org/schema/aop/spring-aop.xsd
        http://www.springframework.org/schema/tx
        http://www.springframework.org/schema/tx/spring-tx.xsd">

    <!--    指定Spring组件扫描范围-->
    <context:component-scan base-package="com.example"/>
    <!--配置数据源信息-->
    <bean id="dataSource" class="org.springframework.jdbc.datasource.DriverManagerDataSource">
        <property name="driverClassName" value="com.mysql.jdbc.Driver"/>
        <property name="url" value="jdbc:mysql://localhost:3306/db02"/>
        <property name="username" value="root"/>
        <property name="password" value="123456"/>
    </bean>

    <!--    配置SqlSessionFactoryBean,作用将SqlSessionFactoryBean存储到Spring容器中-->
    <bean class="org.mybatis.spring.SqlSessionFactoryBean">
        <property name="dataSource" ref="dataSource"/>
    </bean>

    <bean class="org.mybatis.spring.mapper.MapperScannerConfigurer">
        <property name="basePackage" value="com.example.Mapper"/>
    </bean>

<!-- todo 以下是使用AOP进行事务管理部分的配置-->

    <!--    配置平台事务管理器-->
    <bean name="transactionManager1" class="org.springframework.jdbc.datasource.DataSourceTransactionManager">
        <property name="dataSource" ref="dataSource"/>
    </bean>

    <!--    配置Spring提供的通知(advice)-->
    <tx:advice id="AccountServiceAdvice" transaction-manager="transactionManager1">
        <tx:attributes>
            <tx:method name="*"/>
        </tx:attributes>
    </tx:advice>

    <!--    事务增强的AOP-->
    <aop:config>
        <!--        配置切点表达式-->
        <aop:pointcut id="AccountService"
                      expression="execution(* com.example.Service.ServiceImpl.AccountServiceImpl.*(..))"/>
        <!--        配置织入关系,通知引用Spring所提供的-->
        <aop:advisor advice-ref="AccountServiceAdvice" pointcut-ref="AccountService"/>
    </aop:config>

</beans>
-
对于事务、AOP、代理对象的产生等相关知识,可以前往我的主页进行关键字搜索,自行查阅。
- 上述配置文件在最初配置文件的基础之上,使用AOP将目标方法进行事务管理
- 具体的做法如下
- 首先设置切点表达式,确定目标方法后,然后将切点表达式和Spring提供的通知进行织入,而此时需要配置Spring提供的通知,在配置该通知时需要配置事务平台管理器,最后将事务平台管理器配置好之后,就完成了对于目标方法的事务管理。
- 事务平台管理器的作用
-
事务的创建:事务平台管理器通过获取事务配置,从而创建一个新的事务对象,用于执行目标方法。
-
事务的提交:在目标方法正常执行结束后,事务平台管理器会将事务提交,从而将所有修改操作永久保存到数据库。
-
事务的回滚:在目标方法执行发生异常时,事务平台管理器会自动回滚事务,将所有修改操作撤销,保持系统数据的一致性。
-
事务的传播行为:事务平台管理器可以根据配置,将事务从一个方法传播到另一个方法,以保证不同方法之间的数据一致性。
-
事务隔离级别:事务平台管理器可以设置事务的隔离级别,从而决定不同事务之间可见的数据范围和并发度等问题。
-
Spring 支持多种事务平台管理器,例如 DataSourceTransactionManager、HibernateTransactionManager、JpaTransactionManager 等。不同的事务平台管理器对应着不同的持久化技术和数据库访问框架,在使用时需要注意选择合适的方案。
当我们使用 Spring 进行事务管理时,事务平台管理器就是整个事务处理流程中的核心组件。它通过管理和控制事务,保证了数据操作的原子性、一致性、隔离性和持久性等特性,从而维护了数据库的完整性和系统的稳定性。
-
- 再次运行最初存在人为错误的情况下,测试代码
- 运行结果如下
数据一致性得到了保障,AOP进行事务管理成功
详解
- 基于上述配置文件中使用AOP配置事务管理的配置,来对事务管理的配置进行详解
事务增强的AOP
- 事务增强的AOP部分在往期介绍AOP的文章中已经进行详细的阐述了,具体可以查阅Spring专栏中的AOP部分的相关文章。
平台事务管理器
- 平台事务管理器是一个接口,实现该接口取决于当前DAO持久层使用的框架是什么,不同的框架实现不同的接口,正如上述配置中显示,我们使用的是JDBC框架

其对应的平台事务管理器是DataSourceTransactionManager,MyBatis框架也是如此,因为MyBatis底层实现也是JDBC进行操作的。
Spring提供的Advice(重点介绍)
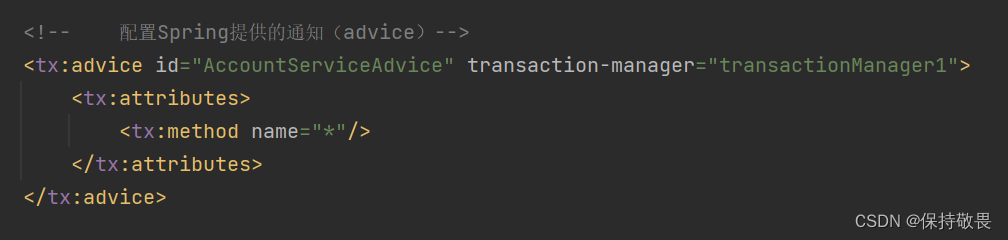
- 主要配置事务的通知(建议/advice),而对于事务的操作则通过平台事务管理器实现,所以引入上述配置的平台事务管理器。
- 主要介绍不同方法的事务属性中的配置(重点)

- 其中method标签用于配置不同方法的事务属性
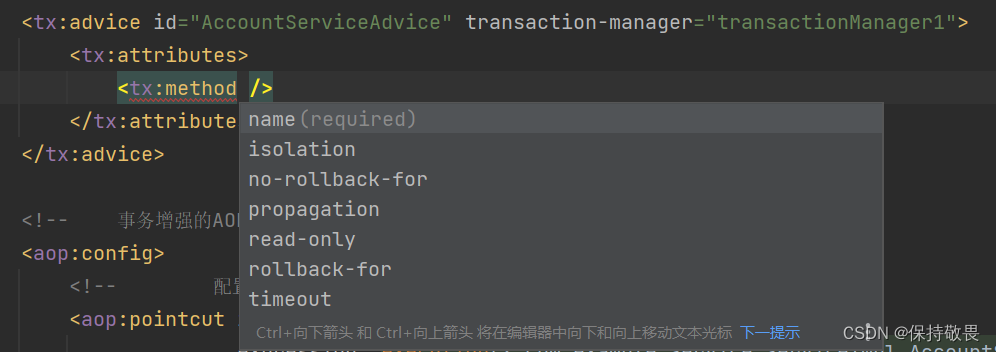
- name属性:指定方法名称,*表示通配符 add*对应所有以add开头的方法,此处需要区分的是切点表达式中指定的方法与此处的指定的方法有什么区别?切点表达式中是过滤哪些方法要解析AOP提供的事务管理增强;事务属性信息的name是指定这写过滤后的方法哪些进行事务属性的配置。
- isolation属性:指定事务的隔离级别,事务并存在三大问题:脏读,不可重复读,幻读/虚读。可以通过设置事务的隔离级别来保证并发问题的出现,常用的是READ_COMMITTED和PEPEATABLE_READ。
-
isolation 解释 DEFAULT 默认隔离级别,取决于当前数据库隔离级别,例如MySQL默认隔离级别是PEPEATABLE_READ READ_UNCOMMITTED A事务可以读取B事务尚未提交的事务记录,不能解决任何并发问题,安全性最顶,性能最高 READ_COMMITTED A事务只能读取到其它事务已经提交的事务,不能提取到未提交的记录,可以解决脏读问题,但不可以解决不可重复读和幻读问题。 PEPEATABLE_READ A事务多次从数据库读取某条记录结果一致,可以解决不可重复读、不可以解决幻读 SERIALIZABLE 串行化,可以解决任何并发问题,安全性最高,但性能最低。
-
- timeout:超时时间,访问数据库的时间做出限制,默认值为-1,即没有超时时间,单位为s
- read-only:是否只读数据库,默认值为false,查询操作指定为只读操作
- propagation:事务的传播行为,主要解决A方法调用B方法时,事务的传播方式的问题,例如:使用单方的事务,还是A和B都是用自己的事务。解决事务嵌套问题,即两业务方法都有事务,调用谁的事务的问题。可以参照Java Web专栏中的文章:事务管理-事务进阶-propagation属性-CSDN博客
-
事务传播行为 解释(前提都是A方法调用B方法) REQUIRED(默认值) A调用B,B需要事务,如果A有事务B就加入A事务中,如果A没有事务,B就自己创建一个事务。
REQUIRED_NEW A调用B,B需要新事物,如果A有事务就挂起,B自己创建一个新事务 SUPPORTS A调用B,B有无事务无所谓,A有事务就加入到A事务中,A无事务B就以非事务的方式执行 NOT_SUPPORTS A调用B,B就以无事务的方式进行,A如果有事务就挂起。
NEVER A调用B,B以无事务方式执行,A如果有事务就抛出异常 MANDATORY A调用B,B要加入A的事务中,如果A无事务就抛出异常 NESTED A调用B,B创建一个新事务,A有事务就作为嵌套事务存在,A没有事务就以创建的新事物执行
-
原理 (源码没有翻太明白)
目前跟着翻阅源代码还不是很清楚(先学后面的)
基于注解声明式事务控制
- 使用注方式就是对于XML配置文件中配置的替代。在老版本的Spring框架中,还需要在配置文件中设置 <tx:annotation-driven/>,从而注解生效。
- 使用的是 @Transactional,将注解使用在类上则是将类中的所有方法都进行事务管理,注解使用在方法上,则是对该方法进行事务管理

使用全注解来对上述案例进行汇总
- 核心配置类
-
package com.example.Config;

import com.alibaba.druid.pool.DruidDataSource;
import org.mybatis.spring.SqlSessionFactoryBean;
import org.mybatis.spring.annotation.MapperScan;
import org.springframework.beans.factory.annotation.Value;
import org.springframework.context.annotation.Bean;
import org.springframework.context.annotation.ComponentScan;
import org.springframework.context.annotation.Configuration;
import org.springframework.context.annotation.PropertySource;
import org.springframework.jdbc.datasource.DataSourceTransactionManager;

import javax.sql.DataSource;

//注解配置类替代配置文件,实现纯注解开发
@Configuration // 表示该类是一个核心配置类,同时将该类交给Spring容器管理(内置了@Component注解)
@ComponentScan({"com.example"})//<context:component-scan base-package="com.example"/>
@PropertySource({"classpath:jdbc.properties"}) // 加载外部properties文件
@MapperScan("com.example.Mapper") //加载对应的Mapper接口类
//@EnableTransactionManagement  Spring版本过低可能需要该注解
public class SpringConfig {
    @Bean
    public DataSource dataSource(
            @Value("${jdbc.driver}") String driver,
            @Value("${jdbc.url}") String url,
            @Value("${jdbc.username}") String username,
            @Value("${jdbc.password}") String password) {
        DruidDataSource dataSource = new DruidDataSource();
        dataSource.setDriverClassName(driver);
        dataSource.setUrl(url);
        dataSource.setUsername(username);
        dataSource.setPassword(password);
        return dataSource;
    }

    @Bean
    public SqlSessionFactoryBean SqlSessionFactory(DataSource dataSource) {
        SqlSessionFactoryBean sqlSessionFactoryBean = new SqlSessionFactoryBean();
        sqlSessionFactoryBean.setDataSource(dataSource);
        return sqlSessionFactoryBean;
    }

    @Bean
    public DataSourceTransactionManager transactionManager(DataSource dataSource) {
        DataSourceTransactionManager dataSourceTransactionManager = new DataSourceTransactionManager();
        dataSourceTransactionManager.setDataSource(dataSource);
        return dataSourceTransactionManager;
    }
}
-
-
使用全注解的方式,则获取Spring容器的方式也需要相应改变,测试类代码如下
-
package com.example.Test;

//import com.example.Config.MyBatisConfig;

import com.example.Config.SpringConfig;
import com.example.Service.AccountService;
import org.springframework.context.ApplicationContext;
import org.springframework.context.annotation.AnnotationConfigApplicationContext;

public class TestAccount {
    public static void main(String[] args) {
        ApplicationContext context = new AnnotationConfigApplicationContext(SpringConfig.class);
        AccountService accountService = (AccountService) context.getBean("accountService");
        accountService.transferMoney("tom", "lucy", 500);
    }
}
-


 936
936


 被折叠的 条评论
为什么被折叠?
被折叠的 条评论
为什么被折叠?
 到【灌水乐园】发言


