


创建异常类
因为后台Java项目是Web工程,所以有异常消息,我们要在原有异常消息的基础之上,封装状态码,所以需要我们自己创建一个异常类。
自定义异常类继承的父类,我没有选择Exception,因为Exception类型的异常,我们必须要手动显式处理,要么上抛,要么捕获。我希望我定义的异常采用既可以采用显式处理,也可以隐式处理,所以我选择继承RuntimeException这个父类.RuntimeException类型的异常可以被虚拟机隐式处理,这样就省去了我们很多手动处理异常的麻烦。
@Data
public class EmosException extends RuntimeException {
    private String msg;
    private int code = 500;

    public EmosException(String msg) {
        super(msg);
        this.msg = msg;
    }

    public EmosException(String msg, Throwable e) {
        super(msg, e);
        this.msg = msg;
    }

    public EmosException(String msg, int code) {
        super(msg);
        this.msg = msg;
        this.code = code;
    }

    public EmosException(String msg, int code, Throwable e) {
        super(msg, e);
        this.msg = msg;
        this.code = code;
    }
}
封装Web返回对象
虽然SpringMVC的Controller可以自动把对象转换成JSON返回给客户端,但是我们需要制定一个统一的标准,保证所有Controller返回的数据格式一致。最简便的办法就是定义封装类,来统一封装返回给客户端的数据。
修改pom.xml文件,添加依赖库.Apache的httpcomponents库里面的Httpstatus类封装了很多状态码,所以我们在Web返回对象中封装状态吗,可以用到这些状态码。
<dependency>
   <groupId>org.apache.httpcomponents</groupId>
    <artifactId>httpcore</artifactId>
    <version>4.4.13</version>
</dependency>
创建返回结果类
public class R extends HashMap<String,Object> {
    public R(){
        put("code", HttpStatus.SC_OK);
        put("msg","success");
    }
    //通过下面的方法可以实现链式调用R
    @Override
    public R put(String key, Object value){
        super.put(key,value);
        return this;
    }
    public static R ok(){
        return new R();
    }
    public static R ok(String msg){
        R r=new R();
        r.put("msg",msg);
        return r;
    }
    public static R ok(Map<String,Object> map){
        R r=new R();
        r.putAll(map);
        return r;
    }

    public static R error(int code,String msg){
        R r=new R();
        r.put("code",code);
        r.put("msg",msg);
        return r;
    }
    public static R error(String msg){
        return error(HttpStatus.SC_INTERNAL_SERVER_ERROR,msg);
    }
    public static R error(){
        return error(HttpStatus.SC_INTERNAL_SERVER_ERROR,"未知异常,请联系管理员");
    }
}
利用Swagger搭建REST API
开发前后端分离架构的项目,往往调试后端Web接口需要用到POSTMAN工具。虽然POSTMAN工具的功能非常强大,但是请求参数很多的情况下,我们手写这些参数和数据还是非常麻烦的。因此我们需要一个调试后端Web接口更加简便的方法。恰好Swagger提供了REST API调用方式,我们不需要借助任何工具的情况下,访问Swagger页面,就可以对Web接口进行调用和调试,这种调试方式的效率要远超POSTMAN软件。
1、添加依赖库
在pom.xml文件中添加Swagger依赖库,这里我们使用的是Swagger2版本,在U方面,比Swagger1版本要好看很多。
 <dependency>
     <groupId>io.springfox</groupId>
     <artifactId>springfox-swagger2</artifactId>
     <version>2.9.2</version>
 </dependency>
 <dependency>
     <groupId>io.springfox</groupId>
     <artifactId>springfox-swagger-ui</artifactId>
     <version>2.9.2</version>
 </dependency>
2、创建Swagger配置类
@Configuration
@EnableSwagger2
public class SwaggerConfig {
    @Bean
    public Docket createRestApi() {
        Docket docket = new Docket(DocumentationType.SWAGGER_2);
        ApiInfoBuilder builder = new ApiInfoBuilder();
        builder.title("EMOS在线办公系统");
        ApiInfo info = builder.build();
        docket.apiInfo(info);


        ApiSelectorBuilder selectorBuilder = docket.select();
        //把全部的类都添加进来
        selectorBuilder.paths(PathSelectors.any());
        //只有加了ApiOperation这个注解的会被添加进来
        selectorBuilder.apis(RequestHandlerSelectors.withMethodAnnotation(ApiOperation.class));
        docket = selectorBuilder.build();

        ApiKey apiKey = new ApiKey("token", "token", "header");
        List<ApiKey> apiKeyList = new ArrayList<>();
        apiKeyList.add(apiKey);
        docket.securitySchemes(apiKeyList);

        AuthorizationScope scope = new AuthorizationScope("global", "accessEverything");
        AuthorizationScope[] scopes = {scope};
        SecurityReference reference = new SecurityReference("token", scopes);
        List refList = new ArrayList();
        refList.add(reference);
        SecurityContext context = SecurityContext.builder().securityReferences(refList).build();
        List cxtList = new ArrayList();
        cxtList.add(context);
        docket.securityContexts(cxtList);

        return docket;
    }
}
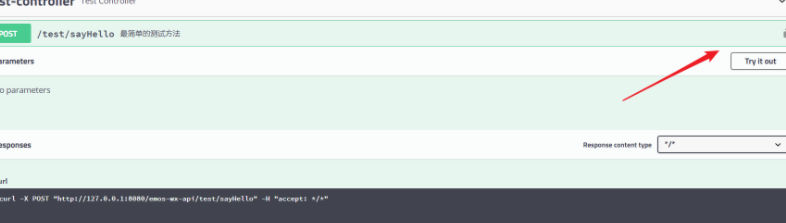
3、编写测试Web接口
@RestController
@RequestMapping("/test")
@Api("测试Web接口")
public class TestController {
@PostMapping("/sayHello")
@ApiOperation("最简单的测试方法")
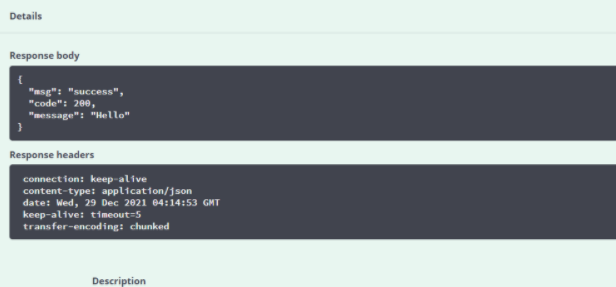
public R sayHello() {
return R.ok().put("message", "Hello");
}
}
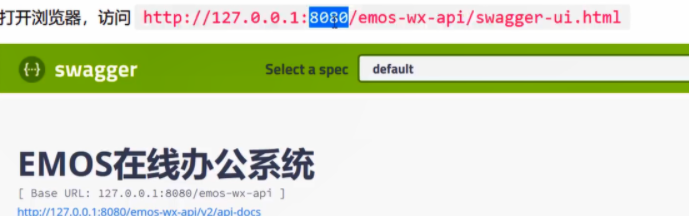
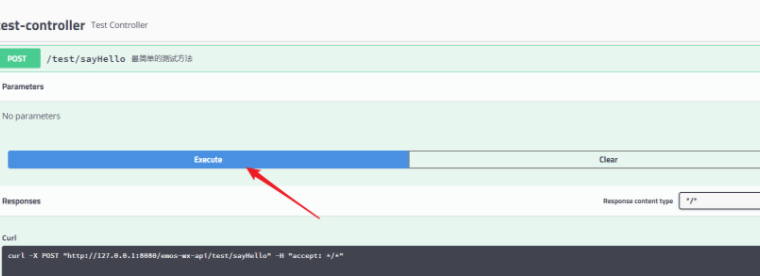
4、测试Web接口
遇到的bug:
Failed to start bean ‘documentationPluginsBootstrapper’; nested exception is java.lang.NullPointerException
springboot 集成Swagger2报错
这里使用的Swagger版本是2.9.2、springboot 版本是2.6.1
发现是springboot版本太高,缺少swagger运行所需要的环境,具体缺少什么还没研究出来,所以只能回退到之前的版本
把springboot回退到2.5.6就能正常启动


 771
771


 被折叠的 条评论
为什么被折叠?
被折叠的 条评论
为什么被折叠?
 到【灌水乐园】发言


