


1. JSTL 标签库介绍
JSTL 标签库 全称是指
JSP Standard Tag Library
JSP
标准标签库。是一个不断完善的开放源代码的
JSP
标签库。
EL 表达式主要是为了替换
jsp
中的表达式脚本,而标签库则是为了替换代码脚本。这样使得整个
jsp
页面变得更佳简洁。
JSTL 由五个不同功能的标签库组成:

在 jsp 标签库中使用 taglib 指令引入标签库:
CORE 标签库
<%@ taglib prefix="c" uri="http://java.sun.com/jsp/jstl/core" %>
XML 标签库
<%@ taglib prefix="x" uri="http://java.sun.com/jsp/jstl/xml" %>
FMT 标签库
<%@ taglib prefix="fmt" uri="http://java.sun.com/jsp/jstl/fmt" %>
SQL
标签库
<%@
taglib
prefix
=
"sql"
uri
=
"http://java.sun.com/jsp/jstl/sql"
%>
FUNCTIONS
标签库
<%@
taglib
prefix
=
"fn"
uri
=
"http://java.sun.com/jsp/jstl/functions"
%>
2. JSTL 标签库的使用步骤
1、先导入
jstl 标签库的 jar 包。
taglibs-standard-impl-1.2.1.jar
taglibs-standard-spec-1.2.1.jar
2、第二步,使用 taglib 指令引入标签库。
3. core 核心库使用
3.1 <c:set />(使用很少)
作用:set 标签可以往域中保存数据
域对象.setAttribute(key,value);格式:<c:set scope="page/request/session/application" var="xxx" value="xxx"/>scope 属性设置保存到哪个域page 表示 PageContext 域(默认值)request 表示 Request 域session 表示 Session 域application 表示 ServletContext 域var 属性设置 key 是多少value 属性设置值
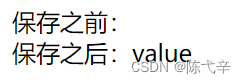
代码示例:
<body>
保存之前:${ requestScope.key }
<c:set scope="request" var="key" value="value"/><br/>
保存之后:${ requestScope.key }
</body>
结果:
3.2 <c:if />标签
if 标签用来做 if 判断
格式:<c:if test="表达式"> 执行判断正确的语句 </c:if>test 属性表示判断的条件(使用 EL 表达式输出)开始标签与结束标签之间执行 判断正确的语句注: <c:if />只会执行 执行判断正确的语句,不会执行判断错误的语句
代码示例:
<c:if test="${12 == 12}">
    <h1>12等于12</h1>
</c:if>
<c:if test="${12 != 12}">
    <h1>12不等于12</h1>
</c:if>
结果:

3.3 <c:choose> <c:when> <c:otherwise>标签
作用:多路判断。跟 switch ... case .... default 非常接近
格式:< c :choose >< c :when test ="EL表达式1 " >EL表达式1正确时 执行的语句</ c :when >< c :when test =" ${ EL表达式2 } " >EL表达式2正确时 执行的语句</ c :when >...< c :otherwise >以上 EL表达式都不正确时 执行的语句</ c :otherwise ></ c :choose >choose 标签开始选择判断when 标签表示每一种判断情况test 属性表示当前这种判断情况的值otherwise 标签表示剩下的情况<c:choose> <c:when> <c:otherwise>标签使用时需要注意的点:1、标签里不能使用 html 注释,要使用 jsp 注释2、when 标签的父标签一定要是 choose 标签
代码示例:
<%
    request.setAttribute("height", 178);
%>
<c:choose>
    <c:when test="${height > 190}">
        身高大于190
    </c:when>
    <c:when test="${height > 180}">
        身高大于190
    </c:when>
    <c:when test="${height > 170}">
        身高大于170
    </c:when>
    <c:otherwise>
        <c:choose>
            <c:when test="${height > 160}">
                身高大于160
            </c:when>
            <c:when test="${height > 150}">
                身高大于150
            </c:when>
            <c:when test="${height > 140}">
                身高大于140
            </c:when>
            <c:otherwise>
                身高小于或等于140
            </c:otherwise>
        </c:choose>
    </c:otherwise>

</c:choose>
结果:

3.4 <c:forEach /> 标签
作用:遍历输出使用。
属性介绍:
begin 属性设置开始的索引end 属性设置结束的索引var 属性表示循环的变量(也是当前正在遍历到的数据)items 表示遍历的集合 (相当于用于for增强)begin 表示遍历的开始索引值end 表示结束的索引值step 属性表示遍历的步长值
varStatus 属性表示当前遍历到的数据的状态而Status类实现了LoopTagStatus接口,并实现了如下方法:
3.4.1 遍历 1 到 10,输出
代码:
<body>
<%--
begin 属性设置开始的索引
end 属性设置结束的索引
var 属性表示循环的变量(也是当前正在遍历到的数据)
for (int i = 1; i < 10; i++)
--%>
<c:forEach begin="1" end="10" var="i">
    <table border="1">
        <tr>
            <td>${i}</td>
        </tr>
    </table>
</c:forEach>
</body>
结果:

3.4.2 遍历数组
代码:
<body>
<%--
2.遍历 Object 数组
for (Object item: arr)
items 表示遍历的数据源(遍历的集合)
var 表示当前遍历到的数据
--%>
<%
    String[] arr = {"aaa", "bbb", "ccc", "ddd"};
    request.setAttribute("arrString",arr);
%>
<c:forEach items="${requestScope.arrString}" var="arr">
    ${arr}<br/>
</c:forEach>
</body>
结果:

3.4.3 遍历 Map 集合
代码:
<body>
<%
    Map<String,Object> map = new HashMap<>();
    map.put("key1", "value1");
    map.put("key2", "value2");
    map.put("key3", "value3");
    request.setAttribute("map",map);
%>
<c:forEach items="${requestScope.map}" var="map">
    ${map.key}:${map.value} <br/>
</c:forEach>
</body>
结果:

3.4.4 遍历 List 集合
需求:list 中存放 Student 类,有属性:编号,用户名,密码,年龄, 电话信息
Student类(构造器,set,get,tostirng略):
public class Student {
    private Integer id;
    private String username;
    private String password;
    private Integer age;
    private String phone;
}
jsp:
<%@ page contentType="text/html;charset=UTF-8" language="java" %>
<html>
<head>
    <title>Title</title>
</head>
<style type="text/css">
    table{
        border:1px black solid;
        border-collapse: collapse;
        width: 60%;
        margin-left:20%;
    }
    tr,th,td{
        border:1px black solid;
        border-collapse: collapse;
        text-align: center;
    }
</style>
<body>
<%--
items 表示遍历的集合
var 表示遍历到的数据
--%>
<%
    List<Student> studentList = new ArrayList<>();
    for (int i = 1; i <= 10; i++) {
        studentList.add(new Student(i,"username"+i,"password"+i,15+i,"phone"+i));
    }
    request.setAttribute("studentList",studentList);
%>
<table>
    <tr>
        <th>编号</th>
        <th>用户名</th>
        <th>密码</th>
        <th>年龄</th>
        <th>手机号</th>
        <th>操作</th>
    </tr>
    <c:forEach items="${requestScope.studentList}" var="list">
        <tr>
            <td>${list.id}</td>
            <td>${list.username}</td>
            <td>${list.password}</td>
            <td>${list.age}</td>
            <td>${list.phone}</td>
            <td>update/delete</td>
        </tr>
    </c:forEach>
</table>
</body>
</html>
结果:

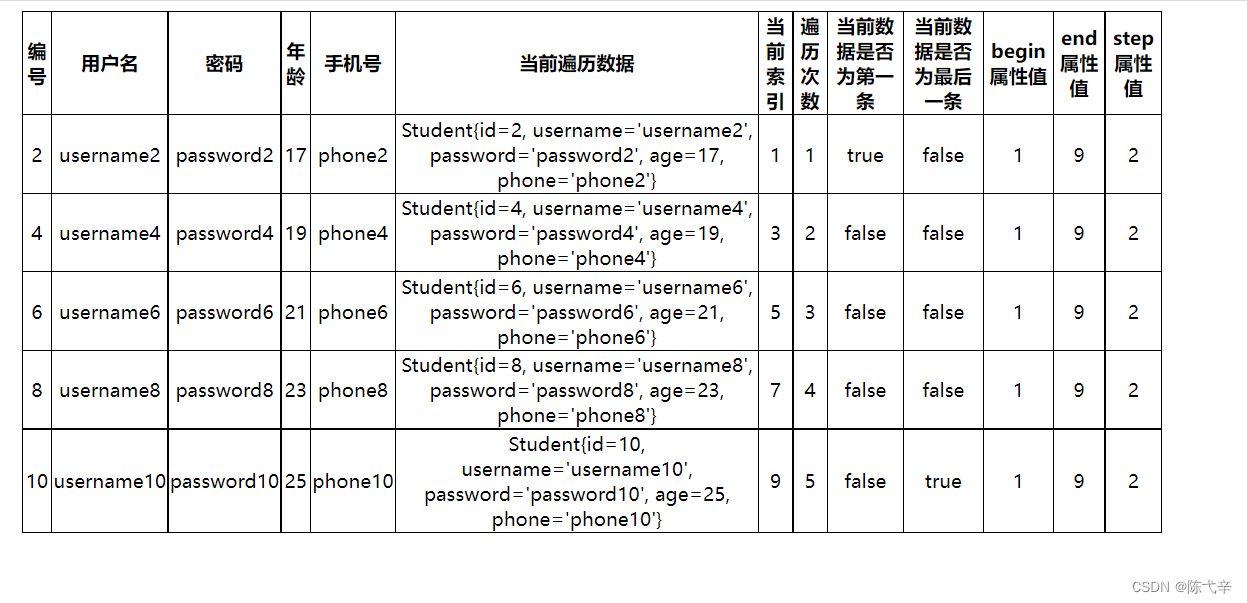
3.4.5 通过遍历 List 集合了解属性
属性介绍:
begin 属性设置开始的索引end 属性设置结束的索引var 属性表示循环的变量(也是当前正在遍历到的数据)items 表示遍历的集合 (相当于用于for增强)begin 表示遍历的开始索引值end 表示结束的索引值step 属性表示遍历的步长值varStatus 属性表示当前遍历到的数据的状态而Status类实现了LoopTagStatus接口,并实现了如下方法:
代码示例:
<%@ page contentType="text/html;charset=UTF-8" language="java" %>
<html>
<head>
    <title>Title</title>
</head>
<style type="text/css">
    table{
        border:1px black solid;
        border-collapse: collapse;
        width: 60%;
        margin-left:20%;
    }
    tr,th,td{
        border:1px black solid;
        border-collapse: collapse;
        text-align: center;
    }
</style>
<body>
<%--
items 表示遍历的集合
var 表示遍历到的数据
--%>
<%
    List<Student> studentList = new ArrayList<>();
    for (int i = 1; i <= 10; i++) {
        studentList.add(new Student(i,"username"+i,"password"+i,15+i,"phone"+i));
    }
    request.setAttribute("studentList",studentList);
%>
<table>
    <tr>
        <th>编号</th>
        <th>用户名</th>
        <th>密码</th>
        <th>年龄</th>
        <th>手机号</th>
        <th>当前遍历数据</th>
        <th>当前索引</th>
        <th>遍历次数</th>
        <th>当前数据是否为第一条</th>
        <th>当前数据是否为最后一条</th>
        <th>begin属性值</th>
        <th>end属性值</th>
        <th>step属性值</th>
    </tr>
    <c:forEach items="${requestScope.studentList}" var="list" begin="1" end="9" step="2" varStatus="status">
        <tr>
            <td>${list.id}</td>
            <td>${list.username}</td>
            <td>${list.password}</td>
            <td>${list.age}</td>
            <td>${list.phone}</td>
            <td>${status.current}</td>
            <td>${status.index}</td>
            <td>${status.count}</td>
            <td>${status.first}</td>
            <td>${status.last}</td>
            <td>${status.begin}</td>
            <td>${status.end}</td>
            <td>${status.step}</td>
        </tr>
    </c:forEach>
</table>
</body>
</html>
结果:


 863
863

 被折叠的 条评论
为什么被折叠?
被折叠的 条评论
为什么被折叠?
 到【灌水乐园】发言


