


目录
1.1也可以用于模块级别,跳过当前模块里所有的测试用例。(注:参数allow_module_level的值设为True)
2.@pytest.mark.skip(用于函数外,跳过测试用例)
3.@pytest.mark.skipif(用于函数外,条件condition,跳过原因reason="xxx")
前言
最近在听极客时间的课程,里面的讲师极力推崇 pytest 框架,鄙视 unittest 框架,哈哈!然后查了些资料,发现了一条 python 鄙视链:pytest 鄙视 > unittest 鄙视 > robotframework 。
pytest 是 python 的第三方单元测试框架,比自带 unittest 更简洁和高效,支持315种以上的插件,同时兼容 unittest 框架。这就使得我们在 unittest 框架迁移到 pytest 框架的时候不需要重写代码。接下来我们在文中来对分析下 pytest 有哪些简洁、高效的用法。
一、安装
首先使用 pip 安装 pytest
pip3 install pytest
查看 pytest 是否安装成功
pip3 show pytest
二、简单使用
1.创建 test_sample.py 文件,代码如下:
#!/usr/bin/env python
# coding=utf-8
import pytest

def inc(x):
    return x + 1

def test_answer():
    assert inc(3) == 5

if __name__ =="__main__":
    pytest.main()
执行结果:
test_sample.py F                                                         [100%]

================================== FAILURES ===================================
_________________________________ test_answer _________________________________

    def test_answer():
>       assert inc(3) == 5
E       assert 4 == 5
E        +  where 4 = inc(3)

test_sample.py:19: AssertionError
============================== 1 failed in 0.41s ==============================
从上面的例子可以看出,pytest 中断言的用法直接使用 assert ,和 unittest 中断言 self.assert 用法有所区别。
2.使用 pytest 执行测试需要遵行的规则:
-
.py 测试文件必须以test_开头(或者以_test结尾)
-
测试类必须以Test开头,并且不能有 init 方法
-
测试方法必须以test_开头
-
断言必须使用 assert
3.pytest.ini 配置文件
[pytest]
addopts = -v -s --html=py_test/scripts/report/report.html -p no:warnings  --reruns=10
testpaths = ./py_test/scripts
python_files= test_rerun.py
python_classes = Test*
python_function = test*
xfail_strict = true
4.addopts: OPTS 命令行参数集
-s:表示输出调试信息,包括 print打印的信息
-v:显示更详细的信息
-vs:这两个参数一起用
-n :支持多线程或者分布式运行测试用例
如:pytest -vs ./testcase/test_login.py -n 2
--html : 测试报告位置
--reruns :失败重跑
-p no:warnings :取消警告
--ff :先执行上次失败的用例
--lf :只执行上次失败的用例
-x :遇到测试用例fail,就结束测试
--maxfail=num:遇到num条测试用例fail, 就结束测试
-k :根据测试用例的部分字符串指定测试用例
如:pytest -vs ./testcase -k “ao”
三、常用方法
1.参数化
pytest 内置装饰器 @pytest.mark.parametrize 可以让测试数据参数化,把测试数据单独管理,类似 ddt 数据驱动的作用,方便代码和测试数据分离。
1.1一次传多个参数
import pytest

@pytest.mark.parametrize('x,y',[(1,2),(3,4)])
def test_sum(x,y):
    sum = x + y
    print(sum)

if __name__ =="__main__":
    pytest.main(['test_sample.py','-s'])
执行结果:
test_sample.py
3
.
7
.

============================== 2 passed in 0.06s ==============================
1.2组合传参:
注意:这种方式一共传递了4组参数 (1,3)、(1,4)、(2,3)、(2,4)。这种方式可以简化测试数据,不用手动再将参数组合。
import pytest

@pytest.mark.parametrize('x',[1,2])
@pytest.mark.parametrize('y',[3,4])
def test_sum(x,y):
    sum = x + y
    print(sum)

if __name__ =="__main__":
    pytest.main(['test_sample.py','-s'])
执行结果:
test_sample.py
4
.
5
.
5
.
6
.

============================== 4 passed in 0.14s ==============================
2、@pytest.fixture()
pytest 提供的 fixture 实现 unittest 中 setup/teardown 功能,可以在每次执行case之前初始化数据。不同点是,fixture 可以只在执行某几个特定 case 前运行,只需要在运行 case 前调用即可。比 setup/teardown 使用起来更灵活。
2.1fixture scope 作用范围
先看下 fixture 函数的定义:
def fixture(scope="function", params=None, autouse=False, ids=None, name=None):
    """
    :arg scope:    可选四组参数:function(默认)、calss、module、package/session

    :arg params:   一个可选的参数列表,它将导致多个参数调用fixture函数和所有测试使用它。

    :arg autouse:  如果为True,则fixture func将为所有测试激活可以看到它。如果为False(默认值),则需要显式激活fixture。

    :arg ids:      每个参数对应的字符串id列表,因此它们是测试id的一部分。如果没有提供id,它们将从参数中自动生成。

    :arg name:     fixture的名称。 这默认为装饰函数的名称。 如果fixture在定义它的同一模块中使用,夹具的功能名称将被请求夹具的功能arg遮蔽; 解决这个问题的一种方法是将装饰函数命名 “fixture_ <fixturename>”然后使用”@ pytest.fixture(name ='<fixturename>')”。
  """
重点说下 scope 四组参数的意义:
-
function:每个方法(函数)都会执行一次。
-
class:每个类都会执行一次。类中有多个方法调用,只在第一个方法调用时执行。
-
module:一个 .py 文件执行一次。一个.py 文件可能包含多个类和方法。
-
package/session:多个文件调用一次,可以跨 .py 文件。
2.2获取被调用函数返回值
import pytest

@pytest.fixture(scope='function')
def login():
    accesstoken = '197ce8083c38467f'

    return accesstoken


def test_sum(login):
    token = login
    print(token)

if __name__ =="__main__":
    pytest.main(['test_sample.py','-s'])
执行结果:
test_sample.py
197ce8083c38467f
.

============================== 1 passed in 0.04s ==============================
若被调用函数返回多个参数:
import pytest

@pytest.fixture(scope='function')
def login():
    accesstoken = '197ce8083c38467f'
    customerguid = '096799f5-e040-11e9-8c01-0242ac11000d'

    return accesstoken,customerguid


def test_sum(login):
    token = login[0]
    guid = login[1]
    print(token)
    print(guid)

if __name__ =="__main__":
    pytest.main(['test_sample.py','-s'])
执行结果:
test_sample.py
197ce8083c38467f
096799f5-e040-11e9-8c01-0242ac11000d
.

============================== 1 passed in 0.07s ==============================
2.3单个用例调用多个函数
import pytest

@pytest.fixture(scope='function')
def login():
    print('登录')

@pytest.fixture(scope='function')
def conn():
    print('连接数据库')

def test_1(login,conn):
    print('测试用例1')

def test_2():
    print('测试用例2')

if __name__ =="__main__":
    pytest.main(['test_sample.py','-s'])
执行结果:
test_sample.py
登录
连接数据库
测试用例1
.
测试用例2
.

============================== 2 passed in 0.05s ==============================
2.4yield
我们刚刚实现了在每个用例之前执行初始化操作,那么用例执行完之后如需要 清除数据(或还原)操作,可以使用 yield 来实现。
#!/usr/bin/env python
# coding=utf-8
import pytest

@pytest.fixture(scope='function')
def login():
    print("登录")
    yield
    print("注销登录")

def test_1():
    print('测试用例1')

def test_2(login):
    print('测试用例2')

if __name__ =="__main__":
    pytest.main(['test_sample.py','-s'])
执行结果:
test_sample.py
测试用例1
.
登录
测试用例2
.注销登录

============================== 2 passed in 0.08s ==============================
3.conftest
上面的案例都是写在同一个.py 文件内的。倘若有多个.py 文件需要调用 login() 方法,就必须把 login() 方法写在外面,这里引用了conftest.py 配置文件。test_xxx.py 测试文件中无需 import conftest,pytest 会自动搜索同级目录中的 conftest.py 文件。
conftest.py 与测试文件目录层级关系
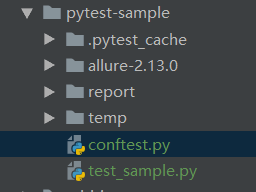
# 新建conftest.py,和 test_sample.py 同级目录
import pytest

@pytest.fixture(scope='function')
def login():
    print("登录")


# test_sample.py 代码如下
import pytest

def test_1():
    print('测试用例1')

def test_2(login):
    print('测试用例2')

if __name__ =="__main__":
    pytest.main(['test_sample.py','-s'])
执行结果:
test_sample.py
测试用例1
.
登录
测试用例2
.

============================== 2 passed in 0.01s ==============================
4、重试机制
有的时候用例执行失败了,然后排查发现不是代码问题,可能和环境或者网络不稳定有关系,这个时候可以引入重试机制,排除一些外在因素。
1、安装 pytest-rerunfailures
pip3 install pytest-rerunfailures
2、重试的两种方法
1)使用装饰器 @pytest.mark.flaky(reruns=5, reruns_delay=2)
- reruns :最大重试次数
- reruns_delay :重试间隔时间,单位是秒
#!/usr/bin/env python
# coding=utf-8
import pytest


@pytest.mark.flaky(reruns=5, reruns_delay=2)
def test():
    assert 0==1

if __name__ =="__main__":
    pytest.main(['test_sample.py','-s'])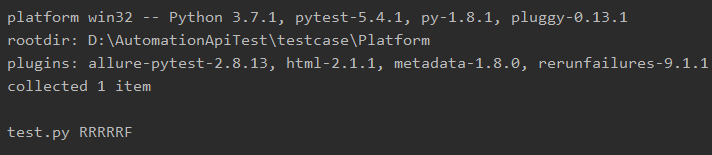
R表示用例失败后正在重试,尝试5次。
2)也可以使用命令行 pytest --reruns 5 --reruns-delay 2 -s ,参数与装饰器 @pytest.mark.flaky 一致,这个就不多说了。
5、测试用例分类@pytest.mark.smoke
有时候我们只需执行部分测试用例,比如从用例集当中挑选 smoke 测试,要怎么做呢?通过装饰器 @pytest.mark.smoke,smoke 是可以自定义的,运行时加上命令‘-m=smoke’,pytest 就会挑选带有装饰器的类或函数运行。
import pytest

@pytest.fixture(scope='function')
def login():
    accesstoken = '197ce8083c38467f'
    customerguid = '096799f5-e040-11e9-8c01-0242ac11000d'

    return accesstoken,customerguid

@pytest.mark.smoke
def test_sum(login):
    token = login[0]
    guid = login[1]
    print(token)
    print(guid)

def test_2():
    print('测试用例')

if __name__ =="__main__":
    pytest.main(['test_sample.py','-s','-m=smoke'])
执行结果:
test_sample.py
197ce8083c38467f
096799f5-e040-11e9-8c01-0242ac11000d
.

======================= 1 passed, 1 deselected in 0.02s =======================
6、skipif-跳过测试
1.pytest.skip (用于函数内,跳过测试用例)
def test_2():
    if 1 < 2:
        pytest.skip('1111111')
    pass
1.1也可以用于模块级别,跳过当前模块里所有的测试用例。(注:参数allow_module_level的值设为True)
if 1==1:
    pytest.skip('1111111',allow_model_level=True)

def test_1():
    pass

def test_2():
    pass
2.@pytest.mark.skip(用于函数外,跳过测试用例)
@pytest.mark.skip(reason='feature not implemented')
def test_1():
    pass

# 模块级别跳过。(注:参数allow_module_level的值设为True)
pytest.skip('skip all tests', allow_module_level=True)
3.@pytest.mark.skipif(用于函数外,条件condition,跳过原因reason="xxx")
@pytest.mark.skipif(condition='1<2',reason='feature not implemented')
def test_1():
   pass
7、控制执行顺序
order-执行顺序
1、控制用例执行顺序的方法
2、在需要调整用例执行顺序的函数(或方法)前增加,如@pytest.mark.run(order=x),x表示数字
3、执行顺序,由小到大、由正到负、未标记的在正数后、负数前执行,顺序为:1,2,3,无标记,-3,-2,-1
4、提示:需要下载 pytest_ordering 依赖包,否则@pytest.mark.run(order=x)既不报错也不会生效
class Testpytest(object):

  @pytest.mark.run(order=-1)
  def test_two(self):
    print("test_two, 测试用例")

  @pytest.mark.run(order=3)
  def test_one(self):
    print("test_one, 测试用例")

  @pytest.mark.run(order=1)
  def test_three(self):
    print("test_three, 测试用例")
8、预期失败
1.xfail-预期失败
xfail-预期失败的函数语法xfail(condition, reason):
--condition 预期失败的条件
--reason 预期失败的原因
#  condition 条件相等判断失败
@pytest.mark.xfail(condition='1==1', reason="The test case")
def test_1():
    print("\n-------")

#  condition 条件不等判断成功
@pytest.mark.xfail(condition='1==2', reason="The test case")
def test_2():
    print("\n-------")


 1911
1911


 被折叠的 条评论
为什么被折叠?
被折叠的 条评论
为什么被折叠?
 到【灌水乐园】发言


