


1. 创建项目
创建maven项目。
引入依赖(mysql connector和servlet):
<dependencies>
    <!-- https://mvnrepository.com/artifact/mysql/mysql-connector-java -->
    <dependency>
        <groupId>mysql</groupId>
        <artifactId>mysql-connector-java</artifactId>
        <version>5.1.49</version>
    </dependency>
    <!-- https://mvnrepository.com/artifact/javax.servlet/javax.servlet-api -->
    <dependency>
        <groupId>javax.servlet</groupId>
        <artifactId>javax.servlet-api</artifactId>
        <version>3.1.0</version>
        <scope>provided</scope>
    </dependency>
</dependencies>
创建目录结构:
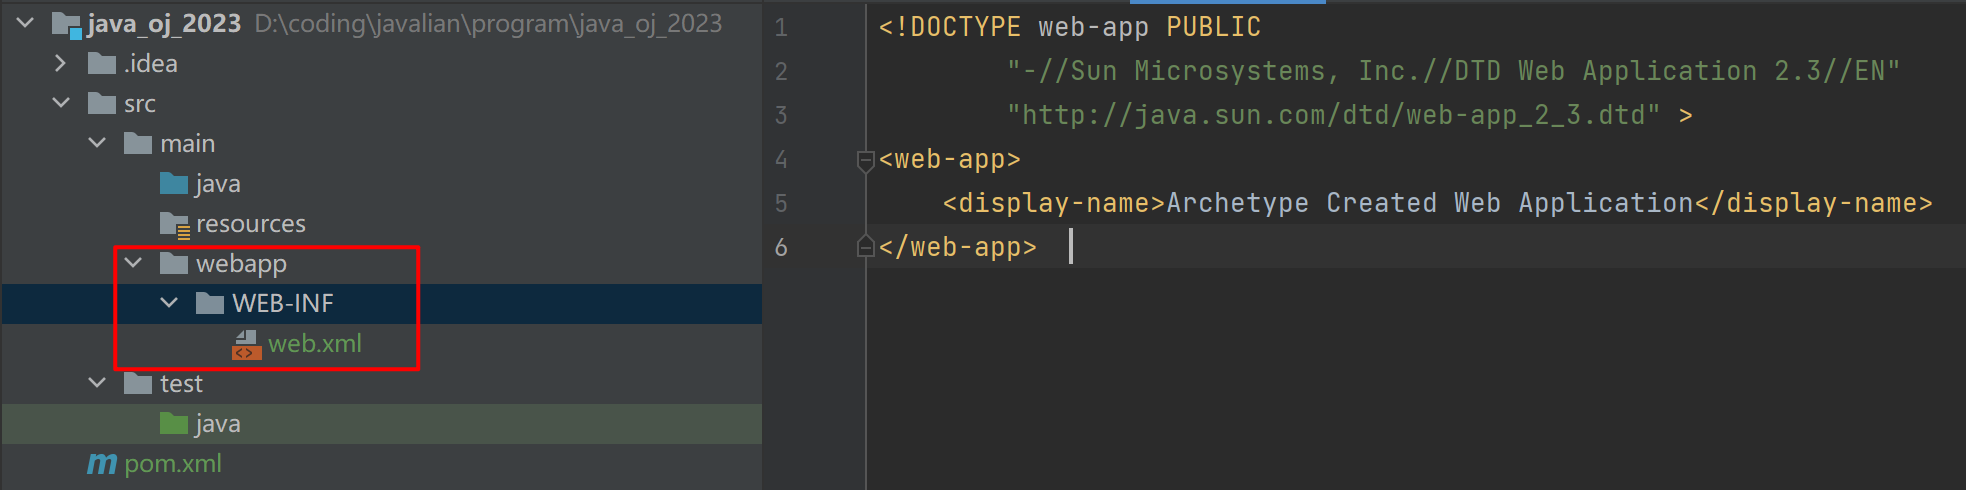
编写web.xml
往 web.xml 中拷贝以下代码. 具体细节内容我们暂时不关注.
<!DOCTYPE web-app PUBLIC
"-//Sun Microsystems, Inc.//DTD Web Application 2.3//EN"
"http://java.sun.com/dtd/web-app_2_3.dtd" >
<web-app>
<display-name>Archetype Created Web Application</display-name>
</web-app>
2. 多进程编程
用户提交的代码,其实也是一个独立的逻辑。这个逻辑是使用多线程执行好,还是多进程呢?
对于这里用户提交的代码,一定是要通过“多进程”的方式来执行的。因为我们无法控制用户到底提交了啥代码。代码很可能是存在问题的,很可能一运行就崩溃的。如果使用多线程,就会导致用户代码直接把整个服务器进程都给带走了的糟糕情况。操作系统上,同一时刻运行着很多个进程如果某个进程挂了,不会影响到其他进程.(每个进程有各自的地址空间)
而在Java 中对系统提供的这些进程操作进行了限制,最终给用户只提供了两个操作:
- 进程创建
通过 Runtime.exec 方法创建多进程。
- 进程等待
通过 Process 类的 waitFor 方法来实现进程的等待.
public class TestExec {
    public static void main(String[] args) throws IOException, InterruptedException {
        // Runtime 在 JVM 中是一个单例
       Runtime runtime =  Runtime.getRuntime();
        // Process 就表示 "进程"
       Process process = runtime.exec("javac");
        // 获取到子进程的标准输出和标准错误, 把这里的内容写入到两个文件中.
        // 获取标准输出, 从这个文件对象中读, 就能把子进程的标准输出给读出来!
        try (InputStream stdoutFrom = process.getInputStream();
             OutputStream stdoutTo = new FileOutputStream("stdout.txt")){
            while (true){
                int ch = stdoutFrom.read();
                if (ch == -1){
                    break;
                }
                stdoutTo.write(ch);
            }
        }
        // 获取标准错误, 从这个文件对象中读, 就能把子进程的标准错误给读出来!
        try (InputStream stderrFrom = process.getErrorStream();
             OutputStream stderrTo = new FileOutputStream("stderr.txt")){
            while (true){
                int ch = stderrFrom.read();
                if (ch == -1){
                    break;
                }
                stderrTo.write(ch);
            }
        }

        // 通过 Process 类的 waitFor 方法来实现进程的等待.
        // 父进程执行到 waitFor 的时候, 就会阻塞. 一直阻塞到子进程执行完毕为止.
        // (和 Thread.join 是非常类似的)
        // 返回值,这个退出码 就表示子进程的执行结果是否 ok. 如果子进程是代码执行完了正常退出, 此时返回的退出码就是 0.
        // 如果子进程代码执行了一半异常退出(抛异常), 此时返回的退出码就非 0.
        int exitCode = process.waitFor();
        System.out.println(exitCode);
    }
}
3. 编译运行模块
1. 实现通过命令行调用程序
通过上面的多进程方法,来封装成一个类:
public class CommandUtil {
    // 1. 通过 Runtime 类得到 Runtime 实例, 执行 exec 方法
    // 2. 获取到标准输出, 并写入到指定文件中.
    // 3. 获取到标准错误, 并写入到指定文件中.
    // 4. 等待子进程结束, 拿到子进程的状态码, 并返回.
    public static int run(String cmd,String stdoutFile,String stderrFile) throws IOException, InterruptedException {
        // 1. 通过 Runtime 类得到 Runtime 实例, 执行 exec 方法
        Process process = Runtime.getRuntime().exec(cmd);
        // 2. 获取到标准输出, 并写入到指定文件中.
        if (stdoutFile != null){
            try (InputStream stdoutFrom = process.getInputStream();
                 OutputStream stdoutTo = new FileOutputStream(stdoutFile)){
                while (true){
                    int ch = stdoutFrom.read();
                    if (ch == -1){
                        break;
                    }
                    stdoutTo.write(ch);
                }
            }
        }
        // 3. 获取到标准错误, 并写入到指定文件中.
        if (stderrFile != null){
            try (InputStream stderrFrom = process.getErrorStream();
                 OutputStream stderrTo = new FileOutputStream(stderrFile)){
                while (true){
                    int ch = stderrFrom.read();
                    if (ch == -1){
                        break;
                    }
                    stderrTo.write(ch);
                }
            }
        }
        // 4. 等待子进程结束, 拿到子进程的状态码, 并返回.
        int exitCode = process.waitFor();
        return exitCode;
    }

    public static void main(String[] args) throws IOException, InterruptedException {
        CommandUtil.run("javac","stdout.txt","stderr.txt");
    }
}
2. 搭建Task类的框架
每次的 “编译+运行” 这个过程, 就称为是一个 Task
这个 Task 类提供的核心方法, 就叫做 compileAndRun, 编译+运行 的意思.
- 参数: 要编译运行的 java 源代码.
- 返回值: 表示编译运行的结果. 编译出错/运行出错/运行正确…
compileAndRun方法的执行步骤:
- 把 question 中的 code 写入到一个 compile.Solution.java 文件中.
- 创建子进程, 调用 javac 进行编译. 注意! 编译的时候, 需要有一个 .java 文件.
如果编译出错, javac 就会把错误信息给写入到 stderr 里. 就可以用一个专门的文件来保存. compileError.txt - 创建子进程, 调用 java 命令并执行
运行程序的时候, 也会把 java 子进程的标准输出和标准错误获取到. stdout.txt, stderr.txt - 父进程获取到刚才的编译执行的结果, 并打包成 compile.Answer 对象
编译执行的结果, 就通过刚才约定的这几个文件来进行获取即可.
先创建Teak的输入内容和返回参数
// 用这个类来表示一个 task 的输入内容
// 会包含要编译的代码
public class Question {
    private String code;

    public String getCode() {
        return code;
    }

    public void setCode(String code) {
        this.code = code;
    }
}
// 表示一个 compile.Task 的执行结果
public class Answer {
    // 错误码. 约定 error 为 0 表示编译运行都 ok, 为 1 表示编译出错, 为 2 表示运行出错(抛异常).
    private int error;
    // 出错的提示信息. 如果 error 为 1, 编译出错了, reason 中就放编译的错误信息, 如果 error 为 2, 运行异常了, reason 就放异常信息
    private String reason;
    // 运行程序得到的标准输出的结果.
    private String stdout;
    // 运行程序得到的标准错误的结果.
    private String stderr;

	//Getter and Setter ……

    @Override
    public String toString() {
        return "compile.Answer{" +
                "error=" + error +
                ", reason='" + reason + '\'' +
                ", stdout='" + stdout + '\'' +
                ", stderr='" + stderr + '\'' +
                '}';
    }
}
创建Task类:
public class Task {
    public Answer compileAndRun(Question question){
    }
}
3. 约定临时文件名
public class Task {
    // 通过一组常量来约定临时文件的名字.
    // 这个表示所有临时文件所在的目录
    private static final String WORK_DIR = "./tmp/" ;
    // 约定代码的类名
    private static final String CLASS = "Solution";
    // 约定要编译的代码文件名.
    private static final String CODE = WORK_DIR + "Solution.java";
    // 约定存放编译错误信息的文件名
    private static final String COMPILE_ERROR = WORK_DIR + "compileError.txt";
    // 约定存放运行时的标准输出的文件名
    private static final String  STDOUT = WORK_DIR + "stdout.txt";
    // 约定存放运行时的标准错误的文件名
    private static final String STDERR = WORK_DIR + "stderr.txt";

    //……
}
为啥要搞这么多临时文件呢?
最主要的目的,就是为了进行“进程间通信。进程和进程之间,是存在独立性的一个进程很难影响到其他进程。
Linux 系统,提供的进程间通信的手段有很多种:管道,消息队列,信号量,信号,socket, 文件…
只要某个东西,可以被多个进程同时访问到,就可以用来进行进程间通信。虽然实际开发中最常见的进程间通信手段是 socket (网络编程)。但是由于javac 和java 这俩进程的代码,都是别人写好的,咱们控制不了。此处也就只能通过 文件 的方式来进程间通信。
此处的临时文件也对于后面的测试,调试,起到关键的作用。
4. 对读写文件的操作进一步封装.
虽然 Java 本身已经提供了不少文件读写操作。但是用起来微麻烦一些。现在封装一下,搞一个类,提供两个方法。让这俩方法,一个负责读取整个文件内容,返回一个字符串。另一个方法负责写入整个字符串到文件中。
对于文本文件来说,字节流和字符流都可以进行。读写字符流会省事很多,字节流可能会比较麻烦.(手动的处理编码格式,尤其是文件中包含中文的时候)。后续需要读写的这些文件,都是文本文件,因此使用字符流更合适一些。
public class FileUtil {
    // 负责把 filePath 对应的文件的内容读取出来, 放到返回值中.
    public static String readFile(String filePath){
        StringBuilder result = new StringBuilder();
        try (Reader reader = new FileReader(filePath)){
            while (true){
                int ch = reader.read();
                if (ch == -1){
                    break;
                }
                result.append((char) ch);
            }
        } catch (IOException e) {
            e.printStackTrace();
        }
        return result.toString();
    }
    // 负责把 content 写入到 filePath 对应的文件中
    public static void writFile(String filePath,String content){
        try (Writer writer = new FileWriter(filePath)){
            writer.write(content);
        } catch (IOException e) {
            e.printStackTrace();
        }
    }

    public static void main(String[] args) {
        FileUtil.writFile("./test.txt","hello world");
        String content = FileUtil.readFile("./test.txt");
        System.out.println(content);
    }
}
5. 实现保存源代码文件
// 每次的 "编译+运行" 这个过程, 就称为是一个 Task
public class Task {
    // .....
    public Answer compileAndRun(Question question){
        Answer answer = new Answer();
        //准备好要存放临时文件目录
        File workDir = new File(WORK_DIR);
        if (!workDir.exists()){
            //创建多级目录
            workDir.mkdirs();
        }
        // 1. 把 question 中的 code 写入到一个 Solution.java 文件中.
        FileUtil.writFile(CODE,question.getCode());
        return null;
    }
    public static void main(String[] args) {
        Task task = new Task();
        Question question = new Question();
        question.setCode("public class Solution {\n" +
                "    public static void main(String[] args) {\n" +
                "        System.out.println(\"hello world\");\n" +
                "    }\n" +
                "}");
        Answer answer = task.compileAndRun(question);
        System.out.println(answer);
    }
}
6. 实现编译功能
// 每次的 "编译+运行" 这个过程, 就称为是一个 Task
public class Task {
    // .....
    public Answer compileAndRun(Question question) throws IOException, InterruptedException {
		//……
        // 2. 创建子进程, 调用 javac 进行编译. 注意! 编译的时候, 需要有一个 .java 文件.
        //       如果编译出错, javac 就会把错误信息给写入到 stderr 里. 就可以用一个专门的文件来保存. compileError.txt
        //需要先把编译命令给构造出来
        String compileCmd = String.format("javac -encoding utf8 %s -d %s",CODE,WORK_DIR);
        System.out.println("编译命令:" + compileCmd);
        CommandUtil.run(compileCmd,null,COMPILE_ERROR);
        // 如果编译出错了, 错误信息就被记录到 COMPILE_ERROR 这个文件中了. 如果没有编译出错, 这个文件是空文件.
        String compileError = FileUtil.readFile(COMPILE_ERROR);
        if (!compileError.equals("")){//编译出错
            //直接返回Answer,让Answer中记录编译的错误信息
            System.out.println("编译出错");
            answer.setError(1);
            answer.setReason(compileError);
            return answer;
        }
        return null;
    }
    public static void main(String[] args) throws IOException, InterruptedException {
        Task task = new Task();
        Question question = new Question();
        question.setCode("public class Solution {\n" +
                "    public static void main(String[] args) {\n" +
                "        System.out.println(\"hello world\");\n" +
                "    }\n" +
                "}");
        Answer answer = task.compileAndRun(question);
        System.out.println(answer);
    }
}
7. 实现运行代码
// 每次的 "编译+运行" 这个过程, 就称为是一个 Task
public class Task {
    //……
    public Answer compileAndRun(Question question) throws IOException, InterruptedException {
        //……

        // 3. 创建子进程, 调用 java 命令并执行
        //       运行程序的时候, 也会把 java 子进程的标准输出和标准错误获取到. stdout.txt, stderr.txt
        String runCmd = String.format("java -classpath %s %s",WORK_DIR,CLASS);
        System.out.println("运行命令 " + runCmd);
        CommandUtil.run(runCmd,STDOUT,STDERR);
        String runError = FileUtil.readFile(STDERR);
        if (!runError.equals("")){
            System.out.println("运行出错");
            answer.setError(2);
            answer.setReason(runError);
            return answer;
        }
        // 4. 父进程获取到刚才的编译执行的结果, 并打包成 compile.Answer 对象
        //       编译执行的结果, 就通过刚才约定的这几个文件来进行获取即可.
        answer.setError(0);
        answer.setStdout(FileUtil.readFile(STDOUT));
        return answer;
    }
}
4. 题目管理模块
把当前的题目的信息给保存到数据库中。
create database  if not exists oj_databases charset utf8;
use oj_databases;
drop table if exists oj_table;
create table oj_table(
    id int primary key auto_increment,
    title varchar(50),
    level varchar(50),
    description varchar(4098), -- 题干
    templateCode varchar(4098), -- 代码模板
    testCode text -- 测试用例
);
1. 封装DBUtil
public class DBUtil {
    //使用单例模式(懒汉)进行封装数据与数据库之间的连接
    private static final String URL = "jdbc:mysql://127.0.0.1:3306/oj_database?characterEncoding=utf8&useSSL=false";
    private static final String USERNAME = "root";
    private static final String PASSWORD = "abc123";
    private static volatile DataSource dataSource = null;//volatile避免出现内存可见性问题

    private static DataSource getDataSource() {
        if (dataSource == null) {//判断是否需要加锁
            synchronized (DBUtil.class) {
                if (dataSource == null) {//判断是否需要实例化
                    MysqlDataSource mysqlDataSource = new MysqlDataSource();
                    mysqlDataSource.setURL(URL);
                    mysqlDataSource.setUser(USERNAME);
                    mysqlDataSource.setPassword(PASSWORD);
                    dataSource = mysqlDataSource;
                }
            }
        }
        return dataSource;
    }

    public static Connection getConnection() throws SQLException {
        return getDataSource().getConnection();
    }

    public static void close(Connection connection, PreparedStatement statement, ResultSet resultSet) {
        if (connection != null) {
            try {
                connection.close();
            } catch (SQLException e) {
                e.printStackTrace();
            }
        }
        if (statement != null) {
            try {
                statement.close();
            } catch (SQLException e) {
                e.printStackTrace();
            }
        }
        if (resultSet != null) {
            try {
                resultSet.close();
            } catch (SQLException e) {
                e.printStackTrace();
            }
        }
    }
}
2. 封装题目表操作
创建problem实体类,一个 Problem 对象,就对应着表中的一条记录:
public class Problem {
    private int id;
    private String title;
    private String level;
    private String description;
    private String templateCode;
    private String testCode;
    //Getter and Setter ……   toString()
}
还需要针对这个表进行“增删改查”.创建一个ProblemDAO来负责进行增删改查操作.
通过这个类封装了针对 Problem 的增删改查.
- 新增题目
- 删除题目
- 查询题目列表
- 查询题目详情
public class ProblemDAO {

    //新增题目
    public void insert(Problem problem){
        Connection connection = null;
        PreparedStatement statement = null;
        try {
            //建立数据库连接
            connection = DBUtil.getConnection();
            //构造sql语句
            String sql = "insert into oj_table values(null,?,?,?,?,?)";
            statement = connection.prepareStatement(sql);
            statement.setString(1,problem.getTitle());
            statement.setString(2,problem.getLevel());
            statement.setString(3,problem.getDescription());
            statement.setString(4,problem.getTemplateCode());
            statement.setString(5,problem.getTestCode());
            //执行sql
            int ret = statement.executeUpdate();
            if (ret == -1){
                System.out.println("新增题目失败");
            }else {
                System.out.println("新增题目");
            }
        } catch (SQLException e) {
            e.printStackTrace();
        }finally {
            DBUtil.close(connection,statement,null);
        }
    }
    //删除题目
    public void delete(int id){
        Connection connection = null;
        PreparedStatement statement = null;
        try {
            //建立数据库连接
            connection = DBUtil.getConnection();
            //构造sql语句
            String sql = "delete from oj_table while id = ?";
            statement = connection.prepareStatement(sql);
            statement.setInt(1,id);
            //执行sql
            int ret = statement.executeUpdate();
            if (ret == -1){
                System.out.println("删除题目失败!");
            }else {
                System.out.println("删除题目成功");
            }
        } catch (SQLException e) {
            e.printStackTrace();
        }finally {
            DBUtil.close(connection,statement,null);
        }
    }
    // 这个操作是把当前题目列表中的所有题都查出来了
    // 万一数据库中的题目特别多, 咋办? 只要实现 "分页查询" 即可. 后台实现分页查询, 非常容易.
    // 前端传过来一个当前的 "页码" , 根据页码算一下, 依据 sql limit offset 语句, 要算出来 offset 是 几
    // 但是前端这里实现一个分页器稍微麻烦一些(比后端要麻烦很多). 此处暂时不考虑分页功能.
    public List<Problem> selectAll(){
        List<Problem> problems = new ArrayList<>();
        Connection connection = null;
        PreparedStatement statement = null;
        ResultSet resultSet = null;
        try {
            //建立数据库连接
            connection = DBUtil.getConnection();
            //构造sql语句
            String sql = "select id,title,level from oj_table";
            statement = connection.prepareStatement(sql);
            //执行sql
            resultSet =  statement.executeQuery();
            //遍历resultSet
            while (resultSet.next()){
                //每一行都是一个Problem对象
                Problem problem = new Problem();
                problem.setId(resultSet.getInt("id"));
                problem.setTitle(resultSet.getString("title"));
                problem.setLevel(resultSet.getString("level"));
                problems.add(problem);
            }
        } catch (SQLException e) {
            e.printStackTrace();
        }finally {
            DBUtil.close(connection,statement,resultSet);
        }
        return problems;
    }
    //查看题目详情
    public Problem selectOne(int id){
        Connection connection = null;
        PreparedStatement statement = null;
        ResultSet resultSet = null;
        try {
            //建立数据库连接
            connection = DBUtil.getConnection();
            //构造sql语句
            String sql = "select * from oj_table where id = ?";
            statement = connection.prepareStatement(sql);
            statement.setInt(1,id);
            //执行sql
            resultSet =  statement.executeQuery();
            //遍历resultSet
            while (resultSet.next()){
                //每一行都是一个Problem对象
                Problem problem = new Problem();
                problem.setId(resultSet.getInt("id"));
                problem.setTitle(resultSet.getString("title"));
                problem.setLevel(resultSet.getString("level"));
                problem.setDescription(resultSet.getString("description"));
                problem.setTemplateCode(resultSet.getString("templateCode"));
                problem.setTestCode(resultSet.getString("testCode"));
                return problem;
            }
        } catch (SQLException e) {
            e.printStackTrace();
        }finally {
            DBUtil.close(connection,statement,resultSet);
        }
        System.out.println("查询题目详情失败");
        return null;
    }
}
3. 对封装的题目表进行测试
测试用例代码,就是一个 main 方法。在这个 main 方法里面,会创建 Solution 的实例,并目调用 里面提供的 核心方法(twoSum)。调用核心方法的时候,传入不同的参数,并针对返回结果进行不同的判定。如果返回结果符合预期,就打印"Test OK”如果不符合预期,就打印“Test failed",同时打印出出错的详情。
public class ProblemDAO {

    //……

    private static void testInsert(){
        ProblemDAO problemDAO = new ProblemDAO();
        Problem problem = new Problem();
        problem.setTitle("两数之和");
        problem.setLevel("简单");
        problem.setDescription("给定一个整数数组 nums 和一个整数目标值 target,请你在该数组中找出 和为目标值 target  的那 两个 整数,并返回它们的数组下标。\n" +
                "\n" +
                "你可以假设每种输入只会对应一个答案。但是,数组中同一个元素在答案里不能重复出现。\n" +
                "\n" +
                "你可以按任意顺序返回答案。\n" +
                "\n" +
                " \n" +
                "\n" +
                "示例 1:\n" +
                "\n" +
                "输入:nums = [2,7,11,15], target = 9\n" +
                "输出:[0,1]\n" +
                "解释:因为 nums[0] + nums[1] == 9 ,返回 [0, 1] 。\n" +
                "示例 2:\n" +
                "\n" +
                "输入:nums = [3,2,4], target = 6\n" +
                "输出:[1,2]\n" +
                "示例 3:\n" +
                "\n" +
                "输入:nums = [3,3], target = 6\n" +
                "输出:[0,1]\n" +
                " \n" +
                "\n" +
                "提示:\n" +
                "\n" +
                "2 <= nums.length <= 104\n" +
                "-109 <= nums[i] <= 109\n" +
                "-109 <= target <= 109\n" +
                "只会存在一个有效答案\n" +
                " \n" +
                "\n" +
                "进阶:你可以想出一个时间复杂度小于 O(n2) 的算法吗?");
        problem.setTemplateCode("class Solution {\n" +
                "    public int[] twoSum(int[] nums, int target) {\n" +
                "\n" +
                "    }\n" +
                "}");
        problem.setTestCode("	public static void main(String[] args) {\n" +
                "        Solution solution = new Solution();\n" +
                "        //testcase1\n" +
                "        int[] nums = {2,7,11,15};\n" +
                "        int target = 9;\n" +
                "        int[] result = solution.twoSum(nums,target);\n" +
                "        if (result.length == 2 && result[0] == 0 && result[1] == 1){\n" +
                "            System.out.println(\"testcase1 ok\");\n" +
                "        }else {\n" +
                "            System.out.println(\"testcase1 failed\");\n" +
                "        }\n" +
                "        //testcase2\n" +
                "        int[] nums2 = {3,2,4};\n" +
                "        int target2 = 6;\n" +
                "        int[] result2 = solution.twoSum(nums2,target2);\n" +
                "        if (result.length == 2 && result[0] == 1 && result[1] == 2){\n" +
                "            System.out.println(\"testcase2 ok\");\n" +
                "        }else {\n" +
                "            System.out.println(\"testcase2 failed\");\n" +
                "        }\n" +
                "    }");
        problemDAO.insert(problem);
        System.out.println("插入成功!");
    }
    private static void testSelectAll(){
        ProblemDAO problemDAO = new ProblemDAO();
        List<Problem> problems = problemDAO.selectAll();
        System.out.println(problems);
    }
    private static void testSelectOne(){
        ProblemDAO problemDAO = new ProblemDAO();
        Problem problem = problemDAO.selectOne(1);
        System.out.println(problem);
    }
    private static void testDelete(){
        ProblemDAO problemDAO = new ProblemDAO();
        problemDAO.delete(1);
    }
    public static void main(String[] args) {
        //testInsert();
        //testSelectAll();
        //testSelectOne();
        testDelete();
    }
}
5. API模块
当前已经把数据库的相关操作封装好了。接下来可以设计服务器提供的 API。这是一些 HTTP 风格的接口.通过这些接口和网页前端进行交互。
a)题目列表页:功能就是展示当前题目的列表。向服务器请求,题目的列表。
b) 题目详情页:
- 功能一: 展示题目的详细要求 => 向服务器请求,获取指定题目的详细信息
- 功能二: 能够有一个代码编辑框,让用户来编写代码.(这个过程不需要和服务器交互,纯前端实现)
- 功能三: 有一个提交按钮点击提交按钮,就能把用户编辑的代码给发到服务器上.服器进行编译和运行,并返回结果. => 向服务器发送用户当前编写的代码,并且获取到结果.
上面这是两个最核心的页面。除此之外,还可以提供一个 题目管理页(给管理员使用,不开放给普通用户)
- 管理员通过这个页面来 新增题目/删除题目
- 向服务器提交新增题目的请求。
- 向服务器提交一个删除题目的请求
咱们现在比较流行的前后端交互的方式,主要是通过JSON 格式来组织的。由于JSON 格式的解析,其实还挺麻烦的。需要引入第三方库,帮我们完成.Java 圈子中,处理JSON 的第三方库有很多Jackson 。
引入jackson依赖:
<!-- https://mvnrepository.com/artifact/com.fasterxml.jackson.core/jackson-databind -->
<dependency>
    <groupId>com.fasterxml.jackson.core</groupId>
    <artifactId>jackson-databind</artifactId>
    <version>2.14.1</version>
</dependency>
1. 获取题目列表
@WebServlet("/problem")
public class ProblemServlet extends HttpServlet {
    private ObjectMapper objectMapper = new ObjectMapper();
    @Override
    protected void doGet(HttpServletRequest req, HttpServletResponse resp) throws ServletException, IOException {
        resp.setStatus(200);
        resp.setContentType("application/json;charset=utf8");
        ProblemDAO problemDAO = new ProblemDAO();
        List<Problem> problems = problemDAO.selectAll();
        String respString = objectMapper.writeValueAsString(problems);
        resp.getWriter().write(respString);
    }
}
2. 获取题目详细信息
@WebServlet("/problem")
public class ProblemServlet extends HttpServlet {
    private ObjectMapper objectMapper = new ObjectMapper();
    @Override
    protected void doGet(HttpServletRequest req, HttpServletResponse resp) throws ServletException, IOException {
        resp.setStatus(200);
        resp.setContentType("application/json;charset=utf8");
        ProblemDAO problemDAO = new ProblemDAO();
        //获取id字段,如果能获取到->题目详情页。不能获取到->题目列表页
        String idString = req.getParameter("id");
        if (idString == null || idString.equals("")){
            //没有获取到id字段,查询题目列表
            List<Problem> problems = problemDAO.selectAll();
            String respString = objectMapper.writeValueAsString(problems);
            resp.getWriter().write(respString);
        }else {
            //题目列表页
            Problem problem = problemDAO.selectOne(Integer.valueOf(idString));
            String respString  = objectMapper.writeValueAsString(problem);
            resp.getWriter().write(respString);
        }

    }
}
3. 实现在线编译运行的思路
思路:
-
先读取请求的正文. 先按照 JSON 格式进行解析
-
根据 id 从数据库中查找到题目的详情 => 得到测试用例代码
-
把用户提交的代码和测试用例代码, 给拼接成一个完整的代码.
-
创建一个 Task 实例, 调用里面的 compileAndRun 来进行编译运行.
-
根据 Task 运行的结果, 包装成一个 HTTP 响应
@WebServlet("/compile")
public class CompileServlet extends HttpServlet {
    static class CompileRequest{//对应req的json值
        public int id;
        public String code;
    }
    static class CompileResponse{//对应resp的json值
        //0 表示编译运行 ok,1 表示编译出错,2 表示运行出错(抛异常)
        public int error;
        //出错的详细原因
        public String reason;
        //测试用例的输出情况,包含了通过几个用例这样的信息
        public String stdout;
    }
    @Override
    protected void doPost(HttpServletRequest req, HttpServletResponse resp) throws ServletException, IOException {


    }
}
4. 实现读取请求正文
@WebServlet("/compile")
public class CompileServlet extends HttpServlet {
	//……
    ObjectMapper objectMapper = new ObjectMapper();
    @Override
    protected void doPost(HttpServletRequest req, HttpServletResponse resp) throws ServletException, IOException {
        //1. 先读取请求的正文. 先按照 JSON 格式进行解析
        String body = readBody(req);
        CompileRequest compileRequest = objectMapper.readValue(body,CompileRequest.class);
    }

    private String readBody(HttpServletRequest req) throws UnsupportedEncodingException {
        //1.获取body的长度
        int contentLength = req.getContentLength();
        //2.准备一个byte[]
        byte[] buffer = new byte[contentLength];
        //3.获取body中的流对象
        try (InputStream inputStream = req.getInputStream()){
            //4.将流对象的内容放到byte[]中
            inputStream.read(buffer);
        } catch (IOException e) {
            e.printStackTrace();
        }
        //将byte[]中的内容构造成字符串,从二进制变成文本文件,我们应该注意的一个问题是:几个字节算一个字符集
        //为了解决这个问题我们指定UTF8为指定字符集
        return new String(buffer,"UTF8");
    }
}
5. 实现代码拼接
所谓的"合并",其实就是把 testCode 的这个 main方法,给嵌入到 requestCode 里面。做法就是把 testCode 给放到 Solution 的最后一个}的前面即可。
@WebServlet("/compile")
public class CompileServlet extends HttpServlet {
    //……
    ObjectMapper objectMapper = new ObjectMapper();
    @Override
    protected void doPost(HttpServletRequest req, HttpServletResponse resp) throws ServletException, IOException {
        //……
        //2.根据 id 从数据库中查找到题目的详情 => 得到测试用例代码
        ProblemDAO problemDAO = new ProblemDAO();
        Problem problem = problemDAO.selectOne(compileRequest.id);
        // 3. 把用户提交的代码和测试用例代码, 给拼接成一个完整的代码.
        //testCode是测试用例代码
        String testCode = problem.getTestCode();
        //finalCode是用户提交代码
        String requestCode =  compileRequest.code;
        //finalCode是最终代码
        String finalCode = mergeCode(testCode,requestCode);
        System.out.println(finalCode);
    }

    private String mergeCode(String testCode, String requestCode) {
        //1.查找requestCode中的最后一个}
        int pos = requestCode.lastIndexOf("}");
        if (pos == -1){
            //说明这个代码没有},是个非法代码
            return null;
        }
        //2.根据这个位置进行字符串截取
        String subStr = requestCode.substring(0,pos);
        //3.进行拼接
        return subStr + testCode + "\n}";
    }
}
写完代码后进行验证,可以用postman进行发送post请求。post请求的body部分为json字符串:
{
    "id":  2,
    "code": "class Solution {\n    public int[] twoSum(int[] nums, int target) {\n        int[] a = {0,1};\n        return a;\n    }\n}"
}
从idea控制台能输出完整的拼接代码说明拼接没问题。
6. 调用Task完成编译和运行
@WebServlet("/compile")
public class CompileServlet extends HttpServlet {
	//……
    @Override
    protected void doPost(HttpServletRequest req, HttpServletResponse resp) throws IOException {
        //……
        // 4. 创建一个 Task 实例, 调用里面的 compileAndRun 来进行编译运行.
        Task task = new Task();
        Question question = new Question();
        question.setCode(finalCode);
        Answer answer = null;
        try {
            answer = task.compileAndRun(question);
        } catch (InterruptedException e) {
            e.printStackTrace();
        }
        // 5. 根据 Task 运行的结果, 包装成一个 HTTP 响应
        resp.setStatus(200);
        resp.setContentType("application/json;charset=utf8");
        CompileResponse compileResponse = new CompileResponse();
        compileResponse.error = answer.getError();
        compileResponse.reason = answer.getReason();
        compileResponse.stdout = answer.getStdout();
        String respString = objectMapper.writeValueAsString(compileResponse);
        resp.getWriter().write(respString);
    }

    //……
}
写完代码后进行验证,可以用postman进行发送post请求。post请求的body部分为json字符串:
{
    "id":  2,
    "code": "class Solution {\n    public int[] twoSum(int[] nums, int target) {\n        int[] a = {0,1};\n        return a;\n    }\n}"
}
postman正常返回:
{
    "error": 0,
    "reason": null,
    "stdout": "testcase1 ok\r\ntestcase2 failed\r\n"
}
7. 处理异常请求
当传输的数据id不存在,或者code不合法,会直返回状态码500(异常)。我们需要一个更温和的处理提高我们的代码的容错能力,返回给用户一个错误提示。
//题目未找到异常
public class ProblemNotFoundException extends Exception{

}
//code非法异常
public class CodeInValidException extends Exception{

}
@WebServlet("/compile")
public class CompileServlet extends HttpServlet {
    //……
    @Override
    protected void doPost(HttpServletRequest req, HttpServletResponse resp) throws IOException {
        CompileRequest compileRequest = null;
        CompileResponse compileResponse = new CompileResponse();
        try {
            resp.setStatus(200);
            resp.setContentType("application/json;charset=utf8");
            //1. 先读取请求的正文. 先按照 JSON 格式进行解析
            String body = readBody(req);
            compileRequest = objectMapper.readValue(body, CompileRequest.class);
            //2.根据 id 从数据库中查找到题目的详情 => 得到测试用例代码
            ProblemDAO problemDAO = new ProblemDAO();
            Problem problem = problemDAO.selectOne(compileRequest.id);
            if (problem == null){
                //为了同意处理错误,在这个地方抛出异常
                throw new ProblemNotFoundException();
            }
            // 3. 把用户提交的代码和测试用例代码, 给拼接成一个完整的代码.
            //testCode是测试用例代码
            String testCode = problem.getTestCode();
            //finalCode是用户提交代码
            String requestCode =  compileRequest.code;
            //finalCode是最终代码
            String finalCode = mergeCode(testCode,requestCode);
            if (finalCode == null){
                //code不合法异常
                throw new CodeInValidException();
            }
            //System.out.println(finalCode);
            // 4. 创建一个 Task 实例, 调用里面的 compileAndRun 来进行编译运行.
            Task task = new Task();
            Question question = new Question();
            question.setCode(finalCode);
            Answer answer = task.compileAndRun(question);
            // 5. 根据 Task 运行的结果, 包装成一个 HTTP 响应
            compileResponse = new CompileResponse();
            compileResponse.error = answer.getError();
            compileResponse.reason = answer.getReason();
            compileResponse.stdout = answer.getStdout();
        } catch (InterruptedException e) {
            e.printStackTrace();
        } catch (ProblemNotFoundException e) {
            //处理题目未找到异常
            compileResponse.error = 3;
            compileResponse.reason = "没有找打指定题目!id = " + compileRequest.id;
        } catch (CodeInValidException e) {
            //处理code不合法异常
            compileResponse.error = 3;
            compileResponse.reason = "提交的代码不符合要求!";
        }finally {
            String respString = objectMapper.writeValueAsString(compileResponse);
            resp.getWriter().write(respString);
        }
    }
    //……
}
8. 区分不提供请求的工作目录
每次有一个请求过来,都需要生成这样的一组临时文件。如果同一时刻,有N个请求一起过来了。这些请求的临时文件的名字和所在的目录都是一样的。此时多个请求之间就会出现“相互干扰”的情况.(非常类似于线程安全问题)
如果采用加锁的方式解决这个问题会发生类似于线程等待,一个用户在提交 代码其他用户不能进行提交代码。更好的办法,就是让每个请求,有一个自己的目录来生成这些临时文件。这样的话相互之间就不再干扰了。
因此,咱们要做的事情就是让每个请求创建的 WORK_DIR 目录都不相同。如果使用类似以mysq的自增主键,我们需要用一个全局变量来存储这个自增值,但是如果重新部署程序的话会导致变量重新自增会有重复的出现 。更好的解决方案是用UUID生成全世界唯一的ID。我们一直提交时间长了文件会变得越来越大,我们可以采取定时清除的办法(每天一清除,保留三天的文件)。
public class Task {
    // 之前这里的名字都是静态常量. 但是现在要实现针对每个请求都有不同的临时目录, 就不能使用静态常量了
    // 这个表示所有临时文件所在的目录
    private String WORK_DIR = null ;
    // 约定代码的类名
    private String CLASS = null;
    // 约定要编译的代码文件名.
    private String CODE = null;
    // 约定存放编译错误信息的文件名
    private String COMPILE_ERROR = null;
    // 约定存放运行时的标准输出的文件名
    private String  STDOUT = null;
    // 约定存放运行时的标准错误的文件名
    private String STDERR = null;
    public Task(){
        // 在 Java 中使用 UUID 这个类就能生成一个 UUID 了
        WORK_DIR = "./tmp/"  + UUID.randomUUID().toString() +"/";
        CLASS = "Solution";
        CODE = WORK_DIR + "Solution.java";
        COMPILE_ERROR = WORK_DIR + "compileError.txt";
        STDOUT = WORK_DIR + "stdout.txt";
        STDERR = WORK_DIR + "stderr.txt";

    }
    //……
}
我们在idea上运行生成的相对路径和通过tomcat运行生成的相对路径是不同的,可以通过一行代码打印出当前运行状态下的相对路径:
//获取到 工作目录
System.out.println("用户的当前工作目录: "+System.getProperty("user.dir"));
6. 前端模块
将上面的前端模版进行修改:
<!DOCTYPE html>
<html lang="en">
<head>
<meta charset="utf-8">
<title>Charcoal - Free Bootstrap 4 UI Kit</title>
<meta name="description" content="Charcoal is a free Bootstrap 4 UI kit build by @attacomsian at Wired Dots." />
<meta name="viewport" content="width=device-width, initial-scale=1.0">
<!--Bootstrap 4-->
<link rel="stylesheet" href="css/bootstrap.min.css">
</head>
<body>
<nav class="navbar navbar-expand-md navbar-dark fixed-top sticky-navigation">
<a class="navbar-brand font-weight-bold" href="#">我的oj系统</a>
<button class="navbar-toggler" type="button" data-toggle="collapse" data-target="#topMenu" aria-controls="navbarSupportedContent" aria-expanded="false" aria-label="Toggle navigation">
<span class="navbar-toggler-icon"></span>
</button>
<div class="collapse navbar-collapse" id="topMenu">
<ul class="navbar-nav ml-auto">
</ul>
</div>
</nav>
<!--hero section-->
<section class="bg-hero">
<div class="container">
<div class="row vh-100">
<div class="col-sm-12 my-auto text-center">
<h1>我的oj平台</h1>
<p class="lead text-capitalize my-4">
基于java Servlet 的oj平台
</p>
<a href="https://gitee.com/dalinya/javalian/tree/master/program/java_oj_2023" class="btn btn-outline-light btn-radius btn-lg">项目链接</a>
</div>
</div>
</div>
</section>
<!--components-->
<section class="my-5 pt-5">
<div class="container">
<!-- Tables -->
<div class="row mb-5" id="tables">
<div class="col-sm-12">
<h1>Tables</h1>
<div class="mt-3 mb-5">
<h3>Table striped</h3>
<table class="table table-striped">
<thead>
<tr>
<th>Header 1</th>
<th>Header 2</th>
<th>Header 3</th>
</tr>
</thead>
<tfoot>
<tr>
<th>Footer 1</th>
<th>Footer 2</th>
<th>Footer 3</th>
</tr>
</tfoot>
<tbody>
<tr>
<td>Cell</td>
<td>Cell</td>
<td>Cell</td>
</tr>
<tr>
<td>Cell</td>
<td>Cell</td>
<td>Cell</td>
</tr>
<tr>
<td>Cell</td>
<td>Cell</td>
<td>Cell</td>
</tr>
</tbody>
</table>
</div>
</div>
</div>
<!--footer-->
<section class="py-5 bg-dark">
<div class="container">
<div class="row">
<div class="col-md-6 offset-md-3 col-sm-8 offset-sm-2 col-xs-12 text-center">
<p class="pt-2 text-muted">
© by yb_Account
</p>
</div>
</div>
</div>
</section>
<script src="https://code.jquery.com/jquery-3.1.1.min.js"></script>
<script src="https://cdnjs.cloudflare.com/ajax/libs/popper.js/1.12.3/umd/popper.min.js"></script>
<script src="https://cdn.staticfile.org/twitter-bootstrap/4.3.1/js/bootstrap.min.js"></script>
<script src="js/app.js"></script>
</body>
</html>
1. 实现题目列表页
当前是通过写死页面的方式,来展现题目的真实的情况是需要通过让页面通过 ajax 的方式从服务器来获取到数据.
<!DOCTYPE html>
<html lang="en">
    <head>
 		<!--和上面一样-->
    </head>
    <body>
        <!--hero section-->
		<!--和上面一样-->

        <!--components-->
        <section class="my-5 pt-5">
            <div class="container">
                <!-- Tables  -->
                <div class="row mb-5" id="tables">
                    <div class="col-sm-12">
                        <div class="mt-3 mb-5">
                            <h3>题目列表</h3>
                            <table class="table table-striped">
                                <thead>
                                    <tr>
                                        <th>编号</th>
                                        <th>标题</th>
                                        <th>难度</th>
                                    </tr>
                                </thead>
                                <!--注意要添加id="problemTable"-->
                                <tbody id = "problemTable">
                                    <!-- <tr>
                                        <td>1</td>
                                        <td>
                                            <a href="#">两数之和</a>
                                        </td>
                                        <td>简答</td>
                                    </tr> -->
                                </tbody>
                            </table>
                        </div>

                    </div>
                </div>

        <!--footer--><!--和上面一样-->

        <script>
            // 在页面加载的时候, 尝试从服务器获取题目列表. 通过 ajax 的方式来进行获取
            function getProblems(){
                // 1. 先通过 ajax 从服务器获取到题目列表.
                $.ajax({
                    url:"problem",
                    type:"GET",
                    success:function(data,status){
                        // data 是响应的 body, status 是响应的状态码
                        // 2. 把得到的响应数据给构造成 HTML 片段
                        makeProblemTable(data);
                    }
                });
            }

            function makeProblemTable(data){
                // 通过这个函数来把数据转换成 HTML 页面片段
                let problemTable = document.querySelector("#problemTable");
                for(let problem of data){
                    let tr = document.createElement("tr");
                    let tdId = document.createElement("td");
                    tdId.innerHTML = problem.id;
                    tr.appendChild(tdId);
                    let tdTitle = document.createElement("td");
                    let a = document.createElement("a");
                    a.innerHTML = problem.title;
                    //todo:需要构造一个页面详情页。来展示题目的详情信息
                    a.href = 'problemDetail.html?id=' + problem.id;
                    tdTitle.appendChild(a);
                    tr.appendChild(tdTitle);

                    let tdLevel = document.createElement("td");
                    tdLevel.innerHTML = problem.level;
                    tr.appendChild(tdLevel);
                    problemTable.appendChild(tr);
                }

            }
            getProblems();
        </script>
    </body>
</html>
2. 实现题目详情页
html中展示题目详情信息。代码编辑框,提交按钮,运行结果。

<section class="my-5 pt-5">
    <div class="container">
        <div class="row mt-4">
            <div class="col-sm-12 pb-4">
                <div class="jumbotron jumbotron-fluid">
                    <div class="container" id="problemDesc">
                        <!-- <h1>Container fluid size jumbotron</h1>
                        <p>Think BIG with a Bootstrap Jumbotron!</p> -->
                    </div>
                </div>
            </div>
        </div>

        <div class="row mt-4">
            <div class="col-sm-12 pb-4">
                <div class="form-group">
                    <label for="codeEditor">代码编辑框</label>
                        <textarea class="form-control" id="codeEditor" style="width: 100%; height: 400px;"></textarea>
                </div>
            </div>
        </div>
        <button type="button" class="btn btn-primary" id="submitButton">提交</button>

        <div class="row mt-4">
            <div class="col-sm-12 pb-4">
                <div class="jumbotron jumbotron-fluid">
                    <div class="container">
                        <pre id="problemResult">

                        </pre>
                    </div>
                </div>
            </div>
        </div>
    </div>
</section>
使用JQuery中的ajax来完成前后端交互。
<script>
    console.log(location.search);

    // 在页面加载的时候, 尝试从服务器获取题目详情. 通过 ajax 的方式来进行获取
    function getProblem() {
        $.ajax({
            url:"problem" + location.search,
            type: "get",
            success: function(data,status){
                makeProblemDetail(data);
            }
        })
    }
    function makeProblemDetail(problem){
        // 1. 获取到 problemDesc, 把题目详情填写进去
        let problemDesc = document.querySelector("#problemDesc");
        let h3 = document.createElement("h3");
        h3.innerHTML = problem.id + "." + problem.title + "_" + problem.level;
        problemDesc.appendChild(h3);

        let pre = document.createElement("pre");
        let p = document.createElement("p");
        p.innerHTML = problem.description;
        pre.appendChild(p);
        problemDesc.appendChild(pre);

        // 2. 把代码的模板填写到编辑框中.
        let codeEditor = document.querySelector("#codeEditor");
        codeEditor.innerHTML = problem.templateCode;

        // 3. 给提交按钮注册一个点击事件
        let submitButton = document.querySelector("#submitButton");
        submitButton.onclick = function(){
            // 点击这个按钮, 就要进行提交. (把编辑框的内容给提交到服务器上)
            let body = {
                id: problem.id,
                code: codeEditor.value,
            };
            $.ajax({
                type:"POST",
                url:"compile",
                data: JSON.stringify(body),
                success: function(data,status){
                    let problemResult = document.querySelector("#problemResult");
                    if(data.error == 0){
                        // 编译运行没有问题, 把 stdout 显示到页面中
                        problemResult.innerHTML= data.stdout;
                    }else{
                        // 编译运行有问题, 把 stdout 显示到页面中
                        problemResult.innerHTML = data.reason;
                    }
                }

            });
        }

    }
    getProblem();
</script>
3. 引入ace.js
前面的文本编辑框中,不仅没有语法高亮,而且一按tabl不是出现水平制表符。有一个第三方库叫做 ace.js.这个就是一个前端版本的代码编辑器。安装非常简单只要在页面中引入对应的 地址 即可。
<!-- 引入 ace.js -->
<script src="https://cdn.bootcdn.net/ajax/libs/ace/1.2.9/ace.js"></script>
<script src="https://cdn.bootcdn.net/ajax/libs/ace/1.2.9/ext-language_tools.js"></script>
在代码编辑框外引入一层新的id = editor 的div:
<div class="form-group">
    <label for="codeEditor">代码编辑框</label>
    <div id="editor" style="min-height:400px">
        <textarea class="form-control" id="codeEditor" style="width: 100%; height: 400px;"></textarea>
    </div>
</div>
初始化ace:
function initAce() {
    // 参数 editor 就对应到刚才在 html 里加的那个 div 的 id
    let editor = ace.edit("editor");
    editor.setOptions({
        enableBasicAutocompletion: true,//是否支持自动补全
        enableSnippets: true,//是否支持代码模版
        enableLiveAutocompletion: true//是否支持代码模版的自动补全
    });
    editor.setTheme("ace/theme/twilight");//设置编辑器的主题
    editor.session.setMode("ace/mode/java");//设置语言模式
    editor.resize();//重新绘制窗口
    document.getElementById('editor').style.fontSize = '20px';//设置字体

    return editor;
}

let editor = initAce();
ace.js 会重新绘制页面(绘制 div#editor)。原来搞的那个 textarea 就没了。
在页面加载的时候,通过另外一个方式
editor.setValue(yourCode);
// 2. 把代码的模板填写到编辑框中.
//let codeEditor = document.querySelector("#codeEditor");
// codeEditor.innerHTML = problem.templateCode;
editor.setValue(problem.templateCode);
在提交代码的时候,也需要通过另一个方式获取到代码内容
let yourCode = editor.getValue();
// 点击这个按钮, 就要进行提交. (把编辑框的内容给提交到服务器上)
let body = {
    id: problem.id,
    //code: codeEditor.value,
    code: editor.getValue(),
};
7. 部署项目
对于插入题目,输入sql语句会比较麻烦。我们可以针对ProblemDAO进行打包 。
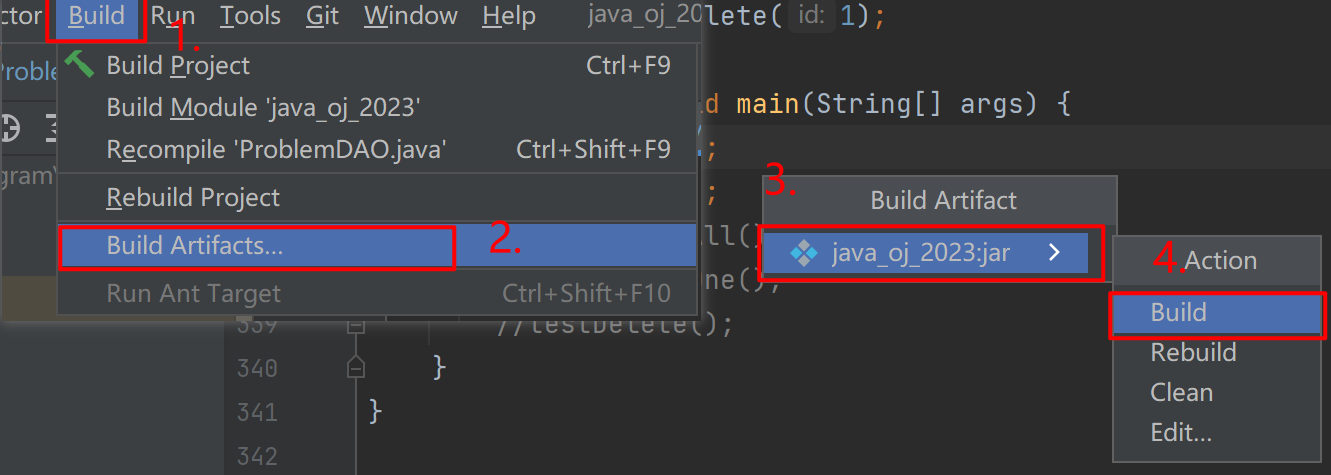
- 进行打成jar包:
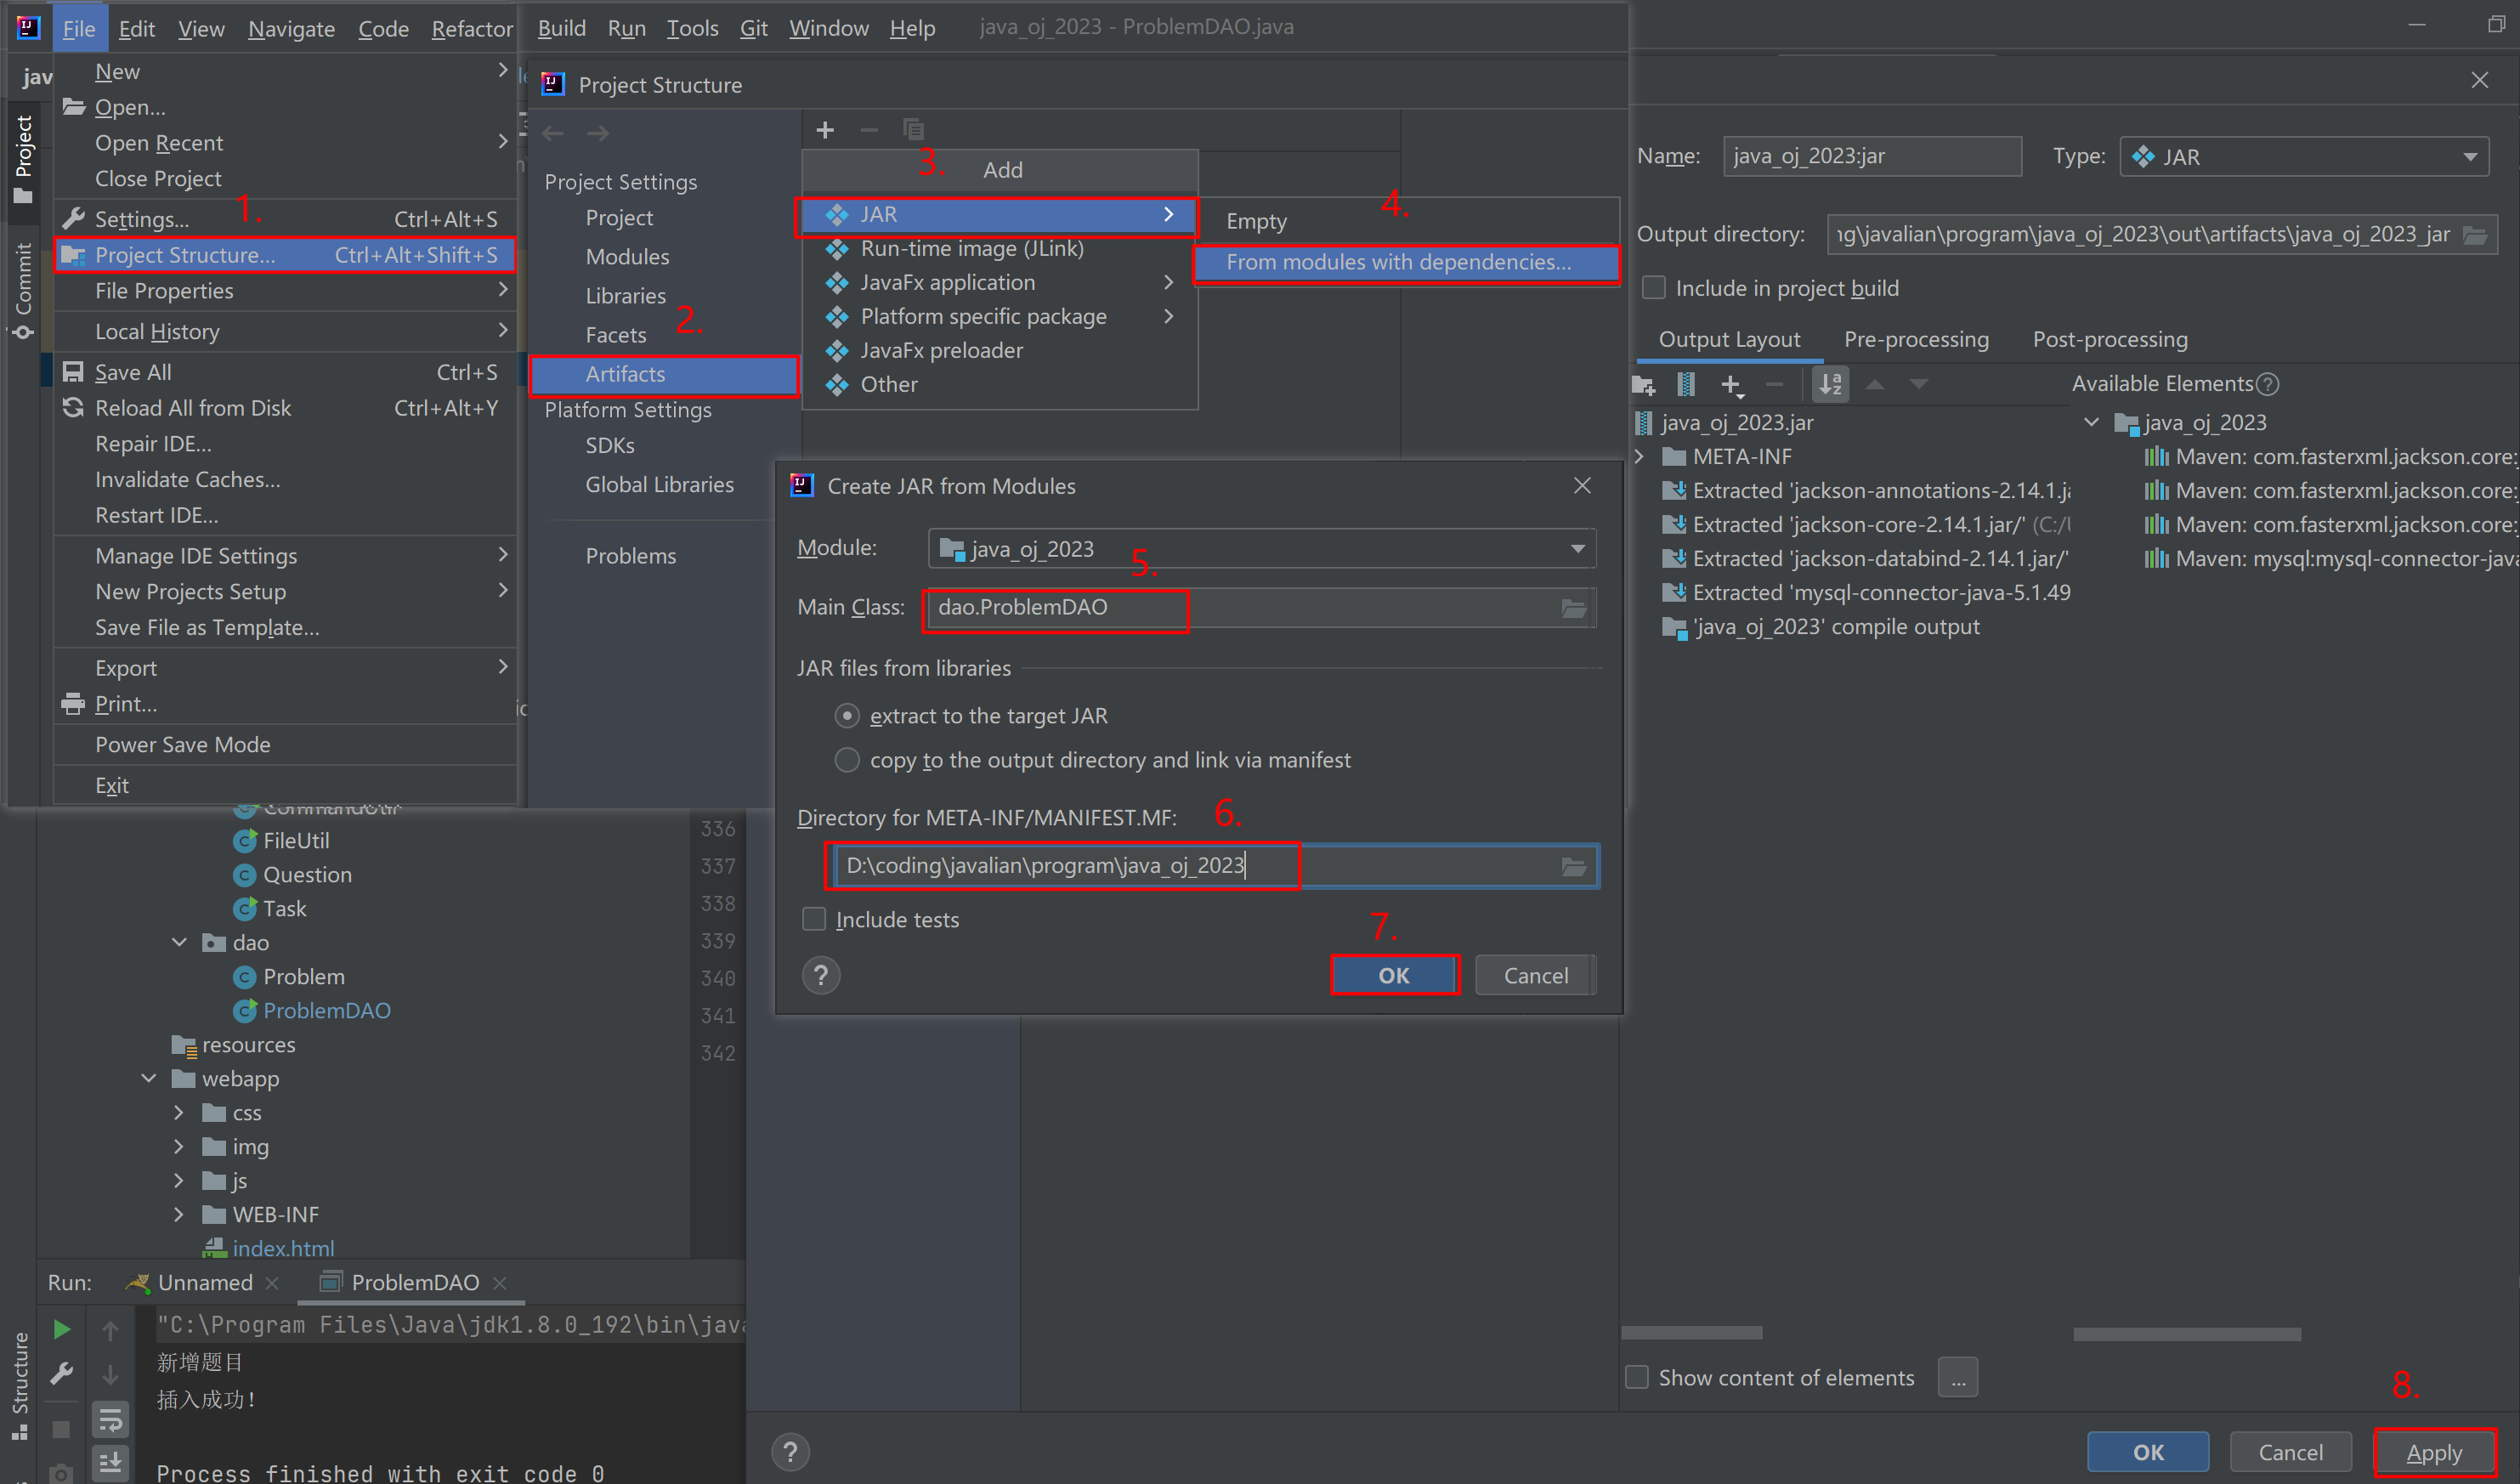
- 将jar包构造出来:


 1476
1476


 被折叠的 条评论
为什么被折叠?
被折叠的 条评论
为什么被折叠?
 到【灌水乐园】发言


