


小知识点:若想使用v-for和v-if两个条件,但又不想使用多余出来的标签,则可以在组件外面添加template标签来实现
 <template>
 	<!-- 使用template标签来使用v-if和v-for避免了多余的标签 -->
 	<template v-for="el in obj">
 		<div v-if="el.is=='true'">{{el.name}}</div>
 	</template>
 </template>
 <script>
 	export default {
 		data() {
 			return {
 				obj: {
 					one: {
 						name: "jack",
 						age: "22",
 						is: "flase"
 					},
 					two: {
 						name: "herry",
 						age: "24",
 						is: "true"
 					},
 					thr: {
 						name: "marray",
 						age: "23",
 						is: "true"
 					}
 				},

 			}
 		},

 	}
 </script>
一、动态组件(component)
含义:有的时候,我们希望页面中的某个地方,在不同组件之间进行动态切换,这时候除了条件渲染,还可以使用动态组件来实现
用法:它允许您根据条件动态选择要渲染的组件。通过使用动态组件,您可以基于不同的状态条件来切换不同的组件,从而实现更灵活的组件复用和组合。
is 属性的值必须是以字符串形式指定的已注册组件的名称。
而 :is 则会将表达式的值作为字符串解析,从而动态地渲染相应的组件。
例:
<!-- 父组件文件 -->
<template>

	<!-- 可以直接设置component中的is来获取组件,component里面is的值必须为字符串 -->
	<component is="box2"> </component>
	<!-- is为变量时是取到data里面的数据,将从data里面取得的值转换为字符串,从而动态的渲染相应的组件-->
	<component :is="box2"> 你好</component>
	<!-- 上面当is为变量时,则将is从data里面取到的值看作字符串解析,成为标签 -->
</template>
<script>
	import box2 from './components/box2.vue'
	export default {
		data() {
			return {
				box2: "你好",
			}
		},
		components: {
			box2
		}
	}
</script>


<!-- 子组件部分 -->
<template>
	<h2 >子组件中的数据</h2>
</template>
<script>
	 export default{	}
 </script>
<style>
</style>
效果图:当is为属性时:![]() 当is为变量时:
当is为变量时:![]()
二、缓存组件(keep-alive)
含义:与动态组件(component)一起使用,keep-alive嵌套着component。当包裹的组件(component)被切换隐藏时,并不会将组件销毁,而是将其缓存起来,下次再次使用时会从缓存中取出复用的过程,
也就是:在不加keep-alive标签时,每次切换的时候该组件都会执行生命周期函数的六个步骤,切换回来也会执行创建前后、挂载前后,父组件会执行更新前后的函数。上一个组件会执行销毁前后的函数
添加了keep-alive标签后,切换时便将该组件存储起来,只执行了(创建前后、挂载前后),没有执行销毁函数,当再次切回时,不执行创建前后、挂载前后的生命周期函数了,而是只执行了父组件的更新前后函数执行了
例:点击按钮,就切换到哪个组件,再切换回来则直接取出来使用即可
<!-- 父组件文件 -->
<template>
	<keep-alive>
	<component :is="aim"></component>
	</keep-alive>
	<button @click="fn('box1')">第一个页面</button>
	<button @click="fn('box2')">第二个页面</button>
</template>
<script>
	import box1 from './components/box1.vue'
	import box2 from './components/box2.vue'

	export default {
		data() {
			return {
				aim: "app",
			}
		},
		components: {
			box1,
			box2,

		},
		methods: {
			fn(n) {
				this.aim = n
				console.log("点击啦=====", this.aim)
			}

		},
		beforeCreate(){
			console.log("父组件的beforeCreate执行了")
		},
		created(){
			console.log("父组件的created执行了")
		},
		beforeMount(){
			console.log("父组件的beforeMount执行了")
		},
		mounted(){
			console.log("父组件的mounted执行了")
		},
		beforeUpdate(){
			console.log("父组件的beforeUpdate执行了")
		},
		updated(){
			console.log("父组件的updated执行了")
		},
		beforeUnmount(){
			console.log("父组件的beforeUnmount执行了")
		},
		unmounted(){
			console.log("父组件的unmounted执行了")
		}

	}
</script>


<!-- 子组件box1部分 -->
<template>
	<h2>第一个页面</h2>
</template>

<script>
	export default{
		beforeCreate(){
				console.log("box1的beforeCreate执行了")
			},
			created(){
				console.log("box1的created执行了")
			},
			beforeMount(){
				console.log("box1的beforeMount执行了")
			},
			mounted(){
				console.log("box1的mounted执行了")
			},
			beforeUpdate(){
				console.log("box1的beforeUpdate执行了")
			},
			updated(){
				console.log("box1的updated执行了")
			},
			beforeUnmount(){
				console.log("box1的beforeUnmount执行了")
			},
			unmounted(){
				console.log("box1的unmounted执行了")
			}


	}
</script>

<style>
</style>


<!-- 子组件box2部分 -->
<template>
	<h2 >第二个页面</h2>
</template>
<script>
	 export default{
		 beforeCreate(){
		 		console.log("box2的beforeCreate执行了")
		 	},
		 	created(){
		 		console.log("box2的created执行了")
		 	},
		 	beforeMount(){
		 		console.log("box2的beforeMount执行了")
		 	},
		 	mounted(){
		 		console.log("box2的mounted执行了")
		 	},
		 	beforeUpdate(){
		 		console.log("box2的beforeUpdate执行了")
		 	},
		 	updated(){
		 		console.log("box2的updated执行了")
		 	},
		 	beforeUnmount(){
		 		console.log("box2的beforeUnmount执行了")
		 	},
		 	unmounted(){
		 		console.log("box2的unmounted执行了")
		 	}

		 }

 </script>
<style>
</style>
1.选择性缓存组件(keep-alive添加include属性,传入的是加载过的组件)
例:如需要将box1组件进行缓存,则在box1组件内部添加name属性:![]()
在keep-alive标签中添加include属性,属性值为name属性的值,即可将box1的组件缓存起来,下次再切换box1,就不执行创建前后和挂载前后的生命周期函数了,父组件就执行更新前后这两个生命周期函数了
(1:存储一个组件
![]()
选择性存储多个组件和选择性不存储组件(exclude)
	<!-- 若想缓存多个组件,则可以写成下面的形式-->
	<!-- 第一种 -->
	<keep-alive :include="/box1|box2/"><component :is="aim"></component></keep-alive>

	<!-- 第二种 -->
	<keep-alive include="box1,box2"><component :is="aim"></component></keep-alive>

	<!-- 第三种:选择性不进行缓存:除了box1这个组件外,其他组件都进行缓存 -->
	<keep-alive exclude="box1"><component :is="aim"></component></keep-alive>
三、异步组件(definedAsnyComponent)
1.懒加载组件
含义:允许将应用程序的不同部分(如模块、组件或函数)按需加载,需要就加载,不需要就不加载,而不是在初始化时一次性加载所有内容。这种按需加载的方式可以提高应用程序的性能和用户体验。
步骤:1.需要从vue中引入defineAsyncComponent函数,这里使用了import来实现了按需加载
![]()
2.引入组件的另一种写法:在注册组件后面直接使用defineAsyncComponent函数进行引入即可,在前面就不用引入了

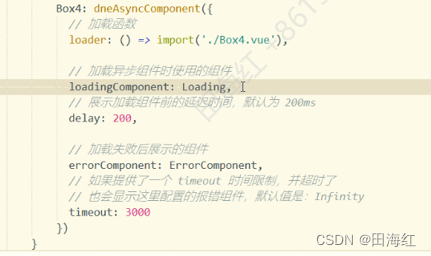
2.预渲染组件
含义:在构建过程中提前将组件的代码编译和渲染成为静态的html
例:引入box4,做下面代码中的操作


 1869
1869


 被折叠的 条评论
为什么被折叠?
被折叠的 条评论
为什么被折叠?
 到【灌水乐园】发言


