


后端:
- 环境搭建
-
- 父项目pom【重点在jwt工具】
<dependencyManagement>
  <dependencies>
    <!-- Spring Dependencies -->
    <dependency>
      <groupId>org.springframework.boot</groupId>
      <artifactId>spring-boot-dependencies</artifactId>
      <version>${spring-boot.version}</version>
      <type>pom</type>
      <scope>import</scope>
    </dependency>

    <dependency>
      <groupId>org.springframework.cloud</groupId>
      <artifactId>spring-cloud-dependencies</artifactId>
      <version>${spring.cloud.version}</version>
      <type>pom</type>
      <scope>import</scope>
    </dependency>

    <dependency>
      <groupId>com.alibaba.cloud</groupId>
      <artifactId>spring-cloud-alibaba-dependencies</artifactId>
      <version>${spring.cloud.alibaba.version}</version>
      <type>pom</type>
      <scope>import</scope>
    </dependency>

    <!-- mybatis-plus -->
    <dependency>
      <groupId>com.baomidou</groupId>
      <artifactId>mybatis-plus-boot-starter</artifactId>
      <version>${mybatis.plus.starter.version}</version>
    </dependency>
    <dependency>
      <groupId>com.baomidou</groupId>
      <artifactId>mybatis-plus-annotation</artifactId>
      <version>${mybatis.plus.starter.version}</version>
    </dependency>

    <!-- Druid连接池 -->
    <dependency>
      <groupId>com.alibaba</groupId>
      <artifactId>druid-spring-boot-starter</artifactId>
      <version>${durid.starter.version}</version>
    </dependency>

    <!--swagger2-->
    <dependency>
      <groupId>io.springfox</groupId>
      <artifactId>springfox-swagger2</artifactId>
      <version>${swagger.version}</version>
    </dependency>
    <dependency>
      <groupId>io.springfox</groupId>
      <artifactId>springfox-swagger-ui</artifactId>
      <version>${swagger.version}</version>
    </dependency>

    <!--jwt-->
    <!--JavaBean工具类,用于JavaBean数据封装-->
    <dependency>
      <groupId>commons-beanutils</groupId>
      <artifactId>commons-beanutils</artifactId>
      <version>${beanutils.version}</version>
    </dependency>

    <!--jwt工具-->
    <dependency>
      <groupId>io.jsonwebtoken</groupId>
      <artifactId>jjwt</artifactId>
      <version>${jwt.jjwt.version}</version>
    </dependency>

    <!--joda 时间工具类 -->
    <dependency>
      <groupId>joda-time</groupId>
      <artifactId>joda-time</artifactId>
      <version>${jwt.joda.version}</version>
    </dependency>

</dependencyManagement>-
- 网关pom
 <dependencies>
        <!-- 网关 -->
        <dependency>
            <groupId>org.springframework.cloud</groupId>
            <artifactId>spring-cloud-starter-gateway</artifactId>
        </dependency>

        <!-- nacos 服务发现 -->
        <dependency>
            <groupId>com.alibaba.cloud</groupId>
            <artifactId>spring-cloud-starter-alibaba-nacos-discovery</artifactId>
        </dependency>

        <!--  测试  -->
        <dependency>
            <groupId>org.springframework.boot</groupId>
            <artifactId>spring-boot-starter-test</artifactId>
        </dependency>

        <!--jwt-->
        <!--JavaBean工具类,用于JavaBean数据封装-->
        <dependency>
            <groupId>commons-beanutils</groupId>
            <artifactId>commons-beanutils</artifactId>
        </dependency>
        <!--jwt工具-->
        <dependency>
            <groupId>io.jsonwebtoken</groupId>
            <artifactId>jjwt</artifactId>
        </dependency>
        <!--joda 时间工具类 -->
        <dependency>
            <groupId>joda-time</groupId>
            <artifactId>joda-time</artifactId>
        </dependency>

        <!--自定义项目-->
        <dependency>
            <groupId>com.czxy</groupId>
            <artifactId>nacos_student_doamin</artifactId>
            <version>1.0-SNAPSHOT</version>
        </dependency>
</dependencies>- 添加JWT和RSA工具类

JwtUtils:
package com.czxy.utils;

import io.jsonwebtoken.Claims;
import io.jsonwebtoken.JwtBuilder;
import io.jsonwebtoken.Jwts;
import io.jsonwebtoken.SignatureAlgorithm;
import org.apache.commons.beanutils.BeanUtils;
import org.joda.time.DateTime;

import java.beans.BeanInfo;
import java.beans.IntrospectionException;
import java.beans.Introspector;
import java.beans.PropertyDescriptor;
import java.lang.reflect.InvocationTargetException;
import java.security.PrivateKey;
import java.security.PublicKey;

public class JwtUtils {
    /**
     *  私钥加密token
     * @param data 需要加密的数据(载荷内容)
     * @param expireMinutes 过期时间,单位:分钟
     * @param privateKey 私钥
     * @return
     */
    public static String generateToken(Object data, int expireMinutes, PrivateKey privateKey)  {
        try {
            //1 获得jwt构建对象
            JwtBuilder jwtBuilder = Jwts.builder();
            //2 设置数据
            if( data == null ) {
                throw new RuntimeException("数据不能为空");
            }
            BeanInfo beanInfo = Introspector.getBeanInfo(data.getClass());
            PropertyDescriptor[] propertyDescriptors = beanInfo.getPropertyDescriptors();
            for (PropertyDescriptor propertyDescriptor : propertyDescriptors) {
                // 获得属性名
                String name = propertyDescriptor.getName();
                // 获得属性值
                Object value = propertyDescriptor.getReadMethod().invoke(data);
                if(value != null) {
                    jwtBuilder.claim(name,value);
                }
            }
            //3 设置过期时间
            jwtBuilder.setExpiration(DateTime.now().plusMinutes(expireMinutes).toDate());
            //4 设置加密
            jwtBuilder.signWith(SignatureAlgorithm.RS256, privateKey);
            //5 构建
            return jwtBuilder.compact();
        } catch (Exception e) {
            throw new RuntimeException(e);
        }
    }

    /**
     * 通过公钥解析token
     * @param token 需要解析的数据
     * @param publicKey 公钥
     * @param beanClass 封装的JavaBean
     * @return
     * @throws Exception
     */
    public static <T> T  getObjectFromToken(String token, PublicKey publicKey,Class<T> beanClass) throws Exception {
        //1 获得解析后内容
        Claims body = Jwts.parser().setSigningKey(publicKey).parseClaimsJws(token).getBody();
        //2 将内容封装到对象JavaBean
        T bean = beanClass.newInstance();
        BeanInfo beanInfo = Introspector.getBeanInfo(beanClass);
        PropertyDescriptor[] propertyDescriptors = beanInfo.getPropertyDescriptors();
        for (PropertyDescriptor propertyDescriptor : propertyDescriptors) {
            // 获得属性名
            String name = propertyDescriptor.getName();
            // 通过属性名,获得对应解析的数据
            Object value = body.get(name);
            if(value != null) {
                // 将获得的数据封装到对应的JavaBean中
                BeanUtils.setProperty(bean,name,value);
            }
        }
        return bean;
    }
}
RsaUtils:
package com.czxy.utils;

import java.io.File;
import java.io.IOException;
import java.nio.file.Files;
import java.security.*;
import java.security.spec.PKCS8EncodedKeySpec;
import java.security.spec.X509EncodedKeySpec;

public class RsaUtils {

    /**
     * 从文件中读取公钥
     *
     * @param filename 公钥保存路径,相对于classpath
     * @return 公钥对象
     * @throws Exception
     */
    public static PublicKey getPublicKey(String filename) throws Exception {
        byte[] bytes = readFile(filename);
        return getPublicKey(bytes);
    }

    /**
     * 从文件中读取密钥
     *
     * @param filename 私钥保存路径,相对于classpath
     * @return 私钥对象
     * @throws Exception
     */
    public static PrivateKey getPrivateKey(String filename) throws Exception {
        byte[] bytes = readFile(filename);
        return getPrivateKey(bytes);
    }

    /**
     * 获取公钥
     *
     * @param bytes 公钥的字节形式
     * @return
     * @throws Exception
     */
    public static PublicKey getPublicKey(byte[] bytes) throws Exception {
        X509EncodedKeySpec spec = new X509EncodedKeySpec(bytes);
        KeyFactory factory = KeyFactory.getInstance("RSA");
        return factory.generatePublic(spec);
    }

    /**
     * 获取密钥
     *
     * @param bytes 私钥的字节形式
     * @return
     * @throws Exception
     */
    public static PrivateKey getPrivateKey(byte[] bytes) throws Exception {
        PKCS8EncodedKeySpec spec = new PKCS8EncodedKeySpec(bytes);
        KeyFactory factory = KeyFactory.getInstance("RSA");
        return factory.generatePrivate(spec);
    }

    /**
     * 根据密文,生存rsa公钥和私钥,并写入指定文件
     *
     * @param publicKeyFilename  公钥文件路径
     * @param privateKeyFilename 私钥文件路径
     * @param secret             生成密钥的密文
     * @throws Exception
     */
    public static void generateKey(String publicKeyFilename, String privateKeyFilename, String secret) throws Exception {
        KeyPairGenerator keyPairGenerator = KeyPairGenerator.getInstance("RSA");
        SecureRandom secureRandom = new SecureRandom(secret.getBytes());
        keyPairGenerator.initialize(1024, secureRandom);
        KeyPair keyPair = keyPairGenerator.genKeyPair();
        // 获取公钥并写出
        byte[] publicKeyBytes = keyPair.getPublic().getEncoded();
        writeFile(publicKeyFilename, publicKeyBytes);
        // 获取私钥并写出
        byte[] privateKeyBytes = keyPair.getPrivate().getEncoded();
        writeFile(privateKeyFilename, privateKeyBytes);
    }

    private static byte[] readFile(String fileName) throws Exception {
        return Files.readAllBytes(new File(fileName).toPath());
    }

    private static void writeFile(String destPath, byte[] bytes) throws IOException {
        File dest = new File(destPath);

        //创建父文件夹
        if(!dest.getParentFile().exists()){
            dest.getParentFile().mkdirs();
        }
        //创建需要的文件
        if (!dest.exists()) {
            dest.createNewFile();
        }

        Files.write(dest.toPath(), bytes);
    }


}
- 使用Rsa工具类【生成公钥和私钥、获取公钥和私钥】
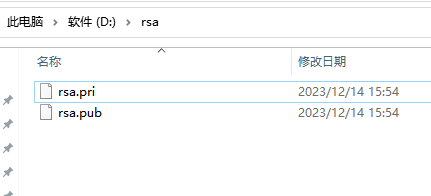
生成公钥和私钥
    private static final String pubKeyPath = "D:\\rsa\\rsa.pub";

    private static final String priKeyPath = "D:\\rsa\\rsa.pri";

    /*
    *生成公钥、私钥
    * * @throws Exception */
    @Test
    public void testRsaGenerate() throws Exception {
        RsaUtils.generateKey(pubKeyPath,priKeyPath,"1234");
    }
获取公钥和私钥
/*
* 测试
* * @throws Exception*/
@Test
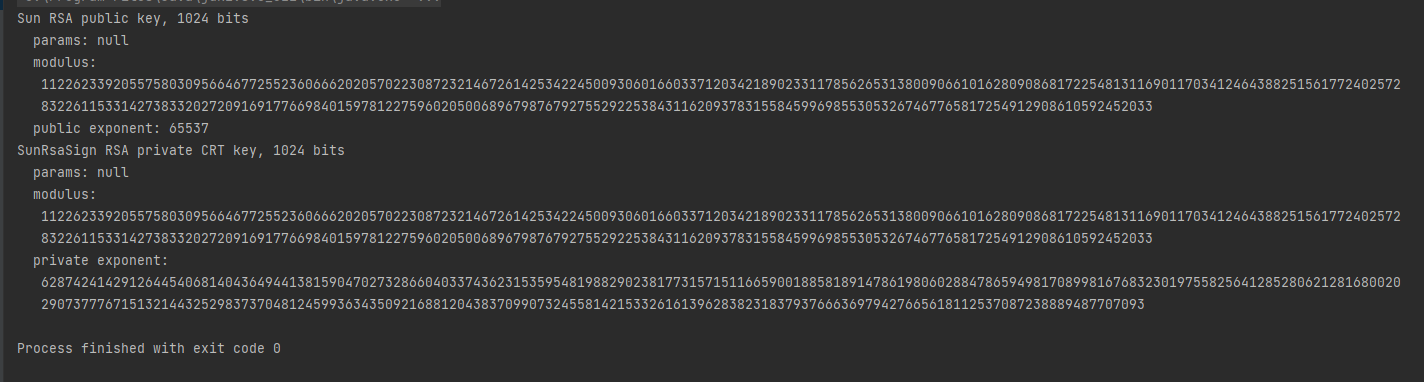
public void testGet() throws Exception {
PublicKey publicKey = RsaUtils.getPublicKey(pubKeyPath);
System.out.println(publicKey);
PrivateKey privateKey = RsaUtils.getPrivateKey(priKeyPath);
System.out.println(privateKey);
}
}
- 使用JWT工具类【生成token、解析token】
数据库:
CREATE TABLE `tb_user` (
  `u_id` VARCHAR(32) PRIMARY KEY NOT NULL COMMENT '用户编号',
  `user_name` VARCHAR(50) UNIQUE DEFAULT NULL COMMENT '用户名',
  `password` VARCHAR(32) DEFAULT NULL COMMENT '密码',
  `gender` BIT(1) DEFAULT NULL COMMENT '性别,1表示男,0表示女',
  `image` VARCHAR(300) DEFAULT NULL COMMENT '头像图片'
);

INSERT  INTO `tb_user`(`u_id`,`user_name`,`password`,`gender`,`image`) VALUES ('u001','jack','1234',1,'https://wpimg.wallstcn.com/f778738c-e4f8-4870-b634-56703b4acafe.gif?imageView2/1/w/80/h/80');
INSERT  INTO `tb_user`(`u_id`,`user_name`,`password`,`gender`,`image`) VALUES ('u002','rose','1234',0,'https://wpimg.wallstcn.com/f778738c-e4f8-4870-b634-56703b4acafe.gif?imageView2/1/w/80/h/80');
INSERT  INTO `tb_user`(`u_id`,`user_name`,`password`,`gender`,`image`) VALUES ('u003','tom','1234',1,'https://wpimg.wallstcn.com/f778738c-e4f8-4870-b634-56703b4acafe.gif?imageView2/1/w/80/h/80');
创建User类:
@Data
@TableName(value = "tb_user")
public class User {
    @TableId(value = "u_id")
    private String uid;

    @TableField(value = "user_name")
    private String username;

    private String password;

    private Boolean gender;

    private String image;
}
生成token:
/**
     * 生成token
     * @throws Exception
     * */
@Test
public void testCreateToken() throws Exception {

User user = new User();
user.setPassword("1234");
user.setUsername("xxx");

String token = JwtUtils.generateToken(user,30, RsaUtils.getPrivateKey(priKeyPath));

System.out.println(token);
}

解析token:
    /**
     * 解析token
     * @throws Exception
     * */
    @Test
    public void testParseToken() throws Exception {
        String token = "eyJhbGciOiJSUzI1NiJ9.eyJjbGFzcyI6ImNvbS5jenh5LmRvbWFpbi5Vc2VyIiwicGFzc3dvcmQiOiIxMjM0IiwidXNlcm5hbWUiOiJ4eHgiLCJleHAiOjE3MDI1NjE4MTR9.XRIiTX1gi9RD2JiRLDSsnpTmPH9VbjfI9TKkL4_UBnWfBmzGZsVUVhpkVPxNJ3UTUyyFkpQ0CRgi0SYuwiUWM08TQhvMdhDfPpV_VRSjOrsgoVMywOT-8QU61Q-nlF03nXYwvbf_keJ8fGBHfadBVowNvGmB0dGWstJsXefVwOQ";
        User user = JwtUtils.getObjectFromToken(token, RsaUtils.getPublicKey(pubKeyPath), User.class);
        System.out.println(user);
    }
上方都是在测试JWT和RSA工具类
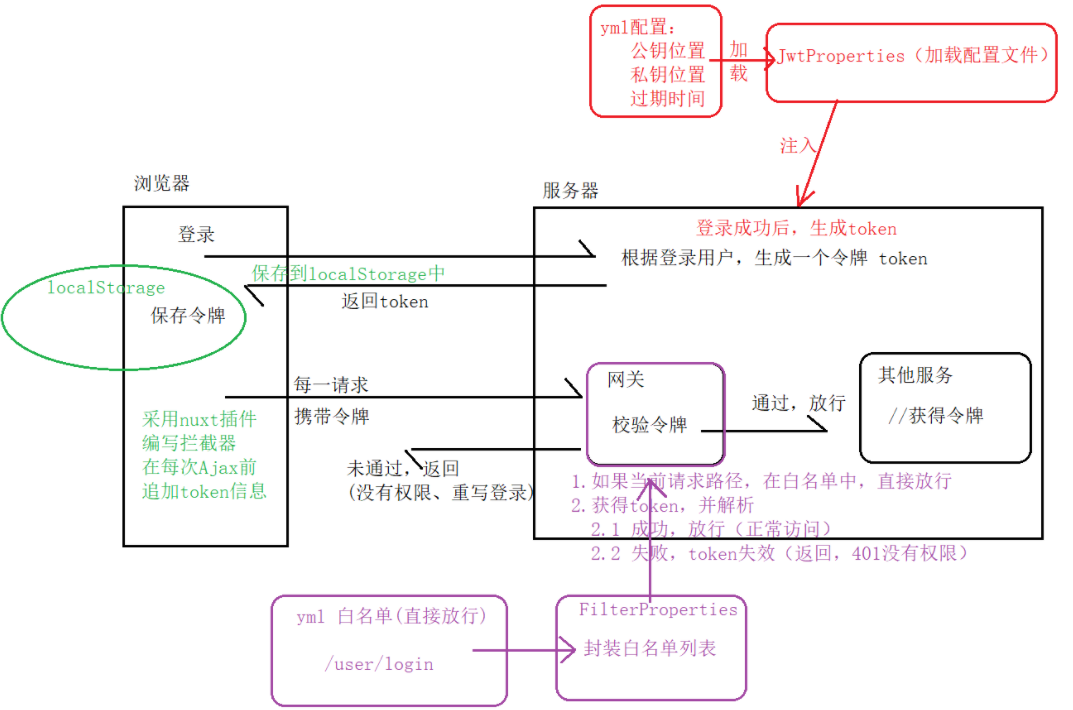
整合登录:【前后端】***
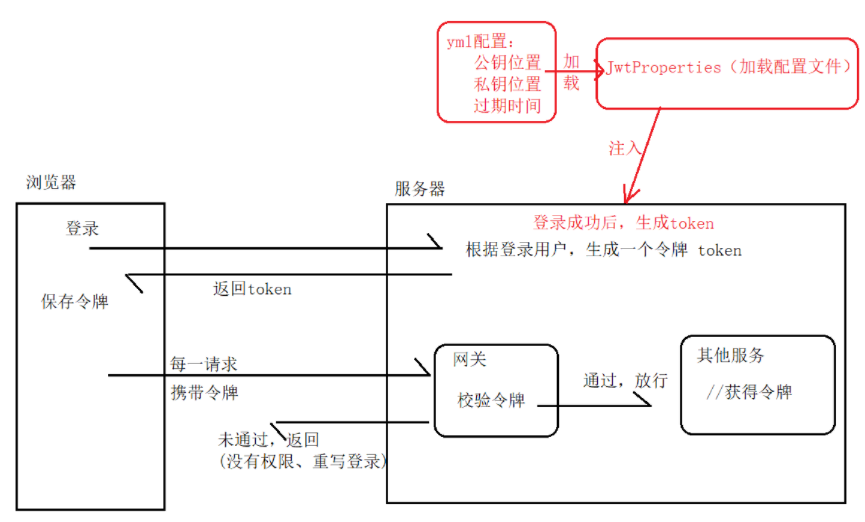
后端登录服务:生成token
- 用户服务JWT环境
<dependencies>
        <!--web起步依赖-->
        <dependency>
            <groupId>org.springframework.boot</groupId>
            <artifactId>spring-boot-starter-web</artifactId>
        </dependency>

        <!-- nacos 服务发现 -->
        <dependency>
            <groupId>com.alibaba.cloud</groupId>
            <artifactId>spring-cloud-starter-alibaba-nacos-discovery</artifactId>
        </dependency>

        <!--swagger2-->
        <dependency>
            <groupId>io.springfox</groupId>
            <artifactId>springfox-swagger2</artifactId>
        </dependency>
        <dependency>
            <groupId>io.springfox</groupId>
            <artifactId>springfox-swagger-ui</artifactId>
        </dependency>
        <!-- feign 远程调用 -->
        <dependency>
            <groupId>org.springframework.cloud</groupId>
            <artifactId>spring-cloud-starter-openfeign</artifactId>
        </dependency>

        <!--测试-->
        <dependency>
            <groupId>org.springframework.boot</groupId>
            <artifactId>spring-boot-starter-test</artifactId>
        </dependency>

        <!-- mybatis plus-->
        <dependency>
            <groupId>com.baomidou</groupId>
            <artifactId>mybatis-plus-boot-starter</artifactId>
        </dependency>
        <!-- mysql驱动 -->
        <dependency>
            <groupId>mysql</groupId>
            <artifactId>mysql-connector-java</artifactId>
        </dependency>

        <!--jwt-->
        <!--JavaBean工具类,用于JavaBean数据封装-->
        <dependency>
            <groupId>commons-beanutils</groupId>
            <artifactId>commons-beanutils</artifactId>
        </dependency>
        <!--jwt工具-->
        <dependency>
            <groupId>io.jsonwebtoken</groupId>
            <artifactId>jjwt</artifactId>
        </dependency>
        <!--joda 时间工具类 -->
        <dependency>
            <groupId>joda-time</groupId>
            <artifactId>joda-time</artifactId>
        </dependency>
</dependencies>- 粘贴上方工具类
- 配置yml文件
#自定义内容
sc:
  jwt:
    secret: sc@Login(Auth}*^31)&czxy% # 登录校验的密钥(自定义内容)
    pubKeyPath: D:/rsa/rsa.pub # 公钥地址
    priKeyPath: D:/rsa/rsa.pri # 私钥地址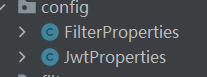
expire: 360 # 过期时间,单位分钟- 创建JwtProperties配置类
package com.czxy.config;

import com.czxy.utils.RsaUtils;
import lombok.Data;
import org.springframework.boot.context.properties.ConfigurationProperties;
import org.springframework.stereotype.Component;

import javax.annotation.PostConstruct;
import java.io.File;
import java.security.PrivateKey;
import java.security.PublicKey;

@Data
@ConfigurationProperties(prefix = "sc.jwt")
@Component
public class JwtProperties {
    private String secret; // 密钥

    private String pubKeyPath;// 公钥

    private String priKeyPath;// 私钥

    private int expire;// token过期时间

    private PublicKey publicKey; // 公钥

    private PrivateKey privateKey; // 私钥

    @PostConstruct			//当前类加载到spring容器时,执行(初始化操作)
    public void init(){
        try {
            File pubFile = new File(this.pubKeyPath);
            File priFile = new File(this.priKeyPath);
            //如果公钥或私钥文件不存在,则自动生成公钥私钥文件
            if( !pubFile.exists() || !priFile.exists()){
                RsaUtils.generateKey( this.pubKeyPath ,this.priKeyPath , this.secret);
            }
            //根据公钥或私钥路径,生成对应的对象
            this.publicKey = RsaUtils.getPublicKey( this.pubKeyPath );
            this.privateKey = RsaUtils.getPrivateKey( this.priKeyPath );
        } catch (Exception e) {
            e.printStackTrace();
        }
    }


}
- 在controller中生成token
package com.czxy.controller;

import com.baomidou.mybatisplus.core.conditions.query.QueryWrapper;
import com.czxy.config.JwtProperties;
import com.czxy.domain.User;
import com.czxy.service.UserService;
import com.czxy.utils.JwtUtils;
import com.czxy.vo.BaseResult;
import org.springframework.web.bind.annotation.PostMapping;
import org.springframework.web.bind.annotation.RequestBody;
import org.springframework.web.bind.annotation.RequestMapping;
import org.springframework.web.bind.annotation.RestController;

import javax.annotation.Resource;

@RestController
@RequestMapping("/user")
public class UserController {
    @Resource
    private UserService userService;

    @Resource
    private JwtProperties jwtProperties;

    /*
    * 登录
    * */
    @PostMapping("/login")
    public BaseResult<User> login(@RequestBody User user){

        // 1. 登录
        User login = userService.login(user);

        // 2. 处理结果
        if (login!= null){

            // 生成token
            String token = JwtUtils.generateToken(user, jwtProperties.getExpire(), jwtProperties.getPrivateKey());

            return BaseResult.ok("登陆成功").append("login", login).append("token", token);
        }else {
            return BaseResult.error("用户名或密码错误");
        }
    }

    /*
    * 用户校验
    * */
    @PostMapping("/checkUsername")
    public BaseResult<String> checkUsername(@RequestBody User user){
        // 1. 校验
        QueryWrapper<User> queryWrapper = new QueryWrapper<>();
        queryWrapper.eq("user_name", user.getUsername());

        User check = userService.getOne(queryWrapper);
        // 2. 处理结果
        if(check != null) {
            return BaseResult.ok("允许登录");
        }else  {
            return BaseResult.error("用户名不存在!");
        }
    }
}
{ "code": 20000, "message": "登录成功", "data": null, "other": { "login": { "uid": "u001", "username": "jack", "password": "1234", "gender": true, "image": "https://wpimg.wallstcn.com/f778738c-e4f8-4870-b634-56703b4acafe.gif?imageView2/1/w/80/h/80" }, "token": "eyJhbGciOiJSUzI1NiJ9.eyJjbGFzcyI6ImNvbS5jenh5LmRvbWFpbi5Vc2VyIiwicGFzc3dvcmQiOiIxMjM0IiwidXNlcm5hbWUiOiJqYWNrIiwiZXhwIjoxNzAyNTY2NTM5fQ.JNANysq-NGKnn-NGbV7i7PXF4OPnDamgf-30j2tsnFIVDT_CkLwJL006o96ic1rFBHaTK-9Y7iWlOt0-9oBvDeBnOrwEErT6GdkKQZs3NxDMUs9h-nS__jaDC11JEtbxPE8H204ggIRZjYHxST-K_cfQ-xLKW2zuvcT3qXgUYgc" }
前端保存/携带token
- 保存:登录成功后,保存到localStorage中
- 携带:每次Ajax前,都追加token。需要对axios进行增强,底层需要编写axios的请求拦截器。
-
- 最终采用nuxt的插件对axios进行增强
- 参考文献:
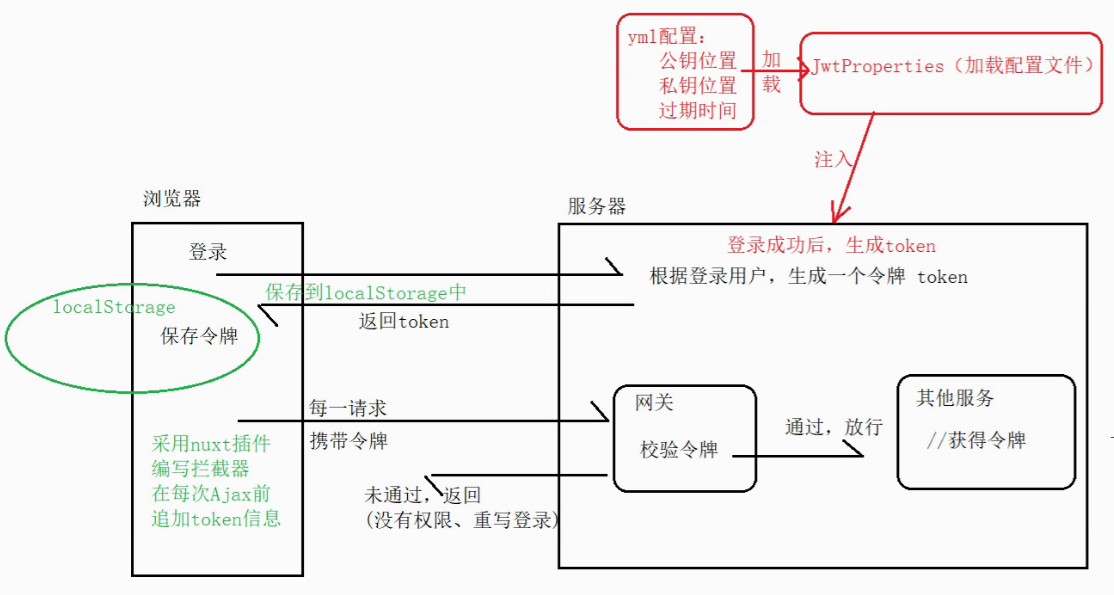
- 浏览器保存token
在登录方法中添加一段代码
 // 将token保存到浏览器端
localStorage.setItem("token", (login.other.token)
登录方法完整版:
// 登录
  login() {
    this.$refs["ruleFrom"].validate(async (valid) => {
      if (valid) {
        // 校验通过start
        let { data: login } = await this.$axios.post(`/user-service/user/login`, this.user)

        if (login.code == 20000) {
          this.$message.success(login.message)

          // 将登录用户信息,保存到浏览器端(关闭浏览器后仍会保存)
          localStorage.setItem("login", JSON.stringify(login.other.login))

          // 将token保存到浏览器端
          localStorage.setItem("token", login.other.token)
          this.$router.push("/")   // 路由跳转到首页

          // location.href = "/"  // 支持服务端渲染
        } else {
          this.$message.error(login.message)
        }
        // 校验通过end
      } else {
        // 校验失败
        console.log('error submit!!');
        return false;
      }
    });
}- 在nuxt.config.js中配置【nuxt插件】
export default {
  plugins: [
    { src: '~/plugins/both-sides.js' },     //  客户端 或 服务器端 运行
    { src: '~/plugins/client-only.js', mode: 'client' },  //  客户端运行
    { src: '~/plugins/server-only.js', mode: 'server' }	  //  服务端运行
  ]
}
这里只需要在客户端运行就可,修改代码如下:
  plugins: [
    { src: '~/plugins/axios.js', mode: 'client' },
],- 在plugins文件夹中创建axios.js文件

- 实现Ajax请求前获取token
export default function ({ $axios, redirect }) {
  $axios.onRequest(config => {
    console.log('Making request to ' + config.url)
    // 获取token
    let token = localStorage.getItem("token")

    // 携带token
    $axios.setToken(token)
  })

  $axios.onError(error => {
    const code = parseInt(error.response && error.response.status)
    if (code === 400) {
      redirect('/400')
    }
  })
}

网关校验token
- 检查环境 网关pom【jwt】已配置
<dependencies>
  <!-- 网关 -->
  <dependency>
    <groupId>org.springframework.cloud</groupId>
    <artifactId>spring-cloud-starter-gateway</artifactId>
  </dependency>

  <!-- nacos 服务发现 -->
  <dependency>
    <groupId>com.alibaba.cloud</groupId>
    <artifactId>spring-cloud-starter-alibaba-nacos-discovery</artifactId>
  </dependency>

  <!--  测试  -->
  <dependency>
    <groupId>org.springframework.boot</groupId>
    <artifactId>spring-boot-starter-test</artifactId>
  </dependency>

  <!--jwt-->
  <!--JavaBean工具类,用于JavaBean数据封装-->
  <dependency>
    <groupId>commons-beanutils</groupId>
    <artifactId>commons-beanutils</artifactId>
  </dependency>
  <!--jwt工具-->
  <dependency>
    <groupId>io.jsonwebtoken</groupId>
    <artifactId>jjwt</artifactId>
  </dependency>
  <!--joda 时间工具类 -->
  <dependency>
    <groupId>joda-time</groupId>
    <artifactId>joda-time</artifactId>
  </dependency>

  <!--自定义项目-->
  <!-- <dependency>
    <groupId>com.czxy</groupId>
    <artifactId>nacos_student_doamin</artifactId>
    <version>1.0-SNAPSHOT</version>
  </dependency> -->
</dependencies>- 配置yml(白名单)
#自定义内容
sc:
  jwt:
    secret: sc@Login(Auth}*^31)&czxy% # 登录校验的密钥(自定义内容)
    pubKeyPath: D:/rsa/rsa.pub # 公钥地址
    priKeyPath: D:/rsa/rsa.pri # 私钥地址
    expire: 360 # 过期时间,单位分钟
  filter:
    allowPaths:
      - /user/login
      - /user/checkUsername
      - /user/register
- /classes- 配置config工具类
JwtProperties类上方已有
FilterProperties:【获得白名单】
package com.czxy.config;

import lombok.Data;
import org.springframework.boot.context.properties.ConfigurationProperties;

import java.util.List;

@Data
@ConfigurationProperties(prefix = "sc.filter")
public class FilterProperties {
    private List<String> allowPaths;
}- 网关过滤器
拷贝
package com.czxy.filter;

import com.czxy.config.FilterProperties;
import com.czxy.config.JwtProperties;
import com.czxy.domain.User;
import com.czxy.utils.JwtUtils;
import org.springframework.boot.context.properties.EnableConfigurationProperties;
import org.springframework.cloud.gateway.filter.GatewayFilterChain;
import org.springframework.cloud.gateway.filter.GlobalFilter;
import org.springframework.core.Ordered;
import org.springframework.core.io.buffer.DataBuffer;
import org.springframework.http.HttpStatus;
import org.springframework.http.server.reactive.ServerHttpResponse;
import org.springframework.stereotype.Component;
import org.springframework.web.server.ServerWebExchange;
import reactor.core.publisher.Flux;
import reactor.core.publisher.Mono;

import javax.annotation.Resource;
import java.nio.charset.StandardCharsets;
import java.util.List;

@Component
@EnableConfigurationProperties({FilterProperties.class})
public class LoginFilter implements GlobalFilter, Ordered {

    @Resource
    private FilterProperties filterProperties;

    @Resource
    private JwtProperties jwtProperties;

    @Override
    public Mono<Void> filter(ServerWebExchange exchange, GatewayFilterChain chain) {
        // 1. 获取请求路径
        String path = exchange.getRequest().getURI().getPath();;
        System.out.println("请求路径:" + path);

        // 2. 白名单
        List<String> allowPaths = filterProperties.getAllowPaths();

        for(String allowPath : allowPaths) {
           // 请求路径中包含放行的路径
            if(path.contains(allowPath)) {
                return chain.filter(exchange);  // 放行
            }
        }

        // 3. 校验token
        // 3.1 获取token  Authorization
        String token = exchange.getRequest().getHeaders().getFirst("Authorization");
        System.out.println(token);
        try {
            // 3.2 校验token,解析成功
            JwtUtils.getObjectFromToken(token,jwtProperties.getPublicKey(), User.class);

            return chain.filter(exchange);  // 放行
        }catch (Exception e) {
            // 3.3 处理失败结果
            ServerHttpResponse response = exchange.getResponse();  // 获取响应对象
            response.setStatusCode(HttpStatus.UNAUTHORIZED);    // 设置状态码
            response.getHeaders().add("Content-Type","application/json;charset=UTF-8");  // 设置响应头
            DataBuffer wrap = response.bufferFactory().wrap("没有权限".getBytes(StandardCharsets.UTF_8));  // 包装响应数据
            return exchange.getResponse().writeWith(Flux.just(wrap));  // 返回响应数据
        }
    }

    @Override
    public int getOrder() {
        return 0;
    }
}
- 校验失败前端处理
// 导入element-ui的提示框
import { MessageBox, Message } from 'element-ui'

  $axios.onError(error => {
    // 获取状态码
    const code = parseInt(error.response && error.response.status)

    // 如果状态码为400 ,跳转到“/400”页面
    if (code === 400) {
      redirect('/400')
    }
    // 如果状态码为401,提示没有权限,并跳转到登录页
    if (code === 401) {
      // 删除无效的token
      localStorage.removeItem("token")

      // 提示
      MessageBox.confirm(error.response.data, '提示', {
        confirmButtonText: '确定',
        cancelButtonText: '取消',
        type: 'warning'
      }).then(() => {
        // 确定
        redirect("/user/login")
      }).catch(() => {
        Message.warning("已取消")
      });
    }
  })
}


 906
906


 被折叠的 条评论
为什么被折叠?
被折叠的 条评论
为什么被折叠?
 到【灌水乐园】发言


