


Vue-CLI
一 Vue-CLI 项目搭建
vue的脚手架:快速帮我们创建出vue的项目
1.安装nodejs
官网:https://nodejs.org/zh-cn/

2.安装cnpm
npm install -g cnpm --registry=https://registry.npm.taobao.org

3.安装vue-cli ,通过脚手架创建vue项目
cnpm install -g @vue/cli
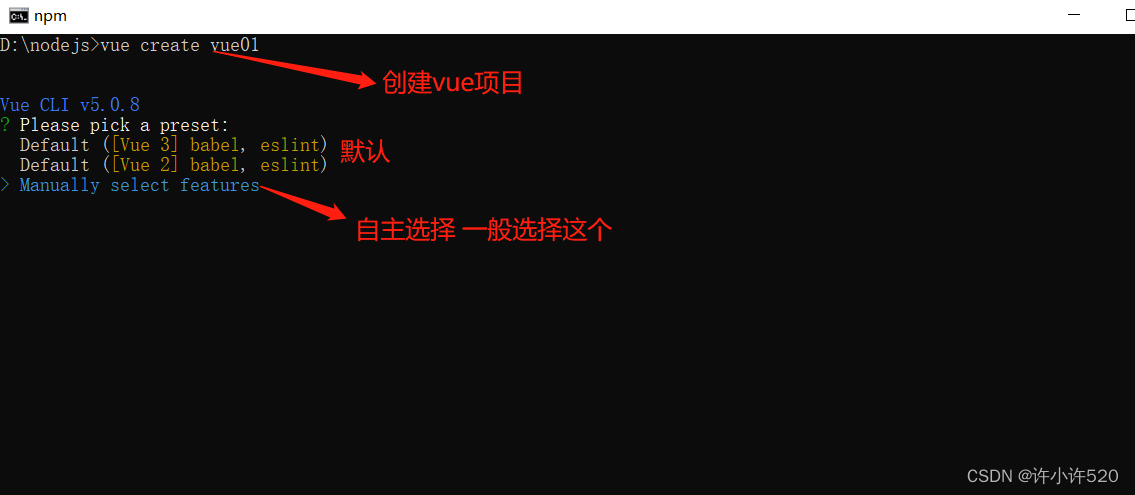
二 项目的创建与运行
vue create vue01
-
首先在终端切换到nodejs的所在位置,输入命令
-
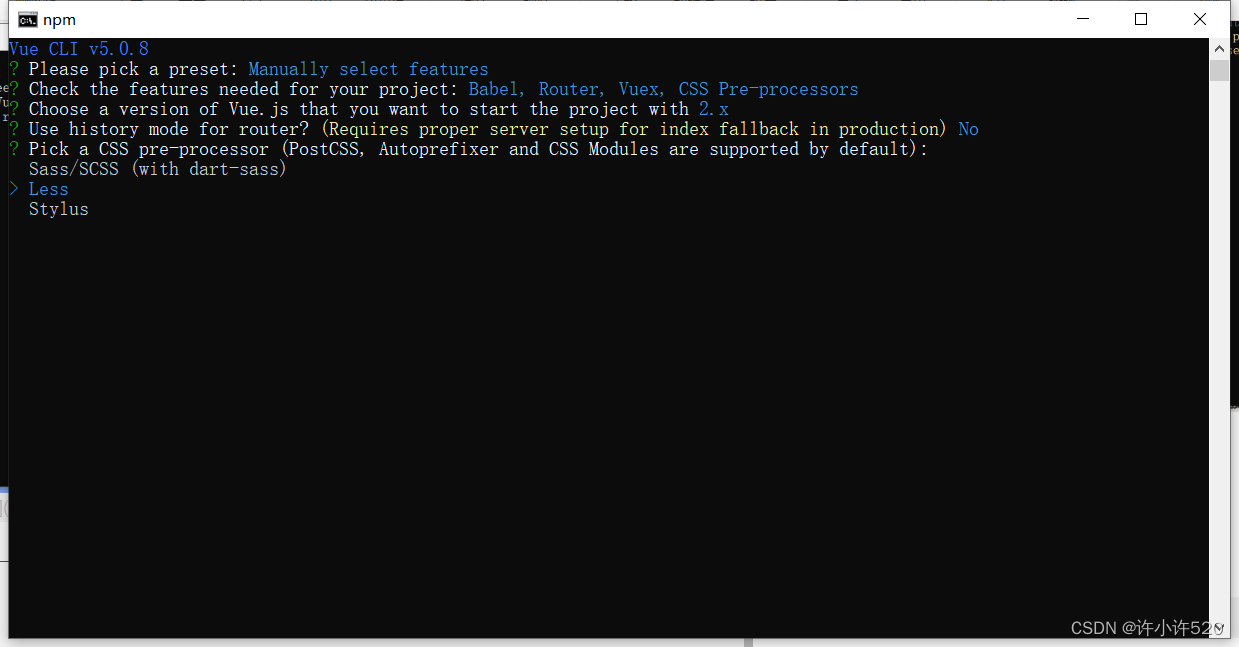
按空格键选择,建议勾选下图已选
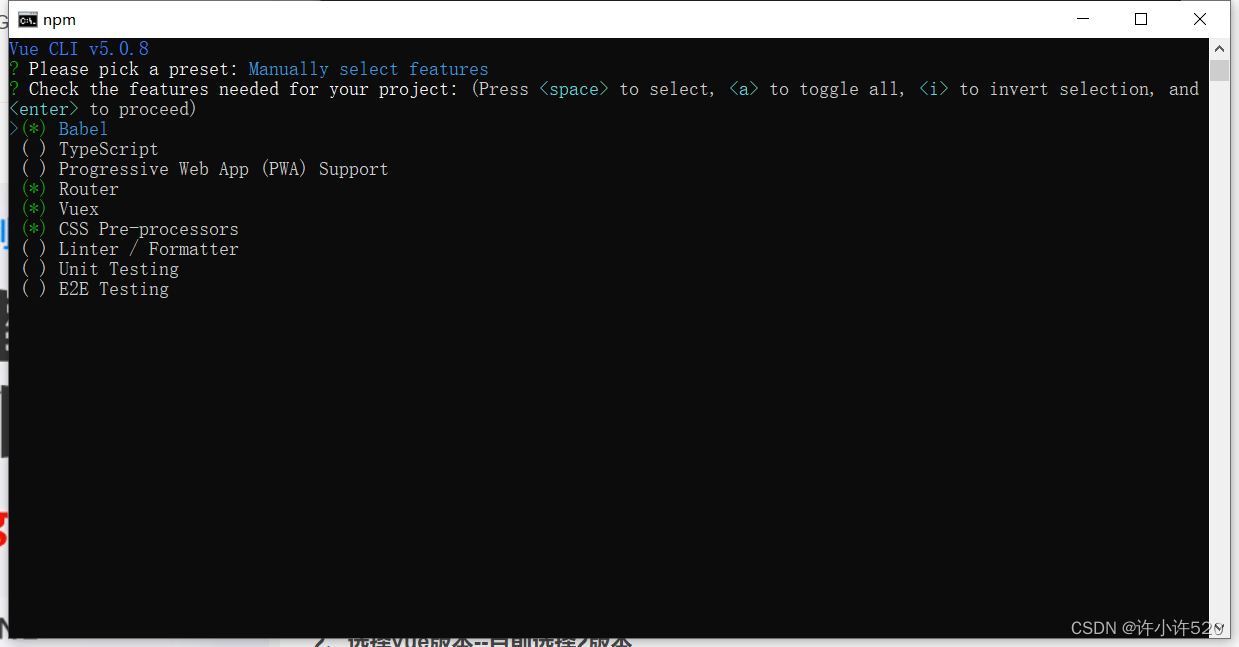
Babel:es6 转 es5
Router:路由
Vuex:数据容器,存储共享数据
CSS Pre-processors:CSS 预处理器,后面会提示你选择 less、sass、stylus 等
Linter / Formatter:代码格式校验(一般情况下默认勾选了,记得取消!!! -
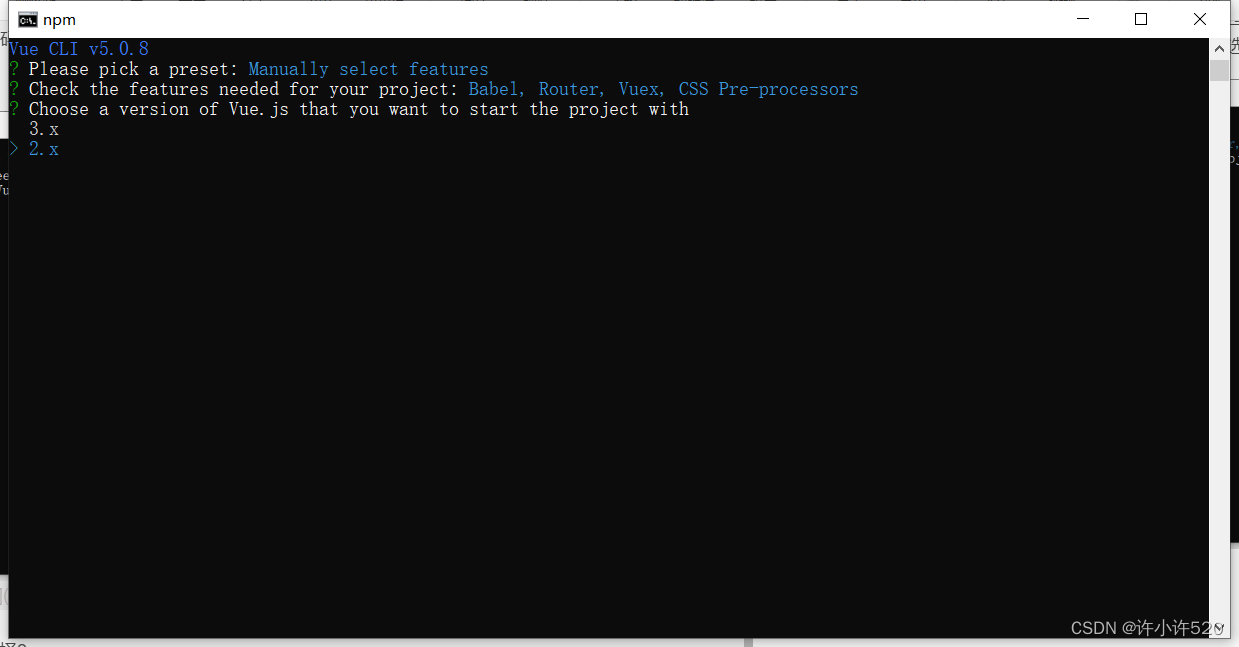
选择vue版本,这里选择2.x
-
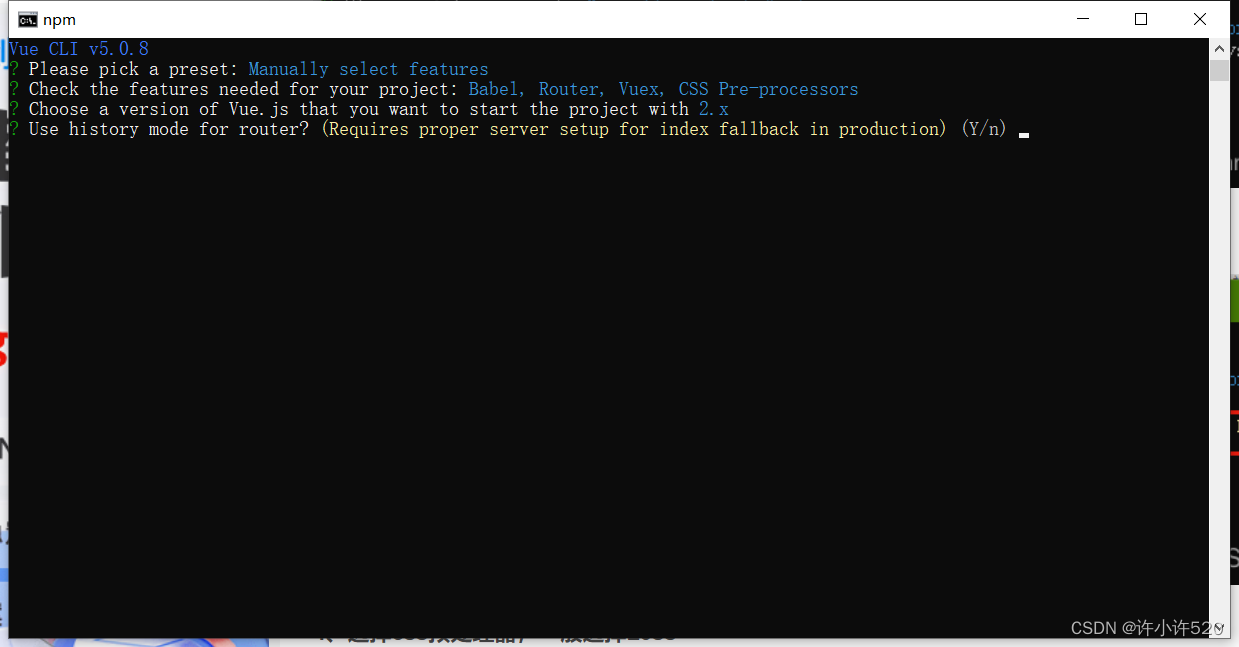
是否选择history路由模式,(这里选择“N”)
-
选择css预处理器,一般选择Less
-
Babel、ESLint 等工具会有一些额外的配置文件,这里的意思是问你将这些工具相关的配置文件写到哪里:
In dedicated config files:分别保存到单独的配置文件
In package.json:保存到 package.json 文件中
这里建议选择第 2 个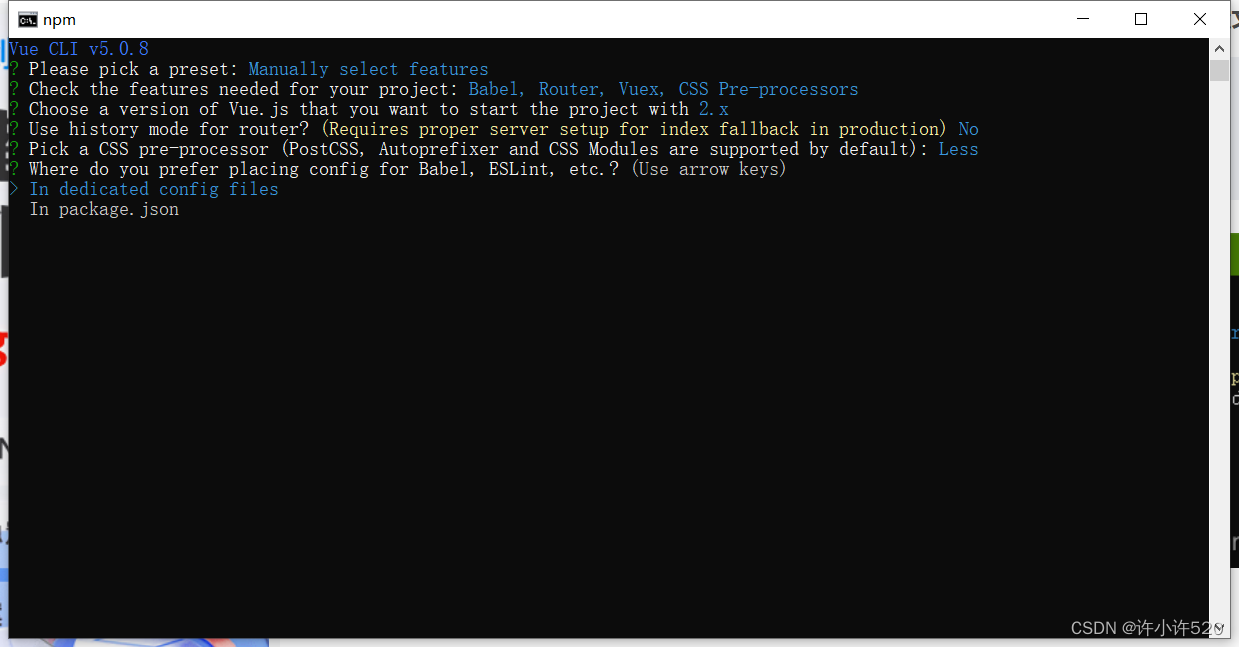
-
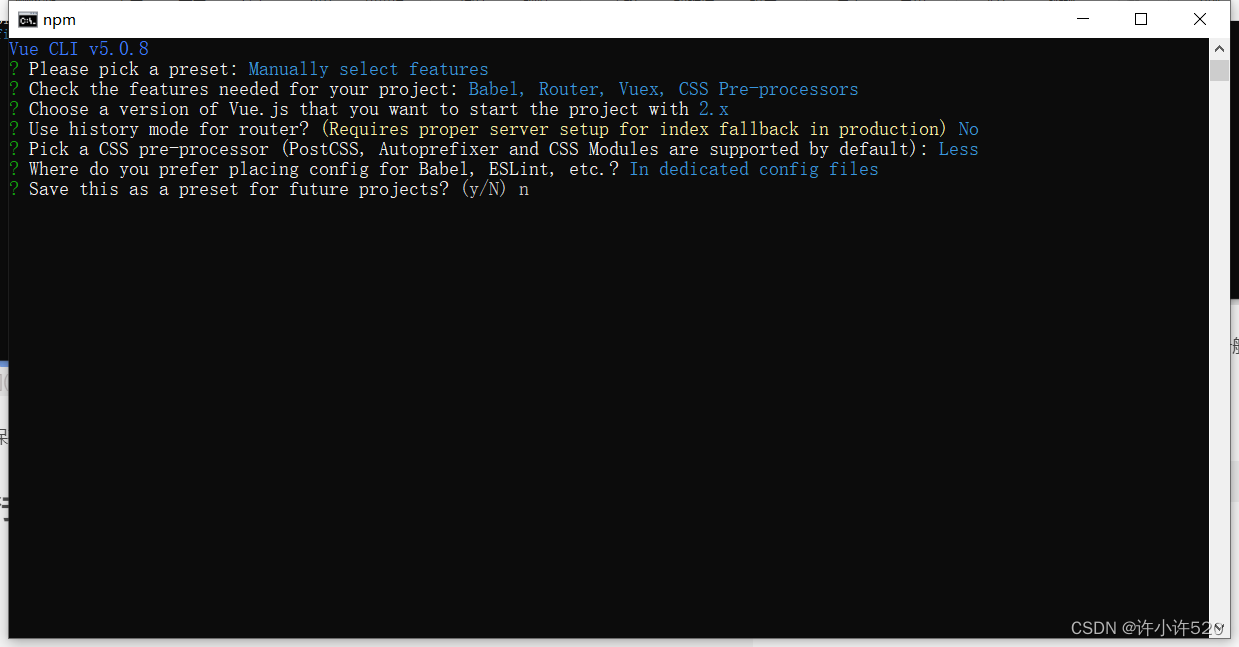
是否将刚才的选择保存起来,下次可以直接用,一般选择N,可以根据自己需要选择
-
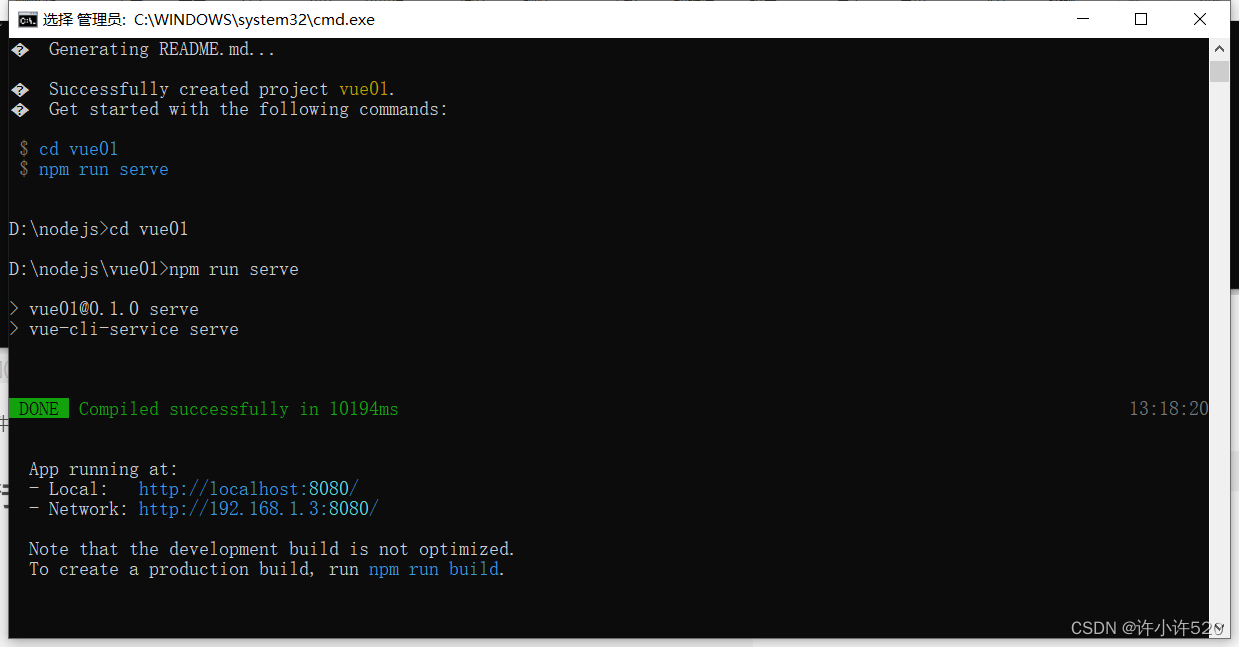
创建成功,cd到文件下,运行vue项目。
-
访问url
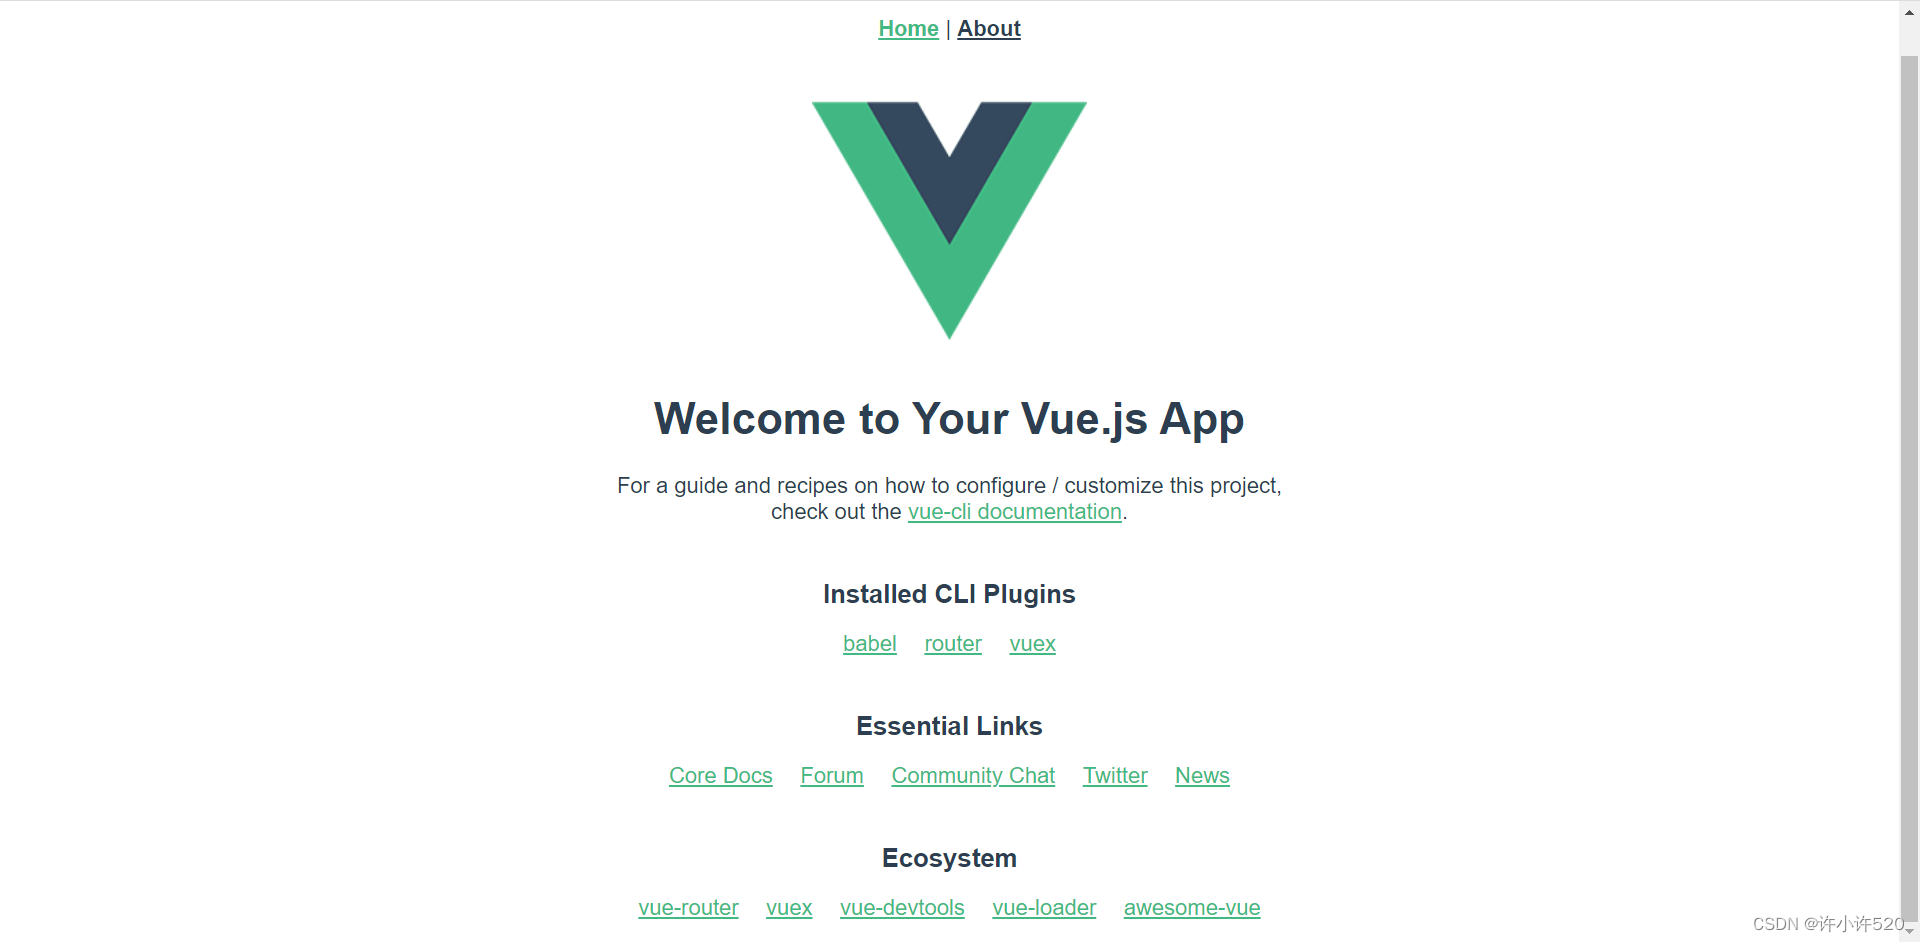
-
可在pycharm中打开vue项目
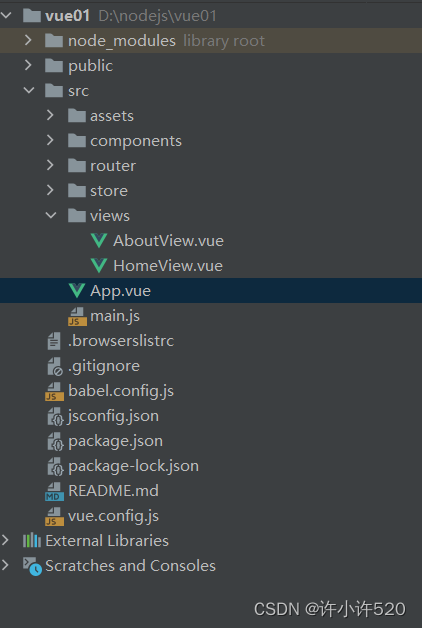
三 vue项目目录介绍
myfirstvue                    # 项目名字
    node_modules              # 文件夹,内部有很多当前项目依赖的模块,可以删除,npm install
    public                    # 文件夹
        -favicon.ico           # 网站小图标
        -index.html            # spa:单页面应用
    src                       # 自己写的源代码
    	-assets                # 静态资源,js,css,图片  类似于static文件夹
    		logo.png          # 静态资源的图片
    	-components           # 组件:小组件,用在别的大(页面组件)组件中
    		-HelloWorld.vue   # 默认了一个hello world组件
    	-router                    # 装了vue-router自动生成的,如果不装就没有
    		index.js              # vue-router的配置
    	-store                # 装了vuex自动生成的,如果不装就没有
    		index.js          # vuex的配置
    	-views                # 放了一堆组件,页面组件
            AboutView.vue     # 关于 页面组件
            HomeView.vue      # 主页  页面组件
    	-App.vue              # 根组件
    	-main.js              # 整个项目启动入口
    .gitignore                #git的忽略文件
    babel.config.js           #babel的配置
    jsconfig.json
    package.json              # 重要:类似于python项目的requirements.txt  当前项目所有依赖
    package-lock.json         #锁定文件:package.json中写了依赖的版本,这个文件锁定所有版本
    README.md                 # 读我,项目的介绍
    vue.config.js             # vue项目的配置文件
四 es6的导入导出语法
要导入必须先导出。
import_from.js
// 默认导出
export default {
    name: "xuxiaoxu",
    printName() {
        console.log(this.name)
    }
}

// 命名导出
export const name = 'jasper'
export const printName = () => {console.log(name)}
App.vue
<template>
  <div id="app">
    {{ defaultName }}
    {{name}}
  </div>
</template>

<script>
import import_from from "@/import_from";
import {name, printName} from "@/import_from"

export default {
  name:'App',
  data() {
    return {
      defaultName: import_from.name,
      name: name
    }
  },
  created() {
    import_from.printName()
    printName()
  }
}
</script>
五 vue项目开发规范
组件化开发
-<template></template>  # html内容写在里面
-<script></script>      # 写js内容
-<style></style>        # 写css样式

# 注意:在写js代码时,必须在export default {}中写
main.js
import Vue from 'vue'
// 把App.vue根组件导入了
import App from './App.vue'
import router from './router'
import store from './store'

Vue.config.productionTip = false

// 把App.vue组件中得数据和模板,插入到了index.html的id为app  div中了
new Vue({
  router,
  store,
  render: h => h(App)
}).$mount('#app')
六 vue项目集成axios
- 安装
-npm install axios --save - 导入使用
Django后端<template> <div id="app"> <p>username:<input type="text" v-model="username"></p> <p>password:<input type="password" v-model="password"></p> <button @click="submitClick">登录</button> <span>{{ error }}</span> </div> </template> <script> import axios from 'axios' export default { name: 'App', data() { return { username: '', password: '', error: '' } }, methods: { submitClick() { axios.post('http://127.0.0.1:8000/user/login/', {username: this.username, password: this.password}).then(item => { if (item.data.code === 100) { alert(item.data.msg) } else { this.error = item.data.msg } }) } } } </script>class Login(ViewSet): @action(methods=['post'], detail=False, url_path='login') def login(self, request): username = request.data.get('username') password = request.data.get('password') user = authenticate(username=username, password=password) if user is not None: login(request, user) return Response({'code': 100, 'msg': '登陆成功'}) return Response({'code': 101, 'msg': '用户名或密码错误'})
七 props配置项
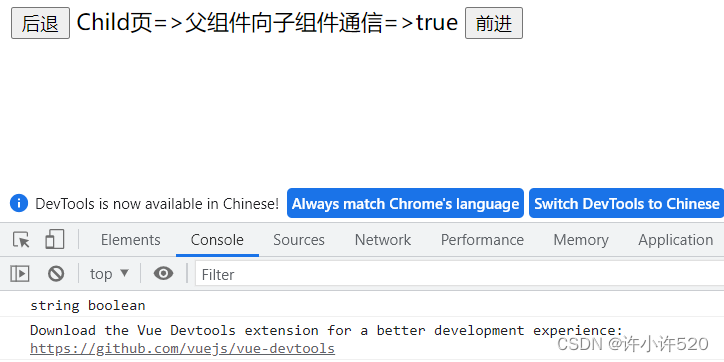
父组件通过自定义属性与子组件通信
子组件components/Child.vue
<template>
  <div>
    <button>后退</button>
    {{ title }}=>{{ msg }}=>{{ is_show1 }}
    <button>前进</button>
  </div>
</template>

<script>
export default {
  name: "Child",
  data() {
    return {
      title: 'Child页'
    }
  },
  // 方式一:
  // props: ['msg', 'is_show1']

  // 方式二:
  // props: {
  //   msg: String,
  //   is_show1: Boolean
  // },

  // 方式三:
  props: {
    msg: {
      type: String,  //类型
      required: true,  //必不必须
      default: '不传的默认值'  //默认值
    },
    is_show1: {
      type: Boolean,
      required: true,
      default: false
    }

  },
  created() {
    console.log(typeof this.msg, typeof this.is_show1)
  }
}
</script>

<style scoped>

</style>
父组件App.vue
<template>
  <div id="app">
        <child msg="父组件向子组件通信" :is_show1="true"></child>
  </div>
</template>

<script>
import Child from "@/components/Child";

export default {
  name: 'App',
  data() {
    return {

    }
  },
  components:{Child}
}
</script>
八 混入
可以把多个组件共用的配置提取成一个混入对象,把多个组件中公用的东西,抽取出来,以后可以全局使用和局部使用。
使用步骤:
-
创建混入
mixin/index.jsexport const mixin1 = { methods: { printMsg() { console.log('混入') } }, mounted() { console.log("你好啊"); }, } export const mixin2 = { data() { return { x: 100, y: 200 } } } -
局部导入,在组件中使用
<template> <div id="app"> <button @click="printMsg">点我打印</button> {{ x }}====={{ y }} </div> </template> <script> import {mixin2, mixin1} from '@/mixin' export default { name: 'App', mixins: [mixin2, mixin1] } </script> -
全局导入,所有组件都可以用
main.jsimport Vue from 'vue' import App from './App.vue' import router from './router' import store from './store' import {mixin1,mixin2} from "@/mixin"; Vue.config.productionTip = false Vue.mixin(mixin1) Vue.mixin(mixin2) new Vue({ router, store, render: h => h(App) }).$mount('#app')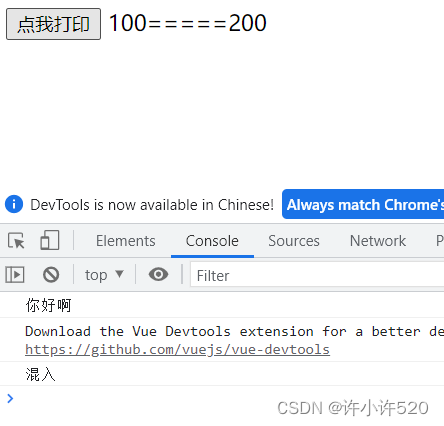
九 插件
功能:用于增强Vue。
本质:包含install方法的一个对象,install的第一个参数是Vue,第二个以后的参数是插件使用者传递的数据。
使用:
- 创建插件 plugins/index.js
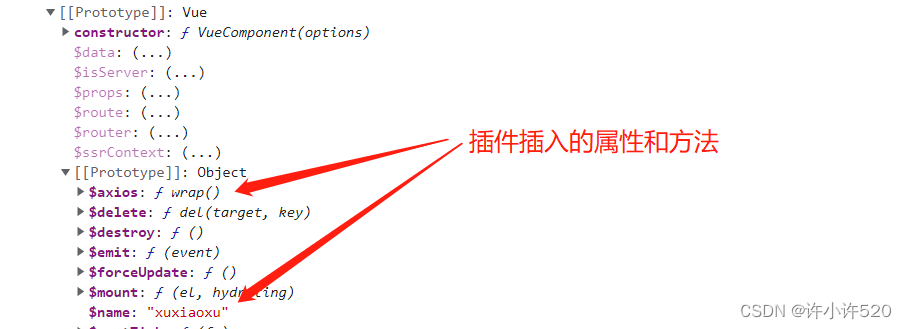
import Vue from "vue"; import axios from 'axios' import {mixin1, mixin2} from "@/mixin"; export default { install(vm) { console.log(vm) Vue.prototype.$name = 'xuxiaoxu' Vue.prototype.$axios = axios // 使用插件 全局加入混入 Vue.mixin(mixin1) Vue.mixin(mixin2) } } - 使用插件
main.jsimport Vue from 'vue' import App from './App.vue' import router from './router' import store from './store' import plugins from "@/plugins"; Vue.config.productionTip = false Vue.use(plugins) new Vue({ router, store, render: h => h(App) }).$mount('#app') - App.vue
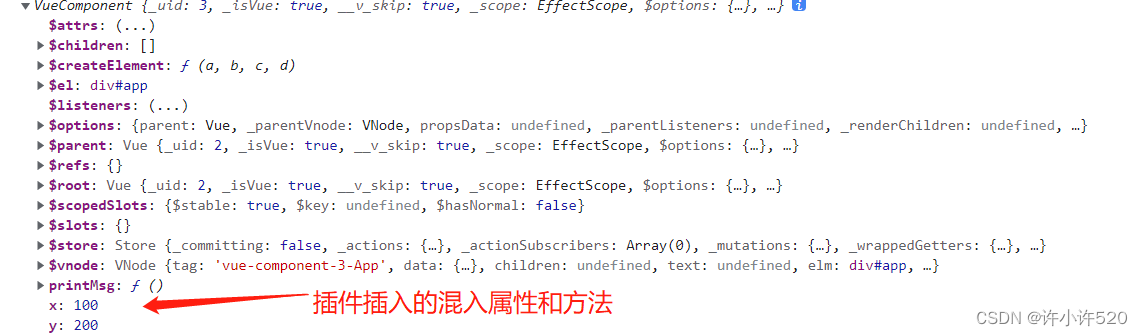
<template>
  <div id="app">
    {{ x }} {{ y }}
    <br>
    {{ $name }}
  </div>
</template>

<script>


export default {
  name: 'App',
  created() {
    console.log(this)
    // 插件插入属性和方法
    console.log(this.$name)
    console.log(this.$axios)
    // 插件插入的混入的属性和方法
    console.log(this.printMsg)
    console.log(this.x)
    console.log(this.y)
  }
}
</script>
十 scoped样式
在styple上写 <style scoped> </style>,以后只针对于当前组件生效
十一 localStorage和sessionStorage和cookie
如果想在浏览器中存储数据
永久存储:localStorage
关闭页面数据就没了(临时存储):sessionStorage
设定一个时间,到时候就过期:cookie
在vue中操作cookie,需要使用vue-cookie插件。
- 安装vue-cookies
npm install vue-cookie --save - 在main.js中使用插件
在vue组件中可以通过this.$cookies进行操作。import Vue from 'vue' import App from './App.vue' import router from './router' import store from './store' import VueCookies from 'vue-cookie' Vue.config.productionTip = false Vue.use(VueCookies) new Vue({ router, store, render: h => h(App) }).$mount('#app') - API
设置一个cookie
获取一个cookiethis.$cookies.set(keyName,value)
删除一个cookiethis.$cookies.get(keyName)// return value
检查某个 cookie name是否存在this.$cookies.delete(keyName)
获取所有 cookie name,以数组形式返回this.$cookies.isKey(keyName) // return false or true
在mainjs中需要这样写,例如:this.$cookies.keys() // return a arrayVueCookies.get(keyName)
App.vue
<template>
<div id="app">
<h1>localStorage</h1>
<button @click="setLocalStorage">添加</button>
<button @click="getLocalStorage">查看</button>
<button @click="removeLocalStorage">删除</button>
<h1>sessionStorage</h1>
<button @click="setSessionStorage">添加</button>
<button @click="getSessionStorage">查看</button>
<button @click="removeSessionStorage">删除</button>
<h1>cookie</h1>
<button @click="setCookie">添加</button>
<button @click="getCookie">查看</button>
<button @click="removeCookie">删除</button>
</div>
</template>
<script>
export default {
name: 'App',
methods: {
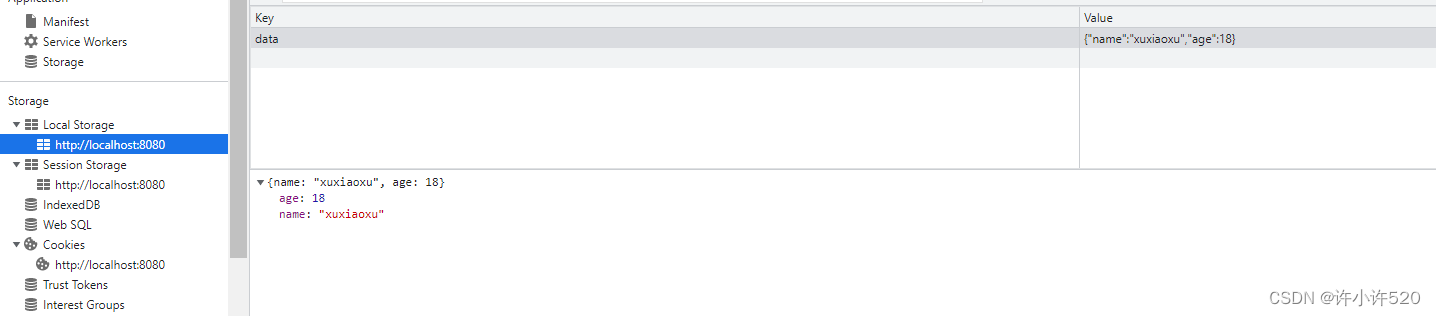
setLocalStorage() {
let obj = {name: 'xuxiaoxu', age: 18}
localStorage.setItem('data', JSON.stringify(obj))
},
getLocalStorage() {
console.log(localStorage.getItem('data'))
},
removeLocalStorage() {
// 清空
// localStorage.clear()
localStorage.removeItem('data')
},
setSessionStorage() {
let obj = {name: 'xuxiaoxu', age: 18}
sessionStorage.setItem('data', JSON.stringify(obj))
},
getSessionStorage() {
console.log(sessionStorage.getItem('data'))
},
removeSessionStorage() {
// 清空
// sessionStorage.clear()
sessionStorage.removeItem('data')
},
setCookie() {
console.log(this)
let obj = {name:'xuxiaoxu',age:18}
this.$cookie.set('data', JSON.stringify(obj),1000)
},
getCookie() {
console.log(this.$cookie.get('data'))
},
removeCookie() {
this.$cookie.delete('data')
}
}
}
</script>

十二 集成elementui
-
安装
npm i element-ui -S -
引入 Element
在main.js中写入以下内容:
import Vue from 'vue' import App from './App.vue' import router from './router' import store from './store' import ElementUI from 'element-ui' import 'element-ui/lib/theme-chalk/index.css' Vue.config.productionTip = false Vue.use(ElementUI) new Vue({ router, store, render: h => h(App) }).$mount('#app') -
在组件中就可以使用了


 2872
2872


 被折叠的 条评论
为什么被折叠?
被折叠的 条评论
为什么被折叠?
 到【灌水乐园】发言


