


一、M74HC595简介
M74HC595器件是采用硅栅C2MOS技术制作的具有输出锁存器(3态)的高速CMOS 8位移寄存器。
该设备包含一个8位串行进、并行出移位寄存器,它提供一个8位d型存储寄存器。存储寄存器有8个3状态输出。为移位寄存器和存储寄存器都提供了单独的时钟。
移位寄存器有直接覆盖清除,串行输入和串行输出(标准)引脚级联。移位寄存器和存储寄存器都使用正边缘触发时钟。如果两个时钟连接在一起,移位寄存器状态将始终是存储寄存器前面的一个时钟脉冲。
特性:
- 高速:在Vcc = 6V时,fMAx = 59mhz(典型)
- 低功耗:Icc = 4 μA (max)
- 工作电压范围宽:Vcc (opr.) = 2 V至6 V
1.M74HC595设备操作原理图:
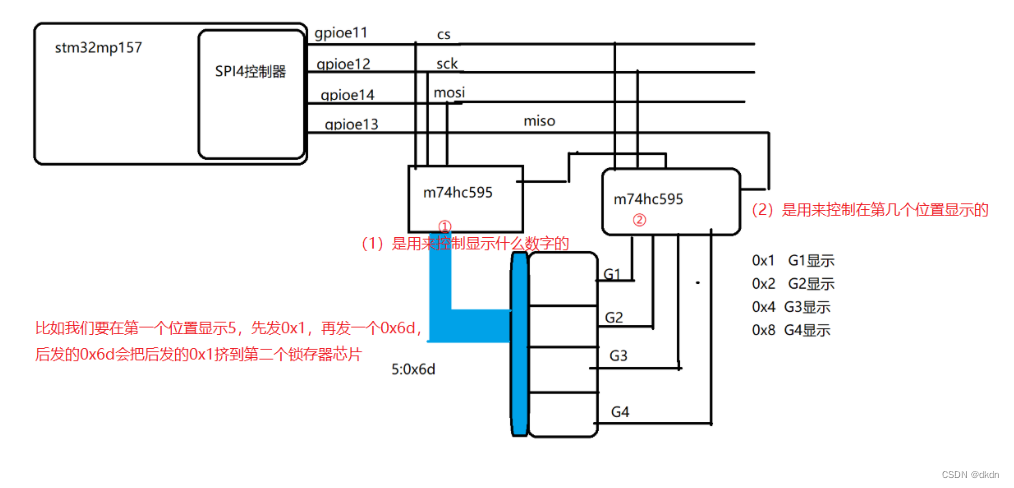
2. 开发板原理图

二、 添加设备树的节点
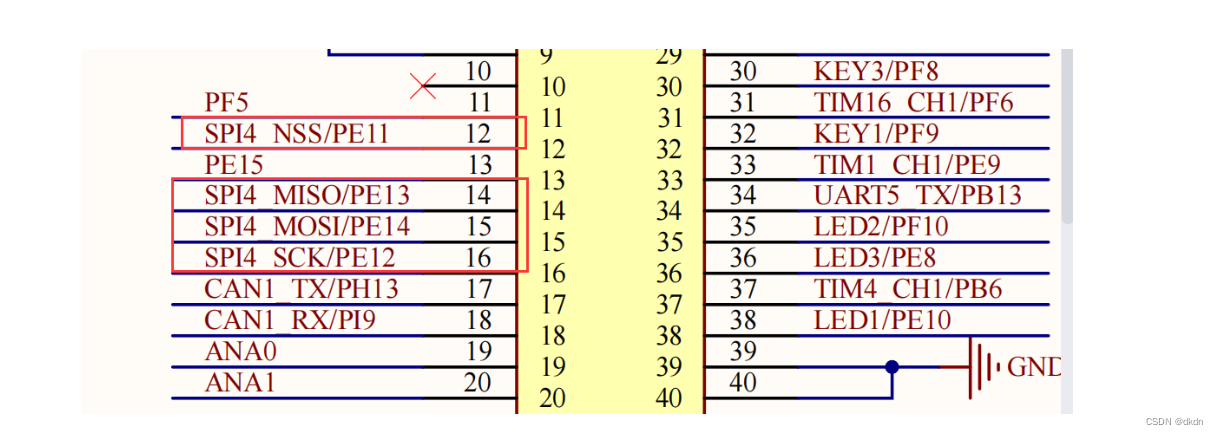
1.设置引脚
首先设置spi引脚的复用功能,找到 spi4_pins_b 节点:
vi stm32mp15-pinctrl.dtsi
![[外链图片转存失败,源站可能有防盗链机制,建议将图片保存下来直接上传(img-tndfKFsg-1662622887640)(图片/1662616736518.png)]](https://img-blog.csdnimg.cn/e3d81ed3693f4fc9af11743b0f5b3a04.png)
2. 找出控制器的设备树
stm32mp151.dtsi
spi4: spi@44005000 {
    #address-cells = <1>;
    #size-cells = <0>;
    compatible = "st,stm32h7-spi";
    reg = <0x44005000 0x400>;
    interrupts = <GIC_SPI 84 IRQ_TYPE_LEVEL_HIGH>;
    clocks = <&rcc SPI4_K>;
    resets = <&rcc SPI4_R>;
    dmas = <&dmamux1 83 0x400 0x01>,
           <&dmamux1 84 0x400 0x01>;
    dma-names = "rx", "tx";
    power-domains = <&pd_core>;
    status = "disabled";
};
3. 根据内核帮助文档编写自己的设备树
/home/linux/linux-5.10.61/Documentation/devicetree/bindings/i2c/
&spi4{
    pinctrl-names = "default", "sleep";
    pinctrl-0 = <&spi4_pins_b>;
    pinctrl-1 = <&spi4_sleep_pins_b>;
    cs-gpios = <&gpioe 11 0>;
    status = "okay";

    m74hc595@0{
        compatible = "m74hc595";
        reg = <0>;
        spi-max-frequency = <10000000>; //10Mhz
    };
};
4. 重新编译设备树
make dtbs
重启开发板
安装驱动
三. 编写M74HC595设备驱动
1.先搭个spi设备驱动框架
#include <linux/init.h>
#include <linux/module.h>
#include <linux/spi/spi.h>

int m74hc595_probe(struct spi_device *spi)
{
    printk("%s:%d\n", __func__, __LINE__);
    return 0;
}
int m74hc595_remove(struct spi_device *spi)
{
    printk("%s:%d\n", __func__, __LINE__);
    return 0;
}

struct of_device_id oftable[] = {
    {.compatible = "m74hc595"}
    {},
};

MODULE_DEVICE_TABLE(of, oftable);

struct spi_driver m74hc595 = {
    .probe = m74hc595_probe,
    .remove = m74hc595_remove,
    .driver = {
        .name = "hello",
        .of_match_table = oftable,
    },
};

module_spi_driver(m74hc595);
MODULE_LICENSE("GPL");
2. 写个Makefile编译一下:
ifeq ($(arch),arm)
KERNELDIR :=/home/linux/linux-5.10.61
CROSS_COMPILE ?=arm-linux-gnueabihf-
else
KERNELDIR :=/lib/modules/$(shell uname -r)/build
CROSS_COMPILE ?=
endif

modname ?=
PWD :=$(shell pwd)

CC :=$(CROSS_COMPILE)gcc

all:
	make -C $(KERNELDIR) M=$(PWD) modules
	# $(CC) test.c -o test
clean:
	make -C $(KERNELDIR) M=$(PWD) clean
	# rm test

install:
	cp *.ko ~/nfs/rootfs/
	# cp test ~/nfs/rootfs/

help:
	echo "make arch = arm or x86 modname= dirvers file name"

obj-m:=$(modname).o
linux@ubuntu:~/linu/driver/csdn/M74HC595$ make arch=arm modname=m74hc595
3. 再写字符设备驱动框架
#include <linux/init.h>
#include <linux/module.h>
#include <linux/spi/spi.h>
#include <linux/fs.h>
#include <linux/cdev.h>
#include <linux/device.h>


#define CNAME "m74hc595"

int major = 0;
int minor = 0;
int count = 1;
dev_t devno;
struct cdev *cdev;
struct class *cls;
struct device *dev;

int m74hc595_open(struct inode *inode, struct file *file)
{
    printk("%s:%s:%d\n", __FILE__, __func__, __LINE__);
    return 0;
}
long m74hc595_ioctl(struct file *file, unsigned int cmd, unsigned long args)
{
    printk("%s:%s:%d\n", __FILE__, __func__, __LINE__);
    return 0;
}

int m74hc595_close(struct inode *inode, struct file *file)
{
    printk("%s:%s:%d\n", __FILE__, __func__, __LINE__);
    return 0;
}
const struct file_operations fops = {
    .open = m74hc595_open,
    .unlocked_ioctl = m74hc595_ioctl,
    .release = m74hc595_close,
};

int m74hc595_probe(struct spi_device *spi)
{
    int ret;
    // 1.分配对象
    cdev = cdev_alloc();
    if (cdev == NULL)
    {
        printk("alloc memory failed\n");
        ret = -ENOMEM;
        goto ERR1;
    }
    // 2.初始化对象
    cdev_init(cdev, &fops);

    // 3.申请设备号
    if (major > 0)
    {
        ret = register_chrdev_region(MKDEV(major, minor), count, CNAME);
        if (ret != 0)
        {
            printk("static:alloc device number failed!\n");
            goto ERR2;
        }
    }
    else if (major == 0)
    {
        ret = alloc_chrdev_region(&devno, 0, 1, CNAME);
        if (ret != 0)
        {
            printk("dynamic:alloc device number failed!\n");
            goto ERR2;
        }
        major = MAJOR(devno);
        minor = MINOR(devno);
    }
    // 4.注册对象
    ret = cdev_add(cdev, MKDEV(major, minor), count);
    if (ret)
    {
        printk("add cdev failed\n");
        goto ERR3;
    }
    // 5.向上层提交目录的信息
    cls = class_create(THIS_MODULE, "hello");
    if (IS_ERR(cls))
    {
        printk("create class failed\n");
        ret = PTR_ERR(cls);
        goto ERR4;
    }
    // 6.向上层提交设备的信息
    dev = device_create(cls, NULL, MKDEV(major, minor), NULL, CNAME);
    if (IS_ERR(dev))
    {
        printk("create device failed\n");
        ret = PTR_ERR(dev);
        goto ERR5;
    }

    return 0;
ERR5:
    class_destroy(cls);
ERR4:
    cdev_del(cdev);
ERR3:
    unregister_chrdev_region(MKDEV(major, minor), count);
ERR2:
    kfree(cdev);
ERR1:
    return ret;
}
int m74hc595_remove(struct spi_device *spi)
{
    device_destroy(cls,MKDEV(major,minor));
    class_destroy(cls);
    cdev_del(cdev);
    unregister_chrdev_region(MKDEV(major, minor), count);
    kfree(cdev);
    return 0;
}

struct of_device_id oftable[] = {
    {.compatible = "m74hc595"},
    {},
};

MODULE_DEVICE_TABLE(of, oftable);

struct spi_driver m74hc595 = {
    .probe = m74hc595_probe,
    .remove = m74hc595_remove,
    .driver = {
        .name = "m74hc595",
        .of_match_table = oftable,
    },
};

module_spi_driver(m74hc595);
MODULE_LICENSE("GPL");
4.封装spi操作结构体
全局变量中添加成员:
struct spi_device *gspi;
u8 code[] = {
	0x3f, //0
	0x06, //1
	0x5b, //2
	0x4f, //3
	0x66, //4
	0x6d, //5
	0x7d, //6
	0x07, //7
	0x7f, //8
	0x6f, //9
	0x77, //A
	0x7c, //b
	0x39, //c
	0x5e, //d
	0x79, //e
	0x71, //f
};

u8 which[] = {
	0x1, //sg0
	0x2, //sg1
	0x4, //sg2
	0x8, //sg3
};
6.M74HC595写数据
(1)新建头文件,封装头文件命令码
#ifndef __M74HC595_H__
#define __M74HC595_H__
#define SEG_WHICH _IOW('K',0,int)
#define SEG_DAT _IOW('K',1,int)
#endif
(2)添加头文件
#include <linux/uaccess.h> //ioctl
#include "m74hc595.h"
(3)在m74hc595_probe中添加
gspi = spi;
(4)直接调用内核封装好的接口
spi_write(gspi,&which[args],1)
7.字符设备驱动的实现
open
int m74hc595_open(struct inode *inode, struct file *file)
{
    printk("%s:%s:%d\n", __FILE__, __func__, __LINE__);
    return 0;
}
ioctl
long m74hc595_ioctl(struct file *file, unsigned int cmd, unsigned long args)
{
    switch(cmd){
		case SEG_WHICH:
			spi_write(gspi,&which[args],1);
			break;
		case SEG_DAT:
			spi_write(gspi,&code[args],1);
			break;
		default: printk("ioctl error\n");break;
	}
    return 0;
}
close
int m74hc595_close(struct inode *inode, struct file *file)
{
    printk("%s:%s:%d\n", __FILE__, __func__, __LINE__);
    return 0;
}
四、测试驱动模块
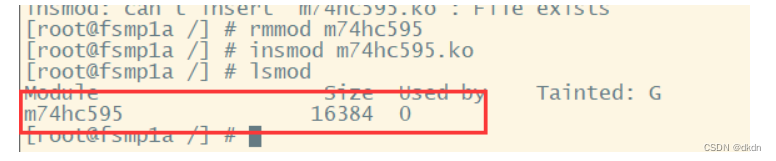
1.加载驱动,查看驱动
insmod
lsmod
2.编写app测试程序
循环打印0-f这16位数
#include <stdio.h>
#include <sys/types.h>
#include <sys/stat.h>
#include <fcntl.h>
#include <unistd.h>
#include <sys/ioctl.h>
#include "m74hc595.h"


int main(int argc, char const *argv[])
{
    int which = 0;
    int data = 0;
    int fd;
    fd = open("/dev/m74hc595",O_RDWR);
    if(fd < 0){
        perror("open error");
        return -1;
    }
    while (1){

        ioctl(fd,SEG_WHICH,which);
        which ++;
        ioctl(fd,SEG_DAT,data);
        data ++;
        if(which > 4)which = 0;
        if(data > 16)data = 0;
        sleep(1);
    }
    close (fd);
    return 0;
}
显示成功


 1757
1757


 被折叠的 条评论
为什么被折叠?
被折叠的 条评论
为什么被折叠?
 到【灌水乐园】发言


