当你需要利用vant组件实现移动端的多选时,本文或许可以给你提供一些帮助
前言
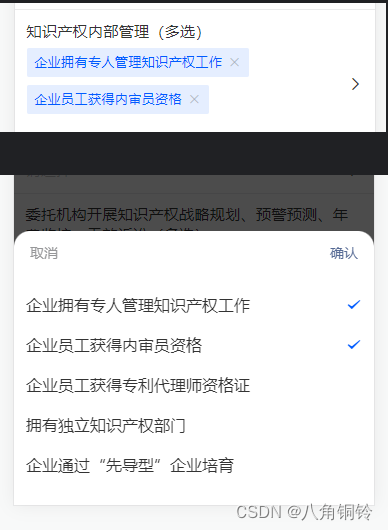
由于 vant 组件的选择器只能实现单选,但往往在实际开发中我们有多选的需求,这时候我们就需要自定义筛选项了。
一、实现效果
二、实现步骤
1.自定义输入框
<van-field
class="field"
label="知识产权内部管理(多选)"
clickable
placeholder="请选择"
@click="openPicker()"
>
<template slot="right-icon">
<van-icon
name="arrow"
@click="openPicker()"
/>
</template>
<template slot="input">
<div v-if="formShowData.length" class="multiple-box">
<div
v-for="(item, index) in formShowData"
:key="index"
class="multiple-item"
>
<span>{{ item.text }}</span>
<van-icon
name="cross"
@click="delInformation(item)"
/>
</div>
</div>
<span v-else style="color: rgba(0, 0, 0, 0.25)">请选择</span>
</template>
</van-field>
2.自定义选择框
<van-popup
v-model="multipleShowPicker"
class="search-data-popup"
round
position="bottom"
>
<div class="header-line">
<div class="cancel" @click="cancelMultiple">取消</div>
<div class="sure" @click="confirmMultiple">确认</div>
</div>
<div class="lists">
<div
v-for="(item, index) in columns"
:key="index"
class="line"
@click="confirmMultiplePicker(item)"
>
<div class="name">{{ item.text }}</div>
<van-icon
v-if="copyArr.some(v => v.value == item.value)"
name="success"
/>
</div>
</div>
</van-popup>
3.js方法
// 打开弹出时触发
openPicker(item) {
this.columns = this.ruleList.map(v => {
// 处理筛选项
return {
text: v.itemRule,
value: v.ruleId
};
});
this.copyArr = _cloneDeep(this.formShowData[this.pickerType]);
this.multipleShowPicker = true;
},
// 多选项点击
confirmMultiplePicker(val) {
const arr = this.copyArr.map(v => v.value);
if (arr.indexOf(val.value) !== -1) {
// 若已经选择过 则取消选择
this.copyArr = this.copyArr.filter(v => v.value !== val.value);
this.$forceUpdate();
} else {
this.copyArr.push(val);
this.$forceUpdate();
}
},
// 点击确定
confirmMultiple() {
this.formShowData = this.copyArr;
this.multipleShowPicker = false;
this.copyArr = [];
},
// 点击取消
cancelMultiple() {
this.$nextTick(() => {
this.copyArr = [];
});
this.multipleShowPicker = false;
},
// 点击删除
delInformation(obj) {
this.formShowData = this.formShowData.filter(
v => v.value !== obj.value
);
this.$forceUpdate();
}
3.css样式
.multiple-box {
display: flex;
flex-direction: column;
z-index: 999;
}
.multiple-item {
width: fit-content;
padding: 12px 16px;
margin-bottom: 16px;
font-size: 28px;
line-height: 36px;
background: rgba(0, 91, 255, 0.1);
border-radius: 4px;
span {
color: rgb(0, 91, 255);
}
.van-icon {
margin-left: 12px;
color: rgba(0, 0, 0, 0.25);
}
}
<style lang="less">
.search-data-popup {
.header-line {
display: flex;
justify-content: space-between;
align-items: center;
height: 44px;
.cancel {
padding: 0 16px;
font-size: 14px;
color: #969799;
}
.sure {
padding: 0 16px;
font-size: 14px;
color: #576b95;
}
}
.lists {
display: flex;
flex-direction: column;
padding: 10px 12px 20px 12px;
height: 200px;
overflow: auto;
.line {
line-height: 40px;
font-size: 16px;
color: #000;
display: flex;
justify-content: space-between;
align-items: center;
}
.van-icon {
color: #005bff;
}
}
}
</style>
总结
以上就是今天要讲的内容,本文可以简单实现移动端多选的功能,希望对你有所帮助。