


keepalived+nginx+tomcat实现web高可用
下载nginx.tar.gz并安装
https://nginx.org/en/download.html

通过ftp工具上传到linux服务器
#进入opt目录,程序安装到opt目录下方便管理/opt 用户级的程序目录,可以理解为 D:/Software , opt 有可选的意思,这里可以用于放置第三方大型软件(或游戏),当你不需要时,直接 rm -rf 掉即可。
cd /opt/
#创建子目录存放程序
mkdir software
#上传完之后解压
tar -zxvf nginx-1.22.1.tar.gz
./configure --prefix=/opt/software/nginx --with-http_stub_status_module --with-http_ssl_module --with-openssl=/opt/software/openssl --with-zlib=/opt/software/ --with-zlib=/opt/software/gcc-c++/zlib-1.3.1
#安装
make && make install
JDK安装
#下载jdk的tar.gz包
#解压
tar -zxvf jdk-8u401-linux-x64.tar.gz
#配置环境变量
vi /etc/profile
#以下包含nginx重新配置nginx就不用再配置环境变量了
export JAVA_HOME=/opt/software/jdk
export CLASSPATH=.:$JAVA_HOME/lib/dt.jar:$JAVA_HOME/lib/tools.jar
export PATH=/opt/software/nginx/sbin:$PATH
export PATH=$JAVA_HOME/bin:$PATH
#查看是否关闭防火墙
systemctl status firewalld
#关闭防火墙
systemctl stop firewalld
#永久关闭防火墙
systemctl disable firewalld.service
安装tomcat
官方下载tomcat9解压即可
keepalived安装下载
#配置生成makefile
#先解压之后配置
./configure --prefix=/opt/software/keepalived
#安装完成后建立目录复制文件到/etc/keepalived/
#(keepalived默认是读取/etc/keepalived/下的keepalived.conf)
mkdir /etc/keepalived/
cp /opt/software/keepalived/etc/keepalived/keepalived.conf.sample /etc/keepalived/
#复制系统相关文件
cp /opt/software/keepalived/etc/sysconfig/keepalived /etc/sysconfig/
#(1.4以后都是在解压里面,1.4以前是在/usr/local/keepalived下面rc.d文件夹里面)
cp /opt/software/keepalived-2.2.8/keepalived/etc/init.d/keepalived /etc/init.d/
#检测nginx启动的脚本
cd /etc/keepalived/
vi nginx_check.sh
#文件内写入
#!/bin/bash
curl -I http://localhost &> /dev/null
#echo $A
if [ $? -ne 0 ];then
    echo 'nginx未存活'
    /opt/software/nginx/sbin/nginx
   sleep 1
    curl -I http://localhost &> /dev/null
    if [ $? -ne 0 ];then
	systemctl stop keepalived
 	echo 'nginx not running, stop keepalived!'

    fi
else
	echo 'nginx存活'
fi

#启动keepalived
/etc/init.d/keepalived start
#若启动失败请更改配置文件名称为keepalived.conf
#修改keepalived的配置文件
! Configuration File for keepalived

global_defs {
   notification_email {
     acassen@firewall.loc
     failover@firewall.loc
     sysadmin@firewall.loc
   }
   notification_email_from Alexandre.Cassen@firewall.loc
   smtp_server 192.168.200.1
   smtp_connect_timeout 30
   router_id LVS_DEVEL
   vrrp_skip_check_adv_addr
   vrrp_strict
   vrrp_garp_interval 0
   vrrp_gna_interval 0
}
vrrp_script nginx_check{
   script "/etc/keepalived/nginx_check.sh"
   interval 2
}
vrrp_instance VI_1 {
    state MASTER
    interface ens33
    virtual_router_id 51
    priority 100
    advert_int 1
    authentication {
        auth_type PASS
        auth_pass 1111
    }
    virtual_ipaddress {
        192.168.32.50
    }
track_script {

#这里配置vrrp_script的名称

nginx_check

}
}

virtual_server 192.168.200.100 443 {
    delay_loop 6
    lb_algo rr
    lb_kind NAT
    persistence_timeout 50
    protocol TCP

    real_server 192.168.201.100 443 {
        weight 1
        SSL_GET {
            url {
              path /
              digest ff20ad2481f97b1754ef3e12ecd3a9cc
            }
            url {
              path /mrtg/
              digest 9b3a0c85a887a256d6939da88aabd8cd
            }
            connect_timeout 3
            retry 3
            delay_before_retry 3
        }
    }
}

virtual_server 10.10.10.2 1358 {
    delay_loop 6
    lb_algo rr
    lb_kind NAT
    persistence_timeout 50
    protocol TCP

    sorry_server 192.168.200.200 1358

    real_server 192.168.200.2 1358 {
        weight 1
        HTTP_GET {
            url {
              path /testurl/test.jsp
              digest 640205b7b0fc66c1ea91c463fac6334d
            }
            url {
              path /testurl2/test.jsp
              digest 640205b7b0fc66c1ea91c463fac6334d
            }
            url {
              path /testurl3/test.jsp
              digest 640205b7b0fc66c1ea91c463fac6334d
            }
            connect_timeout 3
            retry 3
            delay_before_retry 3
        }
    }

    real_server 192.168.200.3 1358 {
        weight 1
        HTTP_GET {
            url {
              path /testurl/test.jsp
              digest 640205b7b0fc66c1ea91c463fac6334c
            }
            url {
              path /testurl2/test.jsp
              digest 640205b7b0fc66c1ea91c463fac6334c
            }
            connect_timeout 3
            retry 3
            delay_before_retry 3
        }
    }
}

virtual_server 10.10.10.3 1358 {
    delay_loop 3
    lb_algo rr
    lb_kind NAT
    persistence_timeout 50
    protocol TCP

    real_server 192.168.200.4 1358 {
        weight 1
        HTTP_GET {
            url {
              path /testurl/test.jsp
              digest 640205b7b0fc66c1ea91c463fac6334d
            }
            url {
              path /testurl2/test.jsp
              digest 640205b7b0fc66c1ea91c463fac6334d
            }
            url {
              path /testurl3/test.jsp
              digest 640205b7b0fc66c1ea91c463fac6334d
            }
            connect_timeout 3
            retry 3
            delay_before_retry 3
        }
    }

    real_server 192.168.200.5 1358 {
        weight 1
        HTTP_GET {
            url {
              path /testurl/test.jsp
              digest 640205b7b0fc66c1ea91c463fac6334d
            }
            url {
              path /testurl2/test.jsp
              digest 640205b7b0fc66c1ea91c463fac6334d
            }
            url {
              path /testurl3/test.jsp
              digest 640205b7b0fc66c1ea91c463fac6334d
            }
            connect_timeout 3
            retry 3
            delay_before_retry 3
        }
    }
}


#刷新系统启动项
systemctl daemon-reload
#重启keepalived
systemctl restart keepalived
#修改nginx配置并重启

#user  nobody;
worker_processes  1;

#error_log  logs/error.log;
#error_log  logs/error.log  notice;
#error_log  logs/error.log  info;

#pid        logs/nginx.pid;


events {
    worker_connections  1024;
}


http {
    include       mime.types;
    default_type  application/octet-stream;

    #log_format  main  '$remote_addr - $remote_user [$time_local] "$request" '
    #                  '$status $body_bytes_sent "$http_referer" '
    #                  '"$http_user_agent" "$http_x_forwarded_for"';

    #access_log  logs/access.log  main;

    sendfile        on;
    #tcp_nopush     on;

    #keepalive_timeout  0;
    keepalive_timeout  65;
   upstream tomcat {
        server 192.168.32.11:8080;
        server 192.168.32.12:8080 backup;
    }
    #gzip  on;

    server {
        listen       80;
        server_name  localhost;

        #charset koi8-r;

        #access_log  logs/host.access.log  main;
        location / {
        proxy_pass http://tomcat;
        proxy_set_header X-NGINX "NGINX-1";
        proxy_set_header Host $http_host;
        proxy_set_header X-Forward-For $remote_addr;
        proxy_set_header X-Real-IP $remote_addr;
        proxy_set_header X-Forwarded-For $proxy_add_x_forwarded_for;
        proxy_set_header X-Forwarded-Proto $scheme;
            #root   html;
            #index  index.html index.htm;
        }


        #error_page  404              /404.html;

        # redirect server error pages to the static page /50x.html
        #
        error_page   500 502 503 504  /50x.html;
        location = /50x.html {
            root   html;
        }

        # proxy the PHP scripts to Apache listening on 127.0.0.1:80
        #
        #location ~ \.php$ {
        #    proxy_pass   http://127.0.0.1;
        #}

        # pass the PHP scripts to FastCGI server listening on 127.0.0.1:9000
        #
        #location ~ \.php$ {
        #    root           html;
        #    fastcgi_pass   127.0.0.1:9000;
        #    fastcgi_index  index.php;
        #    fastcgi_param  SCRIPT_FILENAME  /scripts$fastcgi_script_name;
        #    include        fastcgi_params;
        #}

        # deny access to .htaccess files, if Apache's document root
        # concurs with nginx's one
        #
        #location ~ /\.ht {
        #    deny  all;
        #}
    }


    # another virtual host using mix of IP-, name-, and port-based configuration
    #
    #server {
    #    listen       8000;
    #    listen       somename:8080;
    #    server_name  somename  alias  another.alias;

    #    location / {
    #        root   html;
    #        index  index.html index.htm;
    #    }
    #}


    # HTTPS server
    #
    #server {
    #    listen       443 ssl;
    #    server_name  localhost;

    #    ssl_certificate      cert.pem;
    #    ssl_certificate_key  cert.key;

    #    ssl_session_cache    shared:SSL:1m;
    #    ssl_session_timeout  5m;

    #    ssl_ciphers  HIGH:!aNULL:!MD5;
    #    ssl_prefer_server_ciphers  on;

    #    location / {
    #        root   html;
    #        index  index.html index.htm;
    #    }
    #}

}
nginx -s reload
#配置完毕把tomcat主页加上ip测试keepalived均衡主备
#查看绑定的哪个网卡
ip a
#停掉nginx试试接管
安装nginx缺其他环境例如gcc的自行安装
我这里报错缺少pcre库
error: the HTTP rewrite module requires the PCRE library.
You can either disable the module by using --without-http_rewrite_module
option, or install the PCRE library into the system, or build the PCRE library
statically from the source with nginx by using --with-pcre=<path> option.
https://sourceforge.net/projects/pcre/files/pcre/ 这里网址下载
pcre上传到software并安装
tar -zxvf pcre-8.45.tar.gz
#安装
./configure
#版本
pcre-config --version
#提示我缺少c++库,用来编译,因为纯离线原因linux纯净所以都需要装
configure: error: Invalid C++ compiler or C++ compiler flags
下载gcc-c++地址https://pkgs.org/search/?q=gcc-c%2B%2B

#新建gcc目录并安装
mkdir gcc-c++
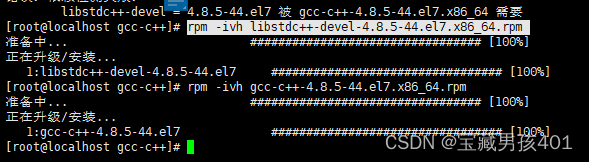
rpm -ivh gcc-c++-4.8.5-44.el7.x86_64.rpm
#报错目前缺什么依赖下什么,不需要全下没必要
错误:依赖检测失败:
libstdc++-devel = 4.8.5-44.el7 被 gcc-c++-4.8.5-44.el7.x86_64 需要

安装完之后我这里不缺包了
rpm -ivh libstdc++-devel-4.8.5-44.el7.x86_64.rpm
gcc -v
g++ -v
#好现在可以继续配置编译pcre了
./configure --prefix=/opt/software/pcre
#configure是一个脚本,一般由Autoconf工具生成,它会检验当前的系统环境,看是否满足安装软件所必需的条件:比如当前系统是否支持待安装软件,是否已经安装软件依赖等。configure脚本最后会生成一个Makefile文件。
#编译并安装
make && make install
#配置nginx
./configure --prefix=/opt/software/nginx --with-http_stub_status_module --with-http_ssl_module
#请注意,如果 make 中出现错误,重新调整执行后还是失败尝试 make clean 清除所有缓存文件后继续。如果是在 make install 过程中也出现错误,在重新调整执行后还是失败尝试执行 make clean 并且删除生成了安装目录,然后重新执行 make 和 make install,如若还是失败,尝试调用 make distclean 清除所有生成的文件。
安装nginx还是失败尝试安装zlib
#报错./configure: error: the HTTP rewrite module requires the PCRE library.
#You can either disable the module by using --without-http_rewrite_module
#option, or install the PCRE library into the system, or build the PCRE #library
#statically from the source with nginx by using --with-pcre=<path> option.
./configure
make
make install
#报错./configure: error: SSL modules require the OpenSSL library.
#You can either do not enable the modules, or install the OpenSSL library
#into the system, or build the OpenSSL library statically from the source
#with nginx by using --with-openssl=<path> option.
#安装ssl 下载地址 https://sourceforge.net/projects/pcre/
./config --prefix=/opt/software/openssl
make & make install
#再次安装nginx
#报错./configure: error: the HTTP gzip module requires the zlib library.
#You can either disable the module by using --without-http_gzip_module
#option, or install the zlib library into the system, or build the zlib #library
#statically from the source with nginx by using --with-zlib=<path> option.
#缺少zlib库但是我都已经安装了,查了需要添加制定参数
./configure --prefix=/opt/software/nginx --with-http_stub_status_module --with-http_ssl_module --with-openssl=/opt/software/openssl --with-zlib=/opt/software/ --with-zlib=/opt/software/gcc-c++/zlib-1.3.1
make && make install
#编译报错
# ll /usr/local/openssl/.openssl/
#ls: cannot access /usr/local/openssl/.openssl/: No such file or directory
    #发现了问题可能的原因后,尝试修改一下nginx1.17.3添加openssl模块时候的相关编译信息(auto/lib/openssl/conf):

# vi auto/lib/openssl/conf
           # CORE_INCS="$CORE_INCS $OPENSSL/.openssl/include"
           # CORE_DEPS="$CORE_DEPS $OPENSSL/.openssl/include/openssl/ssl.h"
          #  CORE_LIBS="$CORE_LIBS $OPENSSL/.openssl/lib/libssl.a"
          #  CORE_LIBS="$CORE_LIBS $OPENSSL/.openssl/lib/libcrypto.a"

#//在该文件中,看到openssl的core相关目录,都被添加上了.openssl这级目录,尝试修改目录信息,去除.openssl这级目录:
# more auto/lib/open/ssl
           # CORE_INCS="$CORE_INCS $OPENSSL/include"
            #CORE_DEPS="$CORE_DEPS $OPENSSL/include/openssl/ssl.h"
            #CORE_LIBS="$CORE_LIBS $OPENSSL/lib/libssl.a"
           # CORE_LIBS="$CORE_LIBS $OPENSSL/lib/libcrypto.a"
      #修改完auto/lib/openssl/conf的信息之后,重新编译安装nginx1.17.3,即可正常编译安装成功。

# make clean
# ./configure --prefix=/usr/local/nginx --with-http_ssl_module --with-openssl=/usr/local/openssl --with-http_stub_status_module --with-http_dav_module --with-http_realip_module --with-http_gzip_static_module --with-http_v2_module
# make && make install
#启动nginx报错./nginx: error while loading shared libraries: libssl.so.1.1: cannot open shared object file: No such file or directory
需要软连接
查找 libssl.so.1.1 文件

find / -name libssl.so.1.1
/usr/local/lib64/libssl.so.1.1
/usr/local/openssl/lib/libssl.so.1.1
/home/software/openssl-1.1.0e/libssl.so.1.1
[root@rhel7pc1 test]# find / -name libcrypto.so.1.1
/usr/local/lib64/libcrypto.so.1.1
/usr/local/openssl/lib/libcrypto.so.1.1
/home/software/openssl-1.1.0e/libcrypto.so.1.1

建立软连接
# ln -s /usr/local/lib64/libssl.so.1.1  /usr/lib64/libssl.so.1.1
# ln -s /usr/local/lib64/libcrypto.so.1.1  /usr/lib64/libcrypto.so.1.1
安装配置nginx启动系统环境变量
vim /etc/profile
#添加
export PATH=/opt/software/nginx/sbin:$PATH
#刷新环境变量
补充keepalived放开防火墙规则
firewall-cmd --add-rich-rule='rule protocol value="vrrp" accept' --permanent firewall-cmd --reload
nginx配置文件
#user nobody;
worker_processes 1;
events {
worker_connections 1024;
}
http {
include mime.types;
default_type application/octet-stream;
sendfile        on;
keepalive_timeout  65;
upstream tomcat {
    server 10.46.6.2:8080;
    server 10.46.6.1:8080 backup;
}
#gzip  on;

server {
    listen       80;
    server_name  localhost;

    #charset koi8-r;

    #access_log  logs/host.access.log  main;
    location / {
    proxy_pass http://tomcat;
    proxy_set_header X-NGINX "NGINX-1";
    proxy_set_header Host $http_host;
    proxy_set_header X-Forward-For $remote_addr;
    proxy_set_header X-Real-IP $remote_addr;
    proxy_set_header X-Forwarded-For $proxy_add_x_forwarded_for;
    proxy_set_header X-Forwarded-Proto $scheme;
        #root   html;
        #index  index.html index.htm;
    }
    location /mapfile {
                add_header 'Access-Control-Allow-Origin' '*';
                expires 24h;
                root  /home;  #指定图片存放路径  核心
                proxy_store on;
                proxy_temp_path     /home/mapfile;  #图片访问路径  核心
                proxy_redirect     off;
                proxy_set_header    Host 127.0.0.1;
                client_max_body_size  10m;
                client_body_buffer_size 1280k;
                proxy_connect_timeout  900;
                proxy_send_timeout   900;
                proxy_read_timeout   900;
                proxy_buffer_size    40k;
                proxy_buffers      40 320k;
                proxy_busy_buffers_size 640k;
                proxy_temp_file_write_size 640k;
                #if ( !-e $request_filename)
                  #{
                  #   proxy_pass http://127.0.0.1; #默认80端口
                 # }
            proxy_intercept_errors on;
            error_page 404 500 502 = /back.png;
            }


    error_page   500 502 503 504  /50x.html;
    location = /50x.html {
        root   html;
    }


}


# another virtual host using mix of IP-, name-, and port-based configuration
#
#server {
#    listen       8000;
#    listen       somename:8080;
#    server_name  somename  alias  another.alias;

#    location / {
#        root   html;
#        index  index.html index.htm;
#    }
#}


# HTTPS server
#
#server {
#    listen       443 ssl;
#    server_name  localhost;

#    ssl_certificate      cert.pem;
#    ssl_certificate_key  cert.key;

#    ssl_session_cache    shared:SSL:1m;
#    ssl_session_timeout  5m;

#    ssl_ciphers  HIGH:!aNULL:!MD5;
#    ssl_prefer_server_ciphers  on;

#    location / {
#        root   html;
#        index  index.html index.htm;
#    }
#}
}


 212
212


 被折叠的 条评论
为什么被折叠?
被折叠的 条评论
为什么被折叠?
 到【灌水乐园】发言


