


一、环境配置
1.使用idea创建一个maven项目
2.在pom.xml文件里导入spring相关依赖(注意导入的依赖版本,太高了可能会报错)
<!-- https://mvnrepository.com/artifact/org.springframework/spring-beans -->
        <dependency>
            <groupId>org.springframework</groupId>
            <artifactId>spring-beans</artifactId>
            <version>5.3.25</version>
        </dependency>

        <!--  spring context -->
        <!-- https://mvnrepository.com/artifact/org.springframework/spring-context -->
        <dependency>
            <groupId>org.springframework</groupId>
            <artifactId>spring-context</artifactId>
            <version>5.3.25</version>
        </dependency>

        <!--  spring core  -->
        <!-- https://mvnrepository.com/artifact/org.springframework/spring-core -->
        <dependency>
            <groupId>org.springframework</groupId>
            <artifactId>spring-core</artifactId>
            <version>5.3.25</version>
        </dependency>

        <!-- https://mvnrepository.com/artifact/org.springframework/spring-expression -->
        <dependency>
            <groupId>org.springframework</groupId>
            <artifactId>spring-expression</artifactId>
            <version>5.3.25</version>
        </dependency>

        <!-- https://mvnrepository.com/artifact/commons-logging/commons-logging -->
        <dependency>
            <groupId>commons-logging</groupId>
            <artifactId>commons-logging</artifactId>
            <version>1.2</version>
        </dependency>
二、创建接口类
Ink接口类:
package com.xx.biz;

public interface Ink {
    public String getColor();
}
Paper接口类:
package com.xx.biz;

public interface Paper {
    public String getContent();
    public void putInChars(String content);
}
三、创建接口实现类
ColorInk:
package com.xx.impl;

import com.xx.biz.Ink;
import lombok.Data;


import java.awt.*;

/**
 * @author xie
 * @description: TODO
 * @date 2024/4/18 14:20
 */
@Data
public class ColorInk implements Ink {
    private int red;
    private int green;
    private int blue;

    @Override
    public String getColor() {
        Color color = new Color(this.red,this.green,this.blue);
        return "#" + Integer.toHexString(color.getRGB()).substring(2);

    }
}
GreyInk:
package com.xx.impl;

import com.xx.biz.Ink;
import lombok.Data;
import lombok.NoArgsConstructor;

import java.awt.*;

/**
 * @author xie
 * @description: TODO
 * @date 2024/4/18 14:18
 */
@Data
@NoArgsConstructor
public class GreyInk implements Ink {
    private int red;
    private int green;
    private int blue;
    @Override
    public String getColor() {
        int c = (this.red + this.green + this.blue)/3;
        Color color = new Color(c,c,c);
        return "#" + Integer.toHexString(color.getRGB()).substring(2);
    }
}
TextPaper:
package com.xx.impl;

import com.xx.biz.Paper;
import lombok.AllArgsConstructor;
import lombok.Data;
import lombok.NoArgsConstructor;

/**
 * @author xie
 * @description: TODO
 * @date 2024/4/18 14:21
 */
@Data
public class TextPaper implements Paper {
    private int charPerLine;
    private int linePerLine;
    private String content = "";

    public TextPaper(int charPerLine, int linePerLine) {
        this.charPerLine = charPerLine;
        this.linePerLine = linePerLine;
    }
    @Override
    public String getContent() {
        String out = "每行字符数" + this.charPerLine + "\n";
        out += "每行页数" + this.linePerLine + "\n";
        out += this.content;
        return out;
    }

    @Override
    public void putInChars(String content) {
        this.content = content;
    }
}
四、编写Printer类
package com.xx;

import com.xx.biz.Ink;
import com.xx.biz.Paper;
import lombok.Data;
import lombok.NoArgsConstructor;

/**
 * @author xie
 * @description: TODO
 * @date 2024/4/18 14:16
 */
@Data
public class Printer {
    private Ink ink;
    private Paper paper;
    public Printer(Ink ink,Paper paper){
        this.ink = ink;
        this.paper = paper;
    }
    public void print(String str){
        System.out.println("使用" + ink.getColor() + "颜色打印");
        paper.putInChars(str);
        System.out.println(paper.getContent());
    }
}
五、创建applicationContext.xml文件,创建相关bean,将实现类注入进去
<?xml version="1.0" encoding="UTF-8" ?>
<!-- spring-config.xml -->
<beans xmlns="http://www.springframework.org/schema/beans"
       xmlns:xsi="http://www.w3.org/2001/XMLSchema-instance"
       xsi:schemaLocation="http://www.springframework.org/schema/beans http://www.springframework.org/schema/beans/spring-beans.xsd">

    <bean id="ColorInk" class="com.xx.impl.ColorInk">
        <property name="red" value="10" />
        <property name="green" value="20" />
        <property name="blue" value="30" />
    </bean>

    <bean id="greyInk" class="com.xx.impl.GreyInk">
        <property name="red" value="20" />
        <property name="green" value="30" />
        <property name="blue" value="40" />
    </bean>

    <bean id="textPaper" class="com.xx.impl.TextPaper">
        <constructor-arg value="10" />
        <constructor-arg value="8" />
    </bean>

    <bean id="printer" class="com.xx.Printer">
        <constructor-arg ref="greyInk" />
        <constructor-arg ref="textPaper" />
    </bean>

</beans>
六、编写测试类及输出结果
import com.xx.Printer;
import org.junit.Test;
import org.springframework.context.ApplicationContext;
import org.springframework.context.support.ClassPathXmlApplicationContext;
/**
* @author xie
* @description: TODO
* @date 2024/4/18 14:29
*/
public class PrinterTest {
@Test
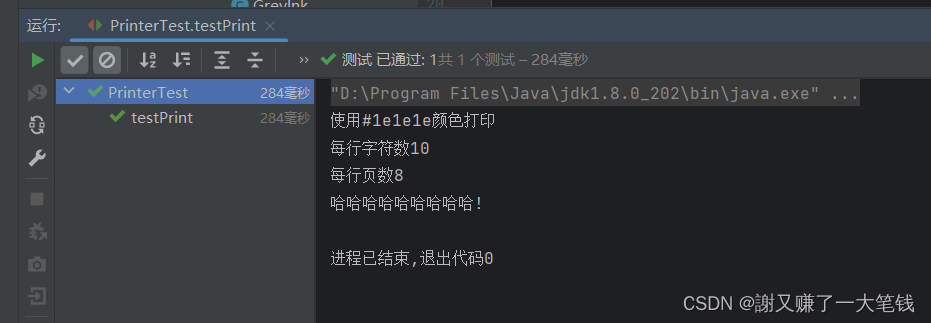
public void testPrint() {
ApplicationContext context = new ClassPathXmlApplicationContext("applicationContext.xml");
Printer printer = (Printer) context.getBean("printer");
printer.print("哈哈哈哈哈哈哈哈哈!");
}
}
输出结果:


 2527
2527

 被折叠的 条评论
为什么被折叠?
被折叠的 条评论
为什么被折叠?
 到【灌水乐园】发言


