


1.安装
openssh 开源
openssh-serve 、openssh-client
启动 systemctl start ssh
设置开机自启 systemctl enable ssh
由于需要修改sshd端口,停用seline服务
setenforce 0
关闭防火墙 firewall-cmd --zone=public --add-port=9999/tcp
systemctl stop firewalld
systemctl disable fireallds 设置开机不自启
对称和非对称加密
des 信息传输的双方是用一个密钥
rsa 公钥和私钥两套加密算法
使用ssh远程管理
1.账号密码方式
ssh -l用户名 -p端口号 域名/ip
ssh -p端口 用户@ip
如果端口默认22,不需要添加p选项
ssh 用户@ip
修改ssh服务端口,不允许root远程登录
vim /etc/ssh/sshd_conf
//38 root
// 17 端口
root无法远程登录,需要其他的用户和权限
useradd zhansan
passwd zhansan
useradd lisi
passwd lisi
zhansan、lisi都可以w 目录code
mkdir /code
groupadd code
chgrp -R code /code. //修改目录code的所属的组为code组
为用户添加w权限
chmod -R g+w /code
2.密钥对
1.选择一个账户 zhansan、 su zhansan
2.生成公钥和私钥 ssh-keygen
3.~/.ssh/
id_rsa 私钥
id_rsa.pub 公钥
将公钥中字符串追加到对应主机的对应用户的家目录的~/.ssh/authorized_key
公钥可以复制字符串,私钥绑定
3.ssh-copy-id -p9999 用户@ip
早:
rsync
sync同步:刷新文件系统缓存,强制将修改过的数据块写入磁盘,并且更新超级快
async异步:将数据先放到缓冲区,再周期性(一般是30s)的去同步到磁盘
rsync远程同步:==remote synchronous==
数据同步过程
sync数据同步 ==> 保存文件(目标)==> 强制把缓存中的数据写入磁盘(立即保存),实时性要求较高的场景
async数据异步 ==> 保存文件(目标)==> 将数据先放到缓冲区,再周期性(一般是30s)的去同步到磁盘,适合大批量数据同步的场景
2.rsync特点
1.可以镜像保存整个目录树和文件系统。
2.可以保留原有的权限(permission,mode)owner,group,时间(修改时
间,modify time)软硬链接,文件acl,文件属性(attributes)信息等。
传输==效率高== ,使用同步算法,只比较变化的(增量备份)
rsync的使用
1.基本语法
rsync [选项] 数据源位置 目标位置
在家目录创建文件去同步到opt
[root@q1 ~]# cd
[root@q1 ~]# mkdir folder
[root@q1 ~]# mkdir folder/f{1..3}
[root@q1 ~]# ls
[root@q1 ~]# ls folder/
f1 f2 f3
将folder目录下的文件传到opt
[root@localhost ~]# rsync -av folder/ /opt/
sending incremental file list
./
f1/
f2/
f3/
sent 107 bytes received 31 bytes 276.00 bytes/sec
total size is 0 speedup is 0.00
[root@localhost ~]# tree /opt/
/opt/
├── f1
├── f2
└── f3
3 directories, 0 files
[root@localhost ~]#
加R选项递归效果
[root@localhost ~]# rm -rf /opt/*
[root@localhost ~]# rsync -avR folder/ /opt/
sending incremental file list
folder/
folder/f1/
folder/f2/
folder/f3/
sent 118 bytes received 32 bytes 300.00 bytes/sec
total size is 0 speedup is 0.00
[root@localhost ~]# tree /opt/
/opt/
└── folder
├── f1
├── f2
└── f3
4 directories, 0 files
[root@localhost ~]#
将f1目录传到f2后,在f1创建文件,发现未同步。
[root@localhost ~]# touch folder/f1/file{1..4}
[root@localhost ~]# tree folder/
folder/
├── f1
│ ├── file1
│ ├── file2
│ ├── file3
│ ├── file4
│ └── file5
├── f2
└── f3
[root@localhost ~]# rsync -av folder/f1/ folder/f2/
sending incremental file list
./
file1
file2
file3
file4
sent 261 bytes received 95 bytes 712.00 bytes/sec
total size is 0 speedup is 0.00
[root@localhost ~]# touch folder/f1/file5
[root@localhost ~]# tree folder/
folder/
├── f1
│ ├── file1
│ ├── file2
│ ├── file3
│ ├── file4
│ └── file5
├── f2
│ ├── file1
│ ├── file2
│ ├── file3
│ └── file4
└── f3
3 directories, 9 files
[root@localhost ~]#
在f1删除一个文件,再次同步到f2,效果
[root@localhost ~]# rm -rf folder/f1/file1
[root@localhost ~]# tree folder/
folder/
├── f1
│ ├── file2
│ ├── file3
│ ├── file4
│ └── file5
├── f2
│ ├── file1
│ ├── file2
│ ├── file3
│ └── file4
└── f3
3 directories, 8 files
[root@localhost ~]# rsync -av folder/f1/ folder/f2/
sending incremental file list
./
file5
sent 150 bytes received 38 bytes 376.00 bytes/sec
total size is 0 speedup is 0.00
[root@localhost ~]# tree folder/
folder/
├── f1
│ ├── file2
│ ├── file3
│ ├── file4
│ └── file5
├── f2
│ ├── file1
│ ├── file2
│ ├── file3
│ ├── file4
│ └── file5
└── f3
3 directories, 9 files
[root@localhost ~]#
发现未同步,f2的file1文件仍存在
解决方法
[root@localhost ~]# rsync -av --delete folder/f1/ folder/f2/
sending incremental file list
./
file1
sent 199 bytes received 38 bytes 474.00 bytes/sec
total size is 28 speedup is 0.12
[root@localhost ~]# tree folder/
folder/
├── f1
│ ├── file1
│ ├── file2
│ ├── file3
│ ├── file4
│ └── file5
├── f2
│ ├── file1
│ ├── file2
│ ├── file3
│ ├── file4
│ └── file5
└── f3
3 directories, 10 files
为文件写内容,再次同步
[root@localhost ~]# vi folder/f1/file1
[root@localhost ~]# cat folder/f1/file1
大家哈,我是光固化
[root@localhost ~]# cat folder/f2/file1
[root@localhost ~]# rsync -av --delete folder/f1/ folder/f2/
sending incremental file list
./
file1
sent 199 bytes received 38 bytes 474.00 bytes/sec
total size is 28 speedup is 0.12
[root@localhost ~]# tree folder/
folder/
├── f1
│ ├── file1
│ ├── file2
│ ├── file3
│ ├── file4
│ └── file5
├── f2
│ ├── file1
│ ├── file2
│ ├── file3
│ ├── file4
│ └── file5
└── f3
3 directories, 10 files
[root@localhost ~]# cat folder/f2/file1
大家哈,我是光固化
即rsync可同步文件的创建、删除、内容的修改、以及文件的属性
从21主机传从到22主机,rsync需要两台机器都安装
[root@q1 ~]# history > history.txt
//scp 方式
[root@q1 ~]# scp -r ./history.txt root@192.168.1.22:/tmp
The authenticity of host '192.168.1.22 (192.168.1.22)' can't be established.
ECDSA key fingerprint is SHA256:BL6/9GQ5XSRRaU7Oo9RL2rnPC/hIU3ZehVq0Ct+W1ng.
ECDSA key fingerprint is MD5:aa:15:ff:52:1f:ee:8e:5d:c4:d5:b6:c9:4c:c7:db:5c.
Are you sure you want to continue connecting (yes/no)? yes
Warning: Permanently added '192.168.1.22' (ECDSA) to the list of known hosts.
root@192.168.1.22's password:
history.txt 100% 23KB 8.0MB/s 00:00
rsync同步方式
[root@q1 ~]# rsync -av folder/ root@192.168.1.22:/tmp
root@192.168.1.22's password:
sending incremental file list
./
f1/
f2/
f3/
sent 107 bytes received 31 bytes 10.22 bytes/sec
total size is 0 speedup is 0.00
[root@localhost ~]# tree /tmp/
/tmp/
├── f1
├── f2
├── f3
├── history.txt
├── ks-script-yu7dKc
├── systemd-private-be89b29ef4a74570a97a71ebd8e7d1bb-chronyd.service-nz3Q3W
│ └── tmp
├── vmware-root
├── yum.log
├── yum_save_tx.2024-07-17.19-57.T984Oj.yumtx
├── yum_save_tx.2024-07-18.10-17.rV1WAH.yumtx
├── yum_save_tx.2024-07-18.10-18.NNnHct.yumtx
└── yum_save_tx.2024-07-18.10-19.PAvOjx.yumtx
6 directories, 7 files
[root@localhost ~]#
[root@localhost ~]# touch /tmp/lj
[root@localhost ~]# dd of=/dev/zero if=/tmp/lj bs=300M count=1
记录了0+0 的读入
记录了0+0 的写出
0字节(0 B)已复制,0.00165945 秒,0.0 kB/秒
[root@localhost ~]# rsync -av /tmp/lj root@192.168.1.23:/tmp
The authenticity of host '192.168.1.23 (192.168.1.23)' can't be established.
ECDSA key fingerprint is SHA256:BL6/9GQ5XSRRaU7Oo9RL2rnPC/hIU3ZehVq0Ct+W1ng.
ECDSA key fingerprint is MD5:aa:15:ff:52:1f:ee:8e:5d:c4:d5:b6:c9:4c:c7:db:5c.
Are you sure you want to continue connecting (yes/no)? yes
Warning: Permanently added '192.168.1.23' (ECDSA) to the list of known hosts.
root@192.168.1.23's password:
sending incremental file list
lj
sent 84 bytes received 35 bytes 26.44 bytes/sec
total size is 0 speedup is 0.00
[root@localhost ~]# ls -l /tmp/lj
-rw-r--r--. 1 root root 0 7月 18 11:06 /tmp/lj
[root@localhost ~]#
本地同步
1.安装rsync
2.rsync -av ~/abc/ /opt/
3.能够同步文件的内容,文件的属性,新增 修改 删除(--delete)
4.rsync -av /目录/ /tmp/ 同步目录下的内容
5.rsync -av /目录 /tmp/ 同步目录
6.rsync -avR 保存相对路径,其实也就是同步了目录
远程同步
1.2台主机都支持rsync的服务
2.rsync -ac 源 用户@ip
3.获取数据pull拉取,
[root@localhost ~]# vi /etc/rsyncd.conf
[root@localhost ~]# mkdir -p /app/studentweb
[root@localhost ~]# cd /app/studentweb/
[root@localhost studentweb]# systemctl restart rsyncd
[app]
path=/app/studentweb/
log file=/var/log/rsync.log
同步服务器的设置
启动服务
systemctl strat rsyncd
修改配置文件
vim /etc/rsyncd.conf
[abc]
path=/app/javajproject/
Log file=/var/rsync.log
重启服务
systemctl restart rsyncd
在另一台主机上拉取rsync服务中的项目
测试是否能够检测到项目 检测到配置的abc
rsync -a root@192.168.1.23::
abc
rsync -av 源 目标位置
[root@localhost ~]# rm -rf /tmp/*
[root@localhost ~]# ls /tmp
[root@localhost ~]# rsync -a root@192.168.1.22::
app
//备份服务器不需要启动rsyncd服务
备份服务器通过rsync同步22主机的源文件
[root@localhost ~]# rsync -av root@192.168.1.22::efg /tmp/
receiving incremental file list
rsync: opendir "/." (in efg) failed: Permission denied (13)
./
sent 27 bytes received 113 bytes 13.33 bytes/sec
total size is 0 speedup is 0.00
rsync error: some files/attrs were not transferred (see previous errors) (code 23) at main.c(1658) [generator=3.1.2]
设置每30秒推送一次代码
编辑计划任务
找到rsync的which地址
[root@localhost ~]# systemctl restart rsyncd
[root@localhost ~]# which rsync
/usr/bin/rsync
[root@localhost ~]# crontab -e
*/1 * * * * /usr/bin/rsync -av /app/studentweb/ root@192.168.1.23:/tmp/
no crontab for root - using an empty one
crontab: installing new crontab
[root@localhost ~]# ls /app/studentweb/
d1 d2 d3
[root@localhost ~]# ls /tmp/
d1 d2 d3
//同步成功
使用计划任务每30秒推送一次代码
如果文件没有修改,就没必要推送
自动监听文件被修改的行为,再推送
给rsyncd服务添加密码
1.编辑/etc/rsyncd.conf
添加两行账户和密码文件的路径
auth users=zhansan,lisisecrets file=/etc/rsync.secrets
[efg]
path=/app/studentweb/
log file=/var/log/rsync.log
auth users=zhansan,lisi //用户名
secrets file=/etc/rsync.secrets //密码文件
2.vim /etc/rsync.secrets //创建编辑密码
格式 账号:密码
[root@localhost ~]# vi /etc/rsync.secrets
zhansan:zhansan
lisi:lisi
以上是编辑rsync的密码
3.为/etc/rsync.secrets密码文件添加权限600
//必须为此文件设置一次权限
4.重启rsyncd服务
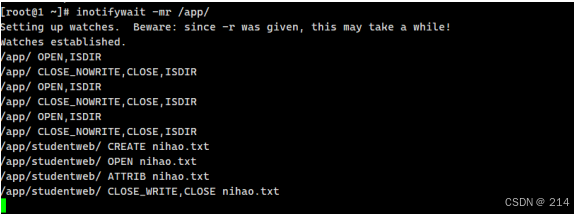
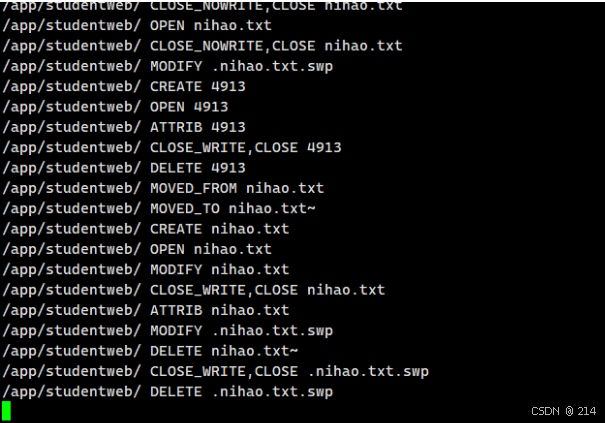
inotify 监听
inotifywait -mr /app/
[root@localhost ~]# yum -y install inotify-tools
[root@localhost ~]# inotifywait -mr /app/
Setting up watches. Beware: since -r was given, this may take a while!
Watches established.
[root@localhost ~]# vim inotify.sh
#!/bin/bash
/usr/bin/inotifywait -mrq -e modify,delete,create,attrib,move /app/studentweb|while read events
do
rsync -av /app/studentweb/ root@192.168.1.23:/tmp/
echo "'date +%F\%T'出现事件¥events" >> /var/log/rsync.log 2>&1
done
[root@localhost ~]# chmod 700 inotify.sh //添加权限
[root@localhost ~]# ./inotify.sh
[root@localhost ~]# touch /app/studentweb/c{1..2}.txt //创建文件测试
[root@localhost ~]# ls /tmp
b1.txt b2.txt b3.txt c1.txt c2.txt d1 d2 d3 //文件已同步
[root@localhost ~]#
//配置完成


 2850
2850

 被折叠的 条评论
为什么被折叠?
被折叠的 条评论
为什么被折叠?
 到【灌水乐园】发言


