


目录
SpringbootWebsocketApplication启动类
WebSocket
- SpringBoot实现长连接时最常用的技术就是WebSocket
- WebSocket是用在Web浏览器和服务器之间进行双向数据传输的一种协议,基于TCP
- 在WebSocket中,只需要服务器和浏览器通过HTTP完成一个“握手”的动作,然后单独建立 一条TCP的通信通道即可进行数据的双向传送了。
- 如果有一方想要关闭连接,则需要再完成一次“握手”通知对方,使得双方同步关闭
- 避免服务器打开多个HTTP连接以节约资源,提高工作效率和资源利用率
- 在SpringBoot项目中的使用:
- 客户端需要在HTML页面上使用JavaScript创建WebSocket端点类的对象
- 服务端需要使用SpringBoot提供的注解标注WebSocket端点类
项目总结
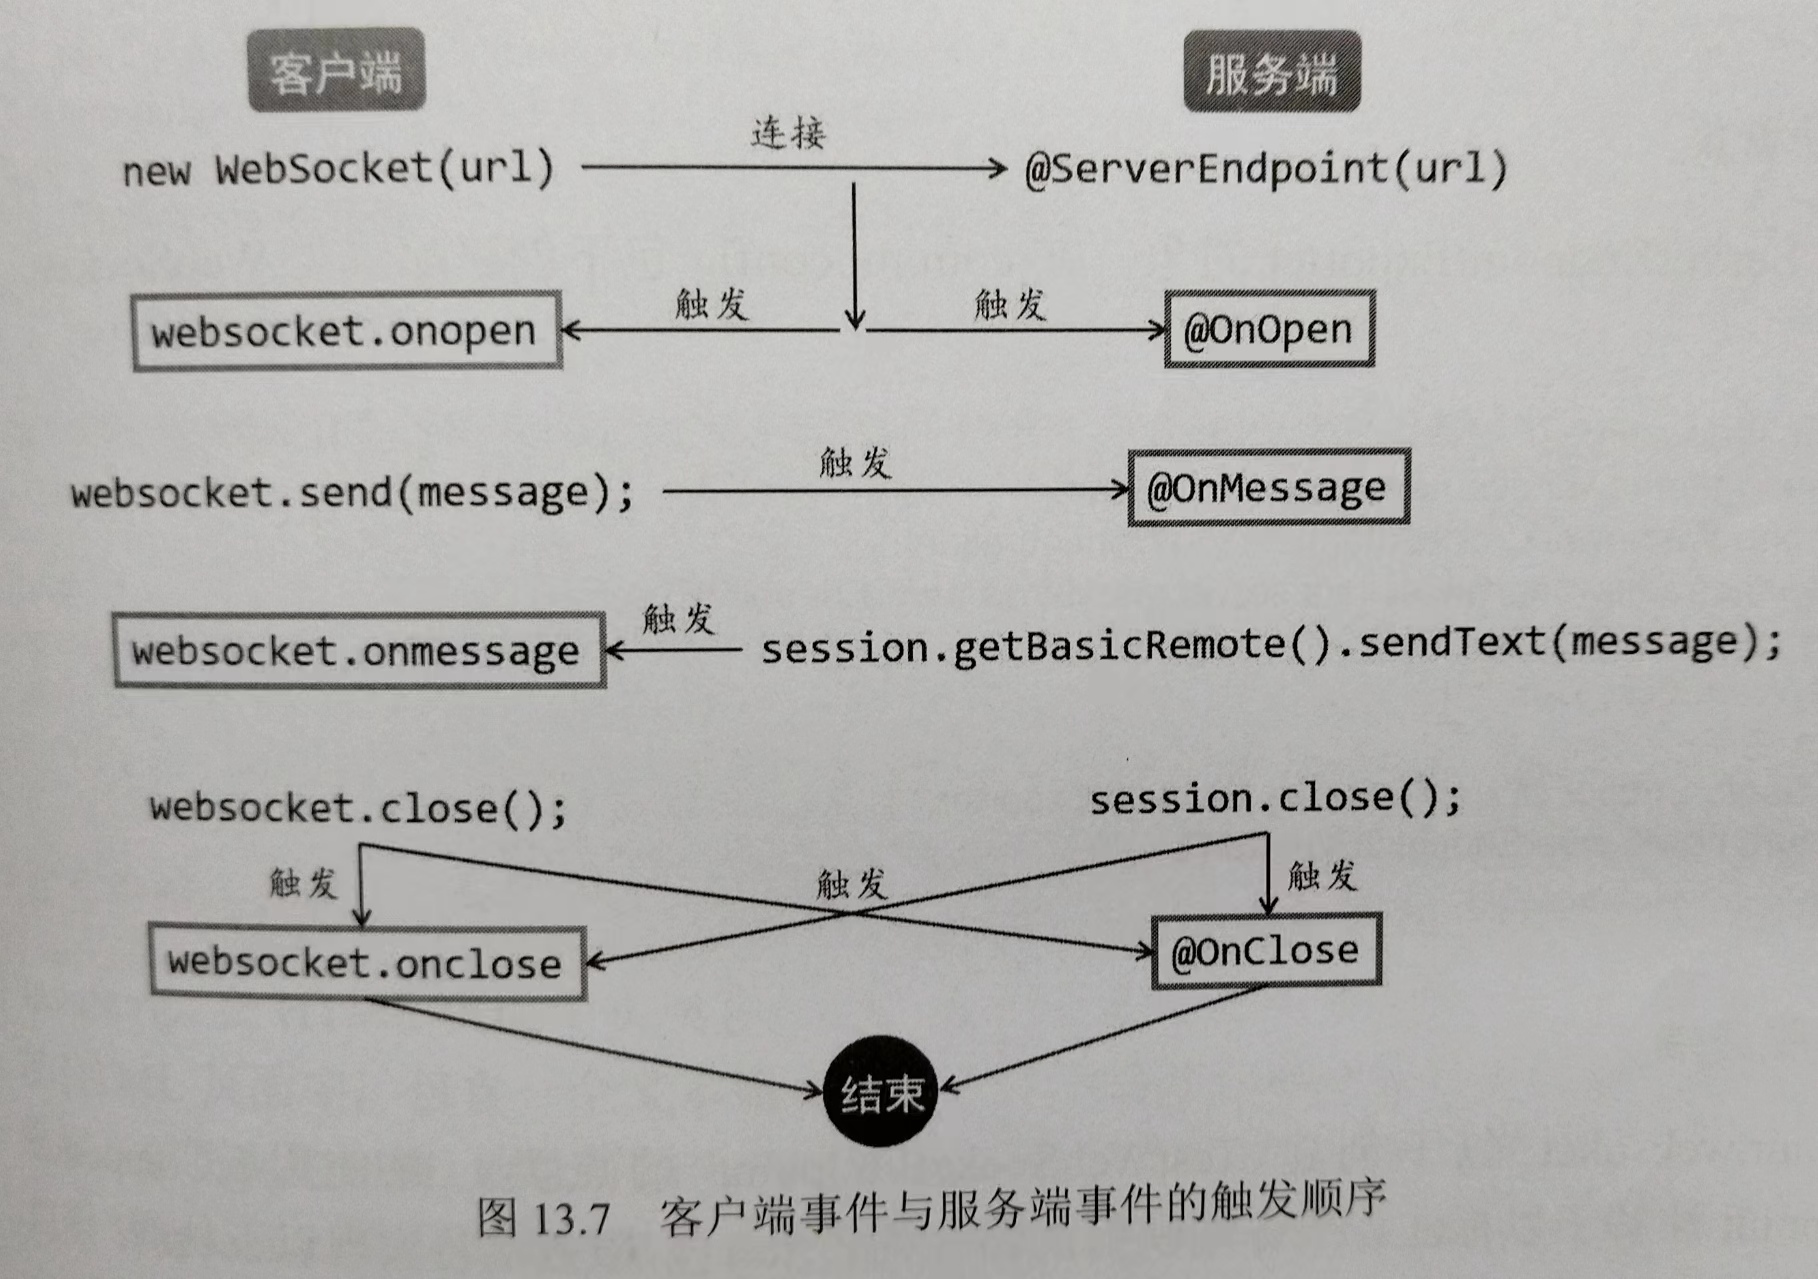
- 当客户端创建WebSocket端点类对象时,就是在尝试创建连接
- 如果连接被成功创建,则同时触发两端的打开连接事件
- 客户端的send()方法会触发服务端的发送消息事件
- 服务端通过远程端点对象发送消息会触发客户端的接收消息事件
- 不管是客户端关闭WebSocket端点类对象,还是服务端关闭Session对象,都会触发双方的关闭连接事件,导致连接被关闭
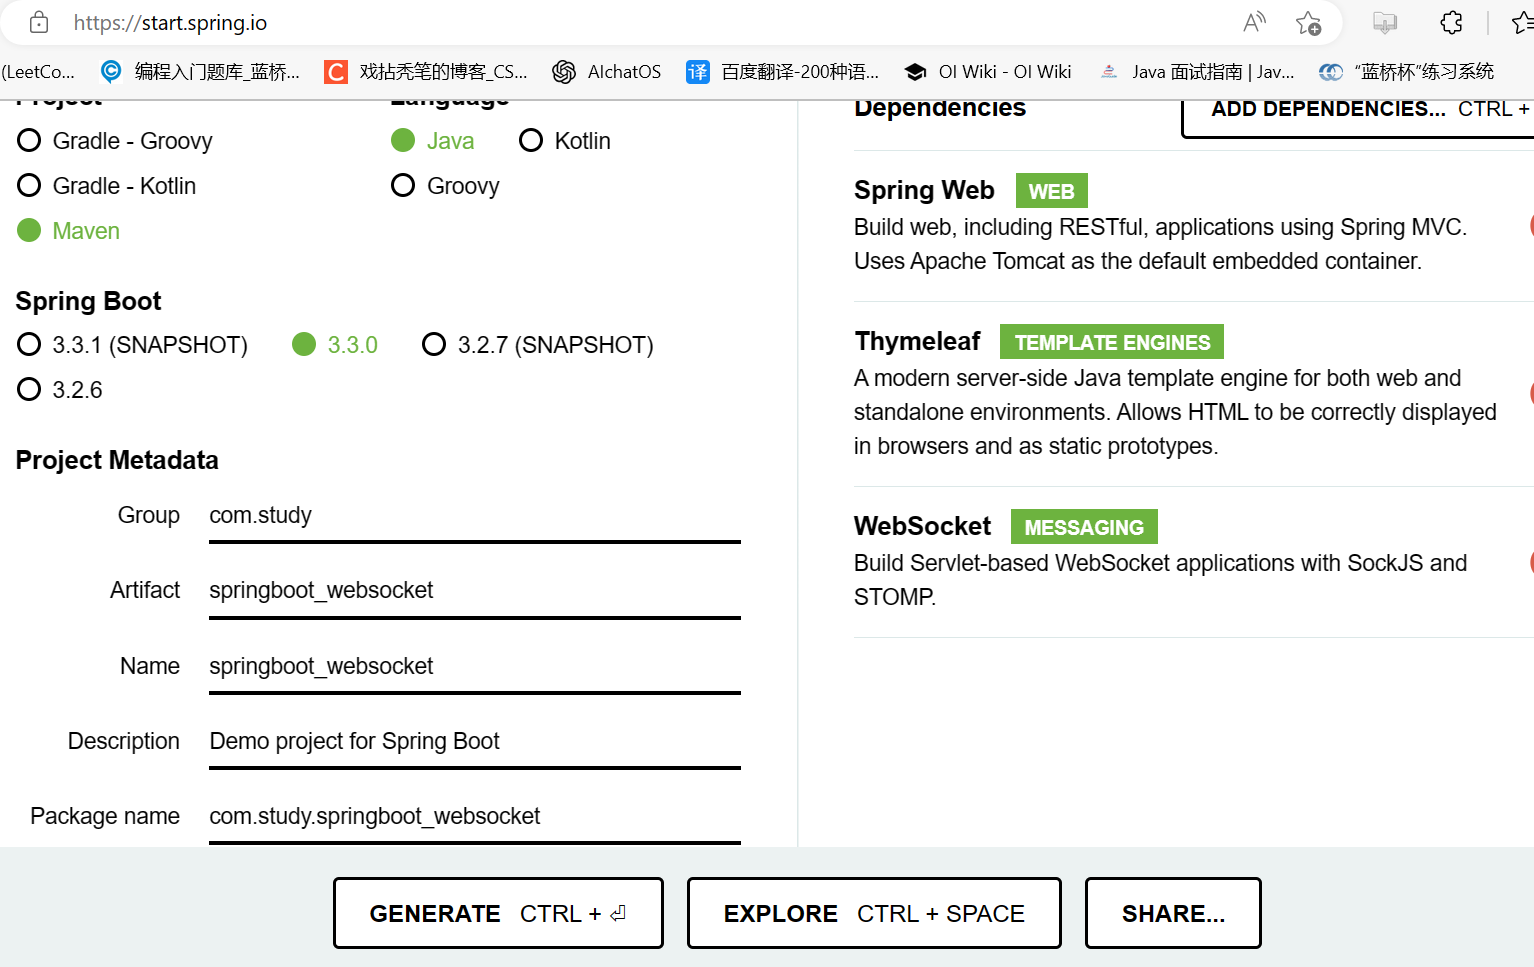
新建一个SpringBoot项目
项目结构:

pom.xml
<?xml version="1.0" encoding="UTF-8"?>
<project xmlns="http://maven.apache.org/POM/4.0.0" xmlns:xsi="http://www.w3.org/2001/XMLSchema-instance"
	xsi:schemaLocation="http://maven.apache.org/POM/4.0.0 https://maven.apache.org/xsd/maven-4.0.0.xsd">
	<modelVersion>4.0.0</modelVersion>
	<parent>
		<groupId>org.springframework.boot</groupId>
		<artifactId>spring-boot-starter-parent</artifactId>
		<version>2.3.12.RELEASE</version>
		<relativePath/> <!-- lookup parent from repository -->
	</parent>
	<groupId>com.study</groupId>
	<artifactId>springboot_websocket</artifactId>
	<version>0.0.1-SNAPSHOT</version>
	<name>springboot_websocket</name>
	<description>Demo project for Spring Boot</description>
	<properties>
		<java.version>8</java.version>
	</properties>
	<dependencies>
		<dependency>
			<groupId>org.springframework.boot</groupId>
			<artifactId>spring-boot-starter-thymeleaf</artifactId>
		</dependency>
		<dependency>
			<groupId>org.springframework.boot</groupId>
			<artifactId>spring-boot-starter-web</artifactId>
		</dependency>
		<dependency>
			<groupId>org.springframework.boot</groupId>
			<artifactId>spring-boot-starter-websocket</artifactId>
			<version>2.4.0</version>
		</dependency>
		<dependency>
			<groupId>org.springframework.boot</groupId>
			<artifactId>spring-boot-starter-test</artifactId>
			<scope>test</scope>
		</dependency>
	</dependencies>

	<build>
		<plugins>
			<plugin>
				<groupId>org.springframework.boot</groupId>
				<artifactId>spring-boot-maven-plugin</artifactId>
			</plugin>
		</plugins>
	</build>

</project>
WebSocketConfig配置类
package com.study.springboot_websocket.config;

import org.springframework.context.annotation.Bean;
import org.springframework.context.annotation.Configuration;
import org.springframework.web.socket.server.standard.ServerEndpointExporter;

@Configuration
public class WebSocketConfig {

    @Bean
    public ServerEndpointExporter serverEndpointExporter(){
        return new ServerEndpointExporter();
    }
}
TestWebSocketEndpoint服务端点类
- 一个服务端可以同时拥有多个WebSocket端点类,不同WebSocket端点类所映射的路径也不同
- @ServerEndpoint
- 该注解将该类标识为WebSocket端点类
- 需要和@Component注解一起使用,让WebSocket端点类可以被SpringBoot注册
- 完整路径是以"ws://"开头的,比如下列代码中,是"ws://localhost:8080/test"
- 客户端使用该完整路径与服务端建立连接
- Session对象:
- 客户端每次与服务端建立连接后都会产生一个Session对象,Session对象可以存储一些由客户端传递给服务端的资料信息
- 客户端只能使用一个Session对象,因为服务端可以连接多个客户端,所以服务端可以同时使用多个Session对象
- WebSocket端点类可以捕捉4个事件:
- 打开连接事件:@OnOpen
- 发送消息事件:@OnMessage
- 发生错误事件:@OnError
- 关闭连接事件:@OnClose
- 当发生某一个事件时可自行触发注解所标注的方法
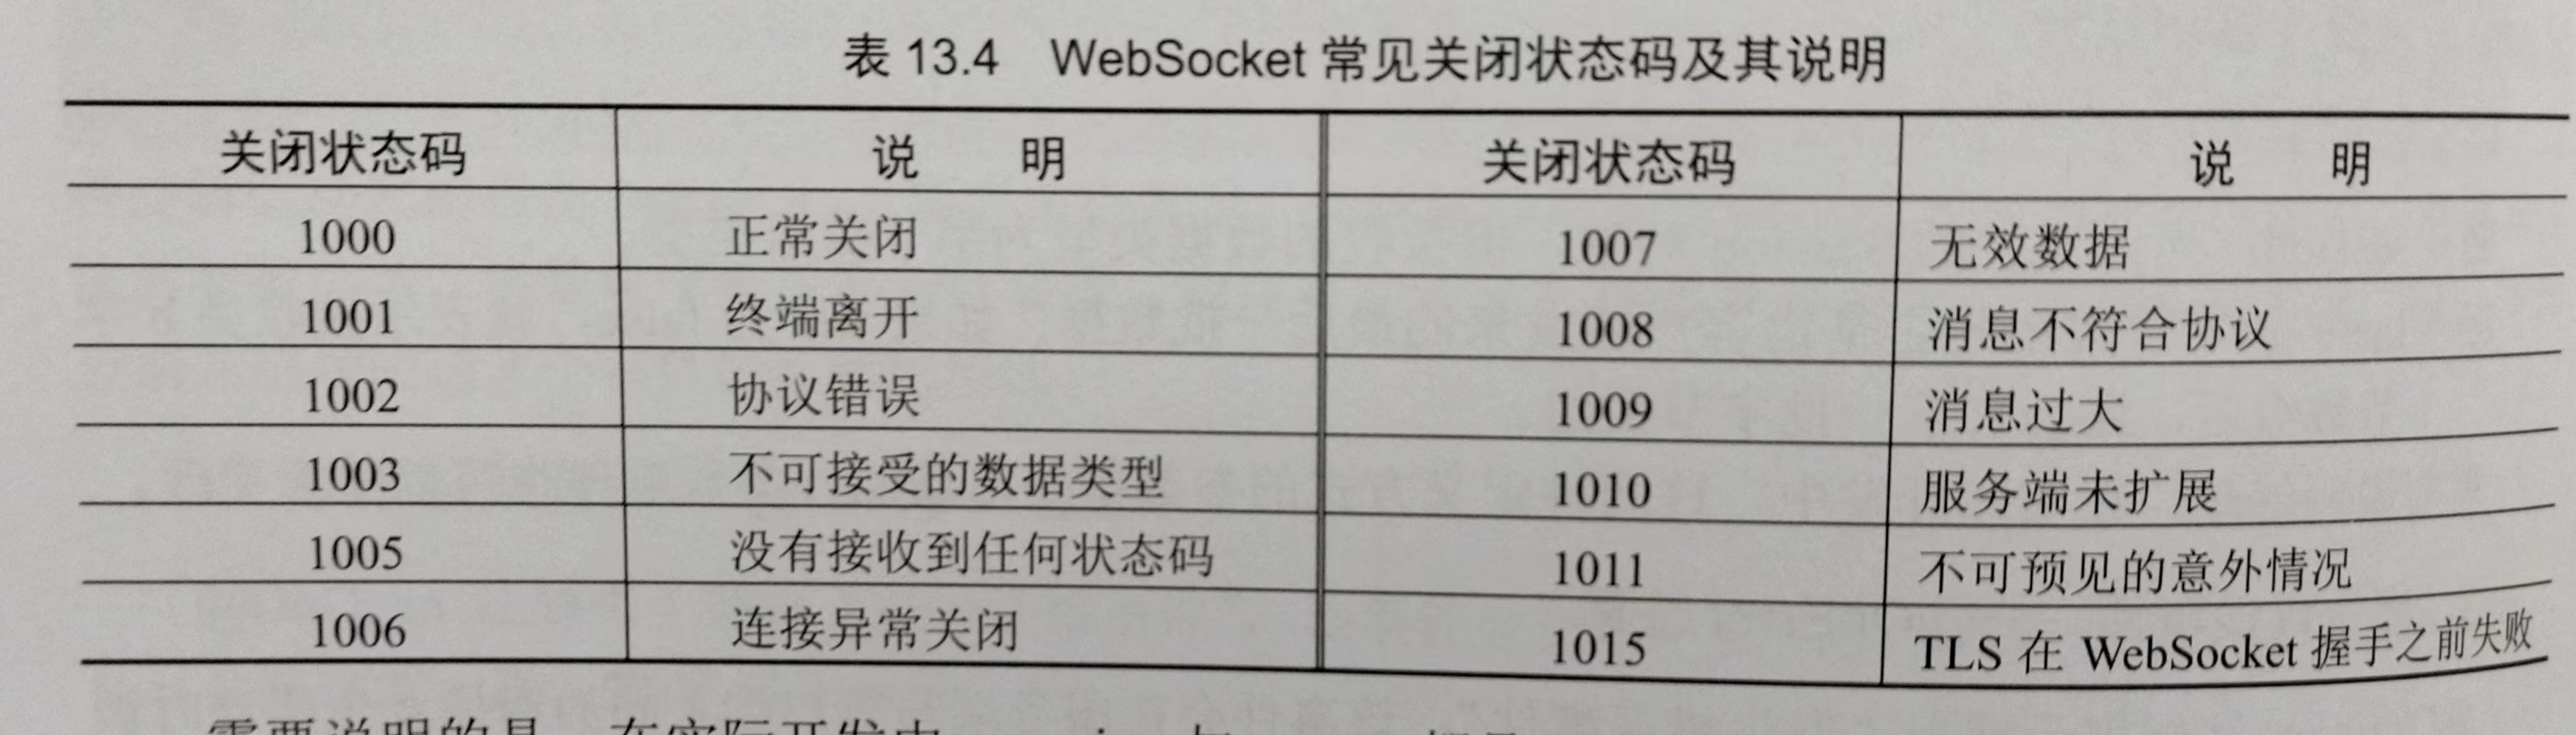
- WebSocket常见关闭状态码:
package com.study.springboot_websocket.websocket;
import org.springframework.stereotype.Component;
import javax.websocket.*;
import javax.websocket.server.ServerEndpoint;
import java.io.IOException;
/**
* 服务器端点类
*/
@Component
@ServerEndpoint("/test")//设置端点的映射路径,将该类标识为WebSocket端点类
public class TestWebSocketEndpoint {
@OnOpen
public void onOpen(Session session)throws IOException {
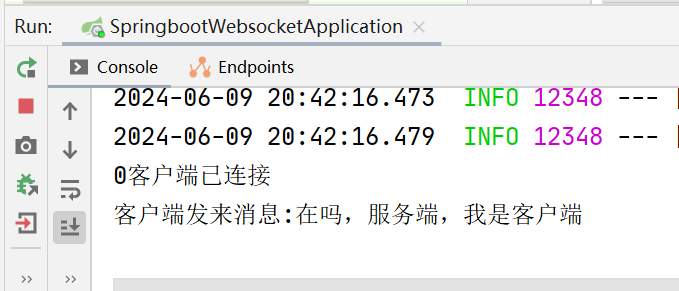
System.out.println(session.getId()+"客户端已连接");
}
/**
* 当连接关闭时,在控制台打印关闭状态码
*/
@OnClose
public void onClose(Session session, CloseReason reason){
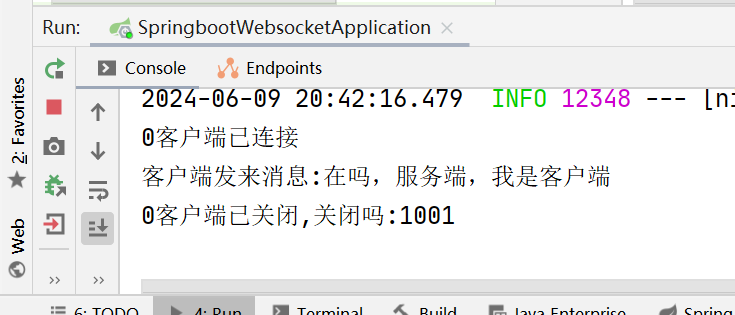
System.out.println(session.getId()+"客户端已关闭,关闭吗:"+reason.getCloseCode().getCode());
}
/**
* 当服务端收到客户端发来的消息后,延迟500毫秒回复
*/
@OnMessage
public void onMessage(String message,Session session){
System.out.println("客户端发来消息:"+message);
try {
Thread.sleep(500);//休眠500毫秒
} catch (InterruptedException e) {
e.printStackTrace();
}
//getAsyncRemote:使用异步发送消息接口的对象向客户端发送消息
session.getAsyncRemote().sendText("服务端收到客户端发来的消息:"+message);
}
/**
* 打印异常
*/
@OnError
public void onError(Session session,Throwable e){
e.printStackTrace();//打印异常
}
}
socket.html客户端
- WebSocket客户端通常是网页浏览器,因此需要使用JavaScript予以实现
- 须保证WebSocket端点类的对象映射的路径与服务端映射的路径相同
- JavaScript的WebSocket端点类也可以捕捉4个事件:
- 打开连接事件
- 接收消息事件
- 发生错误事件
- 关闭连接事件
- 这4个事件与服务器端点的4个事件具有相同的逻辑
- WebSocket端点类的对象常用方法:
- send():向服务端发送消息
- close():正常关闭连接
<!DOCTYPE html>
<html lang="en">
<head>
    <meta charset="UTF-8">
    <script type="text/javascript">
        var websocket=null;
        var local=window.location;//当前页面的URL地址
        var url="ws://"+local.host+"/test";//长链接地址
        if("WebSocket" in window){
            websocket=new WebSocket(url);
        }else{
            alert("当前浏览器不支持长链接,请更换浏览器")
        }
        //连接发生错误触发的方法
        websocket.onerror=function () {
            document.getElementById("message").innerHTML+="<br/>发生错误";
            websocket.close();
        }
        //连接成功建立触发的方法
        websocket.onopen=function (event) {
            document.getElementById("message").innerHTML+="<br/>连接已创建";
        }
        //连接关闭触发的方法
        websocket.onclose=function () {
            document.getElementById("message").innerHTML+="<br/>连接已关闭";
        }
        //接收到消息触发的方法
        websocket.onmessage=function (event) {
            //将服务端发来的消息拼接到div中
            document.getElementById("message").innerHTML+="<br/>"+event.data;
        }
        //监听窗口关闭事件,当窗口关闭后要主动关闭websocket连接
        websocket.opbeforeunload=function () {
            websocket.close();
        }
        //单击按钮触发的方法
        function send() {
            var message=document.getElementById("text").value;//获取输入框中的文本
            websocket.send(message);//发送给服务端
        }
    </script>
</head>
<body>
    <input type="text" id="text">
    <input type="button" id="btn" value="发送" onclick="send()"/>
    <br/>
    <div id="message"></div>
</body>
</html>
IndexController控制器
package com.study.springboot_websocket.controller;

import org.springframework.stereotype.Controller;
import org.springframework.web.bind.annotation.RequestMapping;

@Controller
public class IndexController {
    @RequestMapping("/index")
    public String index(){
        return "socket";//当用户访问"/index"地址时跳转到socket.html页面
    }
}
SpringbootWebsocketApplication启动类
package com.study.springboot_websocket;

import org.springframework.boot.SpringApplication;
import org.springframework.boot.autoconfigure.SpringBootApplication;

@SpringBootApplication
public class SpringbootWebsocketApplication {

	public static void main(String[] args) {
		SpringApplication.run(SpringbootWebsocketApplication.class, args);
	}

}
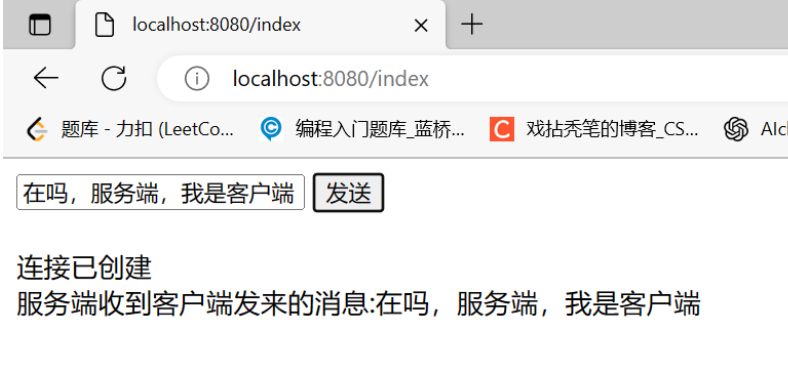
测试客户端和服务端如何使用WebSocket进行连接和通信
运行启动类,访问网址:http://localhost:8080/index
关闭浏览器后


 6589
6589

 被折叠的 条评论
为什么被折叠?
被折叠的 条评论
为什么被折叠?
 到【灌水乐园】发言


