


目录
资源限制
当定义 Pod 时可以选择性地为每个容器设定所需要的资源数量。 最常见的可设定资源是 CPU 和内存大小,以及其他类型的资源。
当为 Pod 中的容器指定了 request 资源时,代表容器运行所需的最小资源量,调度器就使用该信息来决定将 Pod 调度到哪个节点上。当还为容器指定了 limit 资源时,kubelet 就会确保运行的容器不会使用超出所设的 limit 资源量。kubelet 还会为容器预留所设的 request 资源量, 供该容器使用。
如果 Pod 运行所在的节点具有足够的可用资源,容器可以使用超出所设置的 request 资源量。不过,容器不可以使用超出所设置的 limit 资源量。
如果给容器设置了内存的 limit 值,但未设置内存的 request 值,Kubernetes 会自动为其设置与内存 limit 相匹配的 request 值。 类似的,如果给容器设置了 CPU 的 limit 值但未设置 CPU 的 request 值,则 Kubernetes 自动为其设置 CPU 的 request 值 并使之与 CPU 的 limit 值匹配。
官网示例
https://kubernetes.io/docs/concepts/configuration/manage-compute-resources-container/
Pod 和 容器 的资源请求和限制:
spec.containers[].resources.requests.cpu //定义创建容器时预分配的CPU资源
spec.containers[].resources.requests.memory //定义创建容器时预分配的内存资源
spec.containers[].resources.limits.cpu //定义 cpu 的资源上限
spec.containers[].resources.limits.memory //定义内存的资源上限
CPU 资源单位
CPU 资源的 request 和 limit 以 cpu 为单位。Kubernetes 中的一个 cpu 相当于1个 vCPU(1个超线程)。
Kubernetes 也支持带小数 CPU 的请求。spec.containers[].resources.requests.cpu 为 0.5 的容器能够获得一个 cpu 的一半 CPU 资源(类似于Cgroup对CPU资源的时间分片)。表达式 0.1 等价于表达式 100m(毫核),表示每 1000 毫秒内容器可以使用的 CPU 时间总量为 0.1*1000 毫秒。
Kubernetes 不允许设置精度小于 1m 的 CPU 资源。
内存资源单位
内存的 request 和 limit 以字节为单位。可以以整数表示,或者以10为底数的指数的单位(E、P、T、G、M、K)来表示, 或者以2为底数的指数的单位(Ei、Pi、Ti、Gi、Mi、Ki)来表示。
如:1KB=10^3=1000,1MB=10^6=1000000=1000KB,1GB=10^9=1000000000=1000MB
1KiB=2^10=1024,1MiB=2^20=1048576=1024KiB
PS:在买硬盘的时候,操作系统报的数量要比产品标出或商家号称的小一些,主要原因是标出的是以 MB、GB为单位的,1GB 就是1,000,000,000Byte,而操作系统是以2进制为处理单位的,因此检查硬盘容量时是以MiB、GiB为单位,1GiB=2^30=1,073,741,824,相比较而言,1GiB要比1GB多出1,073,741,824-1,000,000,000=73,741,824Byte,所以检测实际结果要比标出的少一些。
kubectl describe -n <命名空间> pods <资源名称>       #查看Pod中的每个容器的资源限制的配置
kubectl describe node <node节点名称>                 #查看node节点的资源总量、每个Pod的资源限制和节点的资源限制总量及比例
示例一
apiVersion: v1
kind: Pod
metadata:
  name: frontend
spec:
  containers:
  - name: app
    image: images.my-company.example/app:v4
    env:
    - name: MYSQL_ROOT_PASSWORD
      value: "password"
    resources:
      requests:
        memory: "64Mi"
        cpu: "250m"
      limits:
        memory: "128Mi"
        cpu: "500m"
  - name: log-aggregator
    image: images.my-company.example/log-aggregator:v6
    resources:
      requests:
        memory: "64Mi"
        cpu: "250m"
      limits:
        memory: "128Mi"
        cpu: "500m"
此例子中的 Pod 有两个容器。每个容器的 request 值为 0.25 cpu 和 64MiB 内存,每个容器的 limit 值为 0.5 cpu 和 128MiB 内存。那么可以认为该 Pod 的总的资源 request 为 0.5 cpu 和 128 MiB 内存,总的资源 limit 为 1 cpu 和 256MiB 内存。
示例二
vim pod2.yaml
apiVersion: v1
kind: Pod
metadata:
  name: frontend
spec:
  containers:
  - name: web
    image: nginx
    env:
    - name: WEB_ROOT_PASSWORD
      value: "password"
    resources:
      requests:
        memory: "64Mi"
        cpu: "250m"
      limits:
        memory: "128Mi"
        cpu: "500m"
  - name: db
    image: mysql
    env:
    - name: MYSQL_ROOT_PASSWORD
      value: "abc123"
    resources:
      requests:
        memory: "512Mi"
        cpu: "0.5"
      limits:
        memory: "1Gi"
        cpu: "1"


kubectl apply -f pod2.yaml
kubectl describe pod frontend
kubectl get pods -o wide
Pod容器的资源限制:resources.requests|limits(resources与image字段同一层级)
resources.requests.cpu|memory|hugepages-<size>|ephemeral-storage|nvidia.com/gpu(需要第三方插件支持) 设置Pod容器创建时需要预留的资源量
resources.limits.cpu|memory|hugepages-<size>|ephemeral-storage|nvidia.com/gpu(需要第三方插件支持) 设置Pod容器能够使用的资源量上限
如果Pod容器的进程使用的内存资源量超过limits.memory设置的值则会引发内存不足OOM错误
QOS服务质量:确定Pod的调度和驱逐优先级
Guaranteed:Pod 中的每个容器,包含初始化容器,必须指定内存、CPU 的 requests 和 limits,并且 requests 和 limits 要相等
Burstable:Pod 中至少一个容器具有内存 或 CPU requests
BestEffort:Pod 中的所有容器都没有指定内存 或 CPU 的 requests和 limits
优先级:Guaranteed > Burstable > BestEffort
Guaranteed (QoS) 的 Pod,其优先级最高,在其资源使用量不超过其 limits 的情况下,可以确保不被杀死
在系统内存资源紧张,且集群中没有 QoS 为 Best-Effort 级别的其它 Pod 时,一旦 Burstable (QoS) 的Pod 使用的资源量超过了其 requests,这些 Pod 就容易被杀死
BestEffort (QoS) 的 Pod,其优先级最低,当系统内存资源紧张时,这些 Pod 底层容器中的进程是最先会被杀死的
健康检查
又称为探针(Probe),探针是由kubelet对容器执行的定期诊断。
探针的三种规则
●livenessProbe :判断容器是否正在运行。如果探测失败,则kubelet会杀死容器,并且容器将根据 restartPolicy 来设置 Pod 状态。 如果容器不提供存活探针,则默认状态为Success。
●readinessProbe :判断容器是否准备好接受请求。如果探测失败,端点控制器将从与 Pod 匹配的所有 service endpoints 中剔除删除该Pod的IP地址。 初始延迟之前的就绪状态默认为Failure。如果容器不提供就绪探针,则默认状态为Success。
●startupProbe(这个1.17版本增加的):判断容器内的应用程序是否已启动,主要针对于不能确定具体启动时间的应用。如果配置了 startupProbe 探测,则在 startupProbe 状态为 Success 之前,其他所有探针都处于无效状态,直到它成功后其他探针才起作用。 如果 startupProbe 失败,kubelet 将杀死容器,容器将根据 restartPolicy 来重启。如果容器没有配置 startupProbe, 则默认状态为 Success。
#注:以上规则可以同时定义。在readinessProbe检测成功之前,Pod的running状态是不会变成ready状态的。
Probe支持三种检查方法
●exec :在容器内执行指定命令。如果命令退出时返回码为0则认为诊断成功。
●tcpSocket :对指定端口上的容器的IP地址进行TCP检查(三次握手)。如果端口打开,则诊断被认为是成功的。
●httpGet :对指定的端口和uri路径上的容器的IP地址执行HTTPGet请求。如果响应的状态码大于等于200且小于400,则诊断被认为是成功的
每次探测都将获得以下三种结果之一
●成功(Success):表示容器通过了检测。
●失败(Failure):表示容器未通过检测。
●未知(Unknown):表示检测没有正常进行。
官网示例
https://kubernetes.io/docs/tasks/configure-pod-container/configure-liveness-readiness-startup-probes/
示例1:exec方式
apiVersion: v1
kind: Pod
metadata:
  labels:
    test: liveness
  name: liveness-exec
spec:
  containers:
  - name: liveness
    image: k8s.gcr.io/busybox
    args:
    - /bin/sh
    - -c
    - touch /tmp/healthy; sleep 30; rm -rf /tmp/healthy; sleep 60
    livenessProbe:
      exec:
        command:
        - cat
        - /tmp/healthy
      failureThreshold: 1
      initialDelaySeconds: 5
      periodSeconds: 5

#initialDelaySeconds:指定 kubelet 在执行第一次探测前应该等待5秒,即第一次探测是在容器启动后的第6秒才开始执行。默认是 0 秒,最小值是 0。
#periodSeconds:指定了 kubelet 应该每 5 秒执行一次存活探测。默认是 10 秒。最小值是 1。
#failureThreshold: 当探测失败时,Kubernetes 将在放弃之前重试的次数。 存活探测情况下的放弃就意味着重新启动容器。就绪探测情况下的放弃 Pod 会被打上未就绪的标签。默认值是 3。最小值是 1。
#timeoutSeconds:探测的超时后等待多少秒。默认值是 1 秒。最小值是 1。(在 Kubernetes 1.20 版本之前,exec 探针会忽略 timeoutSeconds 探针会无限期地 持续运行,甚至可能超过所配置的限期,直到返回结果为止。)
可以看到 Pod 中只有一个容器。kubelet 在执行第一次探测前需要等待 5 秒,kubelet 会每 5 秒执行一次存活探测。kubelet 在容器内执行命令 cat /tmp/healthy 来进行探测。如果命令执行成功并且返回值为 0,kubelet 就会认为这个容器是健康存活的。 当到达第 31 秒时,这个命令返回非 0 值,kubelet 会杀死这个容器并重新启动它。
vim exec.yaml
apiVersion: v1
kind: Pod
metadata:
  name: liveness-exec
  namespace: default
spec:
  containers:
  - name: liveness-exec-container
    image: busybox
    imagePullPolicy: IfNotPresent
    command: ["/bin/sh","-c","touch /tmp/live ; sleep 30; rm -rf /tmp/live; sleep 3600"]
    livenessProbe:
      exec:
        command: ["test","-e","/tmp/live"]
      initialDelaySeconds: 1
      periodSeconds: 3

kubectl create -f exec.yaml

kubectl describe pods liveness-exec
kubectl get pods -w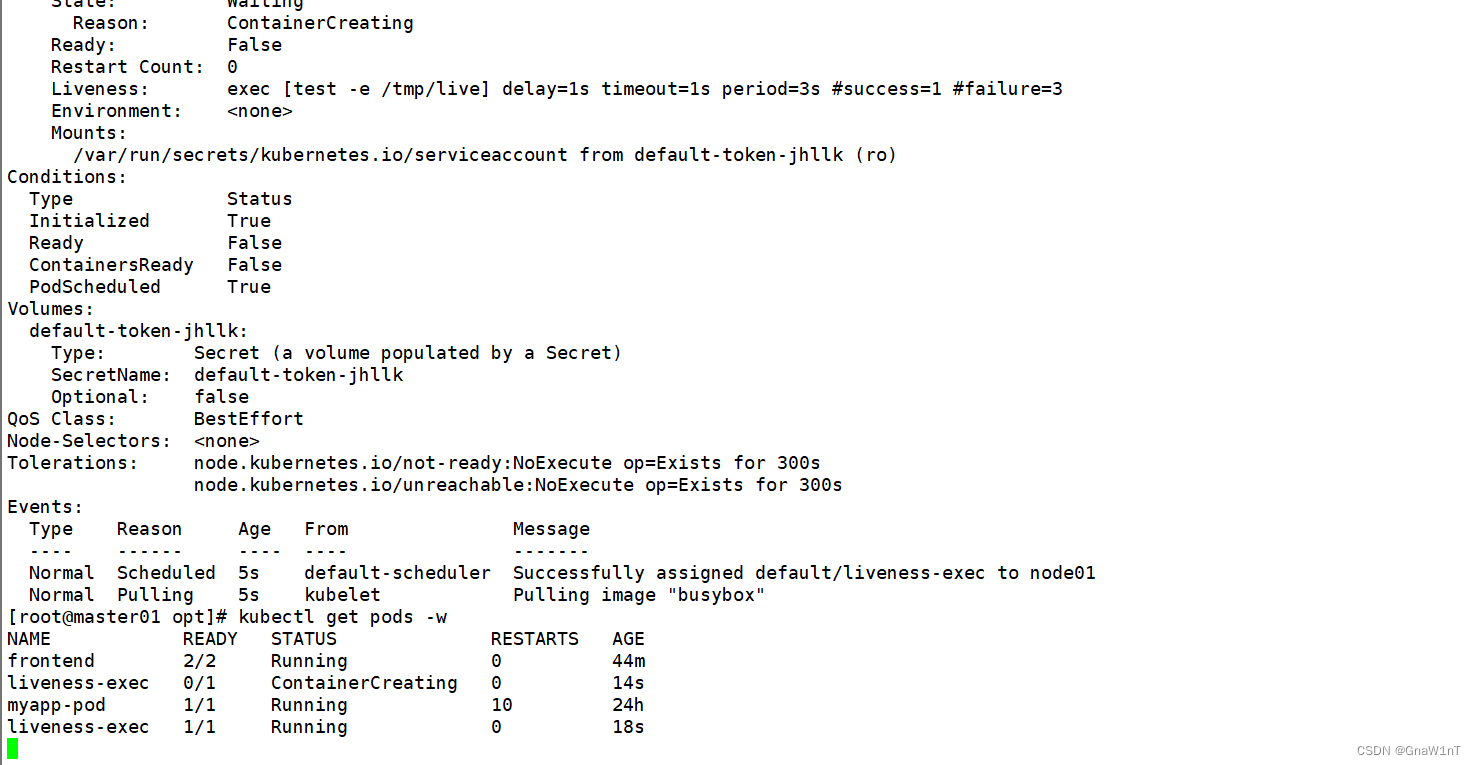
示例2:httpGet方式
apiVersion: v1
kind: Pod
metadata:
  labels:
    test: liveness
  name: liveness-http
spec:
  containers:
  - name: liveness
    image: k8s.gcr.io/liveness
    args:
    - /server
    livenessProbe:
      httpGet:
        path: /healthz
        port: 8080
        httpHeaders:
        - name: Custom-Header
          value: Awesome
      initialDelaySeconds: 3
      periodSeconds: 3
在这个配置文件中,可以看到 Pod 也只有一个容器。initialDelaySeconds 字段告诉 kubelet 在执行第一次探测前应该等待 3 秒。periodSeconds 字段指定了 kubelet 每隔 3 秒执行一次存活探测。kubelet 会向容器内运行的服务(服务会监听 8080 端口)发送一个 HTTP GET 请求来执行探测。如果服务器上 /healthz 路径下的处理程序返回成功代码,则 kubelet 认为容器是健康存活的。如果处理程序返回失败代码,则 kubelet 会杀死这个容器并且重新启动它。
任何大于或等于 200 并且小于 400 的返回代码标示成功,其它返回代码都标示失败。
vim httpget.yaml
apiVersion: v1
kind: Pod
metadata:
  name: liveness-httpget
  namespace: default
spec:
  containers:
  - name: liveness-httpget-container
    image: soscscs/myapp:v1
    imagePullPolicy: IfNotPresent
    ports:
    - name: http
      containerPort: 80
    livenessProbe:
      httpGet:
        port: http
        path: /index.html
      initialDelaySeconds: 1
      periodSeconds: 3
      timeoutSeconds: 10

kubectl create -f httpget.yaml

kubectl exec -it liveness-httpget -- rm -rf /usr/share/nginx/html/index.html

kubectl get pods
示例3:tcpSocket方式
apiVersion: v1
kind: Pod
metadata:
  name: goproxy
  labels:
    app: goproxy
spec:
  containers:
  - name: goproxy
    image: k8s.gcr.io/goproxy:0.1
    ports:
    - containerPort: 8080
    readinessProbe:
      tcpSocket:
        port: 8080
      initialDelaySeconds: 5
      periodSeconds: 10
    livenessProbe:
      tcpSocket:
        port: 8080
      initialDelaySeconds: 15
      periodSeconds: 20
这个例子同时使用 readinessProbe 和 livenessProbe 探测。kubelet 会在容器启动 5 秒后发送第一个 readinessProbe 探测。这会尝试连接 goproxy 容器的 8080 端口。如果探测成功,kubelet 将继续每隔 10 秒运行一次检测。除了 readinessProbe 探测,这个配置包括了一个 livenessProbe 探测。kubelet 会在容器启动 15 秒后进行第一次 livenessProbe 探测。就像 readinessProbe 探测一样,会尝试连接 goproxy 容器的 8080 端口。如果 livenessProbe 探测失败,这个容器会被重新启动。
vim tcpsocket.yaml
apiVersion: v1
kind: Pod
metadata:
  name: probe-tcp
spec:
  containers:
  - name: nginx
    image: soscscs/myapp:v1
    livenessProbe:
      initialDelaySeconds: 5
      timeoutSeconds: 1
      tcpSocket:
        port: 8080
      periodSeconds: 10
      failureThreshold: 2

kubectl create -f tcpsocket.yaml

kubectl exec -it probe-tcp  -- netstat -natp
kubectl get pods -w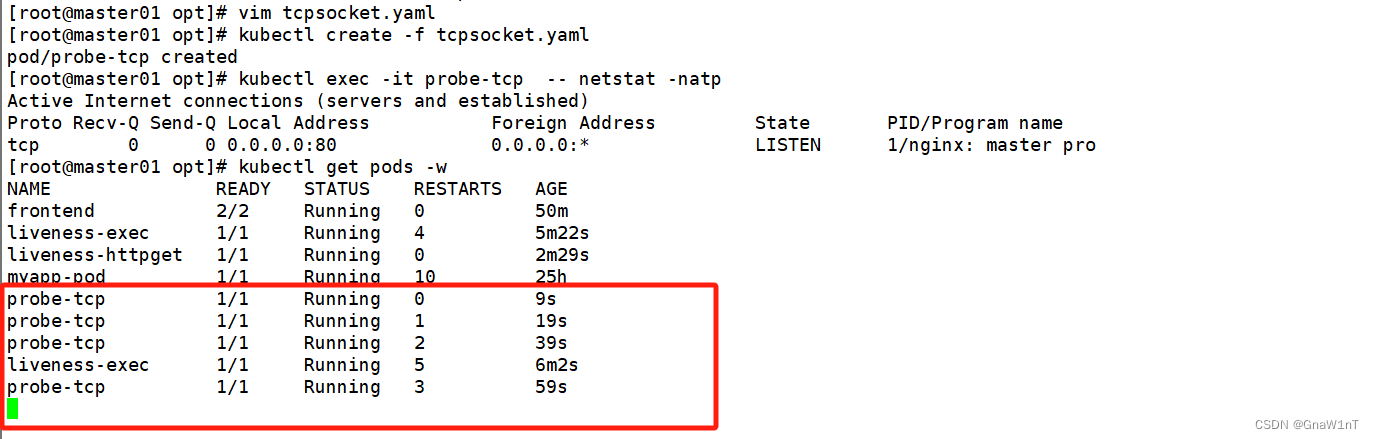
示例4:就绪检测
vim readiness-httpget.yaml
apiVersion: v1
kind: Pod
metadata:
name: readiness-httpget
namespace: default
spec:
containers:
- name: readiness-httpget-container
image: soscscs/myapp:v1
imagePullPolicy: IfNotPresent
ports:
- name: http
containerPort: 80
readinessProbe:
httpGet:
port: 80
path: /index1.html
initialDelaySeconds: 1
periodSeconds: 3
livenessProbe:
httpGet:
port: http
path: /index.html
initialDelaySeconds: 1
periodSeconds: 3
timeoutSeconds: 10
kubectl create -f readiness-httpget.yaml
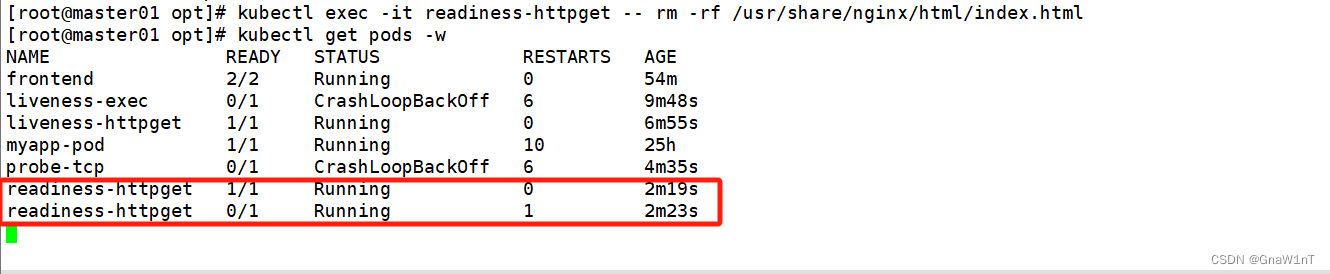
#readiness探测失败,无法进入READY状态
kubectl get pods
kubectl exec -it readiness-httpget sh
# cd /usr/share/nginx/html/
# ls
50x.html index.html
# echo 123 > index1.html
# exit
kubectl get pods
kubectl exec -it readiness-httpget -- rm -rf /usr/share/nginx/html/index.html
kubectl get pods -w
示例5:就绪检测2
vim readiness-myapp.yaml
apiVersion: v1
kind: Pod
metadata:
  name: myapp1
  labels:
     app: myapp
spec:
  containers:
  - name: myapp
    image: soscscs/myapp:v1
    ports:
    - name: http
      containerPort: 80
    readinessProbe:
      httpGet:
        port: 80
        path: /index.html
      initialDelaySeconds: 5
      periodSeconds: 5
      timeoutSeconds: 10
---
apiVersion: v1
kind: Pod
metadata:
  name: myapp2
  labels:
     app: myapp
spec:
  containers:
  - name: myapp
    image: soscscs/myapp:v1
    ports:
    - name: http
      containerPort: 80
    readinessProbe:
      httpGet:
        port: 80
        path: /index.html
      initialDelaySeconds: 5
      periodSeconds: 5
      timeoutSeconds: 10
---
apiVersion: v1
kind: Pod
metadata:
  name: myapp3
  labels:
     app: myapp
spec:
  containers:
  - name: myapp
    image: soscscs/myapp:v1
    ports:
    - name: http
      containerPort: 80
    readinessProbe:
      httpGet:
        port: 80
        path: /index.html
      initialDelaySeconds: 5
      periodSeconds: 5
      timeoutSeconds: 10
---
apiVersion: v1
kind: Service
metadata:
  name: myapp
spec:
  selector:
    app: myapp
  type: ClusterIP
  ports:
  - name: http
    port: 80
    targetPort: 80

kubectl create -f readiness-myapp.yaml
kubectl get pods,svc,endpoints -o wide
kubectl exec -it pod/myapp1 -- rm -rf /usr/share/nginx/html/index.html

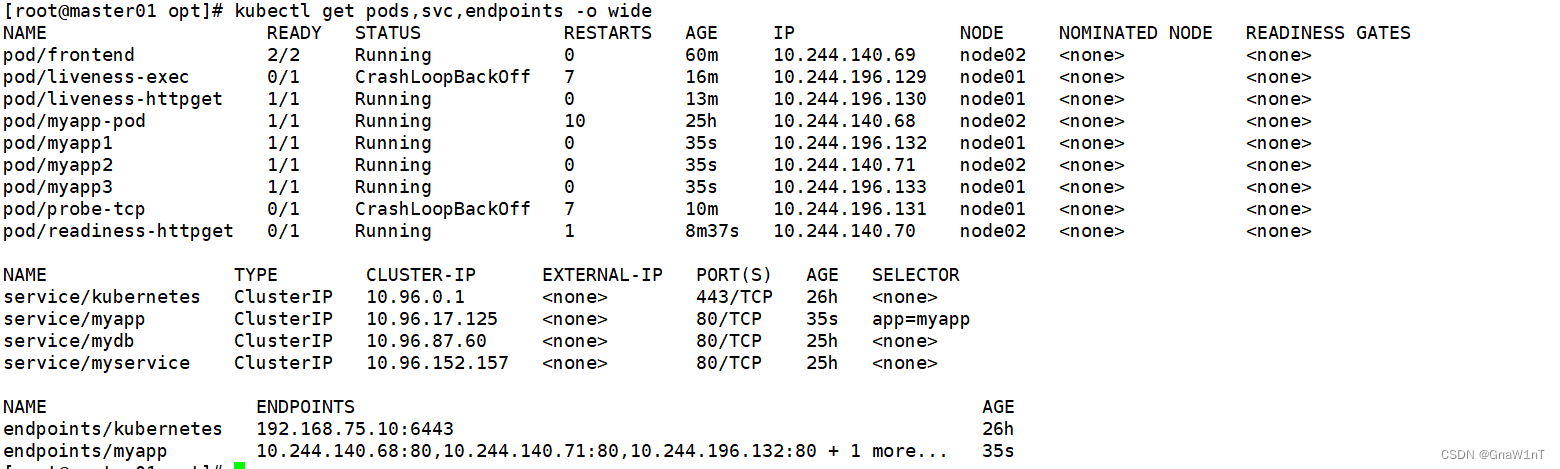
#readiness探测失败,Pod 无法进入READY状态,且端点控制器将从 endpoints 中剔除删除该 Pod 的 IP 地址
kubectl get pods,svc,endpoints -o wide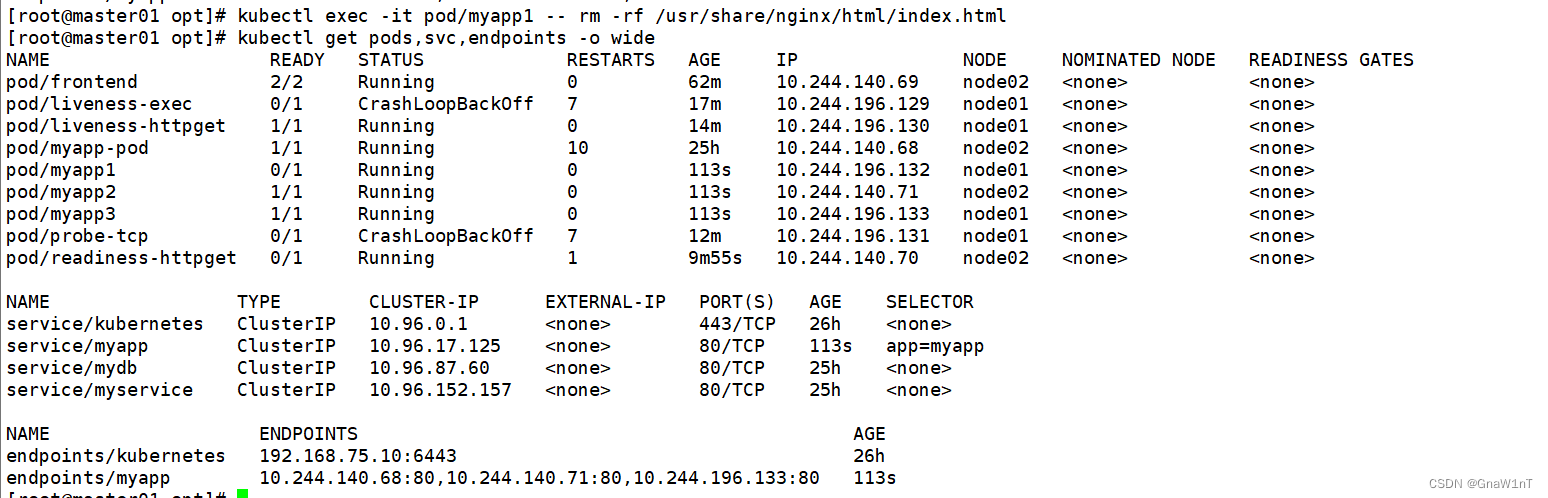
启动、退出动作
vim post.yaml
apiVersion: v1
kind: Pod
metadata:
  name: lifecycle-demo
spec:
  containers:
  - name: lifecycle-demo-container
    image: soscscs/myapp:v1
    lifecycle:   #此为关键字段
      postStart:
        exec:
          command: ["/bin/sh", "-c", "echo Hello from the postStart handler >> /var/log/nginx/message"]
      preStop:
        exec:
          command: ["/bin/sh", "-c", "echo Hello from the poststop handler >> /var/log/nginx/message"]
    volumeMounts:
    - name: message-log
      mountPath: /var/log/nginx/
      readOnly: false
  initContainers:
  - name: init-myservice
    image: soscscs/myapp:v1
    command: ["/bin/sh", "-c", "echo 'Hello initContainers'   >> /var/log/nginx/message"]
    volumeMounts:
    - name: message-log
      mountPath: /var/log/nginx/
      readOnly: false
  volumes:
  - name: message-log
    hostPath:
      path: /data/volumes/nginx/log/
      type: DirectoryOrCreate

kubectl create -f post.yaml

kubectl get pods -o wide

kubectl exec -it lifecycle-demo -- cat /var/log/nginx/message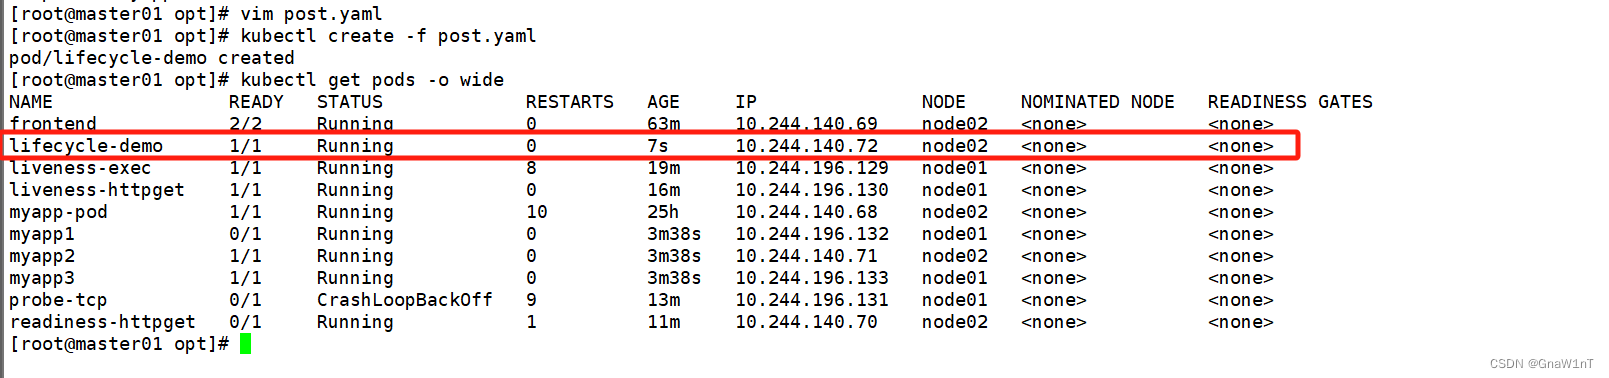
 在 node02 节点上查看
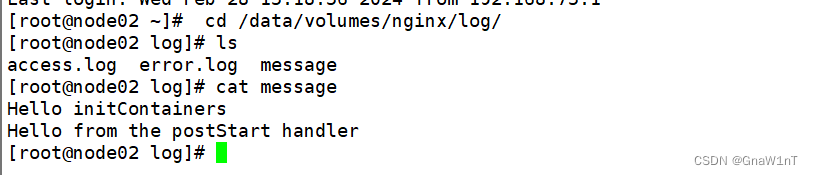 由上可知,init Container先执行,然后当一个主容器启动后,Kubernetes 将立即发送 postStart 事件。
删除 pod 后,再在 node02 节点上查看

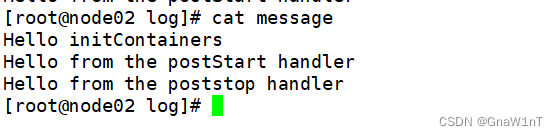
由上可知,当在容器被终结之前, Kubernetes 将发送一个 preStop 事件。


 936
936


 被折叠的 条评论
为什么被折叠?
被折叠的 条评论
为什么被折叠?
 到【灌水乐园】发言


