


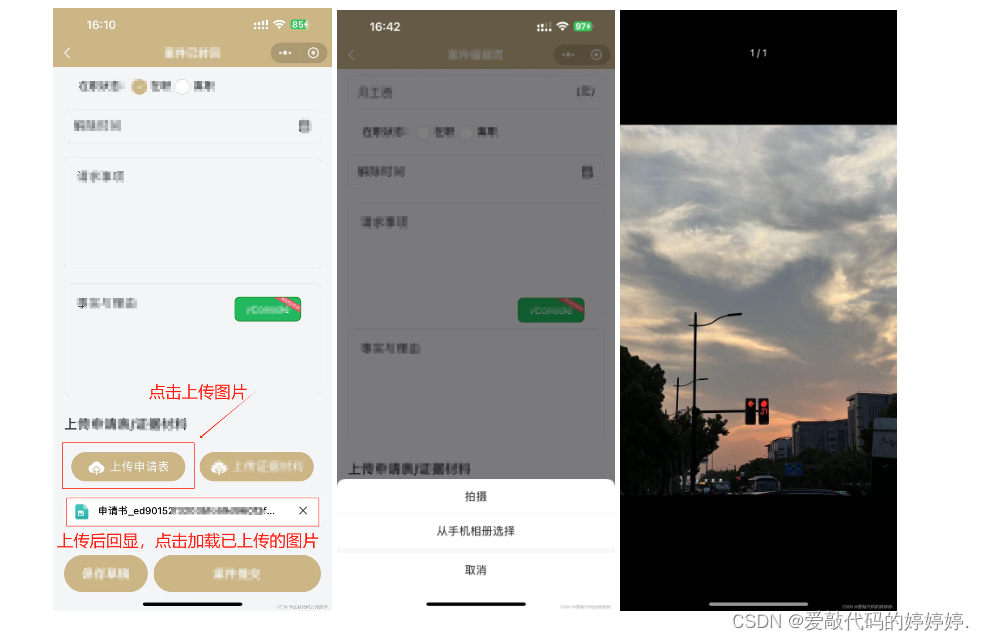
实现效果(如图所示):点击上传=>弹出拍摄或从手机相册中选择图片或视频=>选择图片上传=>上传成功后回显图片。
文件梳理分析(注意点):
-
index文件表示当前页面文件,case-upload-item文件表示封装的组件文件
-
代码中有运用到组件传值这一知识点,基础薄弱的同学先等等,这几天我会抽时间出一个组件传值详细版,代码中已写注释,大概能看懂。
-
代码中的 Config.HOST 是当前项目中的浏览器地址,例如:http://www.example.com 大家在使用的时候把 Config.HOST 更换成自己项目中的地址即可
-
代码完整,包含布局样式和方法,可以直接拿去使用,除了第三点中的Config.HOST其它地方都不需要更改。文章最后附上代码中运用到的小程序自带方法详解
-
注释说明的公用方法可以放入项目中的untils内 (建议)
话不多说,直接上代码(index表当前页面文件):
- index.wxml
<view class="case-edit-upload-container">
  <view class="case-edit-upload-btn-item-container" bind:tap="onChooseImage">
    <view class="case-edit-upload">上传申请表</view>
  </view>
  <view wx:for="{{applications}}" wx:key="index">
    <case-upload-item case-upload-item-class="case-upload-item-class" fileLableImg="{{item.labelImg}}" fileName="{{item.name}}" fileUrl="{{item.url}}" bind:onDelete="onDeleteUploadFile"/>
  </view>
</view>- index.wxss
.case-edit-upload-container {
  margin-bottom: 200rpx;
}

.case-edit-upload-btn-item-container {
  flex: 1;
  height: 80rpx;
  border-radius: 100rpx;
  background: #CBB486;
  display: flex;
  justify-content: center;
  align-items: center;
  color: #fff;
  font-size: 32rpx;
  line-height: 36rpx;
  margin: 0rpx 20rpx;
}

.case-edit-upload {
  display: flex;
  flex-direction: row;
  align-items: center;
}
// 组件暴露的css样式
.case-upload-item-class {
  margin-top: 30rpx;
}- index.ts
data:{
  //先在data 中定义
  applications:[]
}
// 图片上传
onChooseImage() {
  const _this = this;
  // 弹出拍摄或从手机相册中选择图片或视频
  wx.chooseMedia({
    // 最多可以选择的文件个数
    count: 9,
    // 拍摄视频最长拍摄时间,单位秒。时间范围为 3s 至 60s 之间。不限制相册。
    maxDuration: 60,
    success(res) {
      wx.showLoading({
        title: '上传中...',
      });
      let count = 0;
      // 本地临时文件列表
      const tempFilePaths = res.tempFiles;
      if (tempFilePaths.length > 0) {
        tempFilePaths.map((item) => {
          const { tempFilePath, size } = item;
          wx.uploadFile({
            // 这里的url代表服务器地址,这里要用完整的url,/index/uploadEvidence部分不是固定的,更换成自己项目的图片接口地址
            url: `${Config.HOST}/index/uploadEvidence`,
            // 要上传文件资源的路径 (本地路径)
            filePath: tempFilePath,
            // name的值可以自定义,代表文件对应的 key
            name: 'evidence',
            success: function (res) {
              // res.data 服务器返回的数据
              const _res = JSON.parse(res.data);
              if (_res.code === 200) {
                const { applications } = _this.data;
                applications.push({
                  name: tempFilePath,
                  url: _res.data.scr || '',
                  size: `${size}`,
                  labelImg: _this.getLabelImgForUploadItem(_res.data.scr),
                })
                _this.setData({ applications });
              } else {
                wx.showToast({
                  title: '部分文件不支持上传',
                  icon: 'none'
                });
              }
            },
            fail: function () {
              wx.showToast({
                title: '文件上传失败',
                icon: 'error'
              });
            },
            complete: function () {
              count++;
              if (count === tempFilePaths.length) {
                wx.hideLoading();
              }
            }
          })
        })
      }
    }
  });
},
// 删除当前图片
onDeleteUploadFile(e) {
    const { detail: { fileUrl } } = e;
    const { applications = [] } = this.data;
    applications.map((item,index) => {
      const { url } = item;
      if (url === fileUrl) {
        applications.splice(index, 1);
        return;
      }
    });
    this.setData({ applications})
},
// 获取当前文件格式 (公用方法)
getFileSuffix(filePath: string): string{
  const index = (filePath && filePath.lastIndexOf(".")) || -1;
  const suffix = filePath && filePath.substr(index + 1);
  return suffix;
},
// 文件路径格式用于展示(公用方法)
getLabelImgForUploadItem(filePath: string): string{
  const suffix = this.getFileSuffix(filePath) || '';
  if (['doc', 'docx'].indexOf(suffix) >= 0) {
    return '/public/img/icon-word.png';
  } else if (['xls', 'xlsx'].indexOf(suffix) >= 0) {
    return '/public/img/icon-excel.png';
  } else if (['ppt', 'pptx'].indexOf(suffix) >= 0) {
    return '/public/img/icon-ppt.png';
  } else if (suffix === 'pdf') {
    return '/public/img/icon-pdf.png';
  } else if (['png', 'jpg'].indexOf(suffix) >= 0) {
    return '/public/img/icon-image.png';
  } else if (suffix === 'mp3') {
    return '/public/img/icon-audio.png';
  } else if (suffix === 'mp4') {
    return '/public/img/icon-video.png';
  }
  return '/public/img/icon-other.png';
}
- case-upload-item.wxml (组件)
<view class="case-upload-item case-upload-item-class" data-file-url="{{fileUrl}}" bind:tap="onUploadItemClick">
  <image class="case-upload-item-img" src="{{fileLableImg}}" />
  <view class="case-upload-item-name">{{fileName}}</view>
  <!-- 这里的mp-icon需要现在全局引入具体步骤放在下面 -->
  <mp-icon class="case-upload-item-delete" icon="close" size="{{20}}" data-file-url="{{fileUrl}}" wx:if="{{showDelete}}" catchtap="onDeleteUploadItem"></mp-icon>
</view>mp-icon的引入(官网:WeUI组件库简介 | 微信开放文档):
第一步:app.json 文件中写入:
  "useExtendedLib": {
    "weui": true
  },
第二步:在当前文件的json中引入即可,例如这里是case-upload-item.json
{
  "usingComponents": {
    "mp-icon": "weui-miniprogram/icon/icon"
  }
}
case-upload-item.wxss (组件)
.case-upload-item {
  height: 80rpx;
  border-radius: 2rpx;
  background: #fff;
  border: 1rpx solid #D9D9D9;
  display: flex;
  justify-content: space-between;
  align-items: center;
  padding-left: 30rpx;
}

.case-upload-item-img {
  width: 40rpx;
  height: 48rpx;
}

.case-upload-item-delete {
  height: 100%;
  display: flex;
  align-items: center;
  padding: 0rpx 30rpx;
}

.case-upload-item-name {
  flex: 1;
  color: #000;
  font-size: 28rpx;
  font-weight: 500;
  line-height: 44rpx;
  margin: 0rpx 24rpx;
  white-space: nowrap;
  overflow: hidden;
  text-overflow: ellipsis;
}
case-upload-item.ts (组件)
Component({
  // 定义组件外部样式的属性, 将外部定义的 CSS 类名传递到组件内部
  externalClasses: ['case-upload-item-class'],
  properties: {
    fileLableImg: {
      type: String,
      value: '',
    },
    fileName: {
      type: String,
      value: '',
    },
    fileUrl: {
      type: String,
      value: '',
    },
    showDelete: {
      type: Boolean,
      value: true,
    }
  },
  methods: {
    // 查看当前文件或图片
    onUploadItemClick(e: any) {
      console.log('onUploadItemClick:', e)
      const { currentTarget: { dataset: { fileUrl } } } = e;
      // 获取当前图片类型
      const suffix = this.getFileSuffix(fileUrl);
      console.log('suffix:', suffix)
      if (['doc', 'docx', 'xls', 'xlsx', 'pdf', 'ppt', 'pptx'].indexOf(suffix) >= 0) {
        wx.showLoading({
          title: '正在加载文件',
        })
        wx.downloadFile({
          // Config.HOST 代表项目中当前环境的地址,例如:https://www.baidu.com(这里是我从外部引入的,写自己项目环境即可)
          url: fileUrl.indexOf(Config.HOST) < 0 ? `${Config.HOST}${fileUrl}` : fileUrl,
          success: function (res) {
            const filePath = res.tempFilePath
            wx.openDocument({
              filePath: filePath,
              success: function (res) {
                console.log('打开文档成功:', res)
              },
              fail: function (err) {
                console.log('打开文档失败', err)
              }
            })
          },
          fail: function () {
            wx.showToast({
              title: '文件加载失败',
              duration: 2000
            });
          },
          complete: function () {
            wx.hideLoading()
          }
        });
      } else if (['png', 'jpg'].indexOf(suffix) >= 0) {
        wx.previewImage({
          current: fileUrl,
          urls: [`${Config.HOST}${fileUrl}`],
        });
      } else if (['mp4', 'mp3'].indexOf(suffix) >= 0) {
        wx.previewMedia({
          sources: [
            { url: fileUrl.indexOf(Config.HOST) < 0 ? `${Config.HOST}${fileUrl}` : fileUrl, type: 'video' }
          ],
        });
      }
    },
    //删除当前文件或图片,抛出当前url给父组件,并执行onDelete方法
    onDeleteUploadItem(e: any) {
      const { currentTarget: { dataset: { fileUrl } } } = e;
      this.triggerEvent('onDelete', { fileUrl });
    },
    // 获取当前文件类型 (公用方法)
    getFileSuffix (filePath: string): string {
      const index = (filePath && filePath.lastIndexOf(".")) || -1;
      const suffix = filePath && filePath.substr(index + 1);
      return suffix;
    }
  }
});
下面是代码中运用到的微信小程序自带方法的功能描述(附官网地址):
- wx.hideLoading :wx.hideLoading(Object object) | 微信开放文档
- wx.showLoading : wx.showLoading(Object object) | 微信开放文档
- wx.chooseMedia(拍摄或从手机相册中选择图片或视频) :wx.chooseMedia(Object object) | 微信开放文档
- wx.uploadFile : UploadTask | 微信开放文档
- wx.showToast :wx.showToast(Object object) | 微信开放文档
- wx.downloadFile :DownloadTask | 微信开放文档
- wx.openDocument :wx.openDocument(Object object) | 微信开放文档
- wx.previewImage :wx.previewImage(Object object) | 微信开放文档
- wx.previewMedia:wx.previewMedia(Object object) | 微信开放文档


 498
498


 被折叠的 条评论
为什么被折叠?
被折叠的 条评论
为什么被折叠?
 到【灌水乐园】发言


