


前言
在日常生活中,通过发送邮箱验证码来实现用户注册、密码重置和账户验证等功能在许多现代应用程序中非常常见,这里采用hutool工具包封装的一些类实现发送邮箱验证码的功能。
准备工作
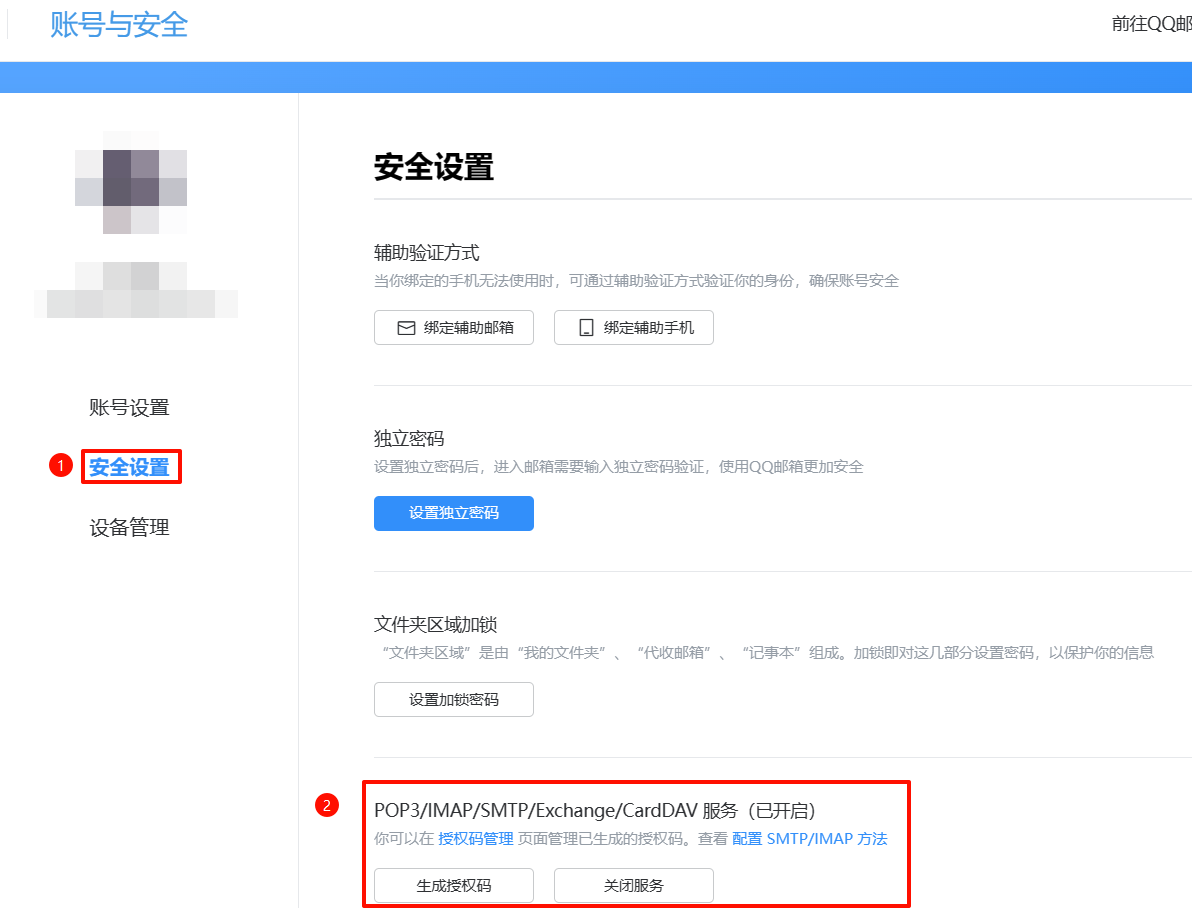
开启POP3/SMTP服务并获取授权码,具体操作很简单,这里就不演示了
代码实现
引入依赖
        <!--hutool工具包-->
        <dependency>
            <groupId>cn.hutool</groupId>
            <artifactId>hutool-all</artifactId>
            <version>5.8.11</version>
        </dependency>
        <!--html解析-->
        <dependency>
            <groupId>org.springframework.boot</groupId>
            <artifactId>spring-boot-starter-thymeleaf</artifactId>
            <version>3.2.0</version>
        </dependency>
        <!--邮件发送-->
        <dependency>
            <groupId>com.sun.mail</groupId>
            <artifactId>javax.mail</artifactId>
            <version>1.6.2</version>
        </dependency>
        <!--redis-->
        <dependency>
            <groupId>org.springframework.boot</groupId>
            <artifactId>spring-boot-starter-data-redis</artifactId>
        </dependency>
配置文件
为了便于修改配置信息,因此要将邮件的相关配置写到配置文件
application.yaml中
- 编写配置类
 @Component
 @ConfigurationProperties(prefix = "captcha.email")
 @Data
 public class EmailProperties {
     /**
      * 邮箱地址(注意:如果使用foxmail邮箱,此处user为qq号)
      */
     private String user;
     /**
      * 发件人昵称(必须正确,否则发送失败)
      */
     private String from;
     /**
      * 邮件服务器的SMTP地址
      */
     private String host;

     /**
      * 邮件服务器的SMTP端口
      */
     private Integer port;

     /**
      * 密码(授权码)
      */
     private String password;

     /**
      * 验证码过期时间
      */
     private Integer expireTime;
 }
- 编写相关配置信息到
application.yaml文件
 captcha:
   email:
     from: 詩筠<XXXXX@qq.com>
     password: dkhfsiudhfsd # 这里我随便填的
     host: smtp.qq.com
     port: 465
     user: XXXXX@qq.com
     expire-time: 300 # 300秒
编写相关工具类
验证码工具类VerifyCodeUtil:
/**
 * 验证码工具类
 * @author shijun
 * @date 2024/05/10
 */
public class VerifyCodeUtil {
    //邮箱正则表达式
    private static final Pattern EMAIL_PATTERN = Pattern.compile("^\\w+((-\\w+)|(\\.\\w+))*\\@[A-Za-z0-9]+((\\.|-)[A-Za-z0-9]+)*\\.[A-Za-z0-9]+$");
    //验证码的字符集
    private static final String CODES = "0123456789ABCDEFGHIJKLMNOPQRSTUVWXYZ";
    //验证码的长度,可以根据需求进行修改
    private static final int CODE_LENGTH = 6;

    /**
     * 生成验证码
     *
     * @return {@link String }
     */
    public static String generateVerifyCode() {
        Random random = new Random();
        StringBuilder verifyCode = new StringBuilder(CODE_LENGTH);
        for (int i = 0; i < CODE_LENGTH; i++) {
            verifyCode.append(CODES.charAt(random.nextInt(CODES.length())));
        }
        return verifyCode.toString();
    }

    /**
     * 检测邮箱是否合法
     *
     * @param email 用户名
     * @return 合法状态
     */
    public static boolean checkEmail(String email) {
        // 检查输入是否为空或null
        if (email == null || email.isEmpty()) {
            return false;
        }
        // 使用正则表达式进行匹配
        Matcher m = EMAIL_PATTERN.matcher(email);
        return m.matches();
    }

}
Redis工具类RedisUtils:
@Component
@AllArgsConstructor
public class RedisUtils {
    private RedisTemplate<Object, Object> redisTemplate;

    /**
     * 普通获取键对应值
     *
     * @param key 键
     * @return 值
     */
    public Object get(String key) {
        return key == null ? null : redisTemplate.opsForValue().get(key);
    }

    /**
     * 普通设置键值
     *
     * @param key   键
     * @param value 值
     * @return true成功 false失败
     */
    public boolean set(String key, Object value) {
        try {
            redisTemplate.opsForValue().set(key, value);
            return true;
        } catch (Exception e) {
            return false;
        }
    }

    /**
     * 普通设置键值并设置过期时间
     *
     * @param key   键
     * @param value 值
     * @param time  时间(秒) time要大于0 如果time小于等于0 将设置无限期
     * @return true成功 false 失败
     */
    public boolean set(String key, Object value, long time) {
        try {
            if (time > 0) {
                redisTemplate.opsForValue().set(key, value, time, TimeUnit.SECONDS);
            } else {
                set(key, value);
            }
            return true;
        } catch (Exception e) {
            return false;
        }
    }

    /**
     * 删除缓存
     *
     * @param key 键
     * @return 是否成功
     */
    public boolean del(String key) {
        return redisTemplate.delete(key);
    }

    /**
     * 指定缓存的失效时间
     *
     * @param key  键值
     * @param time 时间(秒)
     */
    public boolean expire(String key, long time) {
        try {
            if (time > 0) {
                redisTemplate.expire(key, time, TimeUnit.SECONDS);
            }
        } catch (Exception e) {
            e.printStackTrace();
            return false;
        }
        return true;
    }

}
实现验证码发送代码
-
设计邮箱验证码模板
为了改善用户体验,因此要设计一个好看的验证码界面
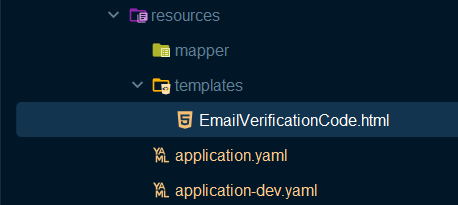
编写EmailVerificationCode.html文件,放到src/main/resources/templates目录下:
<!DOCTYPE html>
<html lang="en" xmlns:th="http://www.thymeleaf.org">
<head>
<meta charset="UTF-8">
<title>邮箱验证码</title>
<style>
table {
width: 700px;
margin: 0 auto;
}
#top {
width: 700px;
border-bottom: 1px solid #ccc;
margin: 0 auto 30px;
}
#top table {
font: 12px Tahoma, Arial, 宋体;
height: 40px;
}
#content {
width: 680px;
padding: 0 10px;
margin: 0 auto;
}
#content_top {
line-height: 1.5;
font-size: 14px;
margin-bottom: 25px;
color: #4d4d4d;
}
#content_top strong {
display: block;
margin-bottom: 15px;
}
#content_top strong span {
color: #f60;
font-size: 16px;
}
#verificationCode {
color: #f60;
font-size: 24px;
}
#content_bottom {
margin-bottom: 30px;
}
#content_bottom small {
display: block;
margin-bottom: 20px;
font-size: 12px;
color: #747474;
}
#bottom {
width: 700px;
margin: 0 auto;
}
#bottom div {
padding: 10px 10px 0;
border-top: 1px solid #ccc;
color: #747474;
margin-bottom: 20px;
line-height: 1.3em;
font-size: 12px;
}
#content_top strong span {
font-size: 18px;
color: #FE4F70;
}
#sign {
text-align: right;
font-size: 18px;
color: #000000;
font-weight: bold;
}
#verificationCode {
height: 100px;
width: 680px;
text-align: center;
margin: 30px 0;
}
#verificationCode div {
height: 100px;
width: 680px;
}
.button {
color: #FE4F70;
margin-left: 10px;
height: 80px;
width: 80px;
resize: none;
font-size: 42px;
border: none;
outline: none;
padding: 10px 15px;
background: #ededed;
text-align: center;
border-radius: 17px;
box-shadow: 6px 6px 12px #cccccc,
-6px -6px 12px #ffffff;
}
.button:hover {
box-shadow: inset 6px 6px 4px #d1d1d1,
inset -6px -6px 4px #ffffff;
}
</style>
</head>
<body>
<table>
<tbody>
<tr>
<td>
<div id="top">
<table>
<tbody><tr><td></td></tr></tbody>
</table>
</div>
<div id="content">
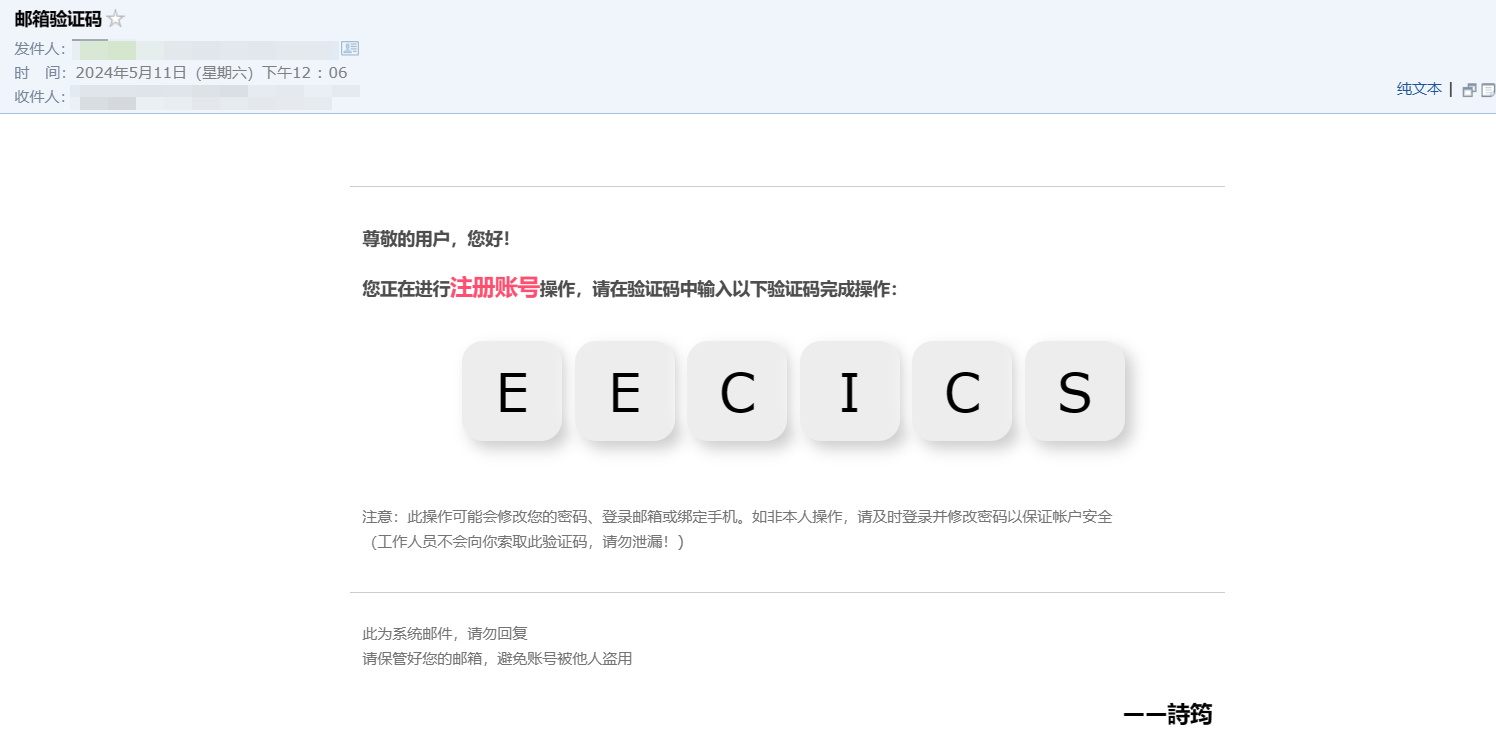
<div id="content_top">
<strong>尊敬的用户,您好!</strong>
<strong>
您正在进行<span>注册账号</span>操作,请在验证码中输入以下验证码完成操作:
</strong>
<div id="verificationCode">
<button class="button" th:each="a:${verifyCode}">[[${a}]]</button>
</div>
</div>
<div id="content_bottom">
<small>
注意:此操作可能会修改您的密码、登录邮箱或绑定手机。如非本人操作,请及时登录并修改密码以保证帐户安全
<br>(工作人员不会向你索取此验证码,请勿泄漏!)
</small>
</div>
</div>
<div id="bottom">
<div>
<p>此为系统邮件,请勿回复<br>
请保管好您的邮箱,避免账号被他人盗用
</p>
<p id="sign">——詩筠</p>
</div>
</div>
</td>
</tr>
</tbody>
</table>
</body>
- 编写
Controller层代码
/**
* 验证码接口
*
* @author shijun
* @date 2024/05/10
*/
@RestController
@Tag(name = "验证码接口")
@RequestMapping("/captcha")
@RequiredArgsConstructor
public class CaptchaController {
private final CaptchaService captchaService;
private final TemplateEngine templateEngine;
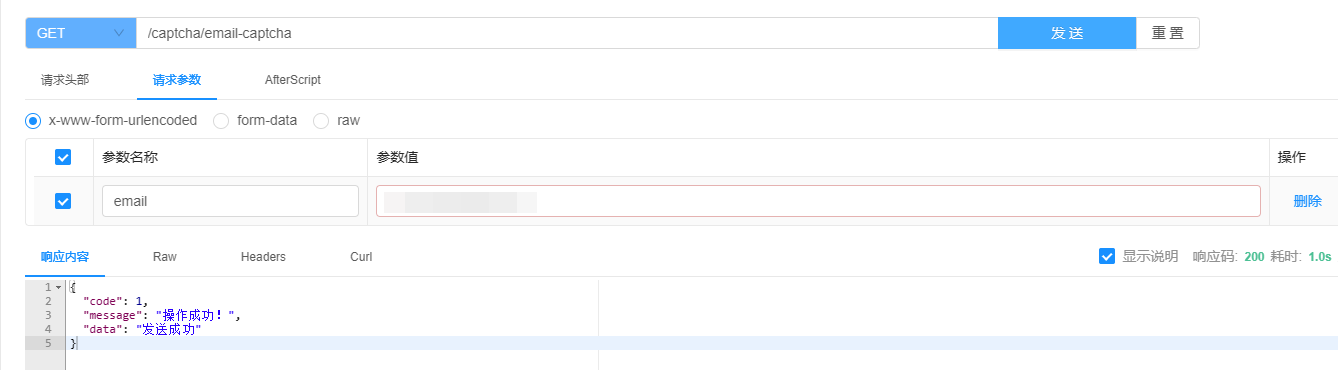
@Operation(summary = "发送邮箱验证码")
@Parameter(name = "email",description = "要发送的邮箱")
@GetMapping("/email-captcha")
public Result<String> sendEmailCaptcha(String email) {
captchaService.sendEmailCaptcha(email);
return Result.success("发送成功");
}
}
- 编写
Service层代码
 public interface CaptchaService {
     /**
      * 发送验证码
      * @param email 邮箱
      */
     void sendEmailCaptcha(String email);
 }
-
编写
Service实现类这里涉及的
BusinessException类是一个自定义异常类,用来进行业务异常处理。可以参考这篇文章进行学习:Spring Boot3自定义异常及全局异常捕获_springboot是如何自定义异常并捕获的-CSDN博客
 @Service
 @RequiredArgsConstructor
 public class CaptchaServiceImpl implements CaptchaService {

     public static final String CAPTCHA_CODE = "captcha-email-";
     private final EmailProperties emailProperties;
     private final RedisUtils redisUtils;
     private final TemplateEngine templateEngine;

     /**
      * 发送邮件验证码
      * @param email 邮箱
      */
     @Override
     public void sendEmailCaptcha(String email) {
         // 验证邮件配置是否完整
         validateEmailProperties();

         // 验证邮箱格式
         if (!VerifyCodeUtil.checkEmail(email)) {
             throw new BusinessException(ResultEnum.EMAIL_FORMAT_ERROR);
         }

         // 生成或获取验证码
         String captcha = getCaptcha(email);

         // 生成邮件内容
         String content = generateEmailContent(captcha);

         // 发送邮件
         List<String> list = Collections.singletonList(email);
         sendEmail(list, content);
     }

     /**
      * 判断邮件配置是否完整
      */
     private void validateEmailProperties() {
         if (emailProperties.getUser() == null || emailProperties.getPassword() == null || emailProperties.getFrom() == null || emailProperties.getHost() == null || emailProperties.getPort() == null) {
             throw new BusinessException(ResultEnum.EMAIL_VERIFICATION_CODE_CONFIGURATION_EXCEPTION);
         }
     }

     /**
      * 获取验证码
      *
      * @param email 邮箱地址,用于生成和存储验证码。
      * @return {@link String} 返回生成的验证码。
      */
     private String getCaptcha(String email) {
         // 根据邮箱生成Redis键名
         String redisKey = CAPTCHA_CODE + email;
         // 尝试从Redis获取现有的验证码
         Object oldCode = redisUtils.get(redisKey);
         if (oldCode == null) {
             // 如果验证码不存在,生成新的验证码
             String captcha = VerifyCodeUtil.generateVerifyCode();
             // 将新生成的验证码存储到Redis,并设置过期时间
             boolean saveResult = redisUtils.set(redisKey, captcha, emailProperties.getExpireTime());
             if (!saveResult) {
                 // 如果存储失败,抛出异常
                 throw new RedisException(MessageConstant.REDIS_SERVICE_EXCEPTION_VERIFICATION_CODE_SAVE_FAILED);
             }
             return captcha;
         } else {
             // 如果验证码存在,重置其在Redis中的过期时间
             boolean expireResult = redisUtils.expire(redisKey, emailProperties.getExpireTime());
             if (!expireResult) {
                 throw new RedisException(MessageConstant.RESET_VERIFICATION_CODE_FAILED);
             }
             return String.valueOf(oldCode);
         }
     }


     /**
      * 生成邮件内容
      * @param captcha 验证码
      * @return {@link String } 邮件内容
      */
     private String generateEmailContent(String captcha) {
         Context context = new Context();
         context.setVariable("verifyCode", Arrays.asList(captcha.split("")));
         return templateEngine.process("EmailVerificationCode.html", context);
     }

     /**
      * 发送邮件
      * @param list
      * @param content 邮件内容
      */
     private void sendEmail(List<String> list, String content) {
         MailAccount account = createMailAccount();
         try {
             Mail.create(account)
                     .setTos(list.toArray(new String[0]))
                     .setTitle(MessageConstant.EMAIL_VERIFICATION_CODE)
                     .setContent(content)
                     .setHtml(true)
                     .setUseGlobalSession(false)
                     .send();
         } catch (Exception e) { // 捕获更广泛的异常
             throw new BusinessException(ResultEnum.EMAIL_SENDING_EXCEPTION);
         }
     }

     /**
      * 创建邮件账户
      * @return {@link MailAccount } 邮件账户
      */
     private MailAccount createMailAccount() {
         MailAccount account = new MailAccount();
         account.setAuth(true);
         account.setHost(emailProperties.getHost());
         account.setPort(emailProperties.getPort());
         account.setFrom(emailProperties.getFrom());
         account.setUser(emailProperties.getUser());
         account.setPass(emailProperties.getPassword());
         account.setSslEnable(true);
         account.setStarttlsEnable(true);
         return account;
     }

 }
测试
参考文章
手把手教你通过SpringBoot实现邮箱注册码验证_springboot+vue简单实现邮箱注册-CSDN博客


 被折叠的 条评论
为什么被折叠?
被折叠的 条评论
为什么被折叠?
 到【灌水乐园】发言


