


文章目录
Spring Boot
Spring Boot 可以轻松创建独立的、生产级的基于 Spring 的应用程序。
Spring Boot 直接嵌入 Tomcat、Jetty 或 Undertow ,可以"直接运行" SpringBoot 应用程序。
SpringBoot 比较传统的 SSM 开发, 简化整合步骤, 提高开发效率。
官网:https://spring.io/projects/spring-boot
1. 约定优于配置
Spring SpringMVC SpringBoot 的关系:他们的关系大概是: Spring Boot > Spring > Spring MVC
- Spring MVC 只是 Spring 处理 WEB 层请求的一个模块/组件, Spring MVC 的基石是Servlet
- Spring 的核心是 IOC 和 AOP, IOC 提供了依赖注入的容器 , AOP 解决了面向切面编程
- Spring Boot 是为了简化开发, 推出的封神框架(约定优于配置[COC],简化了 Spring 项目的配置流程),SpringBoot 包含很多组件/框架,Spring就是最核心的内容之一,也包含 SpringMVC
约定优于配置(Convention over Configuration/COC),又称按约定编程,是一种软件设计规范,本质上是对系统、类库或框架中一些东西假定一个大众化合理的默认值。简单来说就是假如你所期待的配置与约定的配置一致,那么就可以不做任何配置,约定不符合期待时, 才需要对约定进行替换配置。
1.1 配置
SpringBoot 项目最重要也是最核心的配置文件就是
application.properties,所有的框架配置都可以在这个配置文件中说明。
详细配置大全:https://blog.csdn.net/pbrlovejava/article/details/82659702
2. 快速入门
1)创建项目,指定父工程
<parent>
    <groupId>org.springframework.boot</groupId>
    <artifactId>spring-boot-starter-parent</artifactId>
    <version>2.5.3</version>
</parent>
2)导入依赖
<dependencies>
    <dependency>
        <groupId>org.springframework.boot</groupId>
        <artifactId>spring-boot-starter-web</artifactId>
    </dependency>
</dependencies>
3)创建主程序com.lhs.MainApp.java
@SpringBootApplication
public class MainApp {
    public static void main(String[] args) {
        SpringApplication.run(MainApp.class,args);
    }
}
4)创建controller
@Controller
public class MyController {
    @GetMapping("/hi")
    @ResponseBody
    public String hi(){
        return "hi Springboot~~";
    }
}
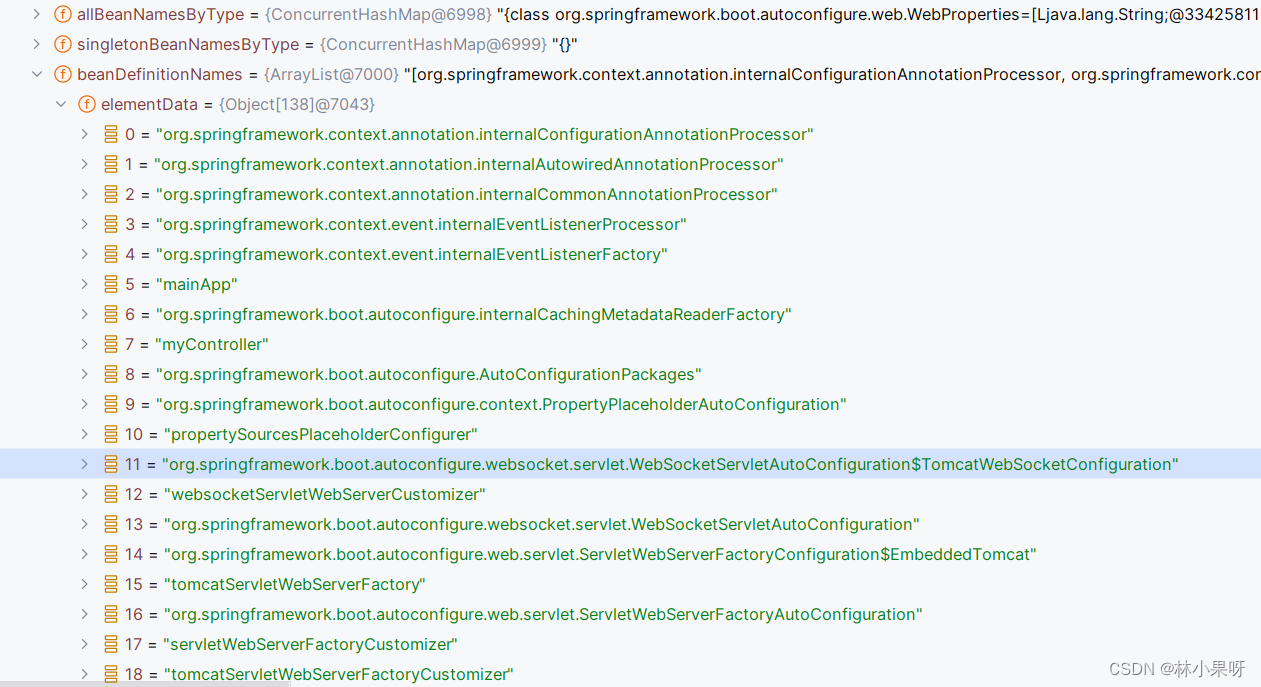
3 ioc容器
SpringBoot会自动将常用的功能注入到ioc容器中
debug查看ioc容器:
@SpringBootApplication
public class MainApp {
    public static void main(String[] args) {
        ConfigurableApplicationContext ioc = SpringApplication.run(MainApp.class,args);
        System.out.println(ioc);

    }
}
可见容器中有tomcat,jackson,字符过滤器等bean:
3.1 @Configuration
我们可以通过
@Configuration创建配置类来注入组件
proxyBeanMethods:代理 bean 的方法
- Full(proxyBeanMethods = true)【保证每个@Bean 方法被调用多少次返回的组件都是单实例的, 是代理方式】
- Lite(proxyBeanMethods = false)【每个@Bean 方法被调用多少次返回的组件都是新创建的, 是非代理方式】
特别说明: proxyBeanMethods 是在 调用@Bean 方法 才生效,因此,需要先获取BeanConfig 组件,再调用方法。
如何选择:
- 组件依赖必须使用 Full 模式默认。如果不需要组件依赖使用 Lite 模
- Lite 模 也称为轻量级模式,因为不检测依赖关系,运行速度快
示例:
@Configuration(proxyBeanMethods = false)
public class BeanConfig {
    @Bean
    public Monster monster01() {
        return new Monster(100, "牛魔王", 500, "芭蕉扇");
    }
}
@SpringBootApplication(scanBasePackages = "com.lhs")
public class MainApp {
    public static void main(String[] args) {
        ConfigurableApplicationContext ioc = SpringApplication.run(MainApp.class,args);
        System.out.println(ioc.getBean("monster01"));
    }
}
3.2 @Import
@Import注解用于导入其他配置类的注解。它可以用于将一个或多个@Configuration类导入到当前Spring Boot应用程序上下文中。
@Import({Dog.class, Cat.class})
@Configuration(proxyBeanMethods = false)
public class BeanConfig {
}
@SpringBootApplication(scanBasePackages = "com.lhs")
public class MainApp {
    public static void main(String[] args) {
        ConfigurableApplicationContext ioc = SpringApplication.run(MainApp.class,args);
        Dog dog = ioc.getBean(Dog.class);
		//通过@import 注入的组件, 组件的名字就是全类名
        String[] beanNamesForType = ioc.getBeanNamesForType(Dog.class);
        for (String s : beanNamesForType) {
            System.out.println("s= " + s);
        }
        Cat cat = ioc.getBean(Cat.class);
        System.out.println("dog= " + dog + " cat= " + cat);
    }
}
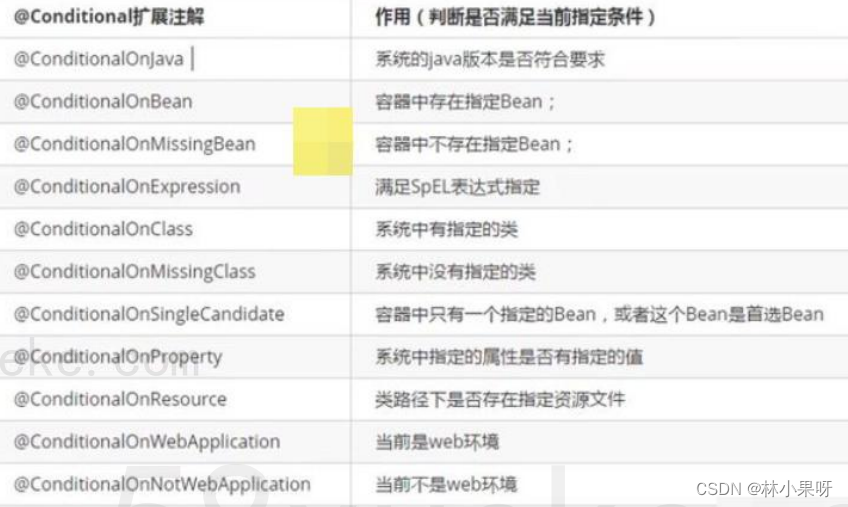
3.3 @Conditional
条件装配:满足 Conditional 指定的条件,则进行组件注入
@Conditional 是一个根注解,下面有很多扩展注解
示例:
@ConditionalOnBean(name = "monster_nmw")
@Bean
public Dog dog01() {
    return new Dog();
}
3.4 @ImportResource
作用:原生配置文件引入, 也就是可以直接导入 Spring 传统的 beans.xml ,可以认为是 SpringBoot 对 Spring 容器文件的兼容。
示例:
@ImportResource("classpath:beans.xml")
public class BeanConfig {
}
3.5 @ConfigurationProperties
@ConfigurationProperties能读取application.properties 的内容,并且把它封装到 JavaBean 中。
示例:
application.properties:
#默认 server.port=8080
server.port=10000
spring.servlet.multipart.max-file-size=10MB

#设置属性 k-v
furn01.id=100
furn01.name=soft_chair!!
furn01.price=45678.9
Furn.java:
@Component
@Data
@AllArgsConstructor
@NoArgsConstructor
// @ConfigurationProperties(prefix = "furn01") 指定在前缀,这样Furn组件就会属性文件中的值绑定了
@ConfigurationProperties(prefix = "furn01")
public class Furn {
    private Integer id;
    private String name;
    private Double price;
}
3.6 扫描包
SpringBoot的默认扫描包为
com.example.project及其子包

我们也可以在@SpringBootApplication上指定要扫描的包
@SpringBootApplication(scanBasePackages = "com.lhs")
public class MainApp {
    public static void main(String[] args) {
        ConfigurableApplicationContext ioc = SpringApplication.run(MainApp.class,args);
    }
}
4. 静态资源访问
只要静态资源放在类路径下: /static 、 /public 、 /resources 、 /META-INF/resources 可以被直接访问- 对应文件 WebProperties.java
访问方式 :默认: 项目根路径/ + 静态资源名 比如
http://localhost:8080/hi.jpg静态资源访问原理:静态映射是 /**,也就是对所有请求拦截,请求进来,先看 Controller 能不能处理,不能处理的请求交给静态资源处理器,如果静态资源找不到则响应 404 页面
改变静态资源访问前缀,比如我们希望 http://localhost:8080/lxg/* 去请求静态资源,可以在application.yml中配置:
spring:
	mvc:
		static-path-pattern: /lxg/**
增加类路径(如果你配置 static-locations, 原来的访问路径就被覆盖):
spring:
	mvc:
		static-path-pattern: /lhs/**
	web:
		resources:
			static-locations: [classpath:/hspimg/, classpath:/public/, classpath:/static/]
5. Rest 风格请求处理
如果要 SpringBoot 支持 页面表单的 Rest 功能, 需要在 application.yml 启用 filter 功能
spring:
	hiddenmethod:
		filter:
			enabled: true #开启页面表单的 Rest 功能
6. 接收参数相关注解
1)@PathVariable:用于获取路径中的动态参数。如:
@GetMapping("/users/{id}")
public User getUser(@PathVariable("id") Integer id) {
    //...
}
访问/users/123,PathVariable会将123赋值给id参数。
2)@RequestHeader:用于获取请求头中的值。如:
@GetMapping("/users")
public User getUser(@RequestHeader("token") String token) {
    //...
}
@RequestHeader会将请求头中名为token的值赋给token参数。
3)@ModelAttribute:在方法执行前,先执行被@ModelAttribute注解的方法,然后将返回的对象传递给请求处理方法。如:
@ModelAttribute
public User getUser() {
    User user = new User();
    user.setId(1);
    user.setName("Tom");
    return user;
}

@GetMapping("/users")
public String getUser(@ModelAttribute("user") User user) {
    System.out.println(user);
    return "success";
}
访问/users时,先执行getUser()方法,然后将返回的User对象传递给请求处理方法。
4)@RequestParam:用于获取请求参数。如:
@GetMapping("/users")
public User getUser(@RequestParam("id") Integer id) {
    //...
}
@RequestParam会将请求参数中名为id的值赋给id参数。
5)@CookieValue:用于获取Cookie的值。如:
@GetMapping("/users")
public User getUser(@CookieValue("JSESSIONID") String sessionId) {
    //...
}
@CookieValue会将Cookie中名为JSESSIONID的值赋给sessionId参数。
6)@RequestBody:用于读取Request请求的body部分数据,利用适合的HttpMessageConverter将参数绑定到要返回的对象上。如:
@PostMapping("/users")
public User updateUser(@RequestBody User user) {
    //...
}
@RequestBody会将请求体中的User JSON对象转换为User对象。
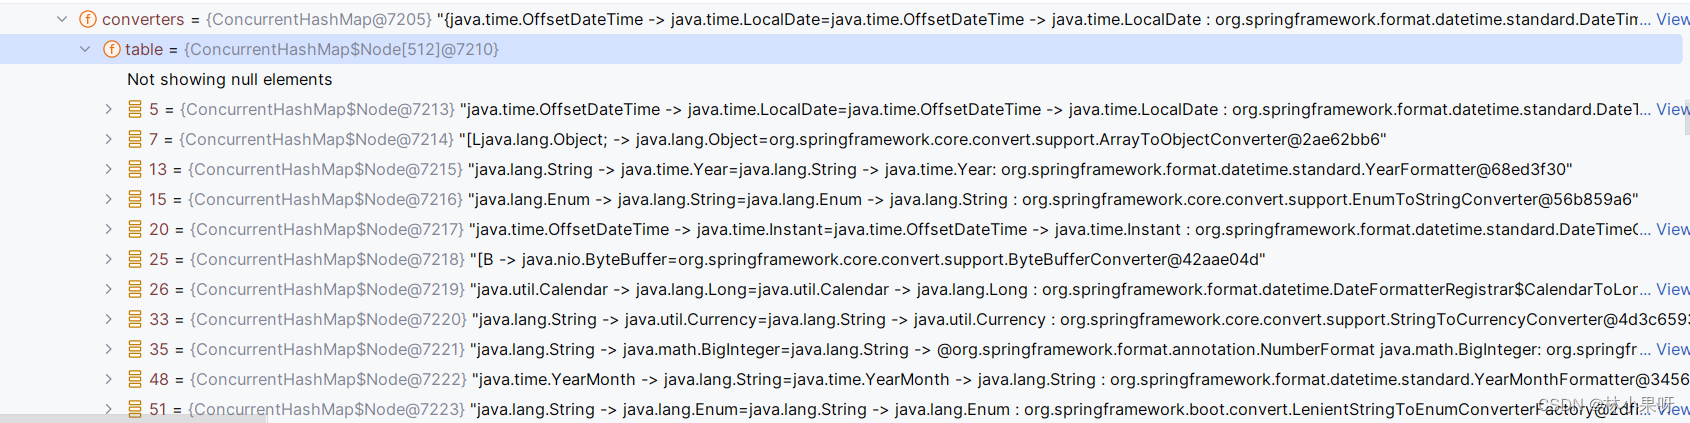
7. 自定义转换器
SpringBoot 在响应客户端请求时,将提交的数据封装成对象时,使用了内置的转换器
SpringBoot 也支持自定义转换器
内置转换器:
自定义转换器示例:
<form action="/savemonster" method="post">
    编号: <input name="id" value="100"><br/>
    姓名: <input name="name" value="牛魔王"/> <br/>
    年龄: <input name="age" value="120"/> <br/>
    婚否: <input name="isMarried" value="true"/> <br/>
    生日: <input name="birth" value="2000/11/11"/> <br/>
    <!-- 坐骑:<input name="car.name" value="法拉利"/><br/>-->
    <!-- 价格:<input name="car.price" value="99999.9"/>-->
    <!-- 使用自定义转换器关联 car, 字符串整体提交 -->
    坐骑: <input name="car" value="保时捷,66666.6">
    <input type="submit" value="保存"/>
</form>
@Configuration(proxyBeanMethods = false)
public class WebConfig {
    @Bean
    public WebMvcConfigurer webMvcConfigurer() {
        return new WebMvcConfigurer() {
            @Override
            public void addFormatters(FormatterRegistry registry) {
                //注册一个 String->Car : 底层和我们手写 Spring/SpringMvc 机制一样
                //仍然使用反射+注解+IO+动态代理那一套来玩,将该转换器注册到转换器 converters 的容器中
                registry.addConverter(new Converter<String, Car>() {
                    @Override
                    public Car convert(String source) {
                        if(!ObjectUtils.isEmpty(source)){
                            Car car = new Car();
                            String[] split = source.split(",");
                            car.setName(split[0]);
                            car.setPrice(Double.parseDouble(split[1]));
                            return car;
                        }
                        return null;
                    }
                });
            }
        };
    }
}
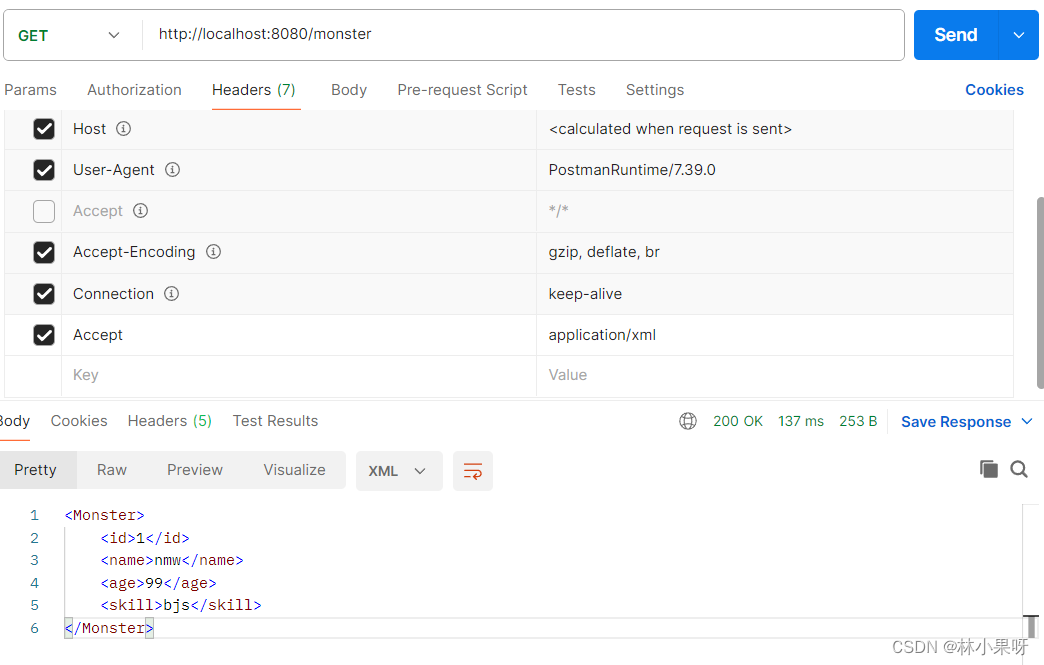
8. 内容协商
根据客户端接收能力不同,SpringBoot 返回不同媒体类型的数据。
比如: 客户端 Http 请求 Accept: application/xml 则返回 xml 数据,客户端 Http 请求 Accept: application/json 则返回 json 数据。
8.1 返回xml数据
1)导入依赖
<dependency>
    <groupId>com.fasterxml.jackson.dataformat</groupId>
    <artifactId>jackson-dataformat-xml</artifactId>
</dependency>
2)添加方法返回数据
@GetMapping("/monster")
@ResponseBody
public Monster getMonster(){
    Monster monster = new Monster(1,"nmw",99,"bjs");
    return monster;
}
3)发生请求
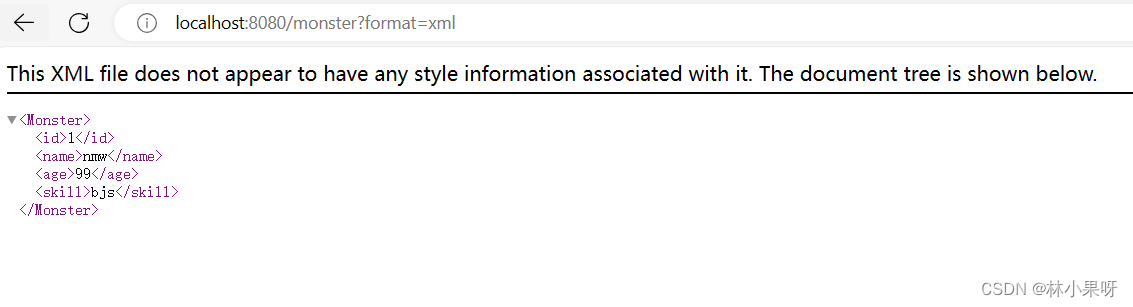
8.2 基于请求参数的内容协商
对于浏览器,我们无法修改其 Accept 的值,需要开启支持基于请求参数的内容协商功能。
1)修改application.yml配置
spring:
  mvc:
    contentnegotiation:
      favor-parameter: true
2)在浏览器请求地址中指定返回格式为xml
9. Thymeleaf
Thymeleaf 是一个跟 Velocity、FreeMarker 类似的模板引擎,可完全替代 JSP。
Thymeleaf 是一个 java 类库,他是一个 xml/xhtml/html5 的模板引擎,可以作为 mvc 的web 应用的 view 层。
Thymeleaf 模版页面无需服务器渲染,也可以被浏览器运行,页面简洁。
在线文档: https://www.thymeleaf.org/doc/tutorials/3.0/usingthymeleaf.html
表达式一览:
| 表达式名字 | 语法 | 用途 |
|---|---|---|
| 变量取值 | ${…} | 获取请求域、session 域、对象等值 |
| 选择变量 | *{…} | 获取上下文对象值 |
| 消息 | #{…} | 获取国际化等值 |
| 链接 | @{…} | 生成链接 |
| 片段表达式 | ~{…} | jsp:include 作用,引入公共页面片段 |
9.1 th 属性
html 有的属性,Thymeleaf 基本都有,而常用的属性大概有七八个。其中 th 属性执行的优先级从 1~8,数字越低优先级越高。
- th:text :设置当前元素的文本内容,相同功能的还有 th:utext,两者的区别在于前者不会转义 html 标签,后者会。优先级不高:order=7
- th:value:设置当前元素的 value 值,类似修改指定属性的还有 th:src,th:href。优先级不高:order=6
- th:each:遍历循环元素,和 th:text 或 th:value 一起使用。注意该属性修饰的标签位置,详细往后看。优先级很高:order=2
- th:if:条件判断,类似的还有 th:unless,th:switch,th:case。优先级较高:order=3
- th:insert:代码块引入,类似的还有 th:replace,th:include,三者的区别较大,若使用不恰当会破坏 html 结构,常用于公共代码块提取的场景。优先级最高:order=1
- th:fragment:定义代码块,方便被 th:insert 引用。优先级最低:order=8
- th:object:声明变量,一般和*{}一起配合使用,达到偷懒的效果。优先级一般:order=4
- th:attr:修改任意属性,实际开发中用的较少,因为有丰富的其他 th 属性帮忙,类似的还有 th:attrappend,th:attrprepend。优先级一般:order=5
9.2 快速入门
1)导入依赖
<dependency>
    <groupId>org.springframework.boot</groupId>
    <artifactId>spring-boot-starter-thymeleaf</artifactId>
</dependency>
由于Spring Boot的自动配置特性,不需要手动配置Thymeleaf。
2)编写基于thymeleaf语法的thymeleaf.html界面
<!DOCTYPE html>
<html xmlns:th="http://www.thymeleaf.org">
    <head>
        <title th:text="${title}">Title</title>
    </head>
    <body>
        <h1 th:text="${message}">Hello, World!</h1>
    </body>
</html>
3)添加方法
@GetMapping("/hello")
public String hello(Model model) {
    model.addAttribute("title", "Hello Page");
    model.addAttribute("message", "Hello, World!");
    return "thymeleaf";
}
10. 拦截器
在 Spring Boot 项目中, 拦截器是开发中常用手段,要来做登陆验证、性能检查、日志记录等。
1)创建拦截器类
public class LoginInterceptor implements HandlerInterceptor {
    @Override
    public boolean preHandle(HttpServletRequest request, HttpServletResponse response, Object handler) throws Exception {
        System.out.println(request.getRequestURL());
        return true;
    }

    @Override
    public void postHandle(HttpServletRequest request, HttpServletResponse response, Object handler, ModelAndView modelAndView) throws Exception {
        HandlerInterceptor.super.postHandle(request, response, handler, modelAndView);
    }

    @Override
    public void afterCompletion(HttpServletRequest request, HttpServletResponse response, Object handler, Exception ex) throws Exception {
        HandlerInterceptor.super.afterCompletion(request, response, handler, ex);
    }
}
2)配置拦截器
@Configuration
public class WebConfig {
    @Bean
    public WebMvcConfigurer webMvcConfigurer(){
        WebMvcConfigurer webMvcConfigurer = new WebMvcConfigurer(){
            @Override
            public void addInterceptors(InterceptorRegistry registry) {
                registry.addInterceptor(new LoginInterceptor()).addPathPatterns("/**").excludePathPatterns("/login");
            }
        };
        return webMvcConfigurer;
    }
}
11. 文件上传
1)创建upload.html
<!DOCTYPE html>
<html lang="en" xmlns:th="http://www.thymeleaf.org">
<head>
	<meta charset="UTF-8">
	<title>upload</title>
</head>
<hr/>
<div style="text-align: center">
	<h1>注册用户~</h1>
	<form action="#" method="post" th:action="@{/upload}" enctype="multipart/form-data">
		头 像:<input type="file" style="width:150px" name="header"><br/><br/>
		宠 物:<input type="file" style="width:150px" name="photos" multiple><br/><br/>
		<input type="submit" value="注册"/>
		<input type="reset" value="重新填写"/>
	</form>
</div>
<hr/>
</body>
</html>
2)在application.yaml中配置允许上传文件的大小
spring:
  mvc:
    contentnegotiation:
      favor-parameter: true
  servlet:
    multipart:
      max-file-size: 10MB
      max-request-size: 100MB
3)Controller中添加方法
// 返回界面
@GetMapping("/upload.html")
public String uploadPage(){
    return "upload";
}

// 接收上传的图片并保存
@PostMapping("/upload")
@ResponseBody
public String upload(@RequestPart("header") MultipartFile header,
                     @RequestPart("photos") MultipartFile[] photos
                    ) throws IOException {
    System.out.println(header);
    String originalFilename = header.getOriginalFilename();
    String path = this.getClass().getResource("/").getPath();
    File file = new File(path + "/images/");
    if (!file.exists()){
        file.mkdir();
    }
    header.transferTo(new File(path + "/images/" + originalFilename));
    for (MultipartFile photo : photos) {
        System.out.println(photo);
    }
    return "上传成功";
}
12. 异常处理
默认情况下,Spring Boot 提供/error 处理所有错误的映射
在发生异常时,服务器会先去资源路径下的error文件夹中找与异常状态码相对于的html界面,例如404.html,若找不到则寻找4xx.html,若都找不到就返回默认界面。

12.1 全局异常
我们可以使用
@ControllerAdvice+@ExceptionHandler处理全局异常
1)创建异常处理类
@ControllerAdvice
public class GlobalExecptionHandler {
    @ExceptionHandler({ArithmeticException.class, NullPointerException.class})
    public String exceptionHandler(Exception e, Model model){
        System.out.println(e.getMessage());
        model.addAttribute("msg",e.getMessage());
        return "error/global";
    }
}
2)创建global.html
<!DOCTYPE html>
<html xmlns:th="http://www.thymeleaf.org">
<head>
	<meta charset="UTF-8">
	<title>Title</title>
</head>
<body>
<div>异常信息:<span th:text="${msg}"></span></div>

</body>
</html>
3)测试
@GetMapping("/err")
public void err(){
    int i = 10/0;
}
12.2 自定义异常
如果 Spring Boot 提供的异常不能满足开发需求,我们也可以自定义异常。
1)创建异常类
@ResponseStatus(HttpStatus.INTERNAL_SERVER_ERROR)
public class MyException extends RuntimeException{
    public MyException() {
    }
    public MyException(String message) {
        super(message);
    }
}
2)测试
@GetMapping("/err")
public void err(){
    throw new MyException("我的异常");
}
13. 注入WEB组件
考虑到实际开发业务非常复杂和兼容,Spring-Boot 支持将 Servlet、Filter、Listener 注入Spring 容器, 成为 Spring bean,也就是说明 Spring-Boot 开放了和原生WEB组件(Servlet、Filter、Listener)的兼容。
13.1 注入Servlet
1)创建自己的servlet类
@WebServlet(urlPatterns = {"/myservlet01","/myservlet02"})
public class Servlet_ extends HttpServlet {
    @Override
    protected void doGet(HttpServletRequest req, HttpServletResponse resp) throws ServletException, IOException {
        System.out.println("myservlet");
    }

    @Override
    protected void doPost(HttpServletRequest req, HttpServletResponse resp) throws ServletException, IOException {
        this.doGet(req,resp);
    }
}
2)配置扫描路径
@ServletComponentScan(basePackages = "com.lhs.servlet")
@SpringBootApplication
public class MainApp {
    public static void main(String[] args) {
        ConfigurableApplicationContext ioc = SpringApplication.run(MainApp.class,args);
    }
}
13.2 注入Filter
@WebFilter(urlPatterns = {"/images/*"})
public class Filter_ implements Filter {
    @Override
    public void init(FilterConfig filterConfig) throws ServletException {
        Filter.super.init(filterConfig);
    }

    @Override
    public void doFilter(ServletRequest servletRequest, ServletResponse servletResponse, FilterChain filterChain) throws IOException, ServletException {
        System.out.println("myfilter");
        filterChain.doFilter(servletRequest,servletResponse);
    }

    @Override
    public void destroy() {
        Filter.super.destroy();
    }
}
13.3 注入Listener
@WebListener
public class Listener_ implements ServletContextListener {
    @Override
    public void contextInitialized(ServletContextEvent sce) {
        System.out.println("项目创建");
    }

    @Override
    public void contextDestroyed(ServletContextEvent sce) {
        System.out.println("项目销毁");
    }
}
14. 内置 Tomcat
14.1 设置
可以在application.yaml中配置内置tomcat
server:
  # 端口
  port: 9999

  tomcat:
    threads:
      # 最大工作线程数
      max: 10
      # 最小工作线程数
      min-spare: 5
    # tomcat 启动的线程数达到最大时,接受排队的请求个数,默认值为 100
    accept-count: 200
    # 最大连接数
    max-connections: 2000
    # 建立连接超时时间毫秒
    connection-timeout: 10000
也可在配置内中配置tomcat
@Component
public class CustomizationBean implements WebServerFactoryCustomizer<ConfigurableServletWebServerFactory> {
    @Override
    public void customize(ConfigurableServletWebServerFactory server) {
        server.setPort(10000);
    }
}
14.2 切换
将 tomcat 切换成 Undertow:排除 tomcat,引入 undertow 即可
<dependencies>
    <dependency>
        <groupId>org.springframework.boot</groupId>
        <artifactId>spring-boot-starter-web</artifactId>
        <!-- 引入 spring-boot-starter-web 排除 tomcat -->
        <exclusions>
            <exclusion>
                <groupId>org.springframework.boot</groupId>
                <artifactId>spring-boot-starter-tomcat</artifactId>
            </exclusion>
        </exclusions>
    </dependency>
    <!-- 引入 undertow -->
    <dependency>
        <groupId>org.springframework.boot</groupId>
        <artifactId>spring-boot-starter-undertow</artifactId>
    </dependency>
15. 数据库操作
15.1 HikariDataSource
HikariDataSource : 目前市面上非常优秀的数据源,是 springboot2 默认数据源
操作数据库:
1)导入依赖
<dependency>
    <groupId>org.springframework.boot</groupId>
    <artifactId>spring-boot-starter-data-jdbc</artifactId>
</dependency>
<dependency>
    <groupId>mysql</groupId>
    <artifactId>mysql-connector-java</artifactId>
    <version>5.1.49</version>
</dependency>
2)配置jdbc
spring:
  datasource:
    driver-class-name: com.mysql.jdbc.Driver
    url: jdbc:mysql://localhost:3306/home_furnishing?userSSL=true&userUnicode=true&characterEncoding=UTF-8
    username: root
    password: xxx
3)测试
@SpringBootTest
public class ApplicationTest {
    @Autowired
    JdbcTemplate jdbcTemplate;

    @Test
    public void jdbcTest(){
        BeanPropertyRowMapper<Furn> mapper = new BeanPropertyRowMapper<>(Furn.class);
        List<Furn> query = jdbcTemplate.query("select * from furniture", mapper);
        System.out.println(query);
    }
}
15.2 整合 Druid
Druid: 性能优秀,Druid 提供性能卓越的连接池功能外,还集成了 SQL 监控,黑名单拦截等功能,强大的监控特性,通过 Druid 提供的监控功能,可以清楚知道连接池和 SQL 的工作情况。
步骤:
1)导入依赖
<dependency>
    <groupId>com.alibaba</groupId>
    <artifactId>druid</artifactId>
    <version>1.1.17</version>
</dependency>
2)注入容器
@Configuration
public class DruidDataSourceConfig {
    // "spring.datasource" 会将 druid 数据源的配置绑定到 application.yml, 就不需要setXxx
    @ConfigurationProperties("spring.datasource")
    @Bean
    public DruidDataSource dataSource(){
        DruidDataSource druidDataSource = new DruidDataSource();
        return druidDataSource;
    }
}
15.3 SQL 监控
Druid 提供的监控功能,可以清楚知道连接池和 SQL 的工作情况。
1)注册监控servlet
@Bean
public ServletRegistrationBean registrationBean(){
    StatViewServlet statViewServlet = new StatViewServlet();
    ServletRegistrationBean<StatViewServlet> registrationBean = new ServletRegistrationBean<>(statViewServlet, "/druid/*");
    registrationBean.addInitParameter("loginUsername","lhs");
    registrationBean.addInitParameter("loginPassword","666");

    return registrationBean;
}
2)访问 http://localhost:8080/druid 即可看到登录界面
3)添加sql拦截器
@ConfigurationProperties("spring.datasource")
@Bean
public DruidDataSource dataSource() throws SQLException {
    DruidDataSource druidDataSource = new DruidDataSource();
    druidDataSource.setFilters("stat");
    return druidDataSource;
}
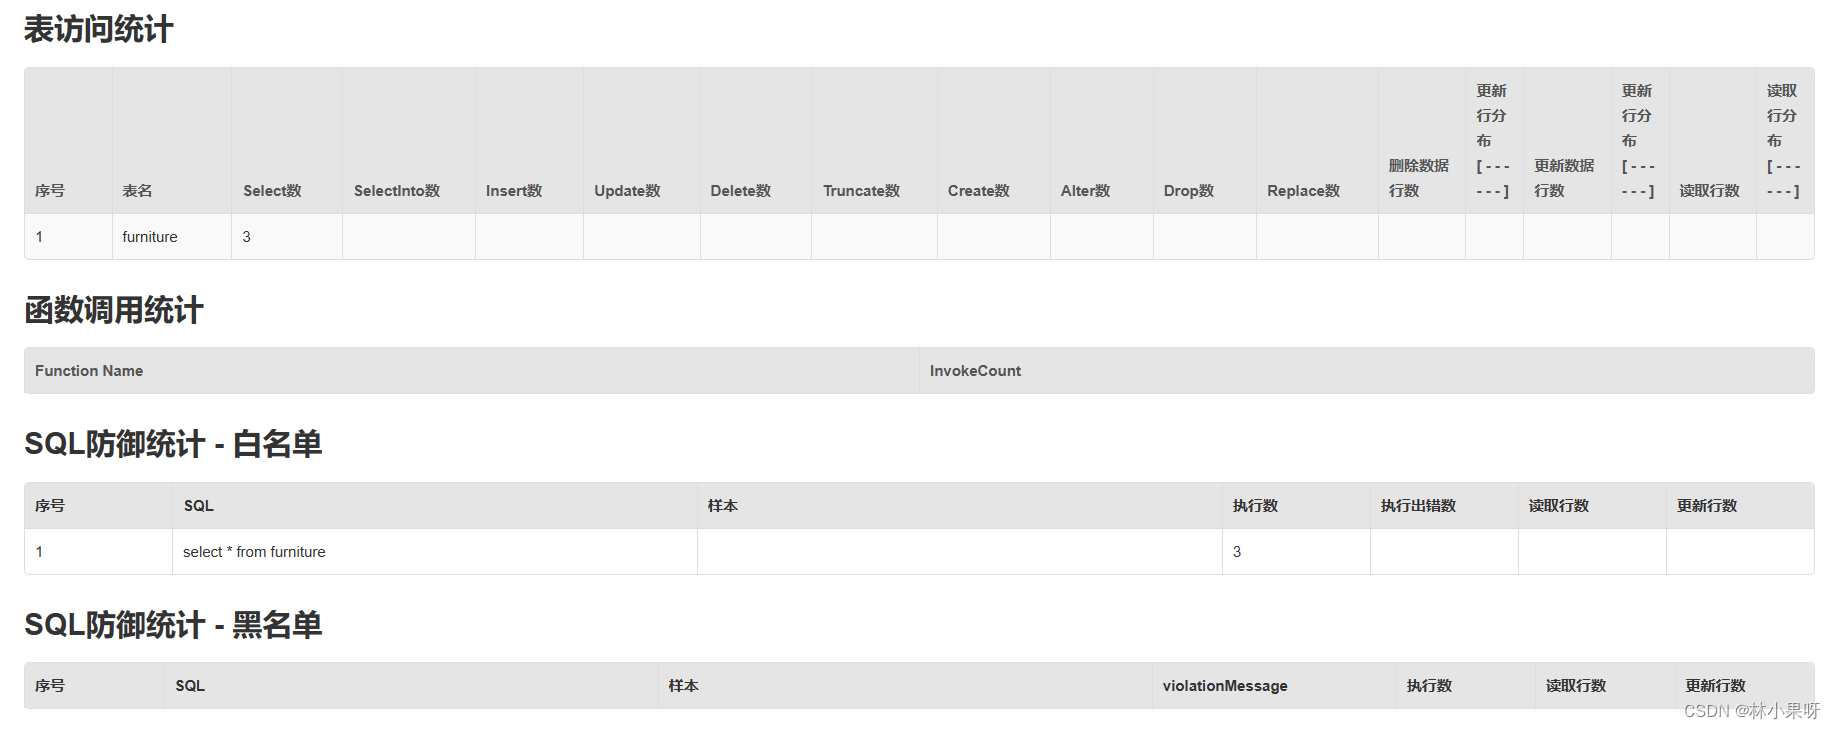
这时即可查看到sql的执行记录:

4)URI 监控
@Bean
public FilterRegistrationBean webStatFilter() {
    WebStatFilter webStatFilter = new WebStatFilter();
    FilterRegistrationBean<WebStatFilter> filterRegistrationBean =
        new FilterRegistrationBean<>(webStatFilter);
    //默认对所有 URL 请求监控
    filterRegistrationBean.setUrlPatterns(Arrays.asList("/*"));
    //排除 URL
    filterRegistrationBean.addInitParameter
        ("exclusions", "*.js,*.gif,*.jpg,*.png,*.css,*.ico,/druid/*");
    return filterRegistrationBean;
}
可以查看到访问的URI:

5)SQL 防火墙
@ConfigurationProperties("spring.datasource")
@Bean
public DruidDataSource dataSource() throws SQLException {
    DruidDataSource druidDataSource = new DruidDataSource();
    druidDataSource.setFilters("stat,wall");
    return druidDataSource;
}
15.4 Druid Spring Boot Starter
Druid Spring Boot Starter 可以让程序员在 Spring Boot 项目中更加轻松集成 Druid 和监控
使用步骤:
1)导入依赖
<dependency>
    <groupId>com.alibaba</groupId>
    <artifactId>druid-spring-boot-starter</artifactId>
    <version>1.1.17</version>
</dependency>
2)在application.yml中添加配置
spring:
  datasource:
    driver-class-name: com.mysql.jdbc.Driver
    url: jdbc:mysql://localhost:3306/home_furnishing?userSSL=true&userUnicode=true&characterEncoding=UTF-8
    username: root
    password: xxx
    druid:
      stat-view-servlet:
        login-username: lhs
        login-password: 666
        enabled: true

      web-stat-filter: #web 监控
        enabled: true
        urlPattern: /*
        exclusions: '*.js,*.gif,*.jpg,*.png,*.css,*.ico,/druid/*'
      filter:
        stat: #sql 监控
          slow-sql-millis: 1000
          logSlowSql: true
          enabled: true
        wall: #防火墙
          enabled: true
          config:
            drop-table-allow: false
16. 整合 MyBatis
1)导入依赖
<dependency>
    <groupId>org.springframework.boot</groupId>
    <artifactId>spring-boot-starter-web</artifactId>
</dependency>
<dependency>
    <groupId>org.mybatis.spring.boot</groupId>
    <artifactId>mybatis-spring-boot-starter</artifactId>
    <version>2.2.2</version>
</dependency>
<dependency>
    <groupId>org.springframework.boot</groupId>
    <artifactId>spring-boot-starter-data-jdbc</artifactId>
</dependency>
<dependency>
    <groupId>mysql</groupId>
    <artifactId>mysql-connector-java</artifactId>
    <version>5.1.49</version>
</dependency>
<dependency>
    <groupId>com.alibaba</groupId>
    <artifactId>druid-spring-boot-starter</artifactId>
    <version>1.1.17</version>
</dependency>
<dependency>
    <groupId>org.projectlombok</groupId>
    <artifactId>lombok</artifactId>
</dependency>
2)创建mapper
@Mapper
public interface FurnMapper {
    public Furn getFurnById(Integer id);
}
3)在resources/mapper下创建FurnMapper.xml
<!DOCTYPE mapper
        PUBLIC "-//mybatis.org//DTD Mapper 3.0//EN"
        "http://mybatis.org/dtd/mybatis-3-mapper.dtd">
<mapper namespace="com.lhs.mapper.FurnMapper">
    <select id="getFurnById" resultType="com.lhs.entity.Furn">
        select * from furniture where id=#{id}
    </select>
</mapper>
4)在application.yml中指定mapper映射文件路径,开启日志
mybatis:
  mapper-locations: classpath:mapper/*.xml
  configuration:
    log-impl: org.apache.ibatis.logging.stdout.StdOutImpl
17. 整合 MyBatis-Plus
MyBatis-Plus (简称 MP)是一个 MyBatis 的增强工具,在 MyBatis 的基础上只做增强不做改变,为简化开发、提高效率而生。
使用步骤:
1)导入依赖
<dependency>
    <groupId>com.baomidou</groupId>
    <artifactId>mybatis-plus-boot-starter</artifactId>
    <version>3.4.3</version>
</dependency>
2)创建mapper接口继承BaseMapper<Furn>
@Mapper
public interface FurnMapper extends BaseMapper<Furn> {
}
BaseMapper<Furn>中帮我们定义好了一系列的crud方法并自动实现
3)创建service接口继承IService<Furn>
public interface FurnService extends IService<Furn> {
}
IService<Furn>中定义好了一系列service层方法
4)实现service接口
@Service
public class FurnServiceImpl extends ServiceImpl<FurnMapper,Furn> implements FurnService {
}
ServiceImpl中调用mapper的方法实现了IService中的方法
17.1 分页
1)添加配置类
@Configuration
public class MybatisPlusConfig {
    @Bean
    public MybatisPlusInterceptor paginationInterceptor() {
        MybatisPlusInterceptor mybatisPlusInterceptor = new MybatisPlusInterceptor();
        mybatisPlusInterceptor.addInnerInterceptor(new PaginationInnerInterceptor());
        return mybatisPlusInterceptor;
    }
}
2)添加方法返回分页信息
@GetMapping("/page")
public Page<Furn> getPage(@RequestParam(value = "pageNum",defaultValue="1")
                          Integer pageNum,
                          @RequestParam(value = "pageSize",defaultValue="5")
                          Integer pageSize){
    Page<Furn> furnByPage = furnService.page(new Page<>(pageNum,pageSize));
    return furnByPage;
}


 56万+
56万+

 被折叠的 条评论
为什么被折叠?
被折叠的 条评论
为什么被折叠?
 到【灌水乐园】发言


