


k8s-kubeadm高可用安装部署

Kubernetes是谷歌以Borg为前身,基于谷歌15年生产环境经验的基础上开源的一个项目 Kubernetes致力于提供跨主机集群的自动部署、扩展、高可用以及运行应用程序容器的平台
Kubernetes Master节点:
-
kube-APIServer: 集群的控制中枢,各个模块之间信息交互都需要经过
kube-apiserver,同时它也是集群管理、资源配置、整个集群安全机制的入口。 -
Controller-Manager: 集群的状态管理器,保证Pod或其他资源达到期望值,也是需要和
apiserver进行通信,在需要的时候创建、更新、删除它所管理的资源。 -
Scheduler: 集群的调度中心,它会根据指定的一系列条件,选择一个或一批最佳的节点,然后部署Pod。
-
Etcd:键值数据库,保存一些集群的信息,一般生产环境中建议部署三个以上节点(奇数个)
基本环境配置
kubeadm 安装方式自 1.14 版本以后,安装方法几乎没有任何变化,本文可以尝试安装最新的k8s集群
[root@localhost ~]# cat /etc/redhat-release
CentOS Linux release 7.9.2009 (Core)
[root@localhost ~]# uname -a
Linux localhost 3.10.0-1160.62.1.el7.x86_64 #1 SMP Tue Apr 5 16:57:59 UTC 2022 x86_64 x86_64 x86_64 GNU/Linux
集群规划
主机规划
| 主机名 | IP地址 | 说明 |
|---|---|---|
| k8s-master01-03 | 192.168.0.100-102 | master节点*3 |
| k8s-master-lb | 192.168.0.200 | keepalived虚拟VIP |
| k8s-node01-02 | 192.168.0.103/104 | worker节点*2 |
网段规划
| 配置信息 | 备注 |
|---|---|
| 系统版本 | centos7.9 |
| docker版本 | 20.10.x |
| pod网段 | 172.16.0.0/12 |
| service网段 | 10.96.0.0/16 |
宿主机网段、k8s service网段、pod网段不能重复
所有机器修改主机名与hosts文件
[root@localhost ~]# hostnamectl set-hostname k8s-master01
[root@localhost ~]# vim /etc/hosts
[root@localhost ~]# cat /etc/hosts
127.0.0.1   localhost localhost.localdomain localhost4 localhost4.localdomain4
::1         localhost localhost.localdomain localhost6 localhost6.localdomain6
192.168.0.100 k8s-master01
192.168.0.101 k8s-master02
192.168.0.102 k8s-master03
192.168.0.200 k8s-master-lb
192.168.0.103 k8s-node01
192.168.0.104 k8s-node02
配置yum源
wget -O /etc/yum.repos.d/CentOS-Base.repo https://mirrors.aliyun.com/repo/Centos-7.repo
yum -y install yum-utils device-mapper-persistent-data lvm2 git telnet net-tools vim psmisc jq wget ntpdate
yum-config-manager --add-repo https://mirrors.aliyun.com/docker-ce/linux/centos/docker-ce.repo
sed -i -e '/mirrors.cloud.aliyuncs.com/d' -e '/mirrors.aliyuncs.com/d' /etc/yum.repos.d/CentOS-Base.repo
所有节点关闭 firewalld、dnsmasq、selinux(CentOS7需要关闭 NetworkManager,CentOS8不需要)
systemctl disable --now firewalld systemctl disable --now dnsmasq systemctl disable --now NetworkManager setenforce 0 sed -i 's#SELINUX=enforcing#SELINUX=disabled#g' /etc/sysconfig/selinux sed -i 's#SELINUX=enforcing#SELINUX=disabled#g' /etc/selinux/config
所有节点关闭swap分区,fstab注释swap
swapoff -a && sysctl -w vm.swappiness=0
sed -ri '/^[^#]*swap/s@^@#@' /etc/fstab
所有节点同步时间 安装ntpdate
rpm -ivh http://mirrors.wlnmp.com/centos/wlnmp-release-centos.noarch.rpm
所有节点同步时间。时间同步配置如下:
ln -sf /usr/share/zoneinfo/Asia/Shanghai /etc/localtime
echo 'Asia/Shanghai' >/etc/timezone
yum -y install ntp
ntpdate time2.aliyun.com
crontab -e
# 加入到crontab
*/5 * * * * /usr/sbin/ntpdate time2.aliyun.com
所有节点配置limit:
ulimit -SHn 65535
vim /etc/security/limits.conf
# 末尾添加如下内容
* soft nofile 65536
* hard nofile 131072
* soft nproc 65535
* hard nproc 655350
* soft memlock unlimited
* hard memlock unlimited
git clone https://github.com/dotbalo/k8s-ha-install.git
Master01节点免密钥登录其他节点,安装过程中生成配置文件和证书均在Master01上操作,集群管理也在Master01上操作,阿里云或者AWS上需要单独一台kubectl服务器。 配置方法:
ssh-keygen -t rsa
for i in k8s-master01 k8s-master02 k8s-master03 k8s-node01 k8s-node02;do ssh-copy-id -i .ssh/id_rsa.pub $i;done
升级内核
所有节点升级系统并重启
yum update -y --exclude=kernel* #CentOS7需要升级,CentOS8可以按需升级系统
安装最新版:
rpm --import https://www.elrepo.org/RPM-GPG-KEY-elrepo.org
rpm -Uvh http://www.elrepo.org/elrepo-release-7.0-2.el7.elrepo.noarch.rpm
yum --enablerepo=elrepo-kernel install kernel-ml kernel-ml-devel -y
更改内核顺序:
grub2-set-default  0 && grub2-mkconfig -o /etc/grub2.cfg && grubby --args="user_namespace.enable=1" --update-kernel="$(grubby --default-kernel)" && reboot
开机后查看内核
[appadmin@k8s-node01 ~]$ uname -a
所有节点安装ipvsadm
yum install ipvsadm ipset sysstat conntrack libseccomp -y
所有节点配置 ipvs 模块,在内核4.19+版本 nf_conntrack_ipv4 已经改为 nf_conntrack, 4.18以下使用 nf_conntrack_ipv4 即可
modprobe -- ip_vs
modprobe -- ip_vs_rr
modprobe -- ip_vs_wrr
modprobe -- ip_vs_sh
modprobe -- nf_conntrack
vim /etc/modules-load.d/ipvs.conf
    # 加入以下内容
ip_vs
ip_vs_lc
ip_vs_wlc
ip_vs_rr
ip_vs_wrr
ip_vs_lblc
ip_vs_lblcr
ip_vs_dh
ip_vs_sh
ip_vs_fo
ip_vs_nq
ip_vs_sed
ip_vs_ftp
ip_vs_sh
nf_conntrack
ip_tables
ip_set
xt_set
ipt_set
ipt_rpfilter
ipt_REJECT
ipip
然后执行
systemctl enable --now systemd-modules-load.service
检查是否加载
[root@k8s-master01 ~]# lsmod | grep -e ip_vs -e nf_conntrack
ip_vs_ftp              16384  0
nf_nat                 32768  1 ip_vs_ftp
ip_vs_sed              16384  0
ip_vs_nq               16384  0
ip_vs_fo               16384  0
ip_vs_dh               16384  0
ip_vs_lblcr            16384  0
ip_vs_lblc             16384  0
ip_vs_wlc              16384  0
ip_vs_lc               16384  0
ip_vs_sh               16384  0
ip_vs_wrr              16384  0
ip_vs_rr               16384  0
ip_vs                 151552  24 ip_vs_wlc,ip_vs_rr,ip_vs_dh,ip_vs_lblcr,ip_vs_sh,ip_vs_fo,ip_vs_nq,ip_vs_lblc,ip_vs_wrr,ip_vs_lc,ip_vs_sed,ip_vs_ftp
nf_conntrack          143360  2 nf_nat,ip_vs
nf_defrag_ipv6         20480  1 nf_conntrack
nf_defrag_ipv4         16384  1 nf_conntrack
libcrc32c              16384  4 nf_conntrack,nf_nat,xfs,ip_vs
开启一些k8s集群中必须的内核参数,所有节点配置k8s内核
cat <<EOF > /etc/sysctl.d/k8s.conf net.ipv4.ip_forward = 1 net.bridge.bridge-nf-call-iptables = 1 net.bridge.bridge-nf-call-ip6tables = 1 fs.may_detach_mounts = 1 vm.overcommit_memory=1 net.ipv4.conf.all.route_localnet = 1 vm.panic_on_oom=0 fs.inotify.max_user_watches=89100 fs.file-max=52706963 fs.nr_open=52706963 net.netfilter.nf_conntrack_max=2310720 net.ipv4.tcp_keepalive_time = 600 net.ipv4.tcp_keepalive_probes = 3 net.ipv4.tcp_keepalive_intvl =15 net.ipv4.tcp_max_tw_buckets = 36000 net.ipv4.tcp_tw_reuse = 1 net.ipv4.tcp_max_orphans = 327680 net.ipv4.tcp_orphan_retries = 3 net.ipv4.tcp_syncookies = 1 net.ipv4.tcp_max_syn_backlog = 16384 net.ipv4.ip_conntrack_max = 65536 net.ipv4.tcp_max_syn_backlog = 16384 net.ipv4.tcp_timestamps = 0 net.core.somaxconn = 16384 EOF sysctl --system
所有节点配置完内核后,重启服务器,保证重启后内核依旧加载
reboot
lsmod | grep --color=auto -e ip_vs -e nf_conntrack
基本组件安装
如果安装得版本低于1.24,选择 Docker 和 Containerd 均可,高于1.24选择 Containerd 作为 Runtime。
cat <<EOF > /etc/yum.repos.d/kubernetes.repo
[kubernetes]
name=Kubernetes
baseurl=http://mirrors.aliyun.com/kubernetes/yum/repos/kubernetes-el7-x86_64
enabled=1
gpgcheck=0
repo_gpgcheck=0
gpgkey=http://mirrors.aliyun.com/kubernetes/yum/doc/yum-key.gpg
       http://mirrors.aliyun.com/kubernetes/yum/doc/rpm-package-key.gpg
EOF
setenforce 0
Containerd作为Runtime
版本大于等于1.24
所有节点安装 docker-ce-20.10*
[root@k8s-master02 ~]# yum -y install docker-ce-20.10.* docker-ce-cli-20.10.*
可以无需启动docker,只需要配置和启动Containerd即可 首先配置Containerd所需得模块(所有节点)
[root@k8s-master01 ~]# cat <<EOF | sudo tee /etc/modules-load.d/containerd.conf
overlay
br_netfilter
EOF

overlay
br_netfilter
所有节点加载模块
[root@k8s-master01 ~]# modprobe -- overlay
[root@k8s-master01 ~]# modprobe -- br_netfilter
所有节点配置 Containerd 所需得内核
[root@k8s-master01 ~]# cat <<EOF | sudo tee /etc/sysctl.d/99-kubernetes-cri.conf
net.bridge.bridge-nf-call-iptables = 1
net.ipv4.ip_forward = 1
net.bridge.bridge-nf-call-ip6tables = 1
EOF

net.bridge.bridge-nf-call-iptables = 1
net.ipv4.ip_forward = 1
net.bridge.bridge-nf-call-ip6tables = 1
所有节点加载内核
[root@k8s-master01 ~]# sysctl --system
所有节点配置Containerd得配置文件
[root@k8s-master01 ~]# cd /etc/containerd/
[root@k8s-master01 containerd]# containerd config default | tee /etc/containerd/config.toml #重新生成一个
[root@k8s-master01 containerd]# vim config.toml
修改以下配置,将false改为true
125             SystemdCgroup = true
所有节点将sandbox_image的Pause镜像改成符合自己版本的地址registry.cn-hangzhou.aliyuncs.com/google_containers/pause
 61     sandbox_image = "registry.cn-hangzhou.aliyuncs.com/google_containers/pause:3.6"
所有节点启动Containerd,并配置开机自启动
[root@k8s-master01 containerd]# systemctl daemon-reload
[root@k8s-master01 containerd]# systemctl enable --now containerd
所有节点配置crictl客户端连接的运行时位置
cat > /etc/crictl.yaml <<EOF
runtime-endpoint: unix:///run/containerd/containerd.sock
image-endpoint: unix:///run/containerd/containerd.sock
timeout: 10
debug: false
EOF
docker作为Runtime
所有节点安装docker-ce 20.10
1yum install docker-ce-20.10.* docker-ce-cli-20.10.* -y
由于新版Kubelet建议使用systemd,所以把Docker的CgroupDriver也改成systemd
mkdir /etc/docker
cat > /etc/docker/daemon.json <<EOF
{
  "exec-opts": ["native.cgroupdriver=systemd"]
}
EOF
所有节点设置开机自启动Docker
systemctl daemon-reload && systemctl enable --now docker
非二进制安装Kubernetes组件
在master01上查看最新得版本是多少
[root@k8s-master01 ~]# yum list kubeadm.x86_64 --showduplicates | sort -r
···
看到目前最新得是1.24.2
kubeadm.x86_64                       1.24.2-0                         kubernetes
···
所有节点安装1.24.2版本 kubeadm、kubelet和kubectl
yum -y install kubeadm-1.24.2* kubelet-1.24.2* kubectl-1.24.2*
查看版本
[root@k8s-master01 ~]# kubeadm version
kubeadm version: &version.Info{Major:"1", Minor:"24", GitVersion:"v1.24.2", GitCommit:"f66044f4361b9f1f96f0053dd46cb7dce5e990a8", GitTreeState:"clean", BuildDate:"2022-06-15T14:20:54Z", GoVersion:"go1.18.3", Compiler:"gc", Platform:"linux/amd64"}
如果选择得是Containerd作为runtime,需要更改kubelet得配置使用Containerd作为Runtime 如果是用docker作为runtime,不要执行下面得命令
cat >/etc/sysconfig/kubelet<<EOF
KUBELET_KUBEADM_ARGS="--container-runtime=remote --runtime-request-timeout=15m --container-runtime-endpoint=unix:///run/containerd/containerd.sock"
EOF
所有节点设置kubelet开机自启动(由于还未初始化,没有kubelet得配置文件,kubelet无法启动,不用进行处理)
systemctl daemon-reload
systemctl enable --now kubelet
高可用组件安装
如果不是高可用集群,haproxy和keepalived无需安装
公有云要用云自带得负载均衡,如阿里云得SLB,腾讯云得ELB,云上环境大部分都不支持keepalived,阿里云kubectl控制端不能放在master节点,使用腾讯云可以解决阿里云SLB有回环,也就是SLB代理得服务器不能反向访问SLB,腾讯云修复了这个问题 所有 master 节点通过yum安装haproxy和keepalived
yum -y install haproxy keepalived
master节点配置haproxy
(详细配置参考haproxy文档)所有master节点得haproxy配置一样
vim /etc/haproxy/haproxy.cfg
# 注意更改IP地址
global
    log         127.0.0.1 local0 err
    maxconn     2000
    ulimit-n    16384
    daemon
    stats timeout 30s

defaults
    mode                    http
    log                     global
    option                  httplog
    timeout http-request    15s
    timeout connect         5000
    timeout client          50000
    timeout server          50000
    timeout http-keep-alive 15s


frontend monitor-in
    bind *:33305
    mode http
    option httplog
    monitor-uri /monitor

frontend k8s-master
    bind 0.0.0.0:16443
    bind 127.0.0.1:16443
    mode tcp
    option tcplog
    tcp-request inspect-delay 5s
    default_backend k8s-master


backend k8s-master
    mode tcp
    option tcplog
    option tcp-check
    balance roundrobin
    default-server inter 10s downinter 5s rise 2 fall 2 slowstart 60s maxconn 250 maxqueue 256 weight 100
    server k8s-master01 192.168.0.100:6443 check
    server k8s-master02 192.168.0.101:6443 check
    server k8s-master03 192.168.0.102:6443 check
启动haproxy
systemctl restart haproxy
netstat -anpt | grep haproxy
systemctl enable --now haproxy
tcp        0      0 0.0.0.0:33305           0.0.0.0:*               LISTEN      4537/haproxy
tcp        0      0 127.0.0.1:16443         0.0.0.0:*               LISTEN      4537/haproxy
tcp        0      0 0.0.0.0:16443           0.0.0.0:*               LISTEN      4537/haproxy
master节点配置keepalived
配置都不一样,注意区分 master01
[root@k8s-master01 ~]# vim /etc/keepalived/keepalived.conf
! Configuration File for keepalived

global_defs {
   router_id LVS_DEVEL
   script_user root
   enable_script_security
}

vrrp_script chk_apiserver {
   script "/etc/keepalived/check_apiserver.sh"
   interval 5
   weight -5
   fall 2
   rise 1
}

vrrp_instance VI_1 {
    state MASTER
    interface ens32	#本机网卡名
    mcase_src_ip 192.168.0.100	#本机IP地址
    virtual_router_id 51
    priority 101
    advert_int 2
    authentication {
        auth_type PASS
        auth_pass K8SHA_KA_AUTH
    }
    virtual_ipaddress {
        192.168.0.200	#VIP地址
    }
    track_script {
      chk_apiserver
    }
}
master02
[root@k8s-master02 ~]# vim /etc/keepalived/keepalived.conf

! Configuration File for keepalived

global_defs {
   router_id LVS_DEVEL
   script_user root
   enable_script_security
}

vrrp_script chk_apiserver {
   script "/etc/keepalived/check_apiserver.sh"
   interval 5
   weight -5
   fall 2
   rise 1
}

vrrp_instance VI_1 {
    state MASTER
    interface ens32
    mcase_src_ip 192.168.0.101
    virtual_router_id 51
    priority 100
    advert_int 2
    authentication {
        auth_type PASS
        auth_pass K8SHA_KA_AUTH
    }
    virtual_ipaddress {
        192.168.0.200
    }
    track_script {
      chk_apiserver
    }
}
master03
[root@k8s-master03 ~]# vim /etc/keepalived/keepalived.conf

! Configuration File for keepalived

global_defs {
   router_id LVS_DEVEL
   script_user root
   enable_script_security
}

vrrp_script chk_apiserver {
   script "/etc/keepalived/check_apiserver.sh"
   interval 5
   weight -5
   fall 2
   rise 1
}

vrrp_instance VI_1 {
    state MASTER
    interface ens32
    mcase_src_ip 192.168.0.102
    virtual_router_id 51
    priority 100
    advert_int 2
    authentication {
        auth_type PASS
        auth_pass K8SHA_KA_AUTH
    }
    virtual_ipaddress {
        192.168.0.200
    }
    track_script {
      chk_apiserver
    }
}
所有master节点配置keepalived健康检查文件
[root@k8s-master01 ~]# vim /etc/keepalived/check_apiserver.sh
#!/bin/bash

err=0
for k in $(seq 1 3)
do
    check_code=$(pgrep haproxy)
    if [[ $check_code == "" ]]; then
        err=$(expr $err + 1)
        sleep 1
        continue
    else
        err=0
        break
    fi
done

if [[ $err != "0" ]]; then
    echo "systemctl stop keepalived"
    /usr/bin/systemctl stop keepalived
    exit 1
else
    exit 0
fi
启动keepalived
chmod +x /etc/keepalived/check_apiserver.sh
systemctl daemon-reload
systemctl enable --now keepalived
所有节点测试VIP
# ping 192.168.0.200
PING 192.168.0.1000 (192.168.0.1000) 56(84) bytes of data.
64 bytes from 192.168.0.1000: icmp_seq=1 ttl=64 time=0.014 ms
集群初始化
官方初始化文件 master01节点创建 kubeadm-config.yaml 配置文件
如果不是高可用集群,192.168.0.200改为master01得地址,16443改为apiserver得端口,默认6443,注意更改kubernetesVersion值和自己得kubeadm得版本一致
[root@k8s-master01 ~]# vim kubeadm-config.yaml
apiVersion: kubeadm.k8s.io/v1beta2
bootstrapTokens:
- groups:
  - system:bootstrappers:kubeadm:default-node-token
  token: 7t2weq.bjbawausm0jaxury
  ttl: 24h0m0s
  usages:
  - signing
  - authentication
kind: InitConfiguration
localAPIEndpoint:
  advertiseAddress: 192.168.0.100
  bindPort: 6443
nodeRegistration:
  criSocket: /run/containerd/containerd.sock
  name: k8s-master01
  taints:
  - effect: NoSchedule
    key: node-role.kubernetes.io/master
---
apiServer:
  certSANs:
  - 192.168.0.200  #改为VIP或云上LB负载均衡地址
  timeoutForControlPlane: 4m0s
apiVersion: kubeadm.k8s.io/v1beta2
certificatesDir: /etc/kubernetes/pki
clusterName: kubernetes
controlPlaneEndpoint: 192.168.0.100:16443
controllerManager: {}
dns:
  type: CoreDNS
etcd:
  local:
    dataDir: /var/lib/etcd
imageRepository: registry.cn-hangzhou.aliyuncs.com/google_containers
kind: ClusterConfiguration
kubernetesVersion: v1.24.2 # 更改此处的版本号和kubeadm version一致
networking:
  dnsDomain: cluster.local
  podSubnet: 172.16.0.0/12
  serviceSubnet: 10.96.0.0/16
scheduler: {}
更新kubeadm文件
[root@k8s-master01 ~]# kubeadm config migrate --old-config kubeadm-config.yaml --new-config new.yaml
W0626 21:23:09.971283   15405 initconfiguration.go:120] Usage of CRI endpoints without URL scheme is deprecated and can cause kubelet errors in the future. Automatically prepending scheme "unix" to the "criSocket" with value "/run/containerd/containerd.sock". Please update your configuration!
把 new.yaml 文件复制到其他master节点
[root@k8s-master01 ~]# for i in k8s-master02 k8s-master03;do scp new.yaml $i:/root/;done
kubeadm安装得k8s集群,组件是采用pod得形式去管理得
所有master节点提前下载组件pod镜像,可以节省初始化时间
其他master节点不需要更改任何配置包括IP地址
# kubeadm config images pull --config /root/new.yaml
[config/images] Pulled registry.cn-hangzhou.aliyuncs.com/google_containers/kube-apiserver:v1.24.2
[config/images] Pulled registry.cn-hangzhou.aliyuncs.com/google_containers/kube-controller-manager:v1.24.2
[config/images] Pulled registry.cn-hangzhou.aliyuncs.com/google_containers/kube-scheduler:v1.24.2
[config/images] Pulled registry.cn-hangzhou.aliyuncs.com/google_containers/kube-proxy:v1.24.2
[config/images] Pulled registry.cn-hangzhou.aliyuncs.com/google_containers/pause:3.7
[config/images] Pulled registry.cn-hangzhou.aliyuncs.com/google_containers/etcd:3.5.3-0
[config/images] Pulled registry.cn-hangzhou.aliyuncs.com/google_containers/coredns:v1.8.6
所有节点设置kubelet开机启动
启动失败无需处理,初始化完成后可正常启动
# systemctl enable --now kubelet
初始化后会在 /etc/kubernetes 目录下生成对应得证书和配置文件,之后其他得master节点加入master01即可 master01节点初始化
[root@k8s-master01 ~]# kubeadm init --config /root/new.yaml  --upload-certs
[init] Using Kubernetes version: v1.24.2
[preflight] Running pre-flight checks
[preflight] Pulling images required for setting up a Kubernetes cluster
[preflight] This might take a minute or two, depending on the speed of your internet connection
[preflight] You can also perform this action in beforehand using 'kubeadm config images pull'
[certs] Using certificateDir folder "/etc/kubernetes/pki"
[certs] Generating "ca" certificate and key
[certs] Generating "apiserver" certificate and key
[certs] apiserver serving cert is signed for DNS names [k8s-master01 kubernetes kubernetes.default kubernetes.default.svc kubernetes.default.svc.cluster.local] and IPs [10.96.0.1 192.168.0.100 192.168.0.1000]
[certs] Generating "apiserver-kubelet-client" certificate and key
[certs] Generating "front-proxy-ca" certificate and key
[certs] Generating "front-proxy-client" certificate and key
[certs] Generating "etcd/ca" certificate and key
[certs] Generating "etcd/server" certificate and key
[certs] etcd/server serving cert is signed for DNS names [k8s-master01 localhost] and IPs [192.168.0.100 127.0.0.1 ::1]
[certs] Generating "etcd/peer" certificate and key
[certs] etcd/peer serving cert is signed for DNS names [k8s-master01 localhost] and IPs [192.168.0.100 127.0.0.1 ::1]
[certs] Generating "etcd/healthcheck-client" certificate and key
[certs] Generating "apiserver-etcd-client" certificate and key
[certs] Generating "sa" key and public key
[kubeconfig] Using kubeconfig folder "/etc/kubernetes"
W0626 21:37:49.572961   17090 endpoint.go:57] [endpoint] WARNING: port specified in controlPlaneEndpoint overrides bindPort in the controlplane address
[kubeconfig] Writing "admin.conf" kubeconfig file
W0626 21:37:49.701434   17090 endpoint.go:57] [endpoint] WARNING: port specified in controlPlaneEndpoint overrides bindPort in the controlplane address
[kubeconfig] Writing "kubelet.conf" kubeconfig file
W0626 21:37:49.811791   17090 endpoint.go:57] [endpoint] WARNING: port specified in controlPlaneEndpoint overrides bindPort in the controlplane address
[kubeconfig] Writing "controller-manager.conf" kubeconfig file
W0626 21:37:49.930033   17090 endpoint.go:57] [endpoint] WARNING: port specified in controlPlaneEndpoint overrides bindPort in the controlplane address
[kubeconfig] Writing "scheduler.conf" kubeconfig file
[kubelet-start] Writing kubelet environment file with flags to file "/var/lib/kubelet/kubeadm-flags.env"
[kubelet-start] Writing kubelet configuration to file "/var/lib/kubelet/config.yaml"
[kubelet-start] Starting the kubelet
[control-plane] Using manifest folder "/etc/kubernetes/manifests"
[control-plane] Creating static Pod manifest for "kube-apiserver"
[control-plane] Creating static Pod manifest for "kube-controller-manager"
[control-plane] Creating static Pod manifest for "kube-scheduler"
[etcd] Creating static Pod manifest for local etcd in "/etc/kubernetes/manifests"
[wait-control-plane] Waiting for the kubelet to boot up the control plane as static Pods from directory "/etc/kubernetes/manifests". This can take up to 4m0s
[apiclient] All control plane components are healthy after 19.524906 seconds
[upload-config] Storing the configuration used in ConfigMap "kubeadm-config" in the "kube-system" Namespace
[kubelet] Creating a ConfigMap "kubelet-config" in namespace kube-system with the configuration for the kubelets in the cluster
[upload-certs] Storing the certificates in Secret "kubeadm-certs" in the "kube-system" Namespace
[upload-certs] Using certificate key:
c3efed12fa4fa6f7c3b8c50f438951996143da6a4f1f67bf9838aa37123b374e
[mark-control-plane] Marking the node k8s-master01 as control-plane by adding the labels: [node-role.kubernetes.io/control-plane node.kubernetes.io/exclude-from-external-load-balancers]
[mark-control-plane] Marking the node k8s-master01 as control-plane by adding the taints [node-role.kubernetes.io/master:NoSchedule]
[bootstrap-token] Using token: 7t2weq.bjbawausm0jaxury
[bootstrap-token] Configuring bootstrap tokens, cluster-info ConfigMap, RBAC Roles
[bootstrap-token] Configured RBAC rules to allow Node Bootstrap tokens to get nodes
[bootstrap-token] Configured RBAC rules to allow Node Bootstrap tokens to post CSRs in order for nodes to get long term certificate credentials
[bootstrap-token] Configured RBAC rules to allow the csrapprover controller automatically approve CSRs from a Node Bootstrap Token
[bootstrap-token] Configured RBAC rules to allow certificate rotation for all node client certificates in the cluster
[bootstrap-token] Creating the "cluster-info" ConfigMap in the "kube-public" namespace
[kubelet-finalize] Updating "/etc/kubernetes/kubelet.conf" to point to a rotatable kubelet client certificate and key
[addons] Applied essential addon: CoreDNS
W0626 21:38:12.849166   17090 endpoint.go:57] [endpoint] WARNING: port specified in controlPlaneEndpoint overrides bindPort in the controlplane address
[addons] Applied essential addon: kube-proxy

Your Kubernetes control-plane has initialized successfully!

To start using your cluster, you need to run the following as a regular user:

  mkdir -p $HOME/.kube
  sudo cp -i /etc/kubernetes/admin.conf $HOME/.kube/config
  sudo chown $(id -u):$(id -g) $HOME/.kube/config

Alternatively, if you are the root user, you can run:

  export KUBECONFIG=/etc/kubernetes/admin.conf

You should now deploy a pod network to the cluster.
Run "kubectl apply -f [podnetwork].yaml" with one of the options listed at:
  https://kubernetes.io/docs/concepts/cluster-administration/addons/

You can now join any number of the control-plane node running the following command on each as root:

# 初始化成功后会产生Token值,用于其他master节点加入时使用
  kubeadm join 192.168.0.100:16443 --token 7t2weq.bjbawausm0jaxury \
	--discovery-token-ca-cert-hash sha256:6480cf4c4d91eb5ad978ba02dfefd27ec8688321f872d3a21d030eecdef46c34 \
	--control-plane --certificate-key c3efed12fa4fa6f7c3b8c50f438951996143da6a4f1f67bf9838aa37123b374e

Please note that the certificate-key gives access to cluster sensitive data, keep it secret!
As a safeguard, uploaded-certs will be deleted in two hours; If necessary, you can use
"kubeadm init phase upload-certs --upload-certs" to reload certs afterward.

Then you can join any number of worker nodes by running the following on each as root:

# 初始化成功后会产生Token值,用于其他node节点加入时使用
kubeadm join 192.168.0.100:16443 --token 7t2weq.bjbawausm0jaxury \
	--discovery-token-ca-cert-hash sha256:6480cf4c4d91eb5ad978ba02dfefd27ec8688321f872d3a21d030eecdef46c34
初始化失败,需要重置后再次初始化
1# kubeadm reset -f ; ipvsadm --clear ; rm -rf ~/.kube
测试kubectl命令,报错提示 localhost:8080 连不上,是因为kubectl连接不到k8s集群
[root@k8s-master01 ~]# kubectl get node
The connection to the server localhost:8080 was refused - did you specify the right host or port?
因为kubectl连接k8s集群需要有证书得文件 证书文件在 /etc/kubernetes/admin.conf 所以在执行kubectl命令时要指定 /etc/kubernetes/admin.conf 才能去连接到k8s集群 指定配置文件得方式,初始化集群后给出了两种,执行以下任意一种即可
To start using your cluster, you need to run the following as a regular user:

  mkdir -p $HOME/.kube
  sudo cp -i /etc/kubernetes/admin.conf $HOME/.kube/config
  sudo chown $(id -u):$(id -g) $HOME/.kube/config

Alternatively, if you are the root user, you can run:

  export KUBECONFIG=/etc/kubernetes/admin.conf
执行以下命令
[root@k8s-master01 ~]# mkdir -p $HOME/.kube
[root@k8s-master01 ~]# sudo cp -i /etc/kubernetes/admin.conf $HOME/.kube/config
[root@k8s-master01 ~]# sudo chown $(id -u):$(id -g) $HOME/.kube/config
执行后可以看到kubectl命令可以正常连接到k8s集群
[root@k8s-master01 ~]# kubectl get node
NAME           STATUS     ROLES           AGE   VERSION
k8s-master01   NotReady   control-plane   12m   v1.24.2
Master加入集群
master节点加入集群
kubeadm join 192.168.0.100:16443 --token 7t2weq.bjbawausm0jaxury \
	--discovery-token-ca-cert-hash sha256:6480cf4c4d91eb5ad978ba02dfefd27ec8688321f872d3a21d030eecdef46c34 \
	--control-plane --certificate-key c3efed12fa4fa6f7c3b8c50f438951996143da6a4f1f67bf9838aa37123b374e
Token过期
新建得集群token有效期是24小时 查看secret,其中 bootstrap-token 是存放token得位置
[root@k8s-master01 ~]# kubectl get secret -n kube-system
NAME                     TYPE                            DATA   AGE
bootstrap-token-7t2weq   bootstrap.kubernetes.io/token   6      25m
bootstrap-token-lslz41   bootstrap.kubernetes.io/token   4      25m
kubeadm-certs            Opaque                          8      25m
在 new.yaml 中也能看到 7t2weq 与上面查出得 bootstrap-token-7t2weq 相对应
[root@k8s-master01 ~]# vim new.yaml

apiVersion: kubeadm.k8s.io/v1beta3
bootstrapTokens:
- groups:
  - system:bootstrappers:kubeadm:default-node-token
  token: 7t2weq.bjbawausm0jaxury
  ttl: 24h0m0s
查看一下该 bootstrap-token-7t2weq 详情
[root@k8s-master01 ~]# kubectl get secret -n kube-system bootstrap-token-7t2weq -oyaml
apiVersion: v1
data:
  auth-extra-groups: c3lzdGVtOmJvb3RzdHJhcHBlcnM6a3ViZWFkbTpkZWZhdWx0LW5vZGUtdG9rZW4=
  expiration: MjAyMi0wNi0yN1QxMzozODoxMlo=
  token-id: N3Qyd2Vx
  token-secret: YmpiYXdhdXNtMGpheHVyeQ==
  usage-bootstrap-authentication: dHJ1ZQ==
  usage-bootstrap-signing: dHJ1ZQ==
kind: Secret
metadata:
  creationTimestamp: "2022-06-26T13:38:12Z"
  name: bootstrap-token-7t2weq
  namespace: kube-system
  resourceVersion: "277"
  uid: 90682502-eb71-45ec-bf42-a2529df16451
type: bootstrap.kubernetes.io/token
可以看到 expiration(过期时间): MjAyMi0wNi0yN1QxMzozODoxMlo= 是加密过得 解密后便可看到真实得过期时间
[root@k8s-master01 ~]# echo "MjAyMi0wNi0yN1QxMzozODoxMlo=" | base64 -d
2022-06-27T13:38:12Z    #这个时间并不是当前时区,需要加8个小时
[root@k8s-master01 ~]# date
Sun Jun 26 22:10:09 CST 2022   # 与当前时间对比距离过期还有22个小时左右
Token过期后生成新得token 工作节点加入集群得token
kubeadm token create --print-join-command #重新生成node节点加入命令
master需要生成 --control-plane --certificate-key
[root@k8s-master01 ~]# kubeadm init phase upload-certs --upload-certs #生成新的certificate-key
I1017 10:44:18.146828    5231 version.go:255] remote version is much newer: v1.28.2; falling back to: stable-1.24
[upload-certs] Storing the certificates in Secret "kubeadm-certs" in the "kube-system" Namespace
[upload-certs] Using certificate key:
33ee2b4749e472107f49f233ee918d65a2166c8b64468cc90559a786b147bfca
kubeadm join 192.168.0.100:16443 --token 7t2weq.bjbawausm0jaxury \
	--discovery-token-ca-cert-hash sha256:7139356257c0da79b287c4d7cd45e8ae4554d00e57a51f039b1109e27be3edec \
    --control-plane --certificate-key 33ee2b4749e472107f49f233ee918d65a2166c8b64468cc90559a786b147bfca
Node节点加入集群
node节点执行
kubeadm join 192.168.0.100:16443 --token 7t2weq.bjbawausm0jaxury \
	--discovery-token-ca-cert-hash sha256:6480cf4c4d91eb5ad978ba02dfefd27ec8688321f872d3a21d030eecdef46c34
都加入集群后master节点可以看到
[root@k8s-master01 ~]# kubectl get node
NAME           STATUS     ROLES           AGE   VERSION
k8s-master01   NotReady   control-plane   20m   v1.24.2
k8s-master02   NotReady   control-plane   27s   v1.24.2
k8s-master03   NotReady   control-plane   25s   v1.24.2
k8s-node01     NotReady   <none>          18s   v1.24.2
k8s-node02     NotReady   <none>          15s   v1.24.2
k8s-node03     NotReady   <none>          4s    v1.24.2
Calico组件安装
关于网络插件得对比可以参考 K8s网络插件Flannel,Calico Kubernetes网络插件对比分析(Flannel,Calico,Weave)
-
flannel:支持网络管理,但是不支持网络策略
-
calico:支持网络管理和网络策略 master01上操作
[root@k8s-master01 k8s-ha-install]# git checkout manual-installation-v1.24.x && cd calico/
编辑calico.yaml文件
[root@k8s-master01 calico]# vim calico.yaml
4578               value: "POD_CIDR"
修改为POD得网段
4578               value: "172.16.0.0/12"
安装calico
1[root@k8s-master01 calico]# kubectl apply -f calico.yaml
查看calico是否安装完成
[root@k8s-master01 ~]# kubectl get pod -n kube-system
安装完成后查看状态是否为Ready状态
12345678[root@k8s-master01 ~]# kubectl get node
NAME           STATUS   ROLES           AGE   VERSION
k8s-master01   Ready    control-plane   65m   v1.24.2
k8s-master02   Ready    control-plane   45m   v1.24.2
k8s-master03   Ready    control-plane   45m   v1.24.2
k8s-node01     Ready    <none>          44m   v1.24.2
k8s-node02     Ready    <none>          44m   v1.24.2
k8s-node03     Ready    <none>          44m   v1.24.2
Metrics部署
在新版的kubernetes中系统的采集均使用metrics-server,可以通过Metrics采集节点和pod的内存、磁盘、cpu和网络的使用情况
把master01节点的front-proxy-ca.crt复制到所有node节点
[root@k8s-master01 k8s-ha-install]# scp /etc/kubernetes/pki/front-proxy-ca.crt k8s-node01:/etc/kubernetes/pki/front-proxy-ca.crt
front-proxy-ca.crt                                                                                    100% 1115     2.5MB/s   00:00
[root@k8s-master01 k8s-ha-install]# scp /etc/kubernetes/pki/front-proxy-ca.crt k8s-node02:/etc/kubernetes/pki/front-proxy-ca.crt
front-proxy-ca.crt                                                                                    100% 1115     2.3MB/s   00:00 [root@k8s-master01 ~]# scp_file[root@k8s-master01 k8s-ha-install]# scp /etc/kubernetes/pki/front-proxy-ca.crt k8s-node01:/etc/kubernetes/pki/front-proxy-ca.crt front-proxy-ca.crt                                                                                    100% 1115     2.5MB/s   00:00    You have new mail in /var/spool/mail/root[root@k8s-master01 k8s-ha-install]# scp /etc/kubernetes/pki/front-proxy-ca.crt k8s-node02:/etc/kubernetes/pki/front-proxy-ca.crt front-proxy-ca.crt                                                                                    100% 1115     2.3MB/s   00:00 sh node /etc/kubernetes/pki/front-proxy-ca.crt front-proxy-ca.crt                           100% 1115     1.6MB/s   00:00    front-proxy-ca.crt                           100% 1115     1.3MB/s   00:00    front-proxy-ca.crt                           100% 1115     1.8MB/s   00:00
安装metrics server
[root@k8s-master01 k8s-ha-install]# kubectl apply -f kubeadm-metrics-server/
查看状态
[root@k8s-master01 ~]# kubectl get po -n kube-system
READY   								STATUS   RESTARTS  				 AGE
metrics-server-6c48d8f6d6-kvc2k            1/1     Running   0             55s
等待 metrics server 安装完成,可以查看资源使用情况
[root@k8s-master01 ~]# kubectl top node
NAME           CPU(cores)   CPU%   MEMORY(bytes)   MEMORY%
k8s-master01   132m         2%     1308Mi          34%
k8s-master02   118m         2%     1367Mi          35%
k8s-master03   100m         2%     1007Mi          26%
k8s-node01     39m          0%     516Mi           13%
k8s-node02     45m          1%     547Mi           14%
k8s-node03     38m          0%     464Mi           12%
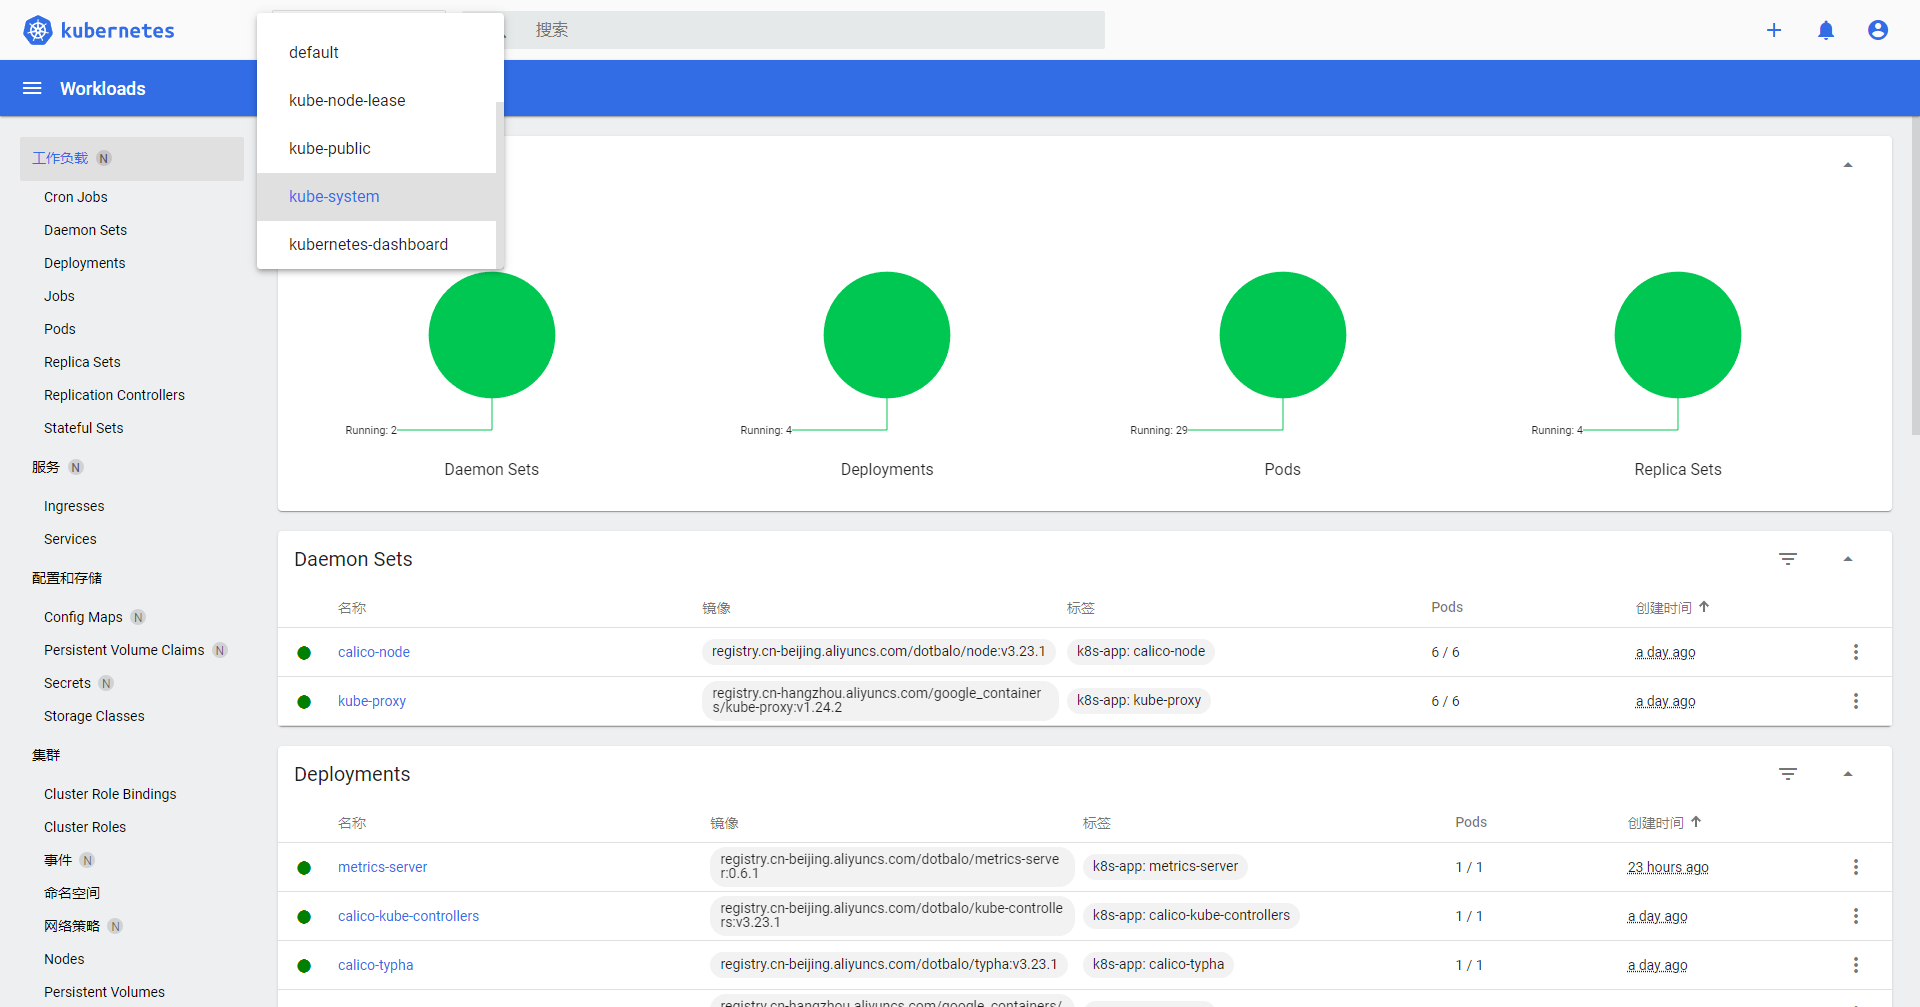
Dashboard部署
Dashboard 用于展示集群中的各类资源,同时也可以通过Dashboard实时查看pod的日志和在容器中执行一些命令等
安装指定版本的Dashboard
[root@k8s-master01 ~]# cd /root/k8s-ha-install/dashboard
[root@k8s-master01 dashboard]# kubectl create -f .
查看状态
[root@k8s-master01 ~]# kubectl get pod -n kubernetes-dashboard
NAME                                         READY   STATUS    RESTARTS   AGE
dashboard-metrics-scraper-5b997cd56f-k2sfg   1/1     Running   0          6m23s
kubernetes-dashboard-5db64fd789-qh5fk        1/1     Running   0          6m23
查看暴露的端口号,暴露的端口号会不一样,请自行查询,我这里为 :31015
[root@k8s-master01 ~]# kubectl get svc -n kubernetes-dashboard
NAME                        TYPE        CLUSTER-IP      EXTERNAL-IP   PORT(S)         AGE
dashboard-metrics-scraper   ClusterIP   10.96.122.64    <none>        8000/TCP        9m43s
kubernetes-dashboard        NodePort    10.96.115.119   <none>        443:31015/TCP   9m43s
若上面查询的TYPE栏显示的kubernetes-dashboard不是为NodePort则需要将svc更改为NodePort模式
Kubectl edit svc kubernetes-dashboard –n kubernetes-dashboard
本文已在配置文件改为NodePort,所以不用再更改
[root@k8s-master01 ~]# vim ~/kubernetes/manual-installation-v1.24.x/dashboard/dashboard.yaml
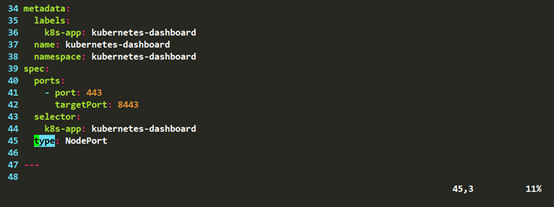
查看type是否为nodeport,查看端口号
kubectl get svc kubernetes-dashboard -n kubernetes-dashboard
安装最新版本的Dashboard
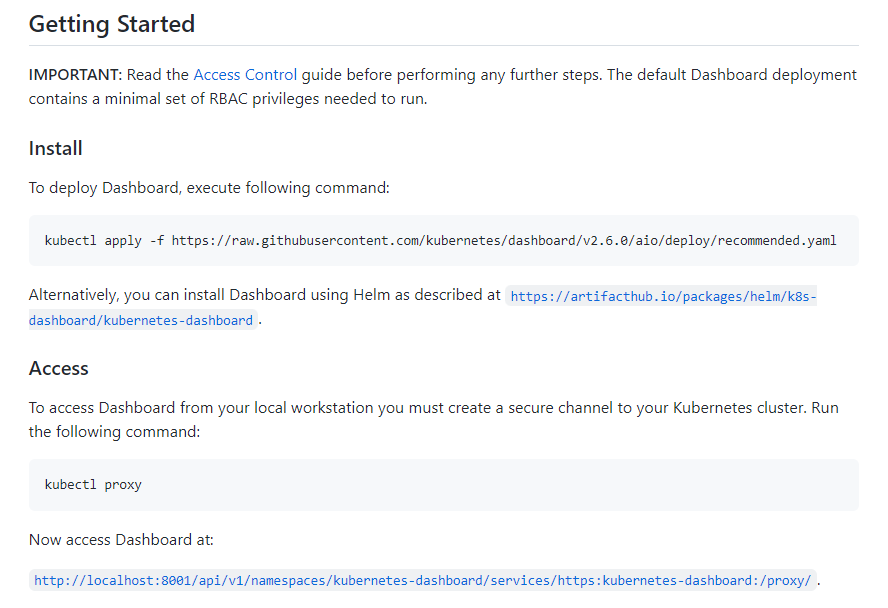
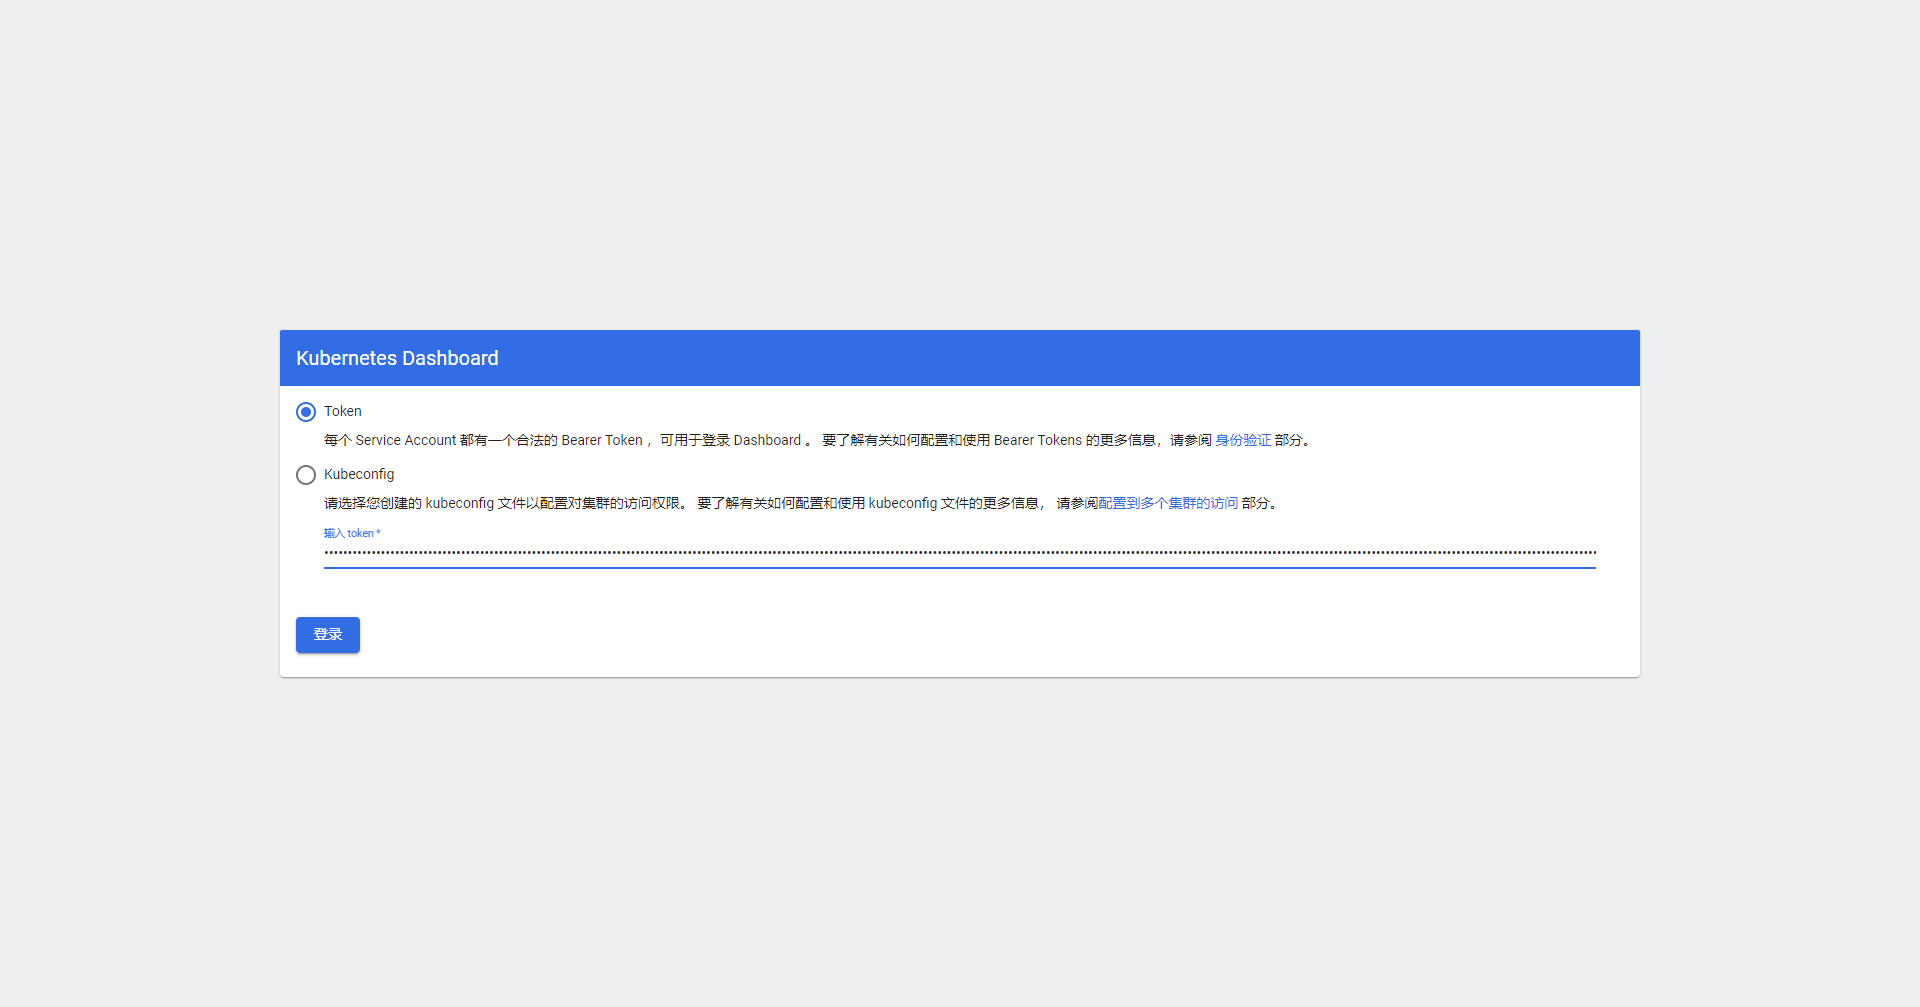
登录Dashboard
在谷歌浏览器Chrome启动快捷方式中加入启动参数,用于解决无法访问Dashboard的问题
--test-type --ignore-certificate-errors
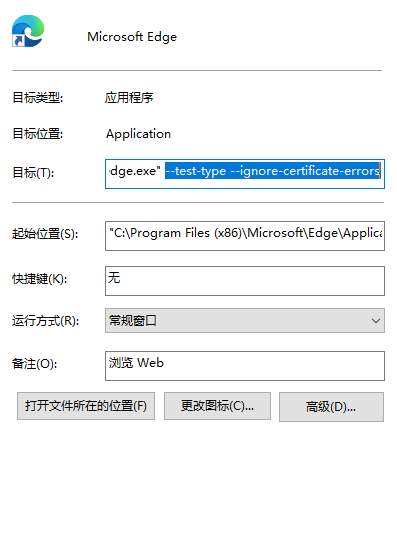
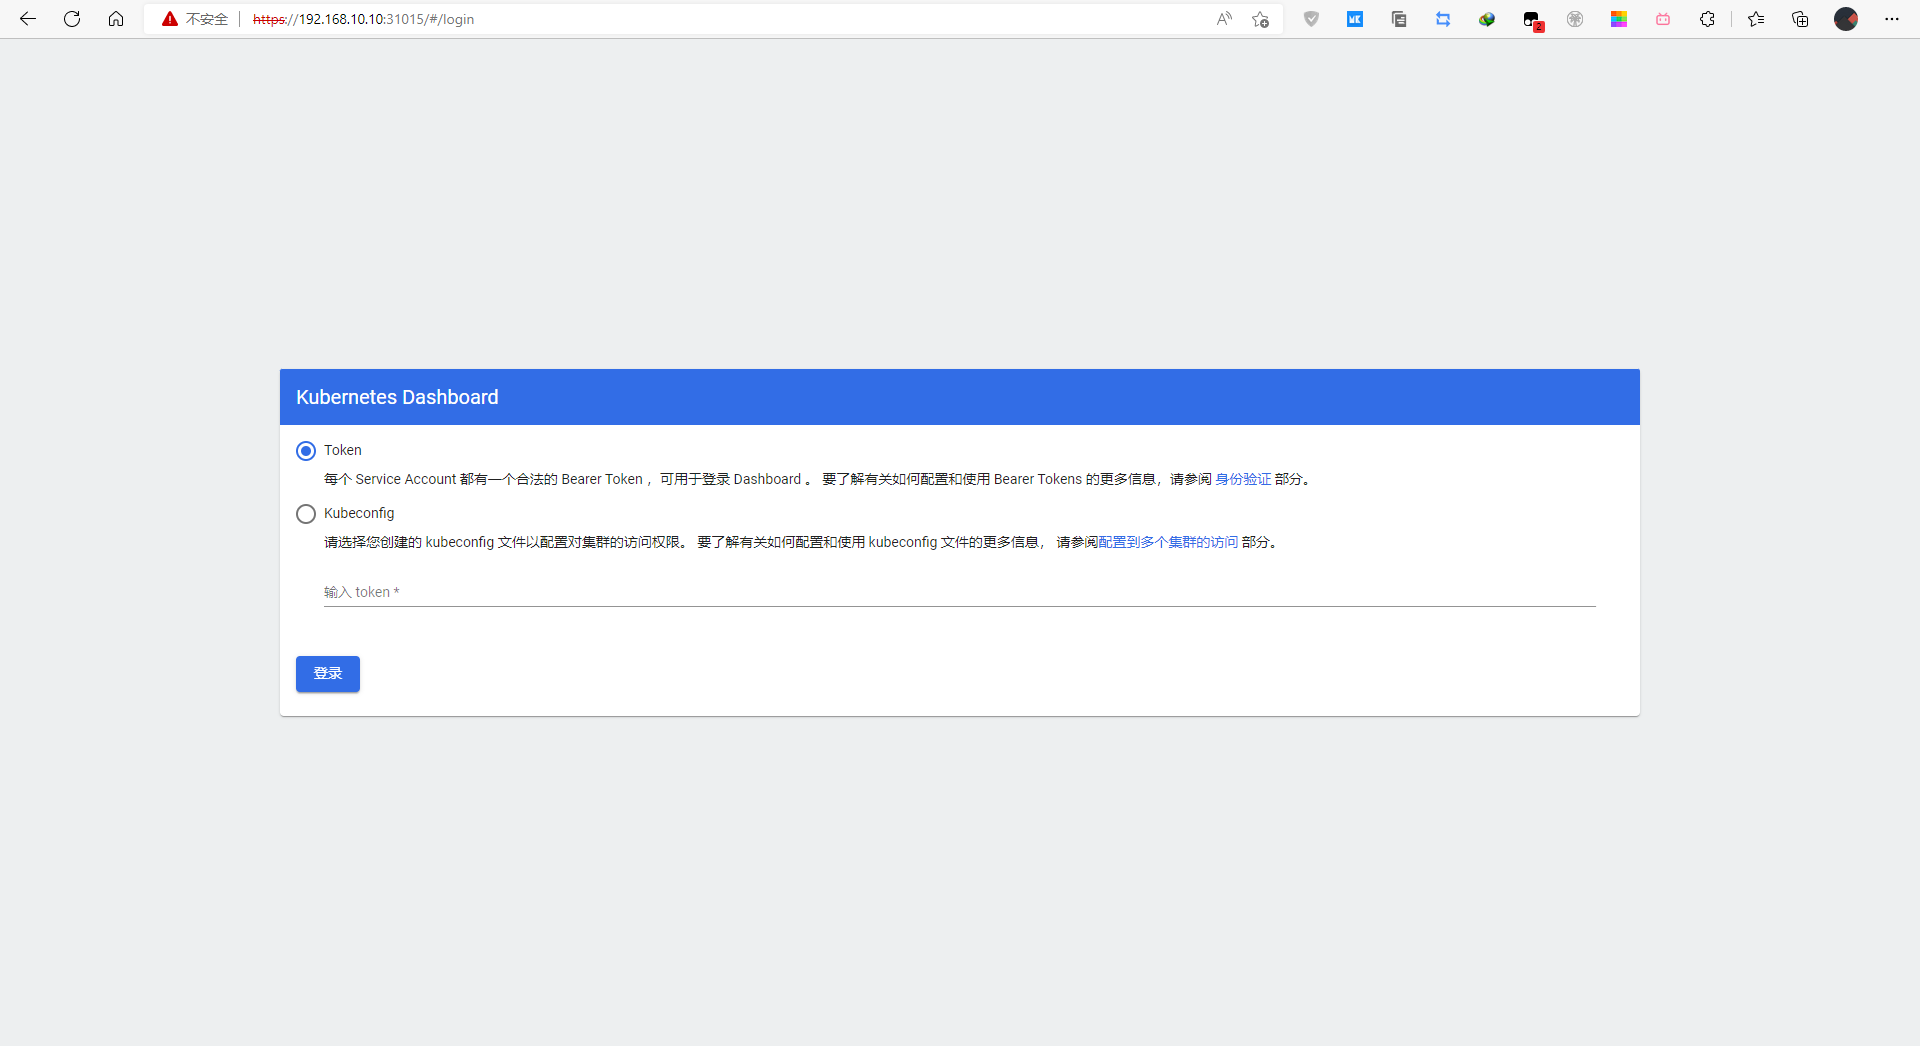
登录dashboard
https+主机IP+暴露的端口号
创建管理员用户
[root@k8s-master01 ~]# wget https://raw.githubusercontent.com/cby-chen/Kubernetes/main/yaml/dashboard-user.yaml
#或者粘贴如下
cat > admin.yaml << EOF
apiVersion: v1
kind: ServiceAccount
metadata:
  name: admin-user

  namespace: kube-system
---

apiVersion: rbac.authorization.k8s.io/v1
kind: ClusterRoleBinding
metadata:
  name: admin-user
  annotations:
    rbac.authorization.kubernetes.io/autoupdate: "true"
roleRef:
  apiGroup: rbac.authorization.k8s.io
  kind: ClusterRole
  name: cluster-admin
subjects:

- kind: ServiceAccount
  name: admin-user
  namespace: kube-system

EOF
执行yaml文件
kubectl apply -f admin.yaml -n kube-system

serviceaccount/admin-user created
clusterrolebinding.rbac.authorization.k8s.io/admin-user created
已经创建用户的话,查询token
[root@k8s-master01 ~]# kubectl -n kube-system describe secret $(kubectl -n kube-system get secret | grep admin-user | awk '{print $1}')
本文安装的是k8s1.24.版本,测试发现之前的查询token方式不能使用,上面查询及配置方法适用于1.24.之前的版本 k8s1.24.*创建admin-user用户,及查询token
[root@k8s-master01 dashboard]# vim /etc/kubernetes/manifests/kube-apiserver.yaml
- kube-apiserver #下方添加如下代码
- --feature-gates=LegacyServiceAccountTokenNoAutoGeneration=false
[root@k8s-master01 dashboard]# vim /etc/kubernetes/manifests/kube-controller-manager.yaml
- kube-controller-manager#下方添加如下代码
- --feature-gates=LegacyServiceAccountTokenNoAutoGeneration=false
systemctl restart kubelet #重启服务
[root@k8s-master01 ~]# cd /root/k8s-ha-install/dashboard/
[root@k8s-master01 dashboard]# kubectl delete -f dashboard-user.yaml   # 删除之前创建的用户
[root@k8s-master01 dashboard]# kubectl create -f dashboard-user.yaml
[root@k8s-master01 dashboard]# kubectl get serviceaccount -n kube-system
NAME                                 SECRETS   AGE
admin-user                           1         28s
...
[root@k8s-master01 dashboard]# kubectl get secret -n kube-system|grep admin-user
admin-user-token-d7qwb                           kubernetes.io/service-account-token   3      79s
[root@k8s-master01 dashboard]# kubectl -n kube-system describe secret $(kubectl -n kube-system get secret | grep admin-user | awk '{print $1}')
Name:         admin-user-token-d7qwb
Namespace:    kube-system
Labels:       <none>
Annotations:  kubernetes.io/service-account.name: admin-user
              kubernetes.io/service-account.uid: 24706c1d-66eb-4965-8d40-dcc6f8181484

Type:  kubernetes.io/service-account-token

Data
====
ca.crt:     1099 bytes
namespace:  11 bytes
token:      eyJhbGciOiJSUzI1NiIsImtpZCI6ImVjb3ZQTGp3VDlwbWQ0QTJPX2NBSFFxM3FKVVRmTGZyYkZPMXVlSjFLV28ifQ.eyJpc3MiOiJrdWJlcm5ldGVzL3NlcnZpY2VhY2NvdW50Iiwia3ViZXJuZXRlcy5pby9zZXJ2aWNlYWNjb3VudC9uYW1lc3BhY2UiOiJrdWJlLXN5c3RlbSIsImt1YmVybmV0ZXMuaW8vc2VydmljZWFjY291bnQvc2VjcmV0Lm5hbWUiOiJhZG1pbi11c2VyLXRva2VuLWQ3cXdiIiwia3ViZXJuZXRlcy5pby9zZXJ2aWNlYWNjb3VudC9zZXJ2aWNlLWFjY291bnQubmFtZSI6ImFkbWluLXVzZXIiLCJrdWJlcm5ldGVzLmlvL3NlcnZpY2VhY2NvdW50L3NlcnZpY2UtYWNjb3VudC51aWQiOiIyNDcwNmMxZC02NmViLTQ5NjUtOGQ0MC1kY2M2ZjgxODE0ODQiLCJzdWIiOiJzeXN0ZW06c2VydmljZWFjY291bnQ6a3ViZS1zeXN0ZW06YWRtaW4tdXNlciJ9.xv0S7RvdyVo7Z0Yw48pt3y-7YcGaqsYwoZ_6NHuXavdD-3GFgMFqJqiBmvXvpI__24HCga2AFNP05rZ49yjBww34h_FohbZ1gzuNgPw4oGoFsMOpQ9l7h4AS_MRR42iWOizxi4yAdXkZ8aLxNcqBnJaG6AngH98rGkQv5KfJho-zda8Lhvp3k-4lS4XDcbeIMl4XOcGhF95qhfdilrar8IM7nHxgHhjG2nBt3kuFdKUDxsr9aJHjfHQ3vFIjb8j2xRo-2YTFPInCQog1PEsvOA0PMVC1G79qslDifn93jHnefvKufjAvDuF8mPafgOCI-H3LKmaiw5Sj1MsIYoho5A
由于集群重启过,端口会发生变化,再次查询dashboard暴露的端口
[root@k8s-master01 ~]# kubectl get svc -n kubernetes-dashboard
NAME                        TYPE        CLUSTER-IP      EXTERNAL-IP   PORT(S)         AGE
dashboard-metrics-scraper   ClusterIP   10.96.79.2      <none>        8000/TCP        22h
kubernetes-dashboard        NodePort    10.96.202.195   <none>        443:30059/TCP   22h
输入创建的token
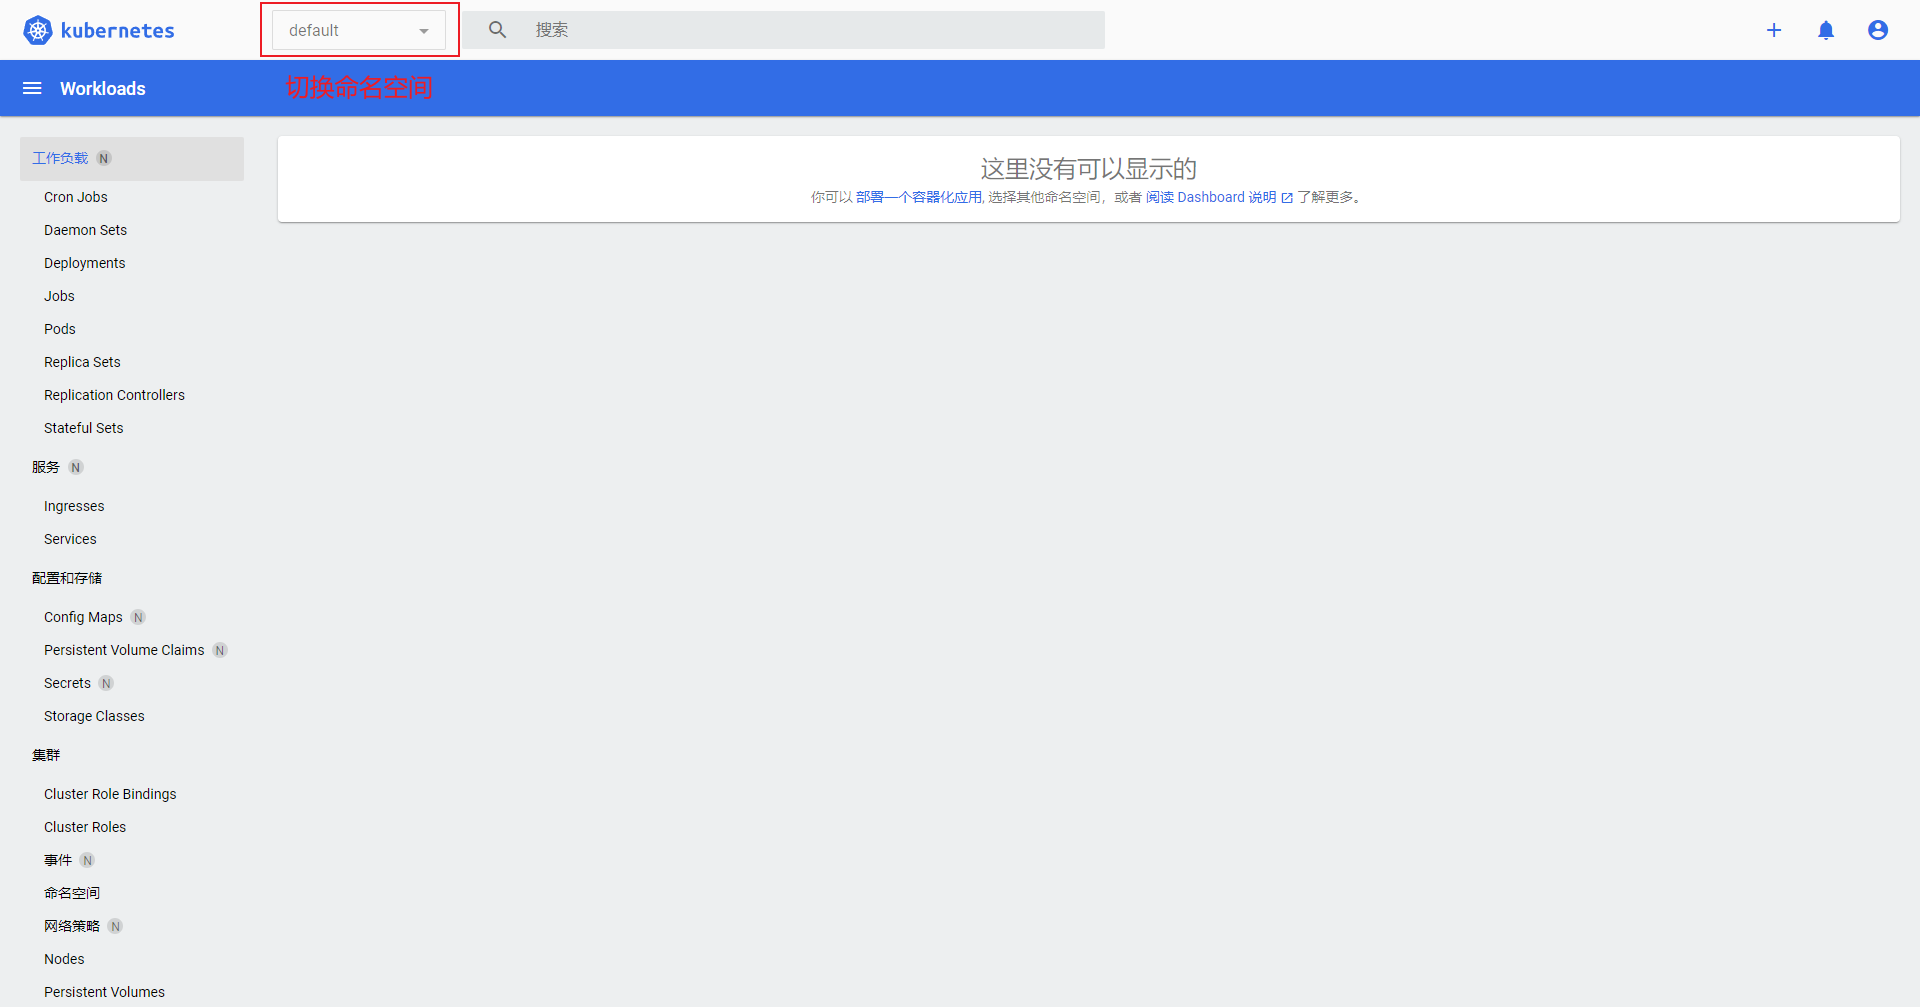
没有安装metrics server是没有监控数据的
关键性配置
Kubernetes Sevice工作模式
Service的工作模式有三种
-
ipvs
-
iptables
-
userspace
目前由于userspace太老已经启用,目前主流的为ipvs与iptables 使用 IPVS 在大规模集群下有一定的性能优势,但是也是需要一定条件才能支持的,如果没有满足的话就会自动降级为使用iptables模式,内核升级为 4.1 版本才完全支持。 在 Kubernetes 集群中,每个 Node 运行一个 kube-proxy 进程。kube-proxy 负责为 Service 实现了一种 VIP(虚拟IP)的形式,而不是 ExternalName 的形式。 在 Kubernetes v1.0 版本,代理完全在 userspace。在 Kubernetes v1.1 版本,新了 iptables 代理,但并不是默认的运行模式。从 Kubernetes v1.2 起,默认就是iptables代理。在 Kubernetes v1.8.0-beta.0 中,添加了 ipvs 代理。在 Kubernetes 1.14 版本开始默认使用 ipvs 代理。
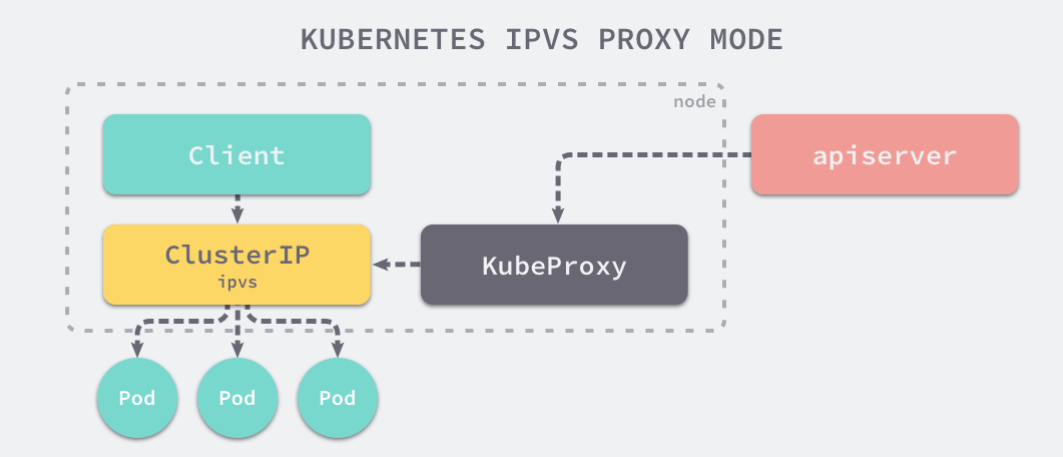
Kube-proxy 是服务路由的构建块,它依赖于经过强化攻击的 iptables 来实现支持核心的服务类型,如 ClusterIP 和 NodePort。 但是,iptables 难以扩展到成千上万的服务,因为它纯粹是为防火墙而设计的,并且基于内核规则列表。
尽管 Kubernetes 在版本v1.6中已经支持5000个节点,但使用 iptables 的 kube-proxy 实际上是将集群扩展到5000个节点的瓶颈。 一个例子是,在5000节点集群中使用 NodePort 服务,如果我们有2000个服务并且每个服务有10个 pod,这将在每个工作节点上至少产生20000个 iptable 记录,这可能使内核非常繁忙。
另一方面,使用基于 IPVS 的集群内服务负载均衡可以为这种情况提供很多帮助。 IPVS 专门用于负载均衡,并使用更高效的数据结构(哈希表),允许几乎无限的规模扩张。
内核升级
本文前期已经完成升级内核步骤,如果已经内核版本已经大于4.1的可以忽略这一步骤,因为此内核版本可以完美的支持IPVS 如果没升级内核版本强行把Sevice模式由 iptables 改成 ipvs,可能会出现以下问题
-
ipvs 指向的后端节点不对,如果重新 svc 删除重建又是对的
-
当副本数量变动时,ipvs 不能立马感知到
-
如果直接用域名访问 svc 时,会出现解析不了的情况
将kube-proxy改为ipvs模式
service底层实现目前主要由两个网络模式组成:iptables与IPVS。他们都是由kube-proxy维护 查看kube-proxy的模式,可以看到默认为iptables
[root@k8s-master01 ~]# curl 127.0.0.1:10249/proxyMode
iptables
kubeadm的安装方式的配置文件是由 ConfigMap 去管理的 所以kube-proxy的配置文件是由 ConfigMap 去管理的 修改kube-proxy的配置文件,改为ipvs模式
[root@k8s-master01 ~]# kubectl edit cm kube-proxy -n kube-system
查找/mode 配置默认为空,空的默认就是iptables模式,改为ipvs

更改后滚动更新一下
[root@k8s-master01 ~]# kubectl patch daemonset kube-proxy -p "{\"spec\":{\"template\":{\"metadata\":{\"annotations\":{\"date\":\"`date +'%s'`\"}}}}}" -n kube-system
更新后pod会进行重启
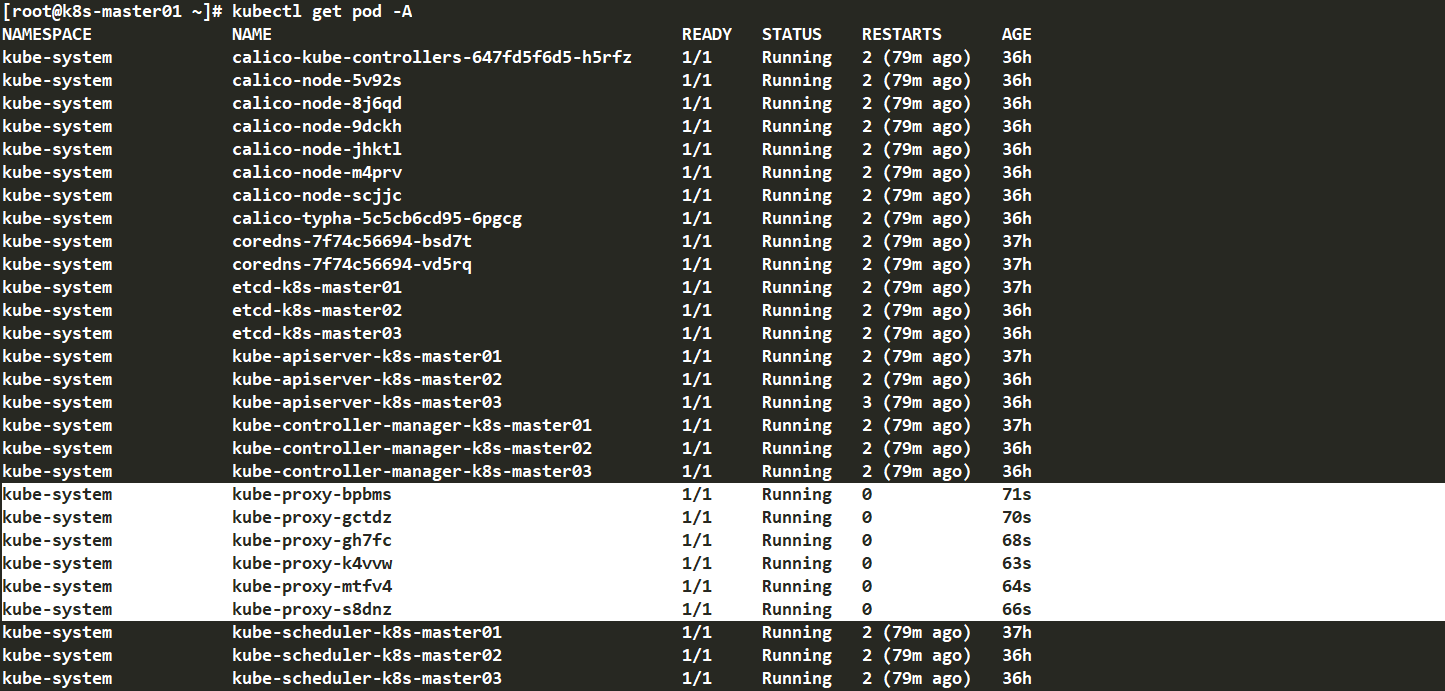
再次查看kube-proxy的模式
[root@k8s-master01 ~]# curl 127.0.0.1:10249/proxyMode
ipvs
注意事项
kubeadm安装的集群,证书有效期默认是一年。master节点的kube-apiserver、kube-scheduler、kube-controller-manager、etcd都是以容器的方式运行的,可以通过kubectl get pod -n kube-system查看 启动和二进制不同的是 kubelet的配置文件在/etc/sysconfig/kubelet和/var/lib/kubelet/config.yaml。修改后需要重启kubelet进程 其他组件的配置文件在/etc/kubernetes/manifests目录下,比如kube-apiserver.yaml该yaml文件修改后,kubelet会自动刷新配置,也就是重启pod,不能再次创建该文件 kube-proxy的配置在kube-system命名空间下的configmap中,可以通过 kubectl edit cm kube-proxy -n kube-system 进行更改,更改后,可以通过patch重启kube-proxy
kubectl patch daemonset kube-proxy -p "{\"spec\":{\"template\":{\"metadata\":{\"annotations\":{\"date\":\"`date +'%s'`\"}}}}}" -n kube-system
证书更新
kubeadm certs check-expiration #查看证书什么时候到期
cp -rp /etc/kubernetes/pki/ /opt/pki.bak #备份证书
kubeadm certs check-expiration #更新证书时间
systemctl restart kubelet #重启


 463
463


 被折叠的 条评论
为什么被折叠?
被折叠的 条评论
为什么被折叠?
 到【灌水乐园】发言


