


我们要做的目标是:
🎯 对着麦克风说话 → 电脑识别你说的话 → AI 回答你 → 电脑朗读回答
✅ 方法一:使用 Python + Whisper + Ollama(本地运行,无需联网)
适合想要更自由、还能说中文的 AI 助手!
🧰 一、你需要准备这些
📌 1. 安装好 Python(如果没装)
-
下载最新版本,安装时记得勾选“Add to PATH”
📌 2. 安装 Whisper(语音识别)
打开终端(CMD 或 PowerShell),输入:
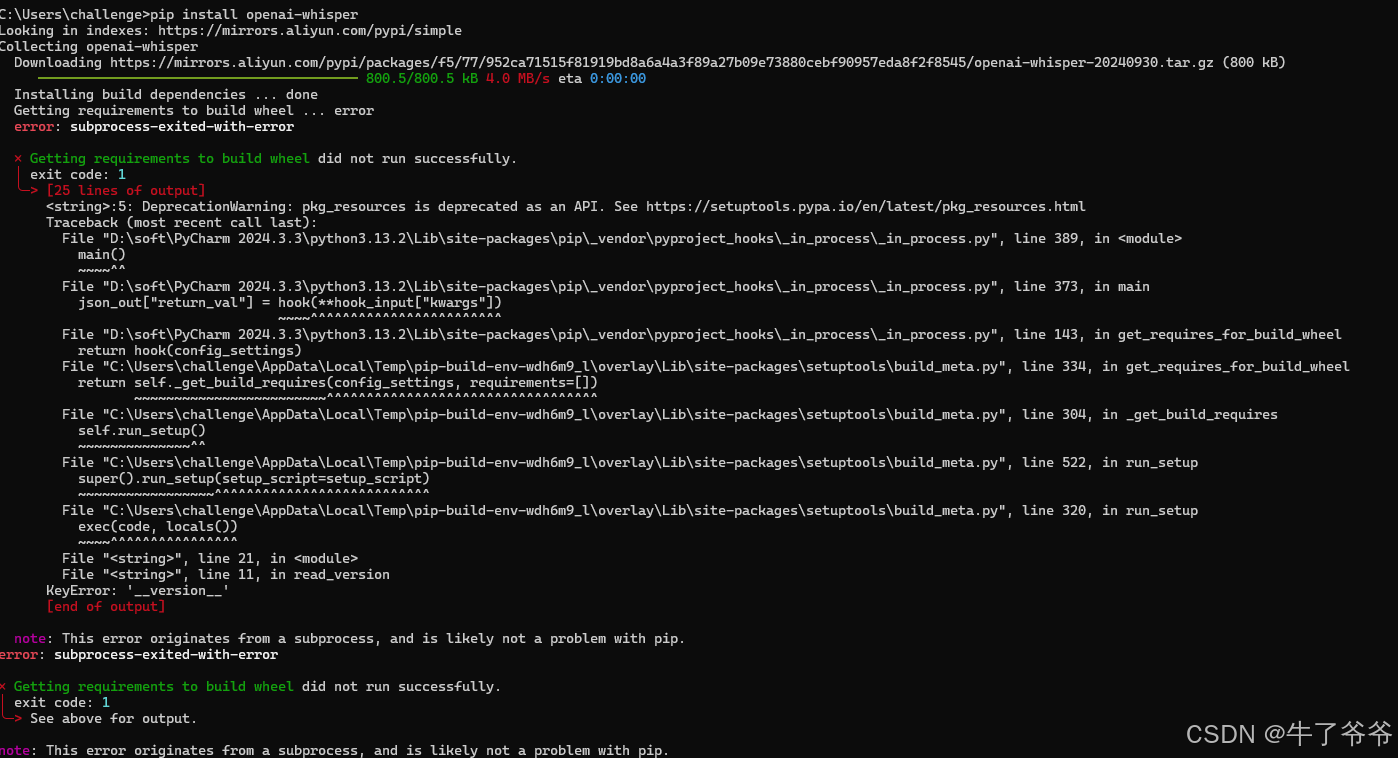
pip install openai-whisper
如果出现下图错误,可参考另一篇我的博客:pip install openai-whisper报错-CSDN博客
第一次安装可能会下载模型,耐心等待
📌 3. 安装语音合成(让电脑“读”出回答)
pip install pyttsx3
📌 4. 安装录音库
pip install sounddevice scipy
📌 5. 安装与本地大模型(如 Ollama)对话功能
pip install requests
🧠 二、确保你已安装并运行好 Ollama
如果没装过本地 Ollama 模型:
安装一下
然后拉一个模型,比如:
ollama pull deepseek-coder
并且保持 Ollama 正在后台运行(不用你手动开,它开机就会自己运行)
🧾 三、语音助手完整代码(直接复制粘贴运行)
import sounddevice as sd
import scipy.io.wavfile as wav
import whisper
import requests
import pyttsx3
import os

# 使用 whisper 模型加载
model = whisper.load_model("base")  # 可改为 tiny / small / medium / large

# 初始化语音合成
engine = pyttsx3.init()

def record_audio(filename="temp.wav", duration=5):
    print("🎙️ 开始录音,请说话...")
    fs = 16000
    recording = sd.rec(int(duration * fs), samplerate=fs, channels=1)
    sd.wait()
    wav.write(filename, fs, recording)
    print("✅ 录音完成!")

def transcribe_audio(filename="temp.wav"):
    print("🧠 正在识别语音...")
    result = model.transcribe(filename, language="zh")
    print(f"📝 你说了:{result['text']}")
    return result['text']

def ask_ollama(prompt, model_name="deepseek-coder"):
    print("🤖 正在向本地AI提问...")
    url = f"http://localhost:11434/api/generate"
    headers = {"Content-Type": "application/json"}
    data = {
        "model": model_name,
        "prompt": prompt,
        "stream": False
    }
    response = requests.post(url, headers=headers, json=data)
    res = response.json()
    answer = res.get("response", "我没有理解你说的意思。")
    print(f"🤖 回答:{answer}")
    return answer

def speak_text(text):
    engine.say(text)
    engine.runAndWait()

# 主程序循环
while True:
    input("🎤 按 Enter 开始语音对话(Ctrl+C 退出)")
    record_audio()
    question = transcribe_audio()
    reply = ask_ollama(question)
    speak_text(reply)
🚀 四、运行方法
-
把上面代码复制到一个
.py文件,比如voice_assistant.py -
打开命令提示符(CMD)
-
运行:
python voice_assistant.py
按 Enter,说出你的问题(比如“帮我写一个Python爬虫”)
等待它回答并朗读!
🎉 效果演示(你将看到):
🎙️ 开始录音,请说话...
✅ 录音完成!
🧠 正在识别语音...
📝 你说了:写一个爬虫抓取百度首页
🤖 正在向本地AI提问...
🤖 回答:以下是使用 requests 和 BeautifulSoup 的示例代码...
📢(语音读出答案)
❓ 常见问题
Q: 要联网吗?
A: 除了第一次下载模型,全程本地运行。不联网也能跑!
Q: Whisper 模型会不会太大?
A: base 模型只有大约 140MB,很轻量。你也可以改成 tiny 更小。
Q: 麦克风没声音怎么办?
A: 检查你电脑是否开启麦克风权限,或者用手机耳机试试。
打包成图形化界面教程
🔧 所需准备
确保你已经安装了以下环境(之前你可能已经装了):
pip install openai-whisper sounddevice scipy pyttsx3 requests
pip install customtkinter
🧾 图形界面完整代码(直接可运行)
import customtkinter as ctk
import sounddevice as sd
import scipy.io.wavfile as wav
import whisper
import requests
import pyttsx3
import threading

# 初始化语音识别模型、语音合成
model = whisper.load_model("base")
engine = pyttsx3.init()

# 录音函数
def record_audio(filename="temp.wav", duration=5):
    fs = 16000
    recording = sd.rec(int(duration * fs), samplerate=fs, channels=1)
    sd.wait()
    wav.write(filename, fs, recording)

# 语音识别函数
def transcribe_audio(filename="temp.wav"):
    result = model.transcribe(filename, language="zh")
    return result['text']

# 向 Ollama 提问
def ask_ollama(prompt, model_name="deepseek-coder"):
    url = "http://localhost:11434/api/generate"
    data = {
        "model": model_name,
        "prompt": prompt,
        "stream": False
    }
    try:
        res = requests.post(url, json=data)
        return res.json().get("response", "我没听懂你的问题。")
    except Exception as e:
        return f"出错了:{e}"

# 语音朗读回答
def speak_text(text):
    engine.say(text)
    engine.runAndWait()

# 主流程(在子线程中运行)
def start_voice_assistant():
    button.configure(state="disabled")
    text_output.configure(state="normal")
    text_output.delete("1.0", "end")
    text_output.insert("end", "🎙️ 开始录音中...\n")
    text_output.update()

    record_audio()
    text_output.insert("end", "✅ 录音完成,识别中...\n")
    question = transcribe_audio()
    text_output.insert("end", f"📝 你说了:{question}\n")

    reply = ask_ollama(question)
    text_output.insert("end", f"🤖 回答:{reply}\n")
    text_output.configure(state="disabled")

    speak_text(reply)
    button.configure(state="normal")

# 创建图形界面
ctk.set_appearance_mode("light")
ctk.set_default_color_theme("blue")

app = ctk.CTk()
app.title("🗣️ 本地语音助手")
app.geometry("500x400")

title = ctk.CTkLabel(app, text="🎧 本地语音助手(点击按钮开始说话)", font=("Microsoft YaHei", 18))
title.pack(pady=20)

button = ctk.CTkButton(app, text="🎤 开始录音", font=("Microsoft YaHei", 16), command=lambda: threading.Thread(target=start_voice_assistant).start())
button.pack(pady=20)

text_output = ctk.CTkTextbox(app, width=450, height=220, font=("Microsoft YaHei", 14))
text_output.pack(pady=10)
text_output.configure(state="disabled")

app.mainloop()
💡 使用方法
-
把代码保存为一个文件,比如
gui_voice_assistant.py -
在命令提示符中运行:
python gui_voice_assistant.py -
会弹出一个窗口,点击按钮开始语音交互!
🎁 打包成 EXE(可选)
你可以用 pyinstaller 把它打包成一个可执行文件:
第一步:安装 PyInstaller
pip install pyinstaller
第二步:打包成 EXE
pyinstaller --noconfirm --onefile --windowed gui_voice_assistant.py
生成的 .exe 文件会在 dist/ 文件夹里,你就可以随时运行,无需打开终端啦!
🎉 你现在拥有了一个真正的本地语音助手!
-
🧠 能识别语音
-
🤖 能用 DeepSeek 本地模型回答
-
🔊 能把答案朗读出来
-
🖼️ 有图形界面,操作简单
❤️ 结语
你现在拥有了一个真正的本地语音 AI 助手,能听你说中文,能写代码,还能读出来!比微软小娜还强!


 257
257

 被折叠的 条评论
为什么被折叠?
被折叠的 条评论
为什么被折叠?
 到【灌水乐园】发言


