


应用程序
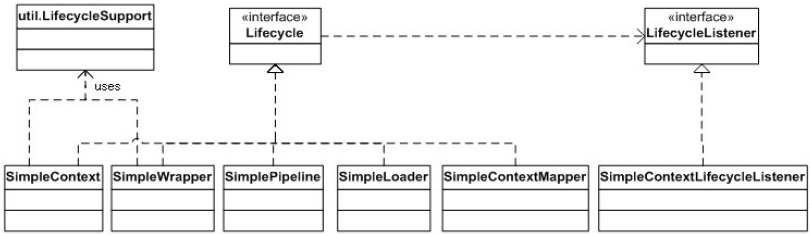
这章的程序是依据上一章建立的,在其中加入了生命周期的支持。下面是这个程序的类图。
SimpleContext
本章中的SimpleContext类与上一章中的相似,除了实现Lifecycle接口以外。
在这个类中除了声明一个LifecycleSupport类的变量以外,它还声明了一个started的布尔值变量,用来记录Context容器是否已经被启动。SimpleContext类提供了来自Lifecycle接口中方法的实现。
    public synchronized void start() throws LifecycleException {
        if (started)
            throw new LifecycleException("SimpleContext has already started");

        // Notify our interested LifecycleListeners
        lifecycle.fireLifecycleEvent(BEFORE_START_EVENT, null);
        started = true;
        try {
            // Start our subordinate components, if any
            if ((loader != null) && (loader instanceof Lifecycle))
                ((Lifecycle) loader).start();

            // Start our child containers, if any
            Container children[] = findChildren();
            for (int i = 0; i < children.length; i++) {
                if (children[i] instanceof Lifecycle)
                    ((Lifecycle) children[i]).start();
            }

            // Start the Valves in our pipeline (including the basic),
            // if any
            if (pipeline instanceof Lifecycle)
                ((Lifecycle) pipeline).start();
            // Notify our interested LifecycleListeners
            lifecycle.fireLifecycleEvent(START_EVENT, null);
        } catch (Exception e) {
            e.printStackTrace();
        }

        // Notify our interested LifecycleListeners
        lifecycle.fireLifecycleEvent(AFTER_START_EVENT, null);
    }
从上面SimpleContext类的start方法中可以看到,它启动了它所有的子容器,以及和它关联的其它组件,如Loader,Pipeline等。使用这种机制,如果你要启动容器中所有的组件,那么你只需要启动容器内最高层的组件就可以了(在这里是SimpleContext)。若是要停止这些组件,也只需要调用最高层组件的stop方法就可以了。
start方法的执行过程:
- 检查这个组件是否已经被启动,如果已经启动那么抛出一个LifecycleException.异常
- 然后派发了一个BEFORE_START_EVENT事件。这样所有在SimpleContext中注册的监听器中对这个事件感兴趣的都会被通知到。
- 将布尔值started设置成true,表示容器已经被启动
- 然后启用所有组件以及它的子容器,有两个实现了Lifecycle接口的组件SimpleLoader和SimplePipeline。SimpleContext有两个Wrapper类型的子容器,同样也实现了Lifecycle接口。
- 在所有组件和了容器的start方法都完成后,会派发两个事件START_EVENT和AFTER_START_EVENT
stop方法的执行过程:
- 首先,检查容器是否被启动,如果没有启动直接抛出一个LifecycleException.异常
- 然后,派发两个事件BEFORE_STOP_EVENT和STOP_EVENT,将布尔值started设置成true
- 接下来,停止所有与容器相关的组件以及它所有的子容器
- 最后,派发一个AFTER_STOP_EVENT事件
SimpleContextLifecycleListener
SimpleContextLifecycleListener类是一个SimpleContext实例的监听器。代码如下:
public class SimpleContextLifecycleListener implements LifecycleListener {

    public void lifecycleEvent(LifecycleEvent event) {
        Lifecycle lifecycle = event.getLifecycle();
        System.out.println("SimpleContextLifecycleListener's event "
                + event.getType().toString());
        if (Lifecycle.START_EVENT.equals(event.getType())) {
            System.out.println("Starting context.");
        } else if (Lifecycle.STOP_EVENT.equals(event.getType())) {
            System.out.println("Stopping context.");
        }
    }
}
接口中lifecycleEvent方法的实现比较简单,它只是在控制台打印出派发出事件的类型。
SimpleLoader
同上一章不同的是,这个类实现了Lifecycle接口。接口中的方法在SimpleLoader中的实现只是简单的打印字符串到控制台。
重要的是,通过实现Lifecycle接口,SimpleLoader实例就可以通过与它关联的容器来启动了。
SimpleLoader中对接口Lifecycle中方法的实现如下:
public void addLifecycleListener(LifecycleListener listener) {
}
public LifecycleListener[] findLifecycleListeners() {
    return null;
}
public void removeLifecycleListener(LifecycleListener listener) {
}
public synchronized void start() throws LifecycleException {
    System.out.println("Starting SimpleLoader");
}
public void stop() throws LifecycleException {
}
SimplePipeline
实现了Lifecycle接口,继承自Lifecycle接口的方法全部置空,没有任何处理。
SimpleWrapper
同样实现了Lifecycle接口,那么它就可以被其父容器启动了。接口中的方法在SimpleWrapper类中只实现了两个:start和stop。
这里的start方法同SimpleContext类中的start方法很相似,它启动所有与Wrapper容器关联的组件,并派发BEFORE_START_EVENT, START_EVENT, 和 AFTER_START_EVENT事件。
但是SimpleWrapper中的stop方法与Context容器的stop方法处理起来有些不同。
    public void stop() throws LifecycleException {
        System.out.println("Stopping wrapper " + name);
        // Shut down our servlet instance (if it has been initialized)
        try {
            instance.destroy();
        } catch (Throwable t) {
        }
        instance = null;
        if (!started)
            throw new LifecycleException("Wrapper " + name + " not started");
        // Notify our interested LifecycleListeners
        lifecycle.fireLifecycleEvent(BEFORE_STOP_EVENT, null);

        // Notify our interested LifecycleListeners
        lifecycle.fireLifecycleEvent(STOP_EVENT, null);
        started = false;

        // Stop the Valves in our pipeline (including the basic), if any
        if (pipeline instanceof Lifecycle) {
            ((Lifecycle) pipeline).stop();
        }

        // Stop our subordinate components, if any
        if ((loader != null) && (loader instanceof Lifecycle)) {
            ((Lifecycle) loader).stop();
        }

        // Notify our interested LifecycleListeners
        lifecycle.fireLifecycleEvent(AFTER_STOP_EVENT, null);
    }
它首先会请求servlet的destroy方法;然后检查Wrapper是否被启动,如果没有抛出LifecycleException异常,重置started布尔值;接下来停止与Wrapper关联的Loader和Pipeline等组件(在当前SimpleWrapper中并没有关联Loader组件);最后,派发一个AFTER_STOP_EVENT事件。
运行程序
运行Bootstrap类的main方法,控制台会打印如下信息:
HttpConnector Opening server socket on all host IP addresses
HttpConnector[8080] Starting background thread
SimpleContextLifecycleListener's event before_start
Starting SimpleLoader
Starting Wrapper Primitive
Starting Wrapper Modern
SimpleContextLifecycleListener's event start
Starting context.
SimpleContextLifecycleListener's event after_start
停止Bootstrap时,控制台打印如下:
SimpleContextLifecycleListener's event before_stop
SimpleContextLifecycleListener's event stop
Stopping context.
Stopping wrapper Primitive
Stopping wrapper Modern
SimpleContextLifecycleListener's event after_stop
前两条的HttpConnector类中open方法打印到控制台的信息。
因为只有SimpleContext类注册了监听器SimpleContextLifecycleListener。所以以SimpleContextLifecycleListener’s开头的信息都是由SimpleContext监听器打印的,另外当SimpleContext派发状态START_EVENT时,监听器会打印“Starting context.”,派发状态为STOP_EVENT时,监听器打印”Stopping context.”。其它信息均是由各组件或是子容器的start方法或是stop方法打印的。


 166
166

 被折叠的 条评论
为什么被折叠?
被折叠的 条评论
为什么被折叠?
 到【灌水乐园】发言


