


导言:项目最近用到换肤功能,要匹配四套皮肤,在github上对比了几个换肤库,发现Android-skin-support的star量比较高,(github地址)用起来效果也不错。当时项目比较紧,留下几个疑问,现在把源码看了看,搞明白了到底是怎么回事。
先说心中的疑问:
1:换肤库是怎么实现对原有的系统控件View的换肤支持?
2:是怎么根据不同的皮肤来找到对应的资源文件的?
3:切换皮肤后,是怎么更新现有View的皮肤的?
带着这三个疑问,我们来从源码看起(本文只讲解androidx的,android包的其实也是一样道理,也可以跳过源码直接看总结结果):
一、xml布局文件是怎么变成对象的?
xml布局文件要想变成一个实实在在的view对象,都会调用LayoutInflater.inflate()方法。
下图是AppcompatActivity的setContentView()的加载layout的实现处。(此处略过AppCompatDelegate代理AppCompatActivity的全生命周期)
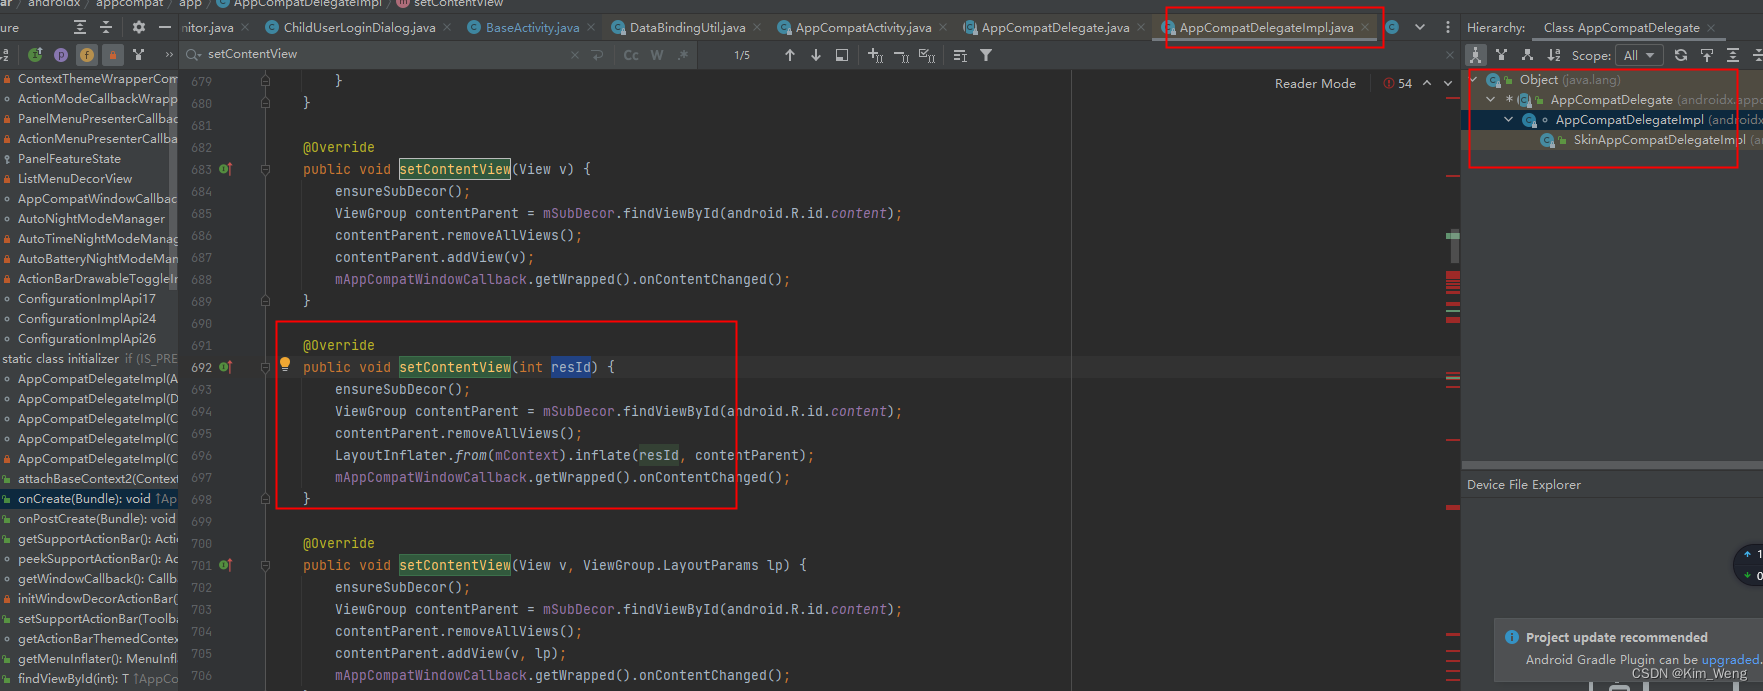
看到LayoutInflater.inflate()是不是很熟悉。比如View通过xml布局创建,也是通过View.inflate(Context context, @LayoutRes int resource, ViewGroup root)方法来加载的。
/**
 * Inflate a view from an XML resource.  This convenience method wraps the {@link
 * LayoutInflater} class, which provides a full range of options for view inflation.
 *
 * @param context The Context object for your activity or application.
 * @param resource The resource ID to inflate
 * @param root A view group that will be the parent.  Used to properly inflate the
 * layout_* parameters.
 * @see LayoutInflater
 */
public static View inflate(Context context, @LayoutRes int resource, ViewGroup root) {
    LayoutInflater factory = LayoutInflater.from(context);
    return factory.inflate(resource, root);
}
方法的本质还是通过LayoutInflater.inflate() 来实现的。下面我们来看下LayoutInflater.inflate()的具体实现。
  /**
     * Inflate a new view hierarchy from the specified xml resource. Throws
     * {@link InflateException} if there is an error.
     *
     * @param resource ID for an XML layout resource to load (e.g.,
     *        <code>R.layout.main_page</code>)
     * @param root Optional view to be the parent of the generated hierarchy (if
     *        <em>attachToRoot</em> is true), or else simply an object that
     *        provides a set of LayoutParams values for root of the returned
     *        hierarchy (if <em>attachToRoot</em> is false.)
     * @param attachToRoot Whether the inflated hierarchy should be attached to
     *        the root parameter? If false, root is only used to create the
     *        correct subclass of LayoutParams for the root view in the XML.
     * @return The root View of the inflated hierarchy. If root was supplied and
     *         attachToRoot is true, this is root; otherwise it is the root of
     *         the inflated XML file.
     */
    public View inflate(@LayoutRes int resource, @Nullable ViewGroup root, boolean attachToRoot) {
        final Resources res = getContext().getResources();
        if (DEBUG) {
            Log.d(TAG, "INFLATING from resource: \"" + res.getResourceName(resource) + "\" ("
                  + Integer.toHexString(resource) + ")");
        }

        View view = tryInflatePrecompiled(resource, res, root, attachToRoot);
        if (view != null) {
            return view;
        }
        XmlResourceParser parser = res.getLayout(resource);
        try {
            return inflate(parser, root, attachToRoot);
        } finally {
            parser.close();
        }
    }
注意到先是tryInflatePrecompiled(resource, res, root, attachToRoot) 此处不做过多解释,主要是先从预编译的dex包里面通过反射来加载View。而反射获取对应的View时可以直接获取到预编译的View对象,而不需要递归调用XML解析。
下面我们看return inflate(parser, root, attachToRoot);方法。
/**
* Inflate a new view hierarchy from the specified XML node. Throws
* {@link InflateException} if there is an error.
* <p>
* <em><strong>Important</strong></em> For performance
* reasons, view inflation relies heavily on pre-processing of XML files
* that is done at build time. Therefore, it is not currently possible to
* use LayoutInflater with an XmlPullParser over a plain XML file at runtime.
*
* @param parser XML dom node containing the description of the view
* hierarchy.
* @param root Optional view to be the parent of the generated hierarchy (if
* <em>attachToRoot</em> is true), or else simply an object that
* provides a set of LayoutParams values for root of the returned
* hierarchy (if <em>attachToRoot</em> is false.)
* @param attachToRoot Whether the inflated hierarchy should be attached to
* the root parameter? If false, root is only used to create the
* correct subclass of LayoutParams for the root view in the XML.
* @return The root View of the inflated hierarchy. If root was supplied and
* attachToRoot is true, this is root; otherwise it is the root of
* the inflated XML file.
*/
public View inflate(XmlPullParser parser, @Nullable ViewGroup root, boolean attachToRoot) {
synchronized (mConstructorArgs) {
Trace.traceBegin(Trace.TRACE_TAG_VIEW, "inflate");
final Context inflaterContext = mContext;
final AttributeSet attrs = Xml.asAttributeSet(parser);
Context lastContext = (Context) mConstructorArgs[0];
mConstructorArgs[0] = inflaterContext;
View result = root;
try {
advanceToRootNode(parser);
final String name = parser.getName();
if (DEBUG) {
System.out.println("**************************");
System.out.println("Creating root view: "
+ name);
System.out.println("**************************");
}
if (TAG_MERGE.equals(name)) {
if (root == null || !attachToRoot) {
throw new InflateException("<merge /> can be used only with a valid "
+ "ViewGroup root and attachToRoot=true");
}
rInflate(parser, root, inflaterContext, attrs, false);
} else {
// Temp is the root view that was found in the xml
final View temp = createViewFromTag(root, name, inflaterContext, attrs);
ViewGroup.LayoutParams params = null;
if (root != null) {
if (DEBUG) {
System.out.println("Creating params from root: " +
root);
}
// Create layout params that match root, if supplied
params = root.generateLayoutParams(attrs);
if (!attachToRoot) {
// Set the layout params for temp if we are not
// attaching. (If we are, we use addView, below)
temp.setLayoutParams(params);
}
}
if (DEBUG) {
System.out.println("-----> start inflating children");
}
// Inflate all children under temp against its context.
rInflateChildren(parser, temp, attrs, true);
if (DEBUG) {
System.out.println("-----> done inflating children");
}
// We are supposed to attach all the views we found (int temp)
// to root. Do that now.
if (root != null && attachToRoot) {
root.addView(temp, params);
}
// Decide whether to return the root that was passed in or the
// top view found in xml.
if (root == null || !attachToRoot) {
result = temp;
}
}
} catch (XmlPullParserException e) {
final InflateException ie = new InflateException(e.getMessage(), e);
ie.setStackTrace(EMPTY_STACK_TRACE);
throw ie;
} catch (Exception e) {
final InflateException ie = new InflateException(
getParserStateDescription(inflaterContext, attrs)
+ ": " + e.getMessage(), e);
ie.setStackTrace(EMPTY_STACK_TRACE);
throw ie;
} finally {
// Don't retain static reference on context.
mConstructorArgs[0] = lastContext;
mConstructorArgs[1] = null;
Trace.traceEnd(Trace.TRACE_TAG_VIEW);
}
return result;
}
}
重点看下此处:final View temp = createViewFromTag(root, name, inflaterContext, attrs),我们看下createViewFromTag()的实现。
  @UnsupportedAppUsage(maxTargetSdk = Build.VERSION_CODES.R, trackingBug = 170729553)
    View createViewFromTag(View parent, String name, Context context, AttributeSet attrs,
            boolean ignoreThemeAttr) {
        if (name.equals("view")) {
            name = attrs.getAttributeValue(null, "class");
        }

        // Apply a theme wrapper, if allowed and one is specified.
        if (!ignoreThemeAttr) {
            final TypedArray ta = context.obtainStyledAttributes(attrs, ATTRS_THEME);
            final int themeResId = ta.getResourceId(0, 0);
            if (themeResId != 0) {
                context = new ContextThemeWrapper(context, themeResId);
            }
            ta.recycle();
        }

        try {
            View view = tryCreateView(parent, name, context, attrs);

            if (view == null) {
                final Object lastContext = mConstructorArgs[0];
                mConstructorArgs[0] = context;
                try {
                    if (-1 == name.indexOf('.')) {
                        view = onCreateView(context, parent, name, attrs);
                    } else {
                        view = createView(context, name, null, attrs);
                    }
                } finally {
                    mConstructorArgs[0] = lastContext;
                }
            }

            return view;
        } catch (InflateException e) {
            throw e;

        } catch (ClassNotFoundException e) {
            final InflateException ie = new InflateException(
                    getParserStateDescription(context, attrs)
                    + ": Error inflating class " + name, e);
            ie.setStackTrace(EMPTY_STACK_TRACE);
            throw ie;

        } catch (Exception e) {
            final InflateException ie = new InflateException(
                    getParserStateDescription(context, attrs)
                    + ": Error inflating class " + name, e);
            ie.setStackTrace(EMPTY_STACK_TRACE);
            throw ie;
        }
  }
接下来是View view = tryCreateView(parent, name, context, attrs);
  @UnsupportedAppUsage(trackingBug = 122360734)
    @Nullable
    public final View tryCreateView(@Nullable View parent, @NonNull String name,
        @NonNull Context context,
        @NonNull AttributeSet attrs) {
        if (name.equals(TAG_1995)) {
            // Let's party like it's 1995!
            return new BlinkLayout(context, attrs);
        }

        View view;
        if (mFactory2 != null) {
            view = mFactory2.onCreateView(parent, name, context, attrs);
        } else if (mFactory != null) {
            view = mFactory.onCreateView(name, context, attrs);
        } else {
            view = null;
        }

        if (view == null && mPrivateFactory != null) {
            view = mPrivateFactory.onCreateView(parent, name, context, attrs);
        }

        return view;
    }
找到了重点:view = mFactory2.onCreateView(parent, name, context, attrs);即通过Factory2来创建View,我们看下Factory2创建view过程。我们需要知道Factory2具体的实例,回到AppCompatDelegateImpl此方法会把AppCompatDelegateImpl作为Factory2。
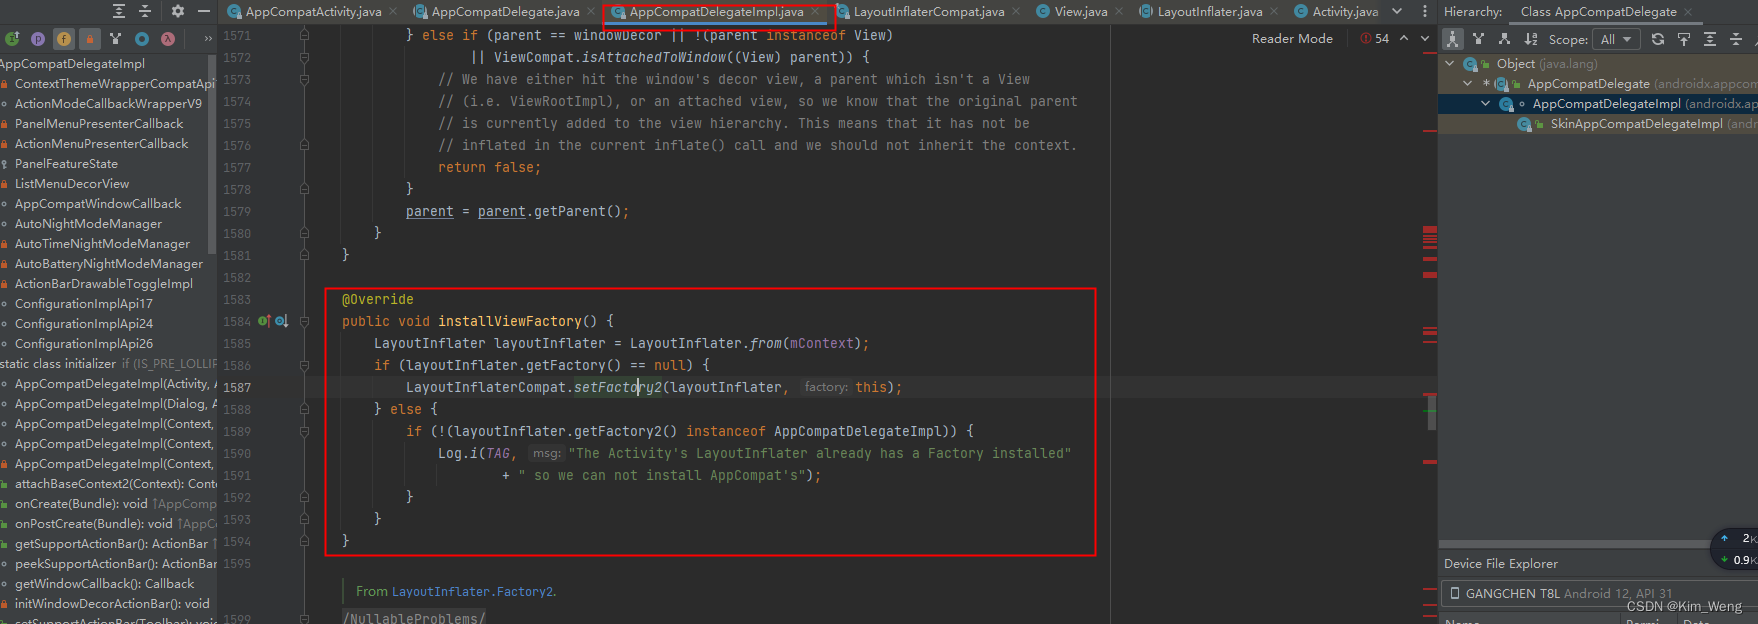
我们看下AppCompatDelegateImpl类中的实现onCreateView方法:
@Override
    public View createView(View parent, final String name, @NonNull Context context,
            @NonNull AttributeSet attrs) {
        if (mAppCompatViewInflater == null) {
            TypedArray a = mContext.obtainStyledAttributes(R.styleable.AppCompatTheme);
            String viewInflaterClassName =
                    a.getString(R.styleable.AppCompatTheme_viewInflaterClass);
            if (viewInflaterClassName == null) {
                // Set to null (the default in all AppCompat themes). Create the base inflater
                // (no reflection)
                mAppCompatViewInflater = new AppCompatViewInflater();
            } else {
                try {
                    Class<?> viewInflaterClass = Class.forName(viewInflaterClassName);
                    mAppCompatViewInflater =
                            (AppCompatViewInflater) viewInflaterClass.getDeclaredConstructor()
                                    .newInstance();
                } catch (Throwable t) {
                    Log.i(TAG, "Failed to instantiate custom view inflater "
                            + viewInflaterClassName + ". Falling back to default.", t);
                    mAppCompatViewInflater = new AppCompatViewInflater();
                }
            }
        }

        boolean inheritContext = false;
        if (IS_PRE_LOLLIPOP) {
            inheritContext = (attrs instanceof XmlPullParser)
                    // If we have a XmlPullParser, we can detect where we are in the layout
                    ? ((XmlPullParser) attrs).getDepth() > 1
                    // Otherwise we have to use the old heuristic
                    : shouldInheritContext((ViewParent) parent);
        }

        return mAppCompatViewInflater.createView(parent, name, context, attrs, inheritContext,
                IS_PRE_LOLLIPOP, /* Only read android:theme pre-L (L+ handles this anyway) */
                true, /* Read read app:theme as a fallback at all times for legacy reasons */
                VectorEnabledTintResources.shouldBeUsed() /* Only tint wrap the context if enabled */
        );
    }
这里最终调用mAppCompatViewInflater.createView,我们接着进入这个方法:
final View createView(View parent, final String name, @NonNull Context context,
            @NonNull AttributeSet attrs, boolean inheritContext,
            boolean readAndroidTheme, boolean readAppTheme, boolean wrapContext) {
        final Context originalContext = context;

        // We can emulate Lollipop's android:theme attribute propagating down the view hierarchy
        // by using the parent's context
        if (inheritContext && parent != null) {
            context = parent.getContext();
        }
        if (readAndroidTheme || readAppTheme) {
            // We then apply the theme on the context, if specified
            context = themifyContext(context, attrs, readAndroidTheme, readAppTheme);
        }
        if (wrapContext) {
            context = TintContextWrapper.wrap(context);
        }

        View view = null;

        // We need to 'inject' our tint aware Views in place of the standard framework versions
        switch (name) {
            case "TextView":
                view = createTextView(context, attrs);
                verifyNotNull(view, name);
                break;
            case "ImageView":
                view = createImageView(context, attrs);
                verifyNotNull(view, name);
                break;
            case "Button":
                view = createButton(context, attrs);
                verifyNotNull(view, name);
                break;
            case "EditText":
                view = createEditText(context, attrs);
                verifyNotNull(view, name);
                break;
            case "Spinner":
                view = createSpinner(context, attrs);
                verifyNotNull(view, name);
                break;
            case "ImageButton":
                view = createImageButton(context, attrs);
                verifyNotNull(view, name);
                break;
            case "CheckBox":
                view = createCheckBox(context, attrs);
                verifyNotNull(view, name);
                break;
            case "RadioButton":
                view = createRadioButton(context, attrs);
                verifyNotNull(view, name);
                break;
            case "CheckedTextView":
                view = createCheckedTextView(context, attrs);
                verifyNotNull(view, name);
                break;
            case "AutoCompleteTextView":
                view = createAutoCompleteTextView(context, attrs);
                verifyNotNull(view, name);
                break;
            case "MultiAutoCompleteTextView":
                view = createMultiAutoCompleteTextView(context, attrs);
                verifyNotNull(view, name);
                break;
            case "RatingBar":
                view = createRatingBar(context, attrs);
                verifyNotNull(view, name);
                break;
            case "SeekBar":
                view = createSeekBar(context, attrs);
                verifyNotNull(view, name);
                break;
            case "ToggleButton":
                view = createToggleButton(context, attrs);
                verifyNotNull(view, name);
                break;
            default:
                // The fallback that allows extending class to take over view inflation
                // for other tags. Note that we don't check that the result is not-null.
                // That allows the custom inflater path to fall back on the default one
                // later in this method.
                view = createView(context, name, attrs);
        }

        if (view == null && originalContext != context) {
            // If the original context does not equal our themed context, then we need to manually
            // inflate it using the name so that android:theme takes effect.
            view = createViewFromTag(context, name, attrs);
        }

        if (view != null) {
            // If we have created a view, check its android:onClick
            checkOnClickListener(view, attrs);
        }

        return view;
    }
此处就是根源了,通过控件名创建具体的View
再看看换肤库的使用:
        SkinCompatManager.withoutActivity(this)
                .addInflater(new SkinAppCompatViewInflater())           // 基础控件换肤初始化
//                .addInflater(new SkinMaterialViewInflater())            // material design 控件换肤初始化[可选]
                .addInflater(new SkinConstraintViewInflater())          // ConstraintLayout 控件换肤初始化[可选]
//                .addInflater(new SkinCardViewInflater())                // CardView v7 控件换肤初始化[可选]
                .setSkinStatusBarColorEnable(false)                     // 关闭状态栏换肤,默认打开[可选]
                .setSkinWindowBackgroundEnable(false)                   // 关闭windowBackground换肤,默认打开[可选]
                .loadSkin();
会通过addInflater来加载对应模块的支持,随便进入一个:
private View createViewFromFV(Context context, String name, AttributeSet attrs) {
        View view = null;
        if (name.contains(".")) {
            return null;
        }
        switch (name) {
            case "View":
                view = new SkinCompatView(context, attrs);
                break;
            case "LinearLayout":
                view = new SkinCompatLinearLayout(context, attrs);
                break;
            case "RelativeLayout":
                view = new SkinCompatRelativeLayout(context, attrs);
                break;
            case "FrameLayout":
                view = new SkinCompatFrameLayout(context, attrs);
                break;
            case "TextView":
                view = new SkinCompatTextView(context, attrs);
                break;
            case "ImageView":
                view = new SkinCompatImageView(context, attrs);
                break;
            case "Button":
                view = new SkinCompatButton(context, attrs);
                break;
            case "EditText":
                view = new SkinCompatEditText(context, attrs);
                break;
            case "Spinner":
                view = new SkinCompatSpinner(context, attrs);
                break;
            case "ImageButton":
                view = new SkinCompatImageButton(context, attrs);
                break;
            case "CheckBox":
                view = new SkinCompatCheckBox(context, attrs);
                break;
            case "RadioButton":
                view = new SkinCompatRadioButton(context, attrs);
                break;
            case "RadioGroup":
                view = new SkinCompatRadioGroup(context, attrs);
                break;
            case "CheckedTextView":
                view = new SkinCompatCheckedTextView(context, attrs);
                break;
            case "AutoCompleteTextView":
                view = new SkinCompatAutoCompleteTextView(context, attrs);
                break;
            case "MultiAutoCompleteTextView":
                view = new SkinCompatMultiAutoCompleteTextView(context, attrs);
                break;
            case "RatingBar":
                view = new SkinCompatRatingBar(context, attrs);
                break;
            case "SeekBar":
                view = new SkinCompatSeekBar(context, attrs);
                break;
            case "ProgressBar":
                view = new SkinCompatProgressBar(context, attrs);
                break;
            case "ScrollView":
                view = new SkinCompatScrollView(context, attrs);
                break;
            default:
                break;
        }
        return view;
    }
则可以看出最终是通过此来替换原生的AppCompatViewInflater,从而在加载布局的时候替换已经实现了换肤的View
总结下:通过替换Factory2,在xml解析成view的时候替换成定义的支持换肤的View
二、怎么根据不同皮肤找到对应资源:
该库要想自定义控件实现换肤,需要通过SkinCompatResources.get***方法来找到对应的资源。比如获取对应的颜色,我们看下
getSkinColor()
private int getSkinColor(Context context, int resId) {
    if (!SkinCompatUserThemeManager.get().isColorEmpty()) {
        ColorStateList colorStateList = SkinCompatUserThemeManager.get().getColorStateList(resId);
        if (colorStateList != null) {
            return colorStateList.getDefaultColor();
        }
    }
    if (mStrategy != null) {
        ColorStateList colorStateList = mStrategy.getColor(context, mSkinName, resId);
        if (colorStateList != null) {
            return colorStateList.getDefaultColor();
        }
    }
    if (!isDefaultSkin) {
        int targetResId = getTargetResId(context, resId);
        if (targetResId != 0) {
            return mResources.getColor(targetResId);
        }
    }
    return context.getResources().getColor(resId);
}
看下这行int targetResId = getTargetResId(context, resId);
public int getTargetResId(Context context, int resId) {
    try {
        String resName = null;
        if (mStrategy != null) {
            resName = mStrategy.getTargetResourceEntryName(context, mSkinName, resId);
        }
        if (TextUtils.isEmpty(resName)) {
            resName = context.getResources().getResourceEntryName(resId);
        }
        String type = context.getResources().getResourceTypeName(resId);
        return mResources.getIdentifier(resName, type, mSkinPkgName);
    } catch (Exception e) {
        // 换肤失败不至于应用崩溃.
        return 0;
    }
}
最终是通过Resource的getResourceEntryName()方法来获取到对应的资源文件(自己有点low了,之前从没听过getResourceEntryName())
总结:根据不同皮肤加不同的后缀名,最终调用Resource.getResourceEntryName()获取皮肤的资源
三、切换皮肤后,是怎么更新现有View的皮肤的?
此处比较简单了,通过调用SkinCompatSupportable.applySkin()重新设置对应的资源。初始化的时候需要使用: SkinCompatManager.withoutActivity(this),这里会通过SkinActivityLifecycle监听activity的生命周期。当页面可见时,刷新已有的界面。
最后总结下原理:
1.通过自定义的SkinCompatDelegate来替换原生的AppCompatDelegateImpl,从而充当Factory2解析和创建xml实现对已有的原生控件的换肤支持。
2.加载资源时,通过对不同皮肤,Resource.getResourceEntryName()加载对应名称的资源文件.


 658
658


 被折叠的 条评论
为什么被折叠?
被折叠的 条评论
为什么被折叠?
 到【灌水乐园】发言


