


本文为了更好的表达,能让更多的人了解各方面的技术,因此在写的时候会不时的说一说基础的知识,也会不时的重复一些重点知识。为此,如果影响到阅读,实在是没有办法。
当然,如果只是想快速的把k8s部署到虚拟机上,只是测试一下性能,那么,此文可能不适合你的阅读。因为可以要花不少时间才可以完成。
由于本文涉及的内容比较多,因此划分为多篇写。
本文使用的代码有很多是来自github,所以,出了问题可以留言,也可以自己到github上面留言。
为了你查阅方便,本文也会把相应的代码归类放到github上。
*时,本人也重新开安装的虚拟机,所以,所有的安装流程都是一步一步的进行,所以,在阅读时不需要考虑整体的结构。 而整体的结构,也会在以下某一节中详细说明。
这个会在最后写
0.0 架构介绍
在本节中,我们会谈论到我们要怎么实现的目标,也就是我们要把k8s配置成什么样子。并且我们需要准备多少台服务器(当然,也可以是虚拟机)。
并且,我们需要使用的软件。
服务器
haproxy ——- 2台
k8smaster ——- 2台
ETCD ——- 3台
k8snode ——- 3台,也可以是n台。
一共 十 台服务器。也可以把ETCD放到k8smaster,在这个文档中,我们会单独创建ETCD集群。IP规划
2.1 master
k8smaster01 —– 192.168.123.180
k8smaster02 —– 192.168.123.1812.2 nodes
k8snode01 —– 192.168.123.190
k8snode02 —– 192.168.123.191
k8snode03 —– 192.168.123.1922.3 haproxy
haproxy01 —– 192.168.123.200
haproxy02 —– 192.168.123.201
k8smasterVIP —– 192.168.123.210 —>这个是虚拟IP地址
NodesVIP —– 192.168.123.211 —>这个是虚拟IP地址
2.3 ETCD
etcd01 —— 192.168.123.220
etcd02 —— 192.168.123.221
etcd02 —— 192.168.123.222
基于以上IP地址:
我们会在k8smaster上面安装api。然后通过haproxy和keepalive做高可用。然后我们会在k8snode上面写安装ingress,用于服务访问,所有的ingress会通过haproxy和keepalive做高可用。然后,我们也会讲到如果增加节点。软件介绍
Centos 7
Docker
keepalive
haproxy
kubernetes 1.6
暂时我们会列出这些,主要现在也记不住版本。我们会在安装过程中详细说明。
基于以上IP地址:
我们会在k8smaster上面安装api。然后通过haproxy和keepalive做高可用。然后我们会在k8snode上面写安装ingress,用于服务访问,所有的ingress会通过haproxy和keepalive做高可用。然后,我们也会讲到如果增加节点。拓扑结构
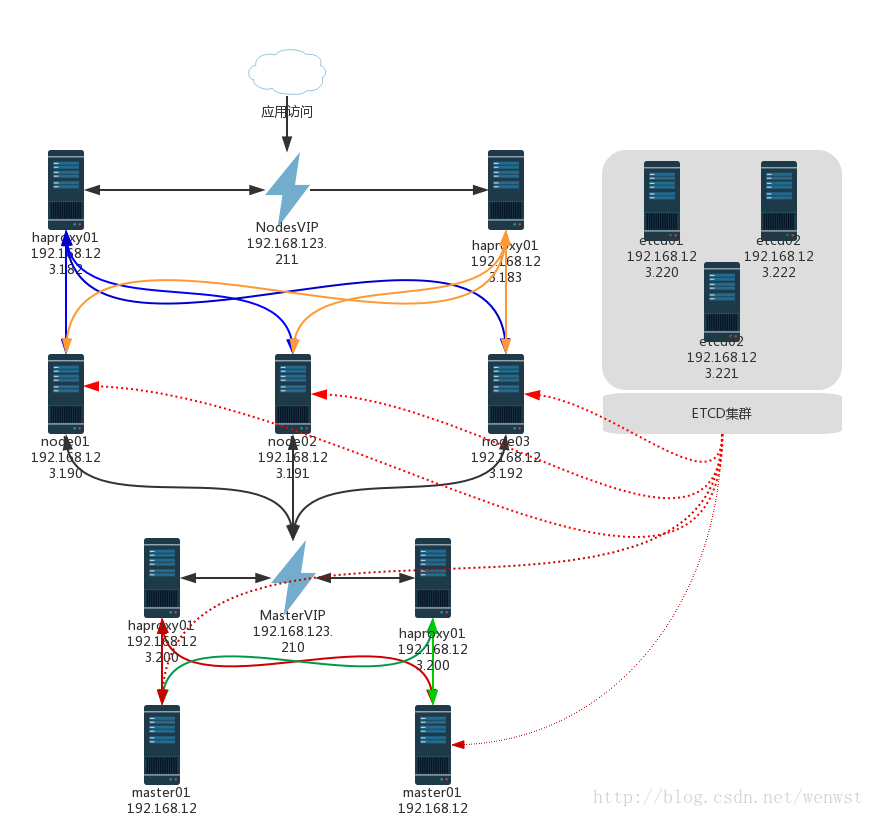
实话这图看起来真心有点乱,不过相对于网上的抽象图,应该更直观一些。如果对图存在疑问,不用担心。在此图上面都标注了IP地址。在随后的章节中,我们会详细的谈论这些。
当然,此图并没有标注的非常详细。比如flanneld就没有写出来。我们在看时,只需要根据结构有一个大概的映像就好。
1.左右结构
2.上中下结构
1.0 环境配置
安装操作系统Centos 7。查看内核版本。
[root@localhost ~]# uname -a
Linux localhost.localdomain 3.10.0-514.16.1.el7.x86_64 #1 SMP Wed Apr 12 15:04:24 UTC 2017 x86_64 x86_64 x86_64 GNU/Linux
升级操作系统到最新,以下的命令可以要执行一会,看你的网络速度。
update -y 升级完成后,看下版本:
[root@localhost yum.repos.d]# uname -r
3.10.0-514.16.1.el7.x86_64
在执行的时候,我们来看下ETCD相关的信息。
2.0 ETCD高可用配置
在配置前,我们可以看下在 0.0 中的拓扑图,在这个图的右上方ETCD集群,IP地址如下:
etcd01 —— 192.168.123.220
etcd02 —— 192.168.123.221
etcd02 —— 192.168.123.222
现在我们首先这配置这三台服务器。
不要急着进行操作,首先了解一下ETCD的相关信息。请看下面一段话:(不是我写的,从网上抄过来的,不想看直接跳过)
ETCD是一个分布式的,一致的 key-value 存储,主要用途是共享配置和服务发现。Etcd 已经在很多分布式系统中得到广泛的使用。所有的分布式系统,都面临的一个问题是多个节点之间的数据共享问题,这个和团队协作的道理是一样的,成员可以分头干活,但总是需要共享一些必须的信息,比如谁是 leader, 都有哪些成员,依赖任务之间的顺序协调等。所以分布式系统要么自己实现一个可靠的共享存储来同步信息(比如 Elasticsearch ),要么依赖一个可靠的共享存储服务,而 Etcd 就是这样一个服务。
* 提供存储以及获取数据的接口,它通过协议保证 Etcd 集群中的多个节点数据的强一致性。用于存储元信息以及共享配置。
* 提供监听机制,客户端可以监听某个key或者某些key的变更(v2和v3的机制不同,参看后面文章)。用于监听和推送变更。
* 提供key的过期以及续约机制,客户端通过定时刷新来实现续约(v2和v3的实现机制也不一样)。用于集群监控以及服务注册发现。
* 提供原子的CAS(Compare-and-Swap)和 CAD(Compare-and-Delete)支持(v2通过接口参数实现,v3通过批量事务实现)。用于分布式锁以及leader选举。
回归正题
2.1 修改hosts文件
我们按照这个对应修改
etcd01 —— 192.168.123.220
etcd02 —— 192.168.123.221
etcd02 —— 192.168.123.222
查看/etc/hosts
[root@localhost ~]# cat /etc/hosts
127.0.0.1   localhost localhost.localdomain
192.168.123.220 etcd01
192.168.123.221 etcd02
192.168.123.222 etcd03
确保
192.168.123.220
192.168.123.221
192.168.123.222
三台服务器的/etc/hosts文件相同
2.2 修改主机名
在192.168.123.220中执行:
hostnamectl set-hostname etcd01在192.168.123.221中执行:
hostnamectl set-hostname etcd02在192.168.123.222中执行:
hostnamectl set-hostname etcd03以上执行完后,重新登录一下终端,命令行前面的提示符就会改成刚刚修改的主机名。
2.3 TLS 认证文件创建
在这里,我们使用到的证书有ca.pem, etcd-key.pem, etcd.pem三个证书。接下来,我们一起创建这三个证书。
2.3.1 安装CFSSL
* 安装wget下载工作
yum install -y wget
* 创建 /root/cfssl目录(这里是使用root帐号登录,因此就在root目录中,写全路径是为了不让你不产生路径上面的混乱。)
mkdir /root/cfssl
* 下载CFSSL执行文件
   wget -O cfssl https://pkg.cfssl.org/R1.2/cfssl_linux-amd64
   wget -O cfssljson https://pkg.cfssl.org/R1.2/cfssljson_linux-amd64
   wget -O cfssl-certinfo https://pkg.cfssl.org/R1.2/cfssl-certinfo_linux-amd64
查看下载目录有以下文件
[root@etcd01 cfssl]# ls
cfssl  cfssl-certinfo  cfssljson
把cfssl的目录/root/cfssl加到环境变量中
export PATH=/root/cfssl:$PATH创建CA配置文件
增加可执行权限
chmod +x cfssl*- 创建证书目录
mkdir /root/ssl
cd /root/ssl- 生成默认的证书配置文件
cfssl print-defaults config > ca-config.json
 cfssl print-defaults csr > ca-csr.json
config.json内容如下:
[root@etcd01 ssl]# cat ca-config.json
{
    "signing": {
        "default": {
            "expiry": "168h"
        },
        "profiles": {
            "www": {
                "expiry": "8760h",
                "usages": [
                    "signing",
                    "key encipherment",
                    "server auth"
                ]
            },
            "client": {
                "expiry": "8760h",
                "usages": [
                    "signing",
                    "key encipherment",
                    "client auth"
                ]
            }
        }
    }
}


[root@etcd01 ssl]# cat ca-csr.json
{
    "CN": "example.net",
    "hosts": [
        "example.net",
        "www.example.net"
    ],
    "key": {
        "algo": "ecdsa",
        "size": 256
    },
    "names": [
        {
            "C": "US",
            "L": "CA",
            "ST": "San Francisco"
        }
    ]
}
接下来,我们需要修改这两个配置文件。
首先,我们来修改ca-config.json
“`
{
“signing”: {
“default”: {
“expiry”: “168h”
},
“profiles”: {
“www”: {
“expiry”: “8760h”,
“usages”: [
“signing”,
“key encipherment”,
“server auth”
]
},
“client”: {
“expiry”: “8760h”,
“usages”: [
“signing”,
“key encipherment”,
“client auth”
]
}
}
}
}
“`
未完续待,正在编写2017.06.16
1.0 环境准备
本节主要介绍安装环境,以及安装环境的简单配置。
这里,你需要注意: 这时的环境为测试环境,如果你要将K8s部署到生产环境,那么,这里可能没有写的这样简单,当然,我也喜欢在后面的文章中能把此处补充的更为详细,更接近于生产环境。
本文使用的操作系统为CentOS。随后,如果时间允许,也会在ubuntu上进行部署和测试。如果写完的话,那么这里可能会多一个连接。
虚拟机安装地址:http://blog.csdn.net/wenwst/article/details/72477444
现在这篇接虚拟机安装地址。
1.1 操作系统
- CentOS 7
查看内核信息
[root@localhost ~]# uname -a
Linux localhost.localdomain 3.10.0-327.el7.x86_64 #1 SMP Thu Nov 19 22:10:57 UTC 2015 x86_64 x86_64 x86_64 GNU/Linux- 系统更新
yum update -y 完成后,查看内核版本
uname -aLinux localhost.localdomain 3.10.0-514.16.1.el7.x86_64 #1 SMP Wed Apr 12 15:04:24 UTC 2017 x86_64 x86_64 x86_64 GNU/Linux- 关闭防火墙
systemctl stop firewalld
systemctl disable firewalld
确认是否关闭
[root@localhost ~]# iptables -L
Chain INPUT (policy ACCEPT)
target     prot opt source               destination

Chain FORWARD (policy ACCEPT)
target     prot opt source               destination

Chain OUTPUT (policy ACCEPT)
target prot opt source destination - 关闭Selinux
[root@localhost ~]# cat /etc/selinux/config

# This file controls the state of SELinux on the system.
# SELINUX= can take one of these three values:
#     enforcing - SELinux security policy is enforced.
#     permissive - SELinux prints warnings instead of enforcing.
#     disabled - No SELinux policy is loaded.
SELINUX=disabled
#SELINUX=enforcing
# SELINUXTYPE= can take one of three two values:
#     targeted - Targeted processes are protected,
#     minimum - Modification of targeted policy. Only selected processes are protected.
#     mls - Multi Level Security protection.
SELINUXTYPE=targeted - 查看网卡信息
[root@localhost ~]# ip a
1: lo: <LOOPBACK,UP,LOWER_UP> mtu 65536 qdisc noqueue state UNKNOWN qlen 1
    link/loopback 00:00:00:00:00:00 brd 00:00:00:00:00:00
    inet 127.0.0.1/8 scope host lo
       valid_lft forever preferred_lft forever
    inet6 ::1/128 scope host
       valid_lft forever preferred_lft forever
2: eno16777736: <BROADCAST,MULTICAST,UP,LOWER_UP> mtu 1500 qdisc pfifo_fast state UP qlen 1000
    link/ether 00:0c:29:40:ce:2c brd ff:ff:ff:ff:ff:ff
    inet 192.168.123.159/24 brd 192.168.123.255 scope global dynamic eno16777736
       valid_lft 1413sec preferred_lft 1413sec
    inet6 fe80::20c:29ff:fe40:ce2c/64 scope link
valid_lft forever preferred_lft forever- 配置文件/etc/hosts
这里增加几个hosts文件,用于提高下载速度。在后面的配置中, 我们还会再配置一次/etc/hosts。
[root@cluster001 etc]# cat /etc/hosts
127.0.0.1   localhost localhost.localdomain localhost4 localhost4.localdomain4
::1         localhost localhost.localdomain localhost6 localhost6.localdomain6
61.91.161.217 gcr.io
61.91.161.217 www.gcr.io
162.242.195.84 index.docker.io
162.242.195.84 www.docker.io
162.242.195.84 registry-1.docker.io
以上部分我们对刚安装的系统进行了最简单的配置。接下来,我们通过相同的方式准备三台服务器。
2.0 配置ETCD高可用集群##
在上一个步骤中,我们暂时准备了三台服务器。现在我们针对这三台服务器做ETCD高可用集群。
2.1 ETCD服务器IP地址
刚才我们准备的三台服务器详细信息如下:
192.168.123.159
192.168.123.160
192.168.123.161
接下来我们会在这三台服务器中安装ETCD高可用集群。
2.1 配置hosts
此部分在刚刚准备的三台服务器中都要执行
我们把以下信息写入到/etc/hosts中:
192.168.123.159  k8s01
192.168.123.160  k8s02
192.168.123.161  k8s03
完成以后,在三台服务器中执行命令,检查
[root@localhost ~]# cat /etc/hosts
127.0.0.1   localhost localhost.localdomain localhost4 localhost4.localdomain4
::1         localhost localhost.localdomain localhost6 localhost6.localdomain6

192.168.123.159  k8s01
192.168.123.160  k8s02
192.168.123.161  k8s03


61.91.161.217 gcr.io
61.91.161.217 www.gcr.io
162.242.195.84 index.docker.io
162.242.195.84 www.docker.io
162.242.195.84 registry-1.docker.io
2.2 配置主机名
此部分在刚刚准备的三台服务器中都要执行
然后在k8s01中执行
hostnamectl set-hostname k8s01
hostname
然后在k8s01中执行
hostnamectl set-hostname k8s02
hostname
然后在k8s01中执行
hostnamectl set-hostname k8s03
hostname
2.3 ETCD证书生成
ETCD使用的证书有以下几个:
ca.pem
kubernetes-key.pem
kubernetes.pem
我们通过CFSSL生成这些证书!
这里的操作只需要在一台服务器上面操作,现在我们是在k8s01上面
- 安装wget
yum install -y wget当前我们工作的目录如下:
[root@k8s01 ssl]# pwd
/root- 下载CFSS
 mkdir /root/ssl
 cd /root/ssl
 wget https://pkg.cfssl.org/R1.2/cfssl_linux-amd64
 wget https://pkg.cfssl.org/R1.2/cfssljson_linux-amd64
 wget https://pkg.cfssl.org/R1.2/cfssl-certinfo_linux-amd64
目录中文件如下
[root@k8s01 ssl]# pwd
/root/ssl
[root@k8s01 ssl]# ls
cfssl-certinfo_linux-amd64  cfssljson_linux-amd64  cfssl_linux-amd64
修改cfssl文件名。
mv cfssl-certinfo_linux-amd64 cfssl-certinfo
mv cfssljson_linux-amd64 cfssljson
mv cfssl_linux-amd64 cfssl
增加可执行权限
chmod +x cfssl-certinfo cfssljson cfssl
修改完后文件名如下:
[root@k8s01 ssl]# ls
cfssl  cfssl-certinfo  cfssljson
将当前目录加到环境变量中
[root@k8s01 ssl]# export PATH=/root/ssl:$PATH- 创建CA
创建CA配置文件
创建证书目录
[root@k8s01 ssl]# mkdir /opt/ssl
[root@k8s01 ssl]# cd /opt/ssl/
[root@k8s01 ssl]# cfssl print-defaults config > config.json
Segmentation fault
在安装中出现的问题
- Segmentation fault
[root@k8s01 ssl]# cfssl print-defaults config > config.json
Segmentation fault可能是写载文件出现了问题,重新下载相应的文件。


 1495
1495

 被折叠的 条评论
为什么被折叠?
被折叠的 条评论
为什么被折叠?
 到【灌水乐园】发言


