


没有翻译第一章是因为第一章只介绍了如何设置IDE,这方面网上文章很多,我就没有翻译,直接从第二章开始。
下面是原文链接,翻译有不对的地方请朋友们指正。
http://www.rastertek.com/gl40tut02.html
Tutorial 2: Creating a Framework and Window
第二章:创建框架和窗口
This OpenGL 4.0 tutorial will cover setting up a basic frame work and window.
这一章涵盖了创建基本框架和窗口的内容。
The Framework
框架
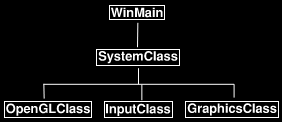
The frame work will begin with five items. It will have a WinMain function to handle the entry point of the application. It will also have a system class that encapsulates the entire application that will be called from within the WinMain function. Inside the system class we will have an opengl class for opengl system calls, a input class for handling user input, and a graphics class for handling the OpenGL graphics code. Here is a diagram of the framework setup:
本章的框架包含了5个部分。其中有一个WinMain方法用来作为程序的入口。还有system类,封装了全部程序,并在WinMain方法中调用。在system类中包含了用来处理opengl系统的opengl类,处理用户输入的input类和处理OpenGL图形的graphics类。下面是这个框架的结构图:
Now that we see how the framework will be setup lets start by looking at the WinMain function inside the main.cpp file.
下面将介绍框架是如何建立的,首先从main.cpp中的WinMain方法开始。
WinMain
// Filename: main.cpp

#include "systemclass.h"


int WINAPI WinMain(HINSTANCE hInstance, HINSTANCE hPrevInstance, PSTR pScmdline, int iCmdshow)
{
 SystemClass* System;
 bool result;

 // Create the system object.
 // 创建system对象
 System = new SystemClass;
 if(!System)
 {
  return 0;
 }

 // Initialize and run the system object.
 // 初始化并运行system对象
 result = System->Initialize();
 if(result)
 {
  System->Run();
 }

 // Shutdown and release the system object.
 // 关闭并释放system对象
 System->Shutdown();
 delete System;
 System = 0;

 return 0;
}
As you can see we kept the WinMain function fairly simple. We create the system class and then initialize it. If it initializes with no problems then we call the system class Run function. The Run function will run its own loop and do all the application code until it completes. After the Run function finishes we then shut down the system object and do the clean up of the system object. So we have kept it very simple and encapsulated the entire application inside the system class. Now lets take a look at the system class header file.
WinMain方法非常简单。我们创建了system类的对象然后对它进行初始化。如果没有出错就调用system对象的Run方法。Run方法将循环运行全部程序代码。Run方法运行结束后我们将关闭并清理system对象。我们将全部的程序逻辑都放在system类中,这样就保证了WinMain方法非常简洁。下面是system类的头文件。
Systemclass.h
// Filename: systemclass.h

#ifndef _SYSTEMCLASS_H_
#define _SYSTEMCLASS_H_
Here we define WIN32_LEAN_AND_MEAN. We do this to speed up the build process, it reduces the size of the Win32 header files by excluding some of the less used APIs.
我们定义了宏WIN32_LEAN_AND_MEAN。这样可以加快编译速度,它通过排除一些不常用的API减小了Win32头文件的大小。
///
// PRE-PROCESSING DIRECTIVES //
///
#define WIN32_LEAN_AND_MEAN
Windows.h is included so that we can call the functions to create/destroy windows and be able to use the other useful win32 functions.
通过包含Windows.h文件我们可以创建和销毁窗口并且可以使用其他的win32方法。
///
// MY CLASS INCLUDES //
///
#include "openglclass.h"
#include "inputclass.h"
#include "graphicsclass.h"
The definition of the class is fairly simple. We see the Initialize, Shutdown, and Run function that was called in WinMain defined here. There are also some private functions that will be called inside those functions. We have also put a MessageHandler function in the class to handle the windows system messages that will get sent to the application while it is running. And finally we have some private variables m_OpenGL, m_Input, and m_Graphics which will be pointers to the three objects that will handle opengl, input, and graphics.
类的定义很简单。我们在WinMain方法里调用的Initialize、Shutdown和Run方法都在这里定义。同时这里也定义了将被用到的私有方法。同时,我们将处理系统窗口消息的MessageHandler方法也放在这个类里。最后,还有一些私有变量m_OpenGL、m_Input和m_Graphics分别指向opengl、输入和图像的3个对象。
// Class name: SystemClass

class SystemClass
{
public:
 SystemClass();
 SystemClass(const SystemClass&);
 ~SystemClass();

 bool Initialize();
 void Shutdown();
 void Run();

 LRESULT CALLBACK MessageHandler(HWND, UINT, WPARAM, LPARAM);

private:
 bool Frame();
 bool InitializeWindows(OpenGLClass*, int&, int&);
 void ShutdownWindows();

private:
 LPCWSTR m_applicationName;
 HINSTANCE m_hinstance;
 HWND m_hwnd;

 OpenGLClass* m_OpenGL;
 InputClass* m_Input;
 GraphicsClass* m_Graphics;
};

/
// FUNCTION PROTOTYPES //
/
static LRESULT CALLBACK WndProc(HWND, UINT, WPARAM, LPARAM);

/
// GLOBALS //
/
static SystemClass* ApplicationHandle = 0;

#endif
The WndProc function and ApplicationHandle pointer are also included in this class file so we can re-direct the windows system messaging into our MessageHandler function inside the system class.
这个类中还包含了WndProc方法和ApplicationHandle指针,这样,我们就可以将windows系统消息转发到system类中的MessageHandler方法。
Now lets take a look at the system class source file:
下面是system类的代码:
Systemclass.cpp
// Filename: systemclass.cpp

#include "systemclass.h"
Here I create an empty copy constructor and empty class destructor. In this class I don't have need of them but if not defined some compilers will generate them for you, and in which case I'd rather they be empty.
这里创建了一个空的复制构造函数和一个空的构造函数。本来这个类不需要这些函数,但是某些编译器会自动帮你生成他们,所以我宁愿放两个空函数在这。
You will also notice I don't do any object clean up in the class destructor. I instead do all my object clean up in the Shutdown function you will see further down. The reason being is that I don't trust it to be called. Certain windows functions like ExitThread() are known for not calling your class destructors resulting in memory leaks. You can of course call safer versions of these functions now but I'm just being careful when programming on windows.
你会发现我在析构函数里什么清理工作都没有做。我使用Shutdown方法来清理对象。这样做的原因是我并不信任析构函数。某些windows函数,比如ExitThread(),周所周知在类的析构时没有调用而引发了内存泄漏。你也可以调用这些方法的安全版本,但是我会在windows编程上多加小心。
SystemClass::SystemClass(const SystemClass& other)
{
}

SystemClass::~SystemClass()
{
}
The following Initialize function does all the setup for the application. It first calls InitializeWindows which will create the window for our application to use and will initialize OpenGL. This function also creates and initializes both the input and graphics objects that the application will use for handling user input and rendering graphics to the screen.
下面的Initialize方法对程序进行了初始化。首先,它调用InitializeWindows为我们的程序创建用来初始化OpenGL的窗口。这个方法同时创建和初始化了程序用来处理用户输入和渲染的输入和图形对象。
bool SystemClass::Initialize()
{
 int screenWidth, screenHeight;
 bool result;

 // Initialize the width and height of the screen to zero.
 screenWidth = 0;
 screenHeight = 0;

 // Create the OpenGL object.
 m_OpenGL = new OpenGLClass;
 if(!m_OpenGL)
 {
  return false;
 }

 // Create the window the application will be using and also initialize OpenGL.
 // 创建程序用的窗口并初始化OpenGL
 result = InitializeWindows(m_OpenGL, screenWidth, screenHeight);
 if(!result)
 {
  MessageBox(m_hwnd, L"Could not initialize the window.", L"Error", MB_OK);
  return false;
 }

 // Create the input object.  This object will be used to handle reading the input from the user.
 m_Input = new InputClass;
 if(!m_Input)
 {
  return false;
 }

 // Initialize the input object.
 m_Input->Initialize();

 // Create the graphics object.  This object will handle rendering all the graphics for this application.
 m_Graphics = new GraphicsClass;
 if(!m_Graphics)
 {
  return false;
 }

 // Initialize the graphics object.
 result = m_Graphics->Initialize(m_OpenGL, m_hwnd);
 if(!result)
 {
  return false;
 }

 return true;
}
The Shutdown function does the clean up. It shuts down and releases everything associated with the opengl, graphics, and input objects. As well it also shuts down the window and cleans up the handles associated with it.
Shutdown方法用来清理对象。它负责关闭和释放所有和opengl、输入、图形有关联的对象。同时它也负责关闭窗口并清理和窗口相关联的句柄。
void SystemClass::Shutdown()
{
 // Release the graphics object.
 if(m_Graphics)
 {
  m_Graphics->Shutdown();
  delete m_Graphics;
  m_Graphics = 0;
 }

 // Release the input object.
 if(m_Input)
 {
  delete m_Input;
  m_Input = 0;
 }

 // Release the OpenGL object.
 if(m_OpenGL)
 {
  delete m_OpenGL;
  m_OpenGL = 0;
 }

 // Shutdown the window.
 ShutdownWindows();

 return;
}
The Run function is where our application will loop and do all the application processing until we decide to quit. The application processing is done in the Frame function which is called each loop. This is an important concept to understand as now the rest of our application must be written with this in mind. The pseudo code looks like the following:
Run方法将循环运行程序直到我们选择退出。每次循环都将调用Frame方法。这里是程序的核心概念。下面是这部分的伪代码:
while not done
check for windows system messages
process system messages
process application loop
check if user wanted to quit during the frame processing
void SystemClass::Run()
{
 MSG msg;
 bool done, result;

 // Initialize the message structure.
 ZeroMemory(&msg, sizeof(MSG));

 // Loop until there is a quit message from the window or the user.
 done = false;
 while(!done)
 {
  // Handle the windows messages.
  if(PeekMessage(&msg, NULL, 0, 0, PM_REMOVE))
  {
   TranslateMessage(&msg);
   DispatchMessage(&msg);
  }

  // If windows signals to end the application then exit out.
  if(msg.message == WM_QUIT)
  {
   done = true;
  }
  else
  {
   // Otherwise do the frame processing.
   result = Frame();
   if(!result)
   {
    done = true;
   }
  }

 }

 return;
}
The following Frame function is where all the processing for our application is done. So far it is fairly simple, we check the input object to see if the user has pressed escape and wants to quit. If they don't want to quit then we call the graphics object to do its frame processing which will render the graphics for that frame. As the application grows we'll place more code inside here.
下面的Frame方法就是我们程序的全部。目前它还很简单,我们检查输入对象是否按下了ESC键来退出。然后我们调用图形对象来渲染一帧。后面我们还会在此添加更多的代码
bool SystemClass::Frame()
{
 bool result;

 // Check if the user pressed escape and wants to exit the application.
 if(m_Input->IsKeyDown(VK_ESCAPE))
 {
  return false;
 }

 // Do the frame processing for the graphics object.
 result = m_Graphics->Frame();
 if(!result)
 {
  return false;
 }

 return true;
}
The MessageHandler function is where we direct the windows system messages into. This way we can listen for certain information that we are interested in. Currently we will just read if a key is pressed or if a key is released and pass that information on to the input object. All other information we will pass back to the windows default message handler.
我们将windows系统消息传入MessageHandler方法。这样我们就可以监听我们关心的事件。目前我们只读取按键按下和抬起的事件并将消息传递给输入对象。其他的windows都会被过滤掉。
LRESULT CALLBACK SystemClass::MessageHandler(HWND hwnd, UINT umsg, WPARAM wparam, LPARAM lparam)
{
 switch(umsg)
 {
  // Check if a key has been pressed on the keyboard.
  case WM_KEYDOWN:
  {
   // If a key is pressed send it to the input object so it can record that state.
   m_Input->KeyDown((unsigned int)wparam);
   return 0;
  }

  // Check if a key has been released on the keyboard.
  case WM_KEYUP:
  {
   // If a key is released then send it to the input object so it can unset the state for that key.
   m_Input->KeyUp((unsigned int)wparam);
   return 0;
  }

  // Any other messages send to the default message handler as our application won't make use of them.
  default:
  {
   return DefWindowProc(hwnd, umsg, wparam, lparam);
  }
 }
}
The InitializeWindows function is where we put the code to build the window we will use to render to. It returns screenWidth and screenHeight back to the calling function so we can make use of them throughout the application. We create the window using some default settings to initialize a plain black window with no borders. The function will make either a small window or make a full screen window depending on a global variable called FULL_SCREEN. If this is set to true then we make the screen cover the entire users desktop window. If it is set to false we just make a 800x600 window in the middle of the screen. I placed the FULL_SCREEN global variable at the top of the graphicsclass.h file in case you want to modify it. It will make sense later why I placed the global in that file instead of the header for this file.
InitializeWindows方法的作用是用来构造渲染用的窗口。通过调用该方法,返回可以在程序全局使用的screenWidth和screenHeight。我们使用默认的设置创建了一个简单的没有边框的窗口。这个方法可以通过FULL_SCREEN变量来决定程序是窗口模式还是全屏。如果它的值为true将创建全屏窗口。如果为false将在桌面中部创建一个800x600的窗口。FULL_SCREEN变量是在graphicsclass.h文件头部的一个可以随时设置值的全局变量。(后面的不懂)
Now this function is also where we initialize OpenGL. The reason for this is because it is completely tied into the creation of the window. The process is that first we create a temporary window so we can talk to OpenGL. Next we get the extensions for opengl and then release the temporary window. With the opengl extensions we can now create the proper window needed for rendering with the latest version of OpenGL. However note that we won't cover OpenGL initialization in this tutorial, just the basic windows initialization. Setting up OpenGL will be the entire topic of the next tutorial.
因为OpenGL和创建窗口关系紧密,所以这个方法也初始化了OpenGL。这段程序首先创建了一个可以和opengl交互的临时窗口。其次,我们获取opengl的扩展然后释放临时窗口。通过opengl扩展,我们创建用来渲染硬件支持的最新版本的OpenGL窗口。但是,本章并没有初始化OpenGL的内容,只包含了基本窗口的初始化。设置OpenGL将在下一章介绍。
bool SystemClass::InitializeWindows(OpenGLClass* OpenGL, int& screenWidth, int& screenHeight)
{
 WNDCLASSEX wc;
 DEVMODE dmScreenSettings;
 int posX, posY;

 // Get an external pointer to this object.
 ApplicationHandle = this;

 // Get the instance of this application.
 m_hinstance = GetModuleHandle(NULL);

 // Give the application a name.
 m_applicationName = L"Engine";

 // Setup the windows class with default settings.
 wc.style         = CS_HREDRAW | CS_VREDRAW | CS_OWNDC;
 wc.lpfnWndProc   = WndProc;
 wc.cbClsExtra    = 0;
 wc.cbWndExtra    = 0;
 wc.hInstance     = m_hinstance;
 wc.hIcon         = LoadIcon(NULL, IDI_WINLOGO);
 wc.hIconSm       = wc.hIcon;
 wc.hCursor       = LoadCursor(NULL, IDC_ARROW);
 wc.hbrBackground = (HBRUSH)GetStockObject(BLACK_BRUSH);
 wc.lpszMenuName  = NULL;
 wc.lpszClassName = m_applicationName;
 wc.cbSize        = sizeof(WNDCLASSEX);

 // Register the window class.
 RegisterClassEx(&wc);
As stated earlier this is where we create a temporary window for opengl to get extensions. We won't setup OpenGL in this tutorial however, that will be done in the next tutorial. This tutorial is just focused on creating a frame work and getting a basic window on the screen.
我们先创建一个临时的窗口用来获取opengl扩展。本章我们不会设置OpenGL,这些将会放在下章介绍。本章的焦点是创建框架和屏幕上的基本窗口。
 // Create a temporary window for the OpenGL extension setup.
 m_hwnd = CreateWindowEx(WS_EX_APPWINDOW, m_applicationName, m_applicationName, WS_POPUP,
    0, 0, 640, 480, NULL, NULL, m_hinstance, NULL);
 if(m_hwnd == NULL)
 {
  return false;
 }

 // Don't show the window.
 ShowWindow(m_hwnd, SW_HIDE);

 // Release the temporary window now that the extensions have been initialized.
 DestroyWindow(m_hwnd);
 m_hwnd = NULL;
This is where we proceed with the regular window creation.
// Determine the resolution of the clients desktop screen.
 screenWidth  = GetSystemMetrics(SM_CXSCREEN);
 screenHeight = GetSystemMetrics(SM_CYSCREEN);

 // Setup the screen settings depending on whether it is running in full screen or in windowed mode.
 if(FULL_SCREEN)
 {
  // If full screen set the screen to maximum size of the users desktop and 32bit.
  memset(&dmScreenSettings, 0, sizeof(dmScreenSettings));
  dmScreenSettings.dmSize       = sizeof(dmScreenSettings);
  dmScreenSettings.dmPelsWidth  = (unsigned long)screenWidth;
  dmScreenSettings.dmPelsHeight = (unsigned long)screenHeight;
  dmScreenSettings.dmBitsPerPel = 32;
  dmScreenSettings.dmFields     = DM_BITSPERPEL | DM_PELSWIDTH | DM_PELSHEIGHT;

  // Change the display settings to full screen.
  ChangeDisplaySettings(&dmScreenSettings, CDS_FULLSCREEN);

  // Set the position of the window to the top left corner.
  posX = posY = 0;
 }
 else
 {
  // If windowed then set it to 800x600 resolution.
  screenWidth  = 800;
  screenHeight = 600;

  // Place the window in the middle of the screen.
  posX = (GetSystemMetrics(SM_CXSCREEN) - screenWidth)  / 2;
  posY = (GetSystemMetrics(SM_CYSCREEN) - screenHeight) / 2;
 }

 // Create the window with the screen settings and get the handle to it.
 m_hwnd = CreateWindowEx(WS_EX_APPWINDOW, m_applicationName, m_applicationName, WS_POPUP,
    posX, posY, screenWidth, screenHeight, NULL, NULL, m_hinstance, NULL);
 if(m_hwnd == NULL)
 {
  return false;
 }

 // Bring the window up on the screen and set it as main focus.
 ShowWindow(m_hwnd, SW_SHOW);
 SetForegroundWindow(m_hwnd);
 SetFocus(m_hwnd);

 // Hide the mouse cursor.
 ShowCursor(false);

 return true;
}
ShutdownWindows does just that. It returns the screen settings back to normal and releases the window and the handles associated with it.
ShutdownWindows方法将屏幕设置回初始状态,并释放所有与窗口相关的句柄。
void SystemClass::ShutdownWindows()
{
 // Show the mouse cursor.
 ShowCursor(true);

 // Fix the display settings if leaving full screen mode.
 if(FULL_SCREEN)
 {
  ChangeDisplaySettings(NULL, 0);
 }

 // Remove the window.
 DestroyWindow(m_hwnd);
 m_hwnd = NULL;

 // Remove the application instance.
 UnregisterClass(m_applicationName, m_hinstance);
 m_hinstance = NULL;

 // Release the pointer to this class.
 ApplicationHandle = NULL;

 return;
}
The WndProc function is where windows sends its messages to. You'll notice we tell windows the name of it when we initialize the window class with wc.lpfnWndProc = WndProc in the InitializeWindows function above. I included it in this class file since we tie it directly into the system class by having it send all the messages to the MessageHandler function defined inside SystemClass. This allows us to hook the messaging functionality straight into our class and keep the code clean.
WndProc方法接收窗口发送的消息。在InitializeWindows方法中,我们通过wc.lpfnWndProc = WndProc语句来设置窗口消息回调函数。通过SystemClass的MessageHandler方法将消息转发到system类。这样处理消息可以保持代码简洁。
LRESULT CALLBACK WndProc(HWND hwnd, UINT umessage, WPARAM wparam, LPARAM lparam)
{
 switch(umessage)
 {
  // Check if the window is being closed.
  case WM_CLOSE:
  {
   PostQuitMessage(0);
   return 0;
  }

  // All other messages pass to the message handler in the system class.
  default:
  {
   return ApplicationHandle->MessageHandler(hwnd, umessage, wparam, lparam);
  }
 }
}
Inputclass.h
To keep the tutorials simple I used the windows input for the time being until I do a tutorial on DirectInput (which is far superior). The input class handles the user input from the keyboard. This class is given input from the SystemClass::MessageHandler function. The input object will store the state of each key in a keyboard array. When queried it will tell the calling functions if a certain key is pressed. Here is the header:
在介绍DirectInput(更高级的输入)之前,暂时使用windows输入来保持代码简洁。input类处理用户键盘输入。此类通过SystemClass::MessageHandler方法获取输入。input对象用键盘数组保存每一个输入值的状态。我们可以通过查询来判断某个键是否被按下。下面是头文件:
// Filename: inputclass.h

#ifndef _INPUTCLASS_H_
#define _INPUTCLASS_H_


// Class name: InputClass

class InputClass
{
public:
 InputClass();
 InputClass(const InputClass&);
 ~InputClass();

 void Initialize();

 void KeyDown(unsigned int);
 void KeyUp(unsigned int);

 bool IsKeyDown(unsigned int);

private:
 bool m_keys[256];
};

#endif
Inputclass.cpp
// Filename: inputclass.cpp

#include "inputclass.h"

InputClass::InputClass()
{
}

InputClass::InputClass(const InputClass& other)
{
}

InputClass::~InputClass()
{
}

void InputClass::Initialize()
{
 int i;

 // Initialize all the keys to being released and not pressed.
 for(i=0; i<256; i++)
 {
  m_keys[i] = false;
 }

 return;
}

void InputClass::KeyDown(unsigned int input)
{
 // If a key is pressed then save that state in the key array.
 m_keys[input] = true;
 return;
}

void InputClass::KeyUp(unsigned int input)
{
 // If a key is released then clear that state in the key array.
 m_keys[input] = false;
 return;
}

bool InputClass::IsKeyDown(unsigned int key)
{
 // Return what state the key is in (pressed/not pressed).
 return m_keys[key];
}
Graphicsclass.h
The graphics class is another object that is created by the system class. All the graphics functionality in this application will be encapsulated in this class. I will also use the header in this file for all the graphics related global settings that we may want to change such as full screen or windowed mode. Currently this class will be empty but in future tutorials will contain all the graphics objects.
system类会创建graphics类的对象。全部的图形方法都被封装在这个类中。用来设置全屏和窗口模式的全局变量放在了文件头部。目前类的方法留空,以后的教程会进行填充。
// Filename: graphicsclass.h

#ifndef _GRAPHICSCLASS_H_
#define _GRAPHICSCLASS_H_

///
// MY CLASS INCLUDES //
///
#include "openglclass.h"
We'll need these four globals to start with.
这里需要4个全局变量。
/
// GLOBALS //
/
const bool FULL_SCREEN = false;
const bool VSYNC_ENABLED = true;
const float SCREEN_DEPTH = 1000.0f;
const float SCREEN_NEAR = 0.1f;


// Class name: GraphicsClass

class GraphicsClass
{
public:
 GraphicsClass();
 GraphicsClass(const GraphicsClass&);
 ~GraphicsClass();

 bool Initialize(OpenGLClass*, HWND);
 void Shutdown();
 bool Frame();

private:
 bool Render();

private:

};

#endif
Graphicsclass.cpp
I have kept this class entirely empty for now as we are just building the framework for this tutorial.
这里保持类的方法为空。本章只是为了构造框架。
// Filename: graphicsclass.cpp

#include "graphicsclass.h"

GraphicsClass::GraphicsClass()
{
}

GraphicsClass::GraphicsClass(const GraphicsClass& other)
{
}

GraphicsClass::~GraphicsClass()
{
}

bool GraphicsClass::Initialize(OpenGLClass* OpenGL, HWND hwnd)
{
 return true;
}

void GraphicsClass::Shutdown()
{
 return;
}

bool GraphicsClass::Frame()
{
 return true;
}

bool GraphicsClass::Render()
{
 return true;
}
Openglclass.h
Just like the GraphicsClass we have created an empty OpenGLClass that will be used for future tutorials but is required for the basic frame work.
类似于GraphicsClass我们创建一个空的OpenGLClass。
// Filename: openglclass.h

#ifndef _OPENGLCLASS_H_
#define _OPENGLCLASS_H_

//
// INCLUDES //
//
#include <windows.h>


// Class name: OpenGLClass

class OpenGLClass
{
public:
 OpenGLClass();
 OpenGLClass(const OpenGLClass&);
 ~OpenGLClass();

private:

};

#endif
Openglclass.h
// Filename: openglclass.cpp

#include "openglclass.h"

OpenGLClass::OpenGLClass()
{
}

OpenGLClass::OpenGLClass(const OpenGLClass& other)
{
}

OpenGLClass::~OpenGLClass()
{
}
Summary
总结
So now we have a framework and a window that will pop up on the screen. This frame work will now be the base for all future tutorials so understanding this frame work is fairly important. Please try the To Do exercise to make sure the code compiles and is working for you before moving on to the next tutorial. If you don't understand this frame work you should still be fine to move onto the other tutorials and they may make more sense to you later once the frame work is filled out more.
现在我们创建好了框架和一个窗口。以后的教程都会用到这个框架,所以一定要理解框架是如何工作的。在继续下一章之前请试一试后面的练习来确保代码可以编译并能正常运行。如果你不理解这个框架,你仍然可以去看其他的教程。或许它们可以给你比这个框架更多的东西。
To Do Exercises
练习
1. Change the FULL_SCREEN parameter to true in the graphicsclass.h header then recompile and run the program. Press the escape key to quit after the window displays.
1. 修改graphicsclass.h文件中FULL_SCREEN变量为true,然后重新编译并运行程序。窗口显示后,按ESC键退出。
Source Code
源代码
http://www.rastertek.com/gl40src02.zip


 1110
1110

 被折叠的 条评论
为什么被折叠?
被折叠的 条评论
为什么被折叠?
 到【灌水乐园】发言


