


话不多说,直接上代码。
一、用XIB来写:直接AutoLayOut拖拽
1、首先,创建个带xib的cell,在cell上面放2个label
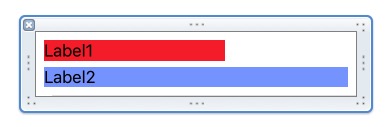
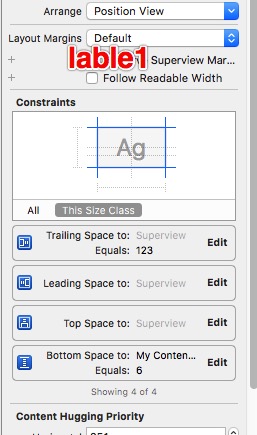
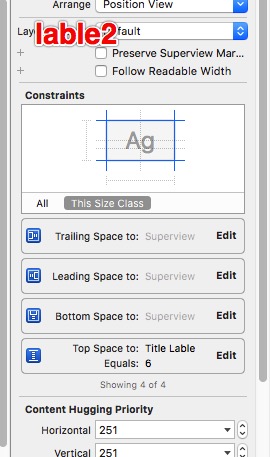
2、给label 加上约束(ps:这边写的是2个lable都是动态的,因此不需要直接固定lable的高度),只需要约束以下lable1的左,上,右的距离,lable2的左,下,右的距离,然后再约束下lable1和lable2之间的距离就OK了,约束如下:
lable1的约束:
lable2的约束:
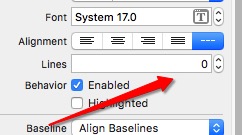
3、设置以下lable1和lable2的lines行数为:0 (这点很重要)
4、在自己的viewController中创建tableView,然后如果是iOS 8 之后的系统,必须要预先写下cell的预测高度,否则动态cell就失效
 //iOS8以后如果要动态计算cell高度,这个估算高度必须要设置,不设置的话自动计算就失效。
    self.tableView.estimatedRowHeight = 200;
    self.tableView.rowHeight = UITableViewAutomaticDimension;
5、实现tableView的代理方法:
-(NSInteger)numberOfSectionsInTableView:(UITableView *)tableView {
    return 1;
}

-(UITableViewCell *)tableView:(UITableView *)tableView cellForRowAtIndexPath:(NSIndexPath *)indexPath
{
    ListCell * cell =[tableView dequeueReusableCellWithIdentifier:@"cellid" forIndexPath:indexPath];
    cell.titleLable.text=_myTitleArray[indexPath.row];
    cell.myContentLable.text=_myDataArray[indexPath.row];
    [cell setNeedsUpdateConstraints];
    [cell updateConstraintsIfNeeded];
    return cell;
}


-(NSInteger)tableView:(UITableView *)tableView numberOfRowsInSection:(NSInteger)section {
    return _myTitleArray.count;
}

-(NSString *)tableView:(UITableView *)tableView titleForHeaderInSection:(NSInteger)section
{
    return @"Show";
}

ios7必须写
//-(CGFloat)tableView:(UITableView *)tableView heightForRowAtIndexPath:(NSIndexPath *)indexPath
//{
//    _cell=(MyCelltest *)[tableView dequeueReusableCellWithIdentifier:@"cellid"];
//
//    MyCelltest * cell= _cell;
//    cell.textLabel.text=[_tableData objectAtIndex:indexPath.row];
//
//    CGFloat contentWidth= CGRectGetWidth(_tableView.frame);
//    [cell.contentView mas_makeConstraints:^(MASConstraintMaker *make) {
//        make.width.equalTo(@(contentWidth));
//    }];
//
//    //重新添加约束
//    [cell setNeedsUpdateConstraints];
//    [cell updateConstraintsIfNeeded];
//
//
//    CGFloat height =[cell.contentView systemLayoutSizeFittingSize:UILayoutFittingCompressedSize].height +1;
//
//    return height;
//
//
//
//}
6、自己加入数据源,运行,此时就OK啦。
二、iOS 7之后试用:纯代码实现动态cell
1、创建个不带xib的AnotherListCell
2、在AnotherListCell.h中申明2个label,和一个CGfloat的变量,来记录cell的高度。还有一个方法来设置table的内容并且计算cell的高度;
#import <UIKit/UIKit.h>

@interface AnotherListCell : UITableViewCell

@property(nonatomic,strong)UILabel * myTitleLable;
@property(nonatomic,strong)UILabel * myContentLable;
@property(nonatomic,assign)CGFloat cellHeight;

-(void)setContentWithTitle:(NSString*)title AndContent:(NSString*)content;

@end
3、在 AnotherListCell.m中实现init方法
-(instancetype)initWithStyle:(UITableViewCellStyle)style reuseIdentifier:(NSString *)reuseIdentifier
{
    if (self = [super initWithStyle:style reuseIdentifier:reuseIdentifier]) {
        [self setUpUI];
    }
    return self;
}


-(void)setUpUI
{
    _myTitleLable =[[UILabel alloc]init];
    _myTitleLable.numberOfLines=0;
    _myTitleLable.font=[UIFont systemFontOfSize:15];
    _myTitleLable.backgroundColor=[UIColor cyanColor];
    [self.contentView addSubview:_myTitleLable];

    _myContentLable =[[UILabel alloc]init];
    _myContentLable.numberOfLines=0;
    _myContentLable.font=[UIFont systemFontOfSize:15];
    _myContentLable.backgroundColor=[UIColor grayColor];
    [self.contentView addSubview:_myContentLable];

}

//设置lable的内容,和高度的计算
-(void)setContentWithTitle:(NSString*)title AndContent:(NSString*)content
{
    // cell的宽度
    CGFloat cellW = [UIScreen mainScreen].bounds.size.width;
    CGFloat jumpLableLeft = 10;//距离左边宽度
    CGFloat jumpLableRight = 10;//距离右边宽度
    //lable的实际宽度
    CGFloat contentLabelMaxW = cellW-jumpLableLeft-jumpLableRight;
    //计算_myTitleLable的frame
    CGSize titleSize =[title sizeWithFont:[UIFont systemFontOfSize:15] constrainedToSize:CGSizeMake(contentLabelMaxW, MAXFLOAT)];
    CGRect titleRect =(CGRect){{jumpLableLeft,jumpLableRight},titleSize};
    _myTitleLable.frame =titleRect;

    //计算_myContentLable的frame
    CGSize contentSize =[content sizeWithFont:[UIFont systemFontOfSize:15] constrainedToSize:CGSizeMake(contentLabelMaxW, MAXFLOAT)];
    CGRect contentRect =(CGRect){{jumpLableLeft,CGRectGetMaxY(_myTitleLable.frame)+10},contentSize};
    _myContentLable.frame =contentRect;

    _myTitleLable.text=title;
    _myContentLable.text=content;
    //cell高度
    _cellHeight =CGRectGetMaxY(_myContentLable.frame)+10;

}
4、在viewController中创建tableView, 此时不同点是纯代码的时候必须要写 -(CGFloat)tableView:(UITableView *)tableView heightForRowAtIndexPath:(NSIndexPath *)indexPath 方法
//纯代码的时候需要实现此方法
-(CGFloat)tableView:(UITableView *)tableView heightForRowAtIndexPath:(NSIndexPath *)indexPath
{
    AnotherListCell * cell =(AnotherListCell*)[self tableView:tableView cellForRowAtIndexPath:indexPath];
    return cell.cellHeight;
}
下面是我的Demo:传送门来了


 5149
5149

 被折叠的 条评论
为什么被折叠?
被折叠的 条评论
为什么被折叠?
 到【灌水乐园】发言


