


spring中事务流程跟aop基本上是一样的,所以还是安装上篇的套路,先看看事务是如何使用的,再分析源码
事务的使用
本文为了清晰的演示事务,所以不使用mybatis,很多时候我们用了这些成熟的框架之后,根本无法理解其原理,有的时候还是多要用用底层的方式进行学习。
@Component
@EnableTransactionManagement
public class TransactionConfig {
	@Bean
	public DataSource dataSource() {
		DruidDataSource dataSource = new DruidDataSource();
		dataSource.setUsername("root");
		dataSource.setPassword("123456");
		dataSource.setUrl("jdbc:mysql://39.105.156.80:3306/demo");
		dataSource.setDriverClassName("com.mysql.jdbc.Driver");
		return dataSource;
	}
	@Bean
	public JdbcTemplate jdbcTemplate(DataSource dataSource) {
		return new JdbcTemplate(dataSource);
	}

	@Bean
	public PlatformTransactionManager transactionManager(DataSource dataSource) {
		return new DataSourceTransactionManager(dataSource);
	}

}
数据库操作
@Slf4j
public class TestDao {
	@Autowired
	JdbcTemplate jdbcTemplate;
	@Transactional(rollbackFor = Exception.class)
	public String select(){
		jdbcTemplate.execute("INSERT INTO `demo`.`blog` (`title`, `content`) VALUES ('222', '222');");
		log.info("select");
		int a  = 5/0;
		return "";
	}
}
测试类
public class TestTransaction {
	public static void main(String[] args) {
		AnnotationConfigApplicationContext ac = new AnnotationConfigApplicationContext();
		ac.register(TransactionConfig.class);
		ac.register(TestDao.class);
		ac.refresh();
		TestDao bean = ac.getBean(TestDao.class);
		bean.select();

	}
}
所以使用事务有如下几个步骤
1、@EnableTransactionManagement注解
2、往spring中注入一个DataSourceTransactionManager
3、在方法上加上@Transactional(rollbackFor = Exception.class)
之后当执行该方法,该方法抛出异常时,会执行回滚操作,那么spring是如何实现的事务呢?我们接下来一步步分析
源码分析
@EnableTransactionManagement注解分析
就是一个组合注解

默认会走proxy
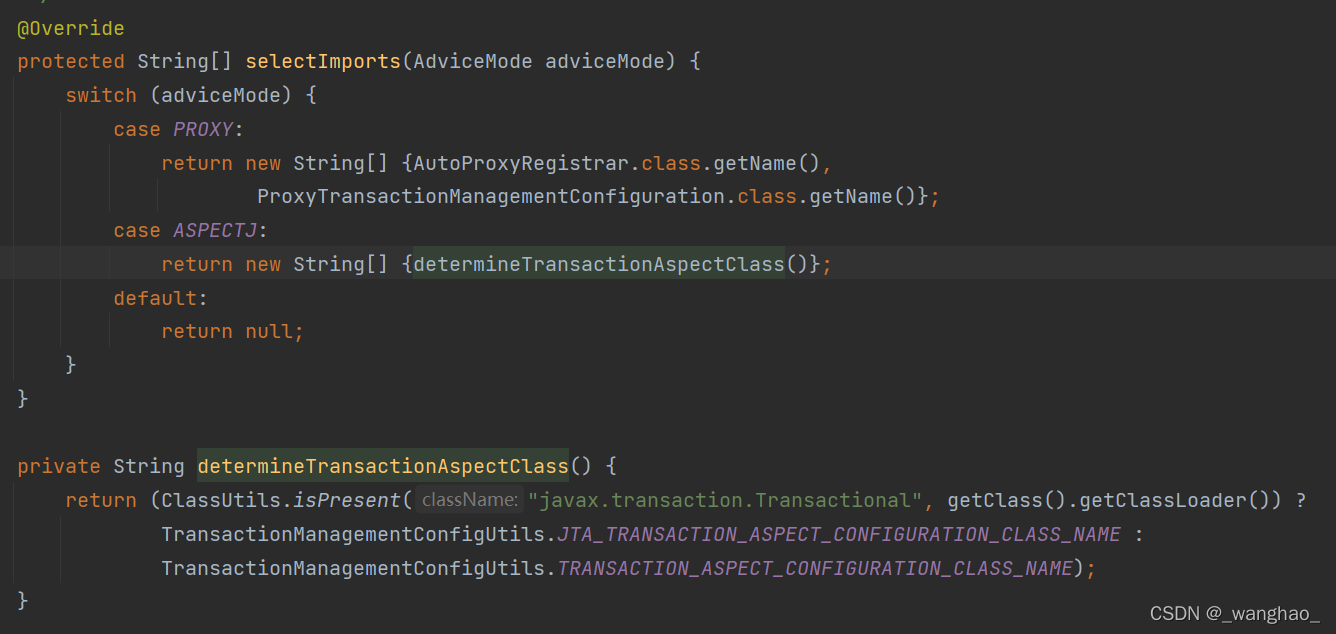
结果就是注入了两个类
AutoProxyRegistrar.class
ProxyTransactionManagementConfiguration.class
AutoProxyRegistrar
@Override
	public void registerBeanDefinitions(AnnotationMetadata importingClassMetadata, BeanDefinitionRegistry registry) {
		boolean candidateFound = false;
		// 拿出所有的注解
		Set<String> annTypes = importingClassMetadata.getAnnotationTypes();
		for (String annType : annTypes) {
			// 查找有mode和proxyTargetClass的注解
			AnnotationAttributes candidate = AnnotationConfigUtils.attributesFor(importingClassMetadata, annType);
			if (candidate == null) {
				continue;
			}
			// 拿出这两个属性
			Object mode = candidate.get("mode");
			Object proxyTargetClass = candidate.get("proxyTargetClass");
			if (mode != null && proxyTargetClass != null && AdviceMode.class == mode.getClass() &&
					Boolean.class == proxyTargetClass.getClass()) {
				candidateFound = true;
				if (mode == AdviceMode.PROXY) {
					// 注入了InfrastructureAdvisorAutoProxyCreator.class
					AopConfigUtils.registerAutoProxyCreatorIfNecessary(registry);
					if ((Boolean) proxyTargetClass) {
						AopConfigUtils.forceAutoProxyCreatorToUseClassProxying(registry);
						return;
					}
				}
			}
		}
		if (!candidateFound && logger.isInfoEnabled()) {
			String name = getClass().getSimpleName();
			logger.info(String.format("%s was imported but no annotations were found " +
					"having both 'mode' and 'proxyTargetClass' attributes of type " +
					"AdviceMode and boolean respectively. This means that auto proxy " +
					"creator registration and configuration may not have occurred as " +
					"intended, and components may not be proxied as expected. Check to " +
					"ensure that %s has been @Import'ed on the same class where these " +
					"annotations are declared; otherwise remove the import of %s " +
					"altogether.", name, name, name));
		}
	}
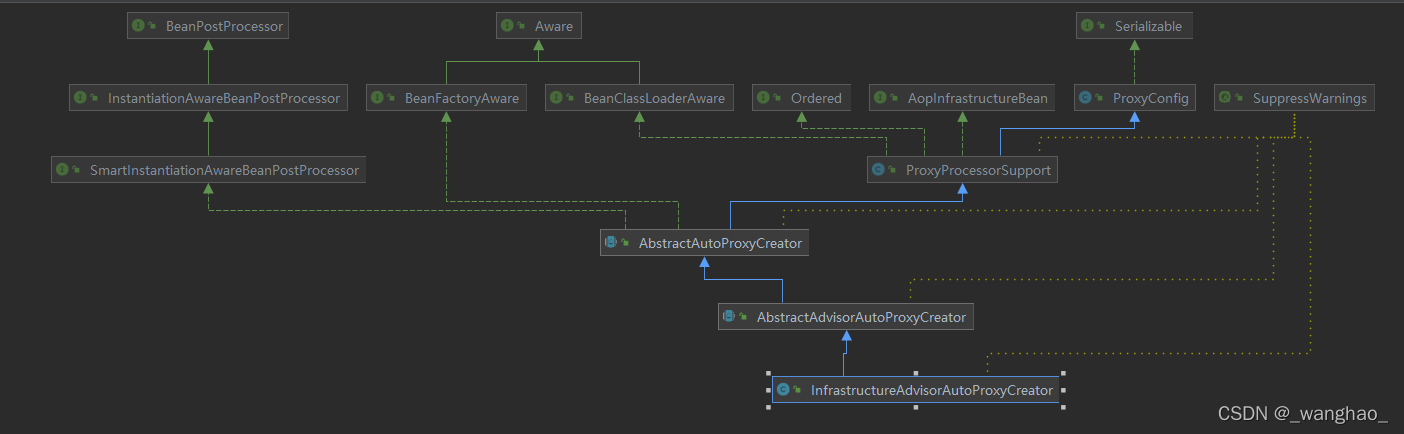
这里完成了InfrastructureAdvisorAutoProxyCreator的注入,InfrastructureAdvisorAutoProxyCreator的继承关系如下
对比下aop的
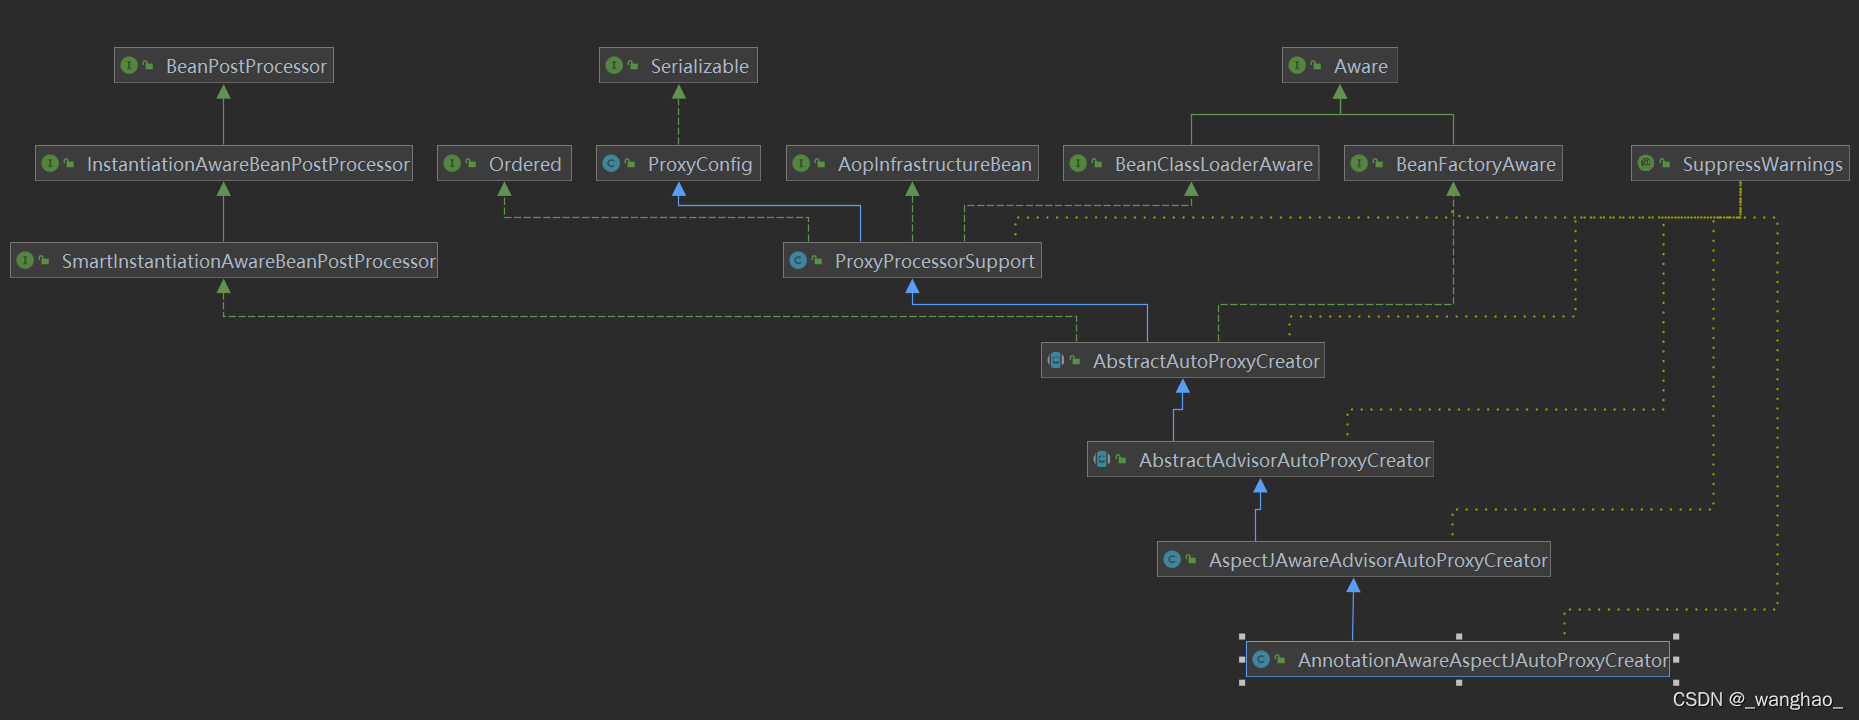
这一步最重要的就是向Spring容器注入了一个自动代理创建器: org.springframework.aop.config.internalAutoProxyCreator,这里有个小细节注意一下,由于AOP和事务注册的都是 名字为org.springframework.aop.config.internalAutoProxyCreator 的BeanPostProcessor,但是只会保留一个,AOP的会 覆盖事务的, 因为AOP优先级更大
所以假如@EnableTransactionManagement和@EnableAspectJAutoProxy 同时存在, 那么AOP的 AutoProxyCreator 会进行覆盖。
ProxyTransactionManagementConfiguration
这是一个配置类
@Configuration(proxyBeanMethods = false)
@Role(BeanDefinition.ROLE_INFRASTRUCTURE)
public class ProxyTransactionManagementConfiguration extends AbstractTransactionManagementConfiguration {

	//注入了一个advisor
	@Bean(name = TransactionManagementConfigUtils.TRANSACTION_ADVISOR_BEAN_NAME)
	@Role(BeanDefinition.ROLE_INFRASTRUCTURE)
	public BeanFactoryTransactionAttributeSourceAdvisor transactionAdvisor(
			TransactionAttributeSource transactionAttributeSource, TransactionInterceptor transactionInterceptor) {

		BeanFactoryTransactionAttributeSourceAdvisor advisor = new BeanFactoryTransactionAttributeSourceAdvisor();
		advisor.setTransactionAttributeSource(transactionAttributeSource);
		advisor.setAdvice(transactionInterceptor);
		if (this.enableTx != null) {
			advisor.setOrder(this.enableTx.<Integer>getNumber("order"));
		}
		return advisor;
	}

	// TransactionAttributeSource 这种类特别像 `TargetSource`这种类的设计模式
	// 这里直接使用的是AnnotationTransactionAttributeSource 基于注解的事务属性源
	@Bean
	@Role(BeanDefinition.ROLE_INFRASTRUCTURE)
	public TransactionAttributeSource transactionAttributeSource() {
		return new AnnotationTransactionAttributeSource();
	}


	// 事务拦截器,它是个`MethodInterceptor`,它也是Spring处理事务最为核心的部分
	// 请注意:你可以自己定义一个TransactionInterceptor(同名的),来覆盖此Bean(注意是覆盖)
	// 另外请注意:你自定义的BeanName必须同名,也就是必须名为:transactionInterceptor 否则两个都会注册进容器里面去
	@Bean
	@Role(BeanDefinition.ROLE_INFRASTRUCTURE)
	public TransactionInterceptor transactionInterceptor(TransactionAttributeSource transactionAttributeSource) {
		TransactionInterceptor interceptor = new TransactionInterceptor();
		// 事务的属性
		interceptor.setTransactionAttributeSource(transactionAttributeSource);
		// 事务管理器(也就是注解最终需要使用的事务管理器,父类已经处理好了)
		// 此处注意:我们是可议不用特殊指定的,最终它自己会去容器匹配一个适合的
		if (this.txManager != null) {
			interceptor.setTransactionManager(this.txManager);
		}
		return interceptor;
	}

}
分析下它的父类
@Configuration
//实现了ImportAware接口,可以拿到@Import所在类的所有注解信息
public abstract class AbstractTransactionManagementConfiguration implements ImportAware {

	@Nullable
	protected AnnotationAttributes enableTx;

	/**
	 * Default transaction manager, as configured through a {@link TransactionManagementConfigurer}.
	 */
	// 注解的默认的事务处理器(可通过实现接口TransactionManagementConfigurer来自定义配置)
	@Nullable
	protected TransactionManager txManager;


	@Override
	public void setImportMetadata(AnnotationMetadata importMetadata) {
		// 此处:只拿到@EnableTransactionManagement这个注解的就成~~~~~ 作为AnnotationAttributes保存起来
		this.enableTx = AnnotationAttributes.fromMap(
				importMetadata.getAnnotationAttributes(EnableTransactionManagement.class.getName(), false));
		if (this.enableTx == null) {
			throw new IllegalArgumentException(
					"@EnableTransactionManagement is not present on importing class " + importMetadata.getClassName());
		}
	}

	// 可以配置一个Bean实现这个接口。然后给注解驱动的给一个默认的事务管理器~~~~
	@Autowired(required = false)
	void setConfigurers(Collection<TransactionManagementConfigurer> configurers) {
		if (CollectionUtils.isEmpty(configurers)) {
			return;
		}
		if (configurers.size() > 1) {
			throw new IllegalStateException("Only one TransactionManagementConfigurer may exist");
		}
		TransactionManagementConfigurer configurer = configurers.iterator().next();
		this.txManager = configurer.annotationDrivenTransactionManager();
	}

	// 注册一个监听器工厂,用以支持@TransactionalEventListener注解标注的方法,来监听事务相关的事件
	// 通过事件监听模式来实现事务的监控~~~~
	@Bean(name = TransactionManagementConfigUtils.TRANSACTIONAL_EVENT_LISTENER_FACTORY_BEAN_NAME)
	@Role(BeanDefinition.ROLE_INFRASTRUCTURE)
	public static TransactionalEventListenerFactory transactionalEventListenerFactory() {
		return new TransactionalEventListenerFactory();
	}

}
这里相当于注册了一个Advisor,事务的流程跟aop类似
BeanFactoryTransactionAttributeSourceAdvisor
这个类里面有一个重要的属性 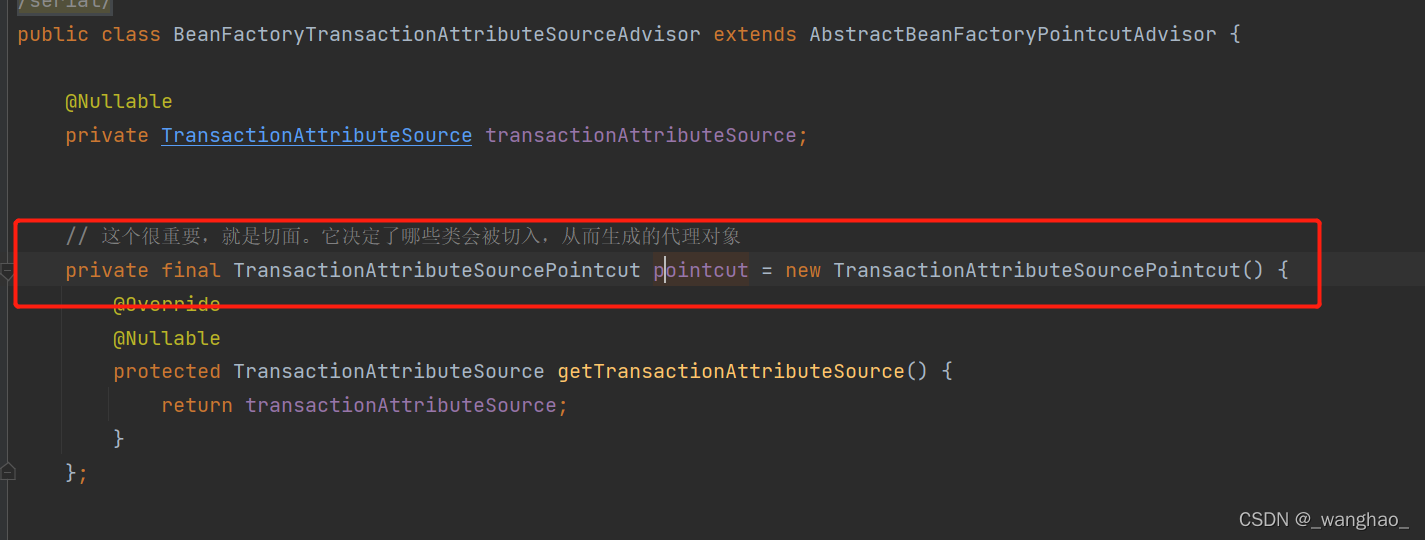
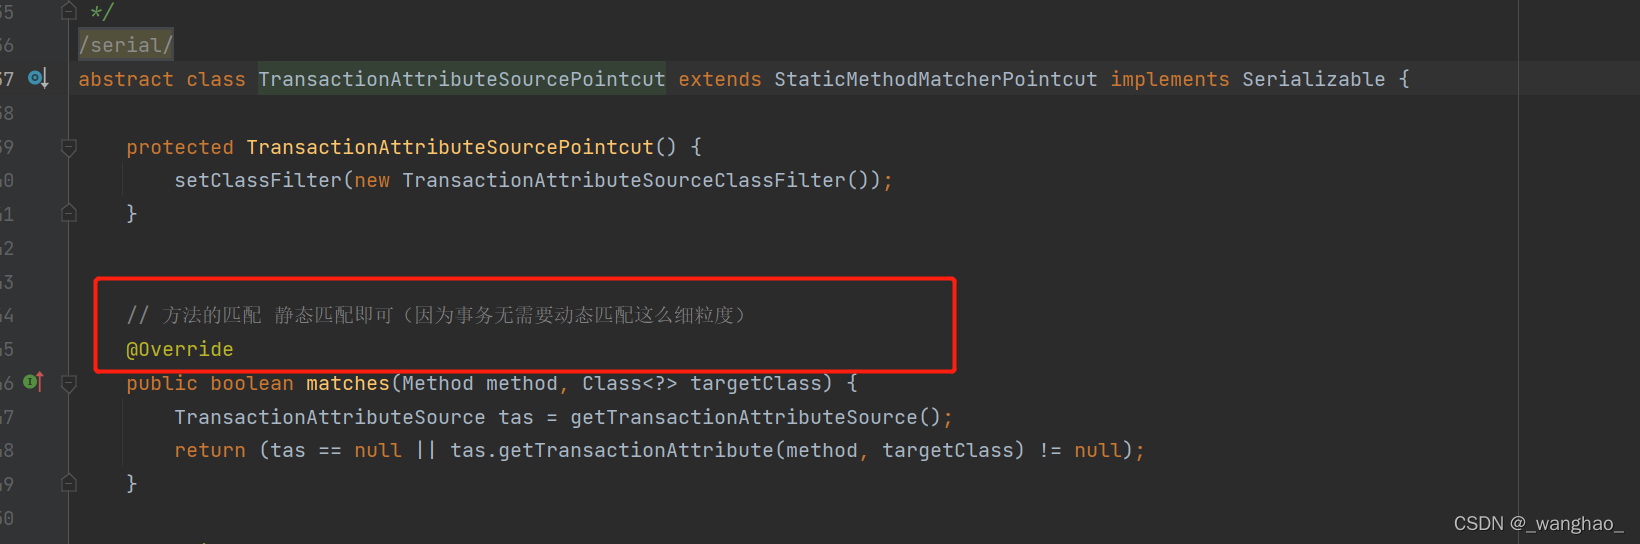
TransactionAttributeSourcePointcut
提供了matches方法,代理过程中会调用这个方法进行匹配,来判断是否需要事务
getTransactionAttribute方法最终在AbstractFallbackTransactionAttributeSource中实现
public TransactionAttribute getTransactionAttribute(Method method, @Nullable Class<?> targetClass) {
		if (method.getDeclaringClass() == Object.class) {
			return null;
		}

		// First, see if we have a cached value.
		Object cacheKey = getCacheKey(method, targetClass);
		TransactionAttribute cached = this.attributeCache.get(cacheKey);
		if (cached != null) {
			// Value will either be canonical value indicating there is no transaction attribute,
			// or an actual transaction attribute.
			if (cached == NULL_TRANSACTION_ATTRIBUTE) {
				return null;
			}
			else {
				return cached;
			}
		}
		else {
			// We need to work it out.
			TransactionAttribute txAttr = computeTransactionAttribute(method, targetClass);
			// Put it in the cache.
			if (txAttr == null) {
				this.attributeCache.put(cacheKey, NULL_TRANSACTION_ATTRIBUTE);
			}
			else {
				String methodIdentification = ClassUtils.getQualifiedMethodName(method, targetClass);
				if (txAttr instanceof DefaultTransactionAttribute) {
					((DefaultTransactionAttribute) txAttr).setDescriptor(methodIdentification);
				}
				if (logger.isTraceEnabled()) {
					logger.trace("Adding transactional method '" + methodIdentification + "' with attribute: " + txAttr);
				}
				this.attributeCache.put(cacheKey, txAttr);
			}
			return txAttr;
		}
	}
	```


 348
348


 被折叠的 条评论
为什么被折叠?
被折叠的 条评论
为什么被折叠?
 到【灌水乐园】发言


