


springcloud 服务配置中心
SpringCloud Config简介
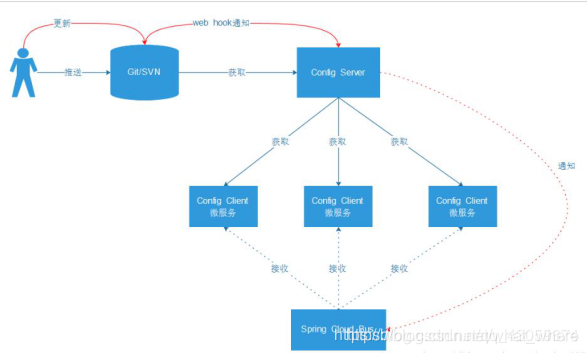
Spring Cloud Config 是 Spring Cloud 团队创建的一个全新项目,用来为分布式系统中的基础设施和微服务应用提供集中化的外部配置支持,它分为服务端与客户端两个部分。其中服务端也称为分布式配置中心,它是一个独立的微服务应用,用来连接配置仓库并为客户端提供获取配置信息、加密 / 解密信息等访问接口;而客户端则是微服务架构中的各个微服务应用或基础设施,它们通过指定的配置中心来管理应用资源与业务相关的配置内容,并在启动的时候从配置中心获取和加载配置信息。Spring Cloud Config 实现了对服务端和客户端中环境变量和属性配置的抽象映射,所以它除了适用于 Spring 构建的应用程序之外,也可以在任何其他语言运行的应用程序中使用。由于 Spring Cloud Config 实现的配置中心默认采用 Git 来存储配置信息,所以使用 Spring Cloud Config 构建的配置服务器,天然就支持对微服务应用配置信息的版本管理,并且可以通过 Git 客户端工具来方便的管理和访问配置内容。当然它也提供了对其他存储方式的支持,比如:GIT仓库、SVN 仓库、本地化文件系统。

Config Server端主要和Git/SVN服务器
通俗点,就是统一管理配置,包括方便切换环境配置,以及修改配置无需动代码,省心省力;
如果用上SpringCloud Bus,能实现无需重启,自动感知配置变化以及应用新配置;
Config Server基本使用
根据前面SpringCloud架构图,首先第一步,要搞个 configServer来联通远程GIT仓库,来读取远程配置;
这里GIT仓库,我们一般选用GitHub https://github.com/,或者码云 https://gitee.com/
我们这里用GitHub演示
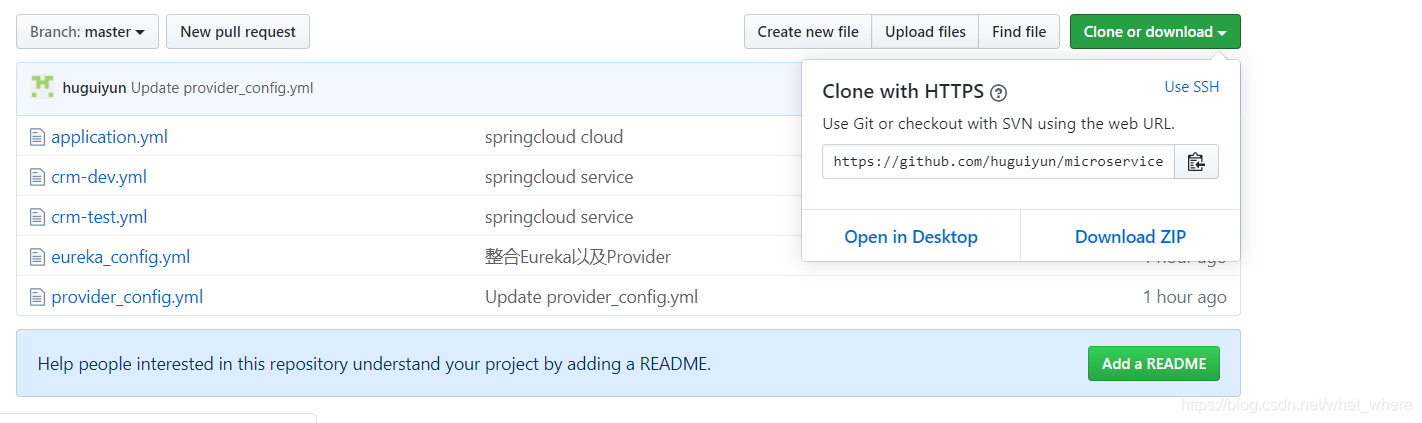
建个仓库 microservice-config 然后 Git下载本地;
上传一个配置文件上到git仓库,application.yml 记住要utf-8编码,否则乱码,解析各种问题;
application.yml 文件内容:
profile: hello

新建module:microservice-config-server-4001
pom.xml
<?xml version="1.0" encoding="UTF-8"?>
<project xmlns="http://maven.apache.org/POM/4.0.0" xmlns:xsi="http://www.w3.org/2001/XMLSchema-instance"
         xsi:schemaLocation="http://maven.apache.org/POM/4.0.0 https://maven.apache.org/xsd/maven-4.0.0.xsd">
    <modelVersion>4.0.0</modelVersion>
    <parent>
        <groupId>com.hu</groupId>
        <artifactId>hu-spring-cloud</artifactId>
        <version>1.0-SNAPSHOT</version>
    </parent>
    <artifactId>microservice-config</artifactId>
    <properties>
        <java.version>1.8</java.version>
    </properties>

    <dependencies>
        <dependency>
            <groupId>com.hu</groupId>
            <artifactId>microservice-common</artifactId>
            <version>1.0-SNAPSHOT</version>
        </dependency>
        <dependency>
            <groupId>org.springframework.boot</groupId>
            <artifactId>spring-boot-starter</artifactId>
        </dependency>

        <dependency>
            <groupId>org.springframework.boot</groupId>
            <artifactId>spring-boot-starter-test</artifactId>
            <scope>test</scope>
            <exclusions>
                <exclusion>
                    <groupId>org.junit.vintage</groupId>
                    <artifactId>junit-vintage-engine</artifactId>
                </exclusion>
            </exclusions>
        </dependency>

        <dependency>
            <groupId>org.springframework.cloud</groupId>
            <artifactId>spring-cloud-config-server</artifactId>
        </dependency>
    </dependencies>

    <build>
        <plugins>
            <plugin>
                <groupId>org.springframework.boot</groupId>
                <artifactId>spring-boot-maven-plugin</artifactId>
            </plugin>
        </plugins>
    </build>
</project>
启动类加上@EnableConfigServer注解:
package com.hu.microserviceconfig;

import org.springframework.boot.SpringApplication;
import org.springframework.boot.autoconfigure.SpringBootApplication;
import org.springframework.cloud.config.server.EnableConfigServer;


@EnableConfigServer
@SpringBootApplication
public class MicroserviceConfigApplication {

    public static void main(String[] args) {
        SpringApplication.run(MicroserviceConfigApplication.class, args);
    }

}
这里我们搞下仓库的Http地址:
然后项目的application.yml配置下:
这里要提到一点的是,如果你创建的是私库,就需要加上你的用户名和密码
server:
  port: 4001

spring:
  application:
    name:  microservice-config
  cloud:
    config:
      server:
        git:
          uri: https://github.com/huguiyun/microservice-config.git
测试:
启动我们的 config server 服务,然后访问 http://localhost:4001/application-xxx.yml,就会返回正确的文本结果;
请求路径匹配规则:
/{application}/{profile}[/{label}]
/{application}-{profile}.yml
/{label}/{application}-{profile}.yml
/{application}-{profile}.properties
/{label}/{application}-{profile}.properties
这里小编看到一篇比较详细的博文:
https://www.cnblogs.com/hellxz/p/9306507.html
Config Client基本使用
根据前面的config原理图,我们需要建立Client端调用server端,最终实现client端获取远程git配置信息;
为了后面演示方便,我们提交三个配置文件到远程git库;
application.yml:
---
spring:
  profiles:
    active: dev
---
spring:
  profiles: dev
port: 111
---
spring:
  profiles: test
port: 222
crm-dev.yml
port:
  777
crm-test.yml
port:
  312
然后我们新建一个module microservice-config-client-5001
加下依赖:
<dependency>
    <groupId>org.springframework.cloud</groupId>
    <artifactId>spring-cloud-starter-config</artifactId>
</dependency>
<dependency>
    <groupId>org.springframework.boot</groupId>
    <artifactId>spring-boot-starter-tomcat</artifactId>
</dependency>
<dependency>
    <groupId>org.springframework.boot</groupId>
    <artifactId>spring-boot-starter-web</artifactId>
</dependency>
我们项目启动的时候,就要调用server config端,获取配置信息,所以这里要bootstrap.yml配置文件,优先级最高:
spring:
  application:
    name: application-dev
  cloud:
    config:
      name: crm
      uri: http://localhost:4001
      profile: test
      label: master
      fail-fast: true
application.yml:
server:
 port: 5001
 context-path: /
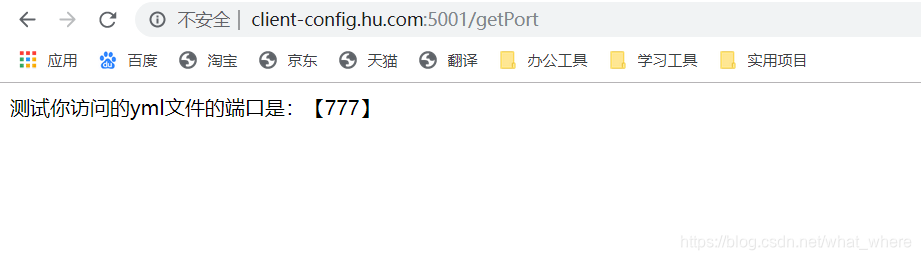
再搞一个 ConfigClientController 类 测试显示端口:
package com.hu.microserviceconfigclient5001.controller;

import org.springframework.beans.factory.annotation.Value;
import org.springframework.cloud.context.config.annotation.RefreshScope;
import org.springframework.web.bind.annotation.GetMapping;
import org.springframework.web.bind.annotation.RestController;

@RestController
@RefreshScope
public class ConfigClientController {

    @Value("${port}")
    private String port;

    @GetMapping("/getPort")
    public String getPort() {
        return "测试你访问的yml文件的端口是:【"+port+"】";
    }
}
启动项目访问 http://localhost:5001/getPort
这里小编加了Hosts加个本地域名映射:
Config整合Eureka
我们现在搞个实例来演示下,eureka整合config以及服务器提供者整合config,这样大伙可以举一反一,方便理解;
首先是eureka整合config
我们先搞个配置文件到git;
eureka_config.yml
spring:
  profiles:
    active:
    - dev
---
server:
  port: 2004
  context-path: /
spring:
  profiles: dev
eureka:
  instance:
    hostname: localhost
  client:
    register-with-eureka: false
    fetch-registry: false
    service-url:
      defaultZone: http://${eureka.instance.hostname}:${server.port}/eureka/
---
server:
  port: 2005
  context-path: /
spring:
  profiles: test
eureka:
  instance:
    hostname: localhost
  client:
    register-with-eureka: false
    fetch-registry: false
    service-url:
      defaultZone: http://${eureka.instance.hostname}:${server.port}/eureka/
新建module microservice-eureka-server-config-2004
pom.xml:
<dependency>
    <groupId>org.springframework.cloud</groupId>
    <artifactId>spring-cloud-starter-config</artifactId>
</dependency>
<dependency>
    <groupId>org.springframework.cloud</groupId>
    <artifactId>spring-cloud-starter-eureka-server</artifactId>
</dependency>
bootstrap.yml
spring:
  application:
    name: microservice-eureka-server-config
  cloud:
    config:
      name: eureka_config
      uri: http://localhost:4001  # 配置configserver地址
      profile: dev  # 级别
      label: master  # 分支 git中 默认master
application.yml
spring:
 application:
   name: microservice-eureka-server-config
启动类加上 @EnableEurekaServer 注解
package com.hu.microserviceeurekaserverconfig2004;

import org.springframework.boot.SpringApplication;
import org.springframework.boot.autoconfigure.SpringBootApplication;
import org.springframework.cloud.netflix.eureka.server.EnableEurekaServer;


@EnableEurekaServer
@SpringBootApplication
public class MicroserviceEurekaServerConfig2004Application {

    public static void main(String[] args) {
        SpringApplication.run(MicroserviceEurekaServerConfig2004Application.class, args);
    }
}
我们启动 microservice-config-server-4001
再启动 microservice-eureka-server-config-2004
测试连接 http://localhost:2004/
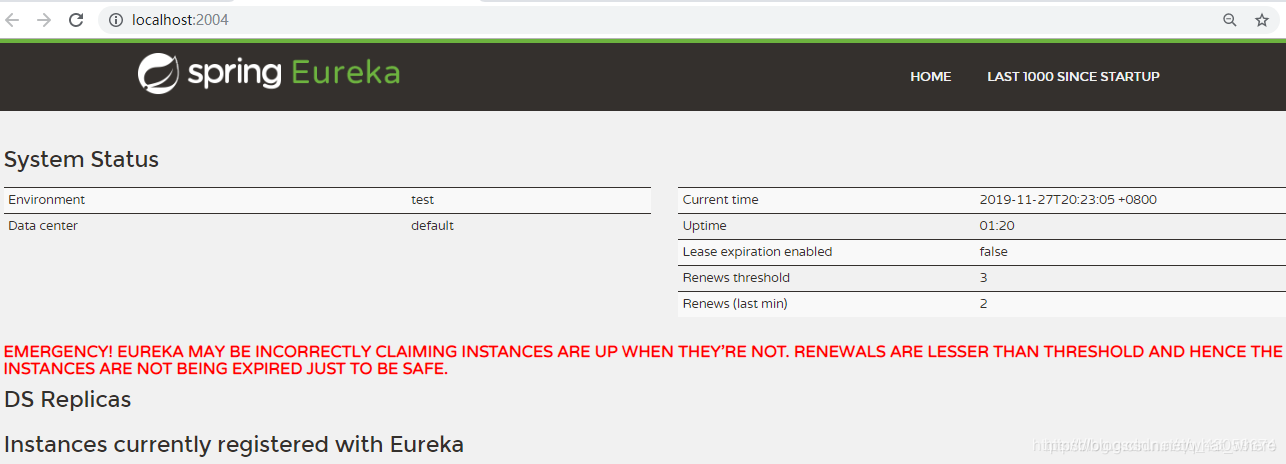
说明成功读取远程Git配置,然后eureka启动OK;
然后我们就是把服务提供者和config整合,把服务提供者注册到eureka;
我们搞个配置provider_config.yml,push到远程gitHub;
spring:
  profiles:
    active: dev
---
server:
  port: 1007
  context-path: /

# 数据源配置
spring:
  profiles: dev
  application:
    name: microservice-student
  datasource:
    type: com.alibaba.druid.pool.DruidDataSource
    driver-class-name: com.mysql.jdbc.Driver
    url: jdbc:mysql://localhost:3306/tb_stu?useUnicode=true&characterEncoding=UTF-8&useJDBCCompliantTimezoneShift=true&useLegacyDatetimeCode=false&serverTimezone=UTC
    username: root
    password: 123
  jpa:
    hibernate:
      ddl-auto: update
    show-sql: true

eureka:
  instance:
    hostname: localhost
    appname: microservice-student
    instance-id: microservice-student:1007
    prefer-ip-address: true
  client:
    service-url:
      defaultZone: http://localhost:2004/eureka

info:
  groupId: com.hu.testSpringcloud
  artifactId: microservice-student-provider-config-1007
  version: 1.0-SNAPSHOT
  userName: http://hu.com
  phone: 123456
---
server:
  port: 1008
  context-path: /

# 数据源配置
spring:
  profiles: test
  application:
    name: microservice-student
  datasource:
    type: com.alibaba.druid.pool.DruidDataSource
    driver-class-name: com.mysql.jdbc.Driver
    url: jdbc:mysql://localhost:3306/tb_stu?useUnicode=true&characterEncoding=UTF-8&useJDBCCompliantTimezoneShift=true&useLegacyDatetimeCode=false&serverTimezone=UTC
    username: root
    password: 123
  jpa:
    hibernate:
      ddl-auto: update
    show-sql: true

eureka:
  instance:
    hostname: localhost
    appname: microservice-student
    instance-id: microservice-student:1008
    prefer-ip-address: true
  client:
    service-url:
      defaultZone: http://localhost:2004/eureka

info:
  groupId: com.hu.testSpringcloud
  artifactId: microservice-student-provider-config-1008
  version: 1.0-SNAPSHOT
  userName: http://hu.com
  phone: 123456
新建module:microservice-student-provider-config
pom.xml:
<?xml version="1.0" encoding="UTF-8"?>
<project xmlns="http://maven.apache.org/POM/4.0.0" xmlns:xsi="http://www.w3.org/2001/XMLSchema-instance"
         xsi:schemaLocation="http://maven.apache.org/POM/4.0.0 https://maven.apache.org/xsd/maven-4.0.0.xsd">
    <modelVersion>4.0.0</modelVersion>
    <parent>
        <groupId>com.hu</groupId>
        <artifactId>cpc-spring-cloud</artifactId>
        <version>1.0-SNAPSHOT</version>
    </parent>
    <artifactId>microservice-student-provider-config-1004</artifactId>
    <properties>
        <java.version>1.8</java.version>
    </properties>

    <dependencies>
        <dependency>
            <groupId>com.hu</groupId>
            <artifactId>microservice-common</artifactId>
            <version>1.0-SNAPSHOT</version>
        </dependency>

        <dependency>
            <groupId>org.springframework.boot</groupId>
            <artifactId>spring-boot-starter-web</artifactId>
        </dependency>
        <dependency>
            <groupId>org.springframework.boot</groupId>
            <artifactId>spring-boot-starter-test</artifactId>
            <scope>test</scope>
        </dependency>
        <dependency>
            <groupId>org.springframework.boot</groupId>
            <artifactId>spring-boot-starter-data-jpa</artifactId>
        </dependency>
        <dependency>
            <groupId>mysql</groupId>
            <artifactId>mysql-connector-java</artifactId>
        </dependency>
        <dependency>
            <groupId>org.springframework.boot</groupId>
            <artifactId>spring-boot-starter-tomcat</artifactId>
        </dependency>
        <dependency>
            <groupId>com.alibaba</groupId>
            <artifactId>druid-spring-boot-starter</artifactId>
        </dependency>
        <!--  修改后立即生效,热部署  -->
        <dependency>
            <groupId>org.springframework</groupId>
            <artifactId>springloaded</artifactId>
        </dependency>
        <dependency>
            <groupId>org.springframework.boot</groupId>
            <artifactId>spring-boot-devtools</artifactId>
        </dependency>

        <!--添加注册中心Eureka相关配置-->
        <dependency>
            <groupId>org.springframework.cloud</groupId>
            <artifactId>spring-cloud-starter-eureka</artifactId>
        </dependency>
        <dependency>
            <groupId>org.springframework.cloud</groupId>
            <artifactId>spring-cloud-starter-config</artifactId>
        </dependency>
        <!-- actuator监控引入 -->
        <dependency>
            <groupId>org.springframework.boot</groupId>
            <artifactId>spring-boot-starter-actuator</artifactId>
        </dependency>
    </dependencies>

    <build>
        <plugins>
            <plugin>
                <groupId>org.springframework.boot</groupId>
                <artifactId>spring-boot-maven-plugin</artifactId>
            </plugin>
        </plugins>
    </build>
</project>
bootstrap.yml:
spring:
  application:
    name: microservice-student-provider-config
  cloud:
    config:
      name: provider_config
      uri: http://localhost:4001  # 配置configserver地址
      profile: dev  # 级别
      label: master  # 分支 git中 默认master
application.yml
spring:
  application:
    name: microservice-student-provider-config
启动下这个项目;
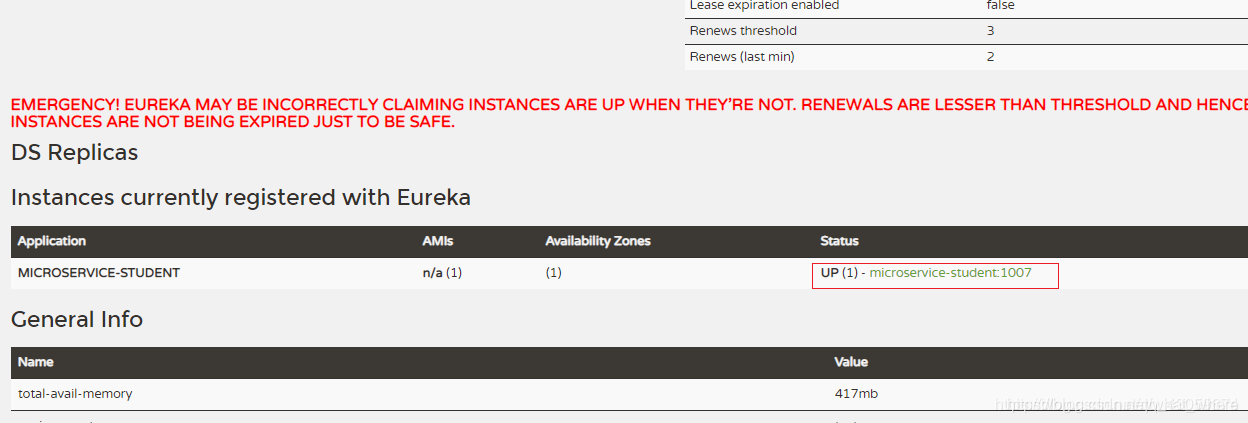
说明成功注册到服务注册中心了;


 914
914


 被折叠的 条评论
为什么被折叠?
被折叠的 条评论
为什么被折叠?
 到【灌水乐园】发言


