


咱们废话不多说,直接开干!!!
目录
一、项目目录
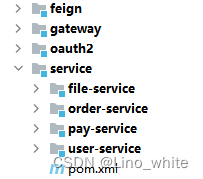
feign:远程接口调用
Gateway:资源服务器
Oauth2:授权服务器
user-service: 普通资源
二、Token
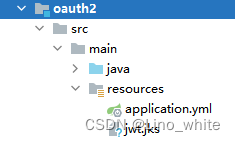
对于Token采用非对称加密,因此到 java 的 bin 目录下打开 cmd,执行以下命令,生成 jwt.jks
keytool -genkey -alias jwt -keyalg RSA -keystore jwt.jks将其复制到 oauth2 的 resource 目录下,
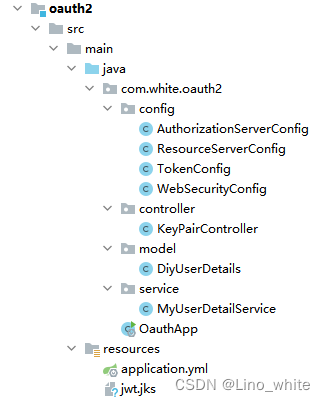
三、授权服务器oauth
1.pom
    <dependencies>
        <dependency>
            <groupId>org.springframework.cloud</groupId>
            <artifactId>spring-cloud-starter-openfeign</artifactId>
        </dependency>
        <dependency>
            <groupId>org.springframework.cloud</groupId>
            <artifactId>spring-cloud-starter-loadbalancer</artifactId>
        </dependency>
        <dependency>
            <groupId>org.springframework.boot</groupId>
            <artifactId>spring-boot-starter-web</artifactId>
        </dependency>
        <dependency>
            <groupId>com.alibaba.cloud</groupId>
            <artifactId>spring-cloud-starter-alibaba-nacos-discovery</artifactId>
        </dependency>
        <dependency>
            <groupId>org.springframework.cloud</groupId>
            <artifactId>spring-cloud-starter-oauth2</artifactId>
        </dependency>
        <dependency>
            <groupId>mysql</groupId>
            <artifactId>mysql-connector-java</artifactId>
        </dependency>
        <!--jwt token -->
        <dependency>
            <groupId>org.springframework.security</groupId>
            <artifactId>spring-security-oauth2-jose</artifactId>
        </dependency>
        <dependency>
            <groupId>org.springframework.security</groupId>
            <artifactId>spring-security-oauth2-resource-server</artifactId>
        </dependency>
        <!--springboot_redis 缓存 -->
        <dependency>
            <groupId>org.springframework.boot</groupId>
            <artifactId>spring-boot-starter-data-redis</artifactId>
        </dependency>
        <dependency>
            <groupId>com.baomidou</groupId>
            <artifactId>mybatis-plus-boot-starter</artifactId>
        </dependency>
        <dependency>
            <groupId>com.white.feign</groupId>
            <artifactId>feign</artifactId>
            <version>1.0</version>
            <scope>compile</scope>
        </dependency>
        <dependency>
            <groupId>com.white</groupId>
            <artifactId>common</artifactId>
            <version>1.0</version>
            <scope>compile</scope>
        </dependency>
    </dependencies>
2.application
server:
  port: 8101
  servlet:
    context-path: /uaa
spring:
  application:
    name: oauth-service
  datasource:
    url: jdbc:mysql://localhost:3306/pay_system?useUnicode=true
    driver-class-name: com.mysql.cj.jdbc.Driver
    username: root
    password: 12345
  main:
    allow‐bean‐definition‐overriding: true
    allow-circular-references: true
  cloud:
    nacos:
      discovery:
        server-addr: 127.0.0.1:8848
    sentinel:
      transport:
        dashboard: localhost:8080
feign:
  sentinel:
    enabled: true
3.OauthApp启动类
@SpringBootApplication
@EnableFeignClients(basePackages = "com.white.feign.client")
@EnableDiscoveryClient
public class OauthApp
{
    public static void main( String[] args )
    {
        SpringApplication.run(OauthApp.class,args);
    }
}
4.DiyUserDetails
package com.white.oauth2.model;

import com.white.feign.model.User;
import lombok.AllArgsConstructor;
import lombok.Data;
import lombok.NoArgsConstructor;
import org.springframework.beans.factory.annotation.Autowired;
import org.springframework.security.core.GrantedAuthority;
import org.springframework.security.core.authority.SimpleGrantedAuthority;
import org.springframework.security.core.userdetails.UserDetails;
import org.springframework.util.StringUtils;

import java.util.ArrayList;
import java.util.Collection;
import java.util.List;

@Data
@AllArgsConstructor
@NoArgsConstructor
public class DiyUserDetails extends User implements UserDetails {
    private String username;
    private String password;

    private List<GrantedAuthority> authorities;//授权的
    @Override
    public Collection<? extends GrantedAuthority> getAuthorities() {
        return authorities;
    }

    @Override
    public String getPassword() {
        return password;
    }

    @Override
    public String getUsername() {
        return username;
    }

    @Override
    public boolean isAccountNonExpired() {
        return true;
    }

    @Override
    public boolean isAccountNonLocked() {
        return true;
    }

    @Override
    public boolean isCredentialsNonExpired() {
        return true;
    }

    @Override
    public boolean isEnabled() {
        return true;
    }
}
5.MyUserDetailService
这里的UserFeign是在feign模块下定义的
package com.white.oauth2.service;

import com.white.feign.client.UserFeign;
import com.white.feign.model.User;
import com.white.oauth2.model.DiyUserDetails;
import lombok.extern.slf4j.Slf4j;
import org.springframework.beans.factory.annotation.Autowired;
import org.springframework.security.core.GrantedAuthority;
import org.springframework.security.core.authority.AuthorityUtils;
import org.springframework.security.core.userdetails.UserDetails;
import org.springframework.security.core.userdetails.UserDetailsService;
import org.springframework.security.core.userdetails.UsernameNotFoundException;
import org.springframework.stereotype.Service;

import java.util.List;

/**
 * 作用:
 * @author: white文
 * @time: 2023/5/23 11:00
 */
@Slf4j
@Service
public class MyUserDetailService implements UserDetailsService {

    @Autowired
    UserFeign userFeign;

    @Override
    public UserDetails loadUserByUsername(String username) throws UsernameNotFoundException {
        log.info("********开始loadUserByUsername********");
        User user = userFeign.findUser_ByUsername(username);
        if (user==null) throw new UsernameNotFoundException(username);
        List<GrantedAuthority> grantedAuthorities = AuthorityUtils
                .commaSeparatedStringToAuthorityList(user.getIdentity());
        DiyUserDetails details=new DiyUserDetails();
        details.setUsername(username);
        details.setPassword(user.getPassword());
        details.setAuthorities(grantedAuthorities);
        log.info("查询到user为"+user.getUsername()+" 密码"+user.getPassword());
        return details;
    }
}
6.KeyPairController
package com.white.oauth2.controller;

import com.nimbusds.jose.jwk.JWKSet;
import com.nimbusds.jose.jwk.RSAKey;
import org.springframework.beans.factory.annotation.Autowired;
import org.springframework.web.bind.annotation.GetMapping;
import org.springframework.web.bind.annotation.RestController;

import java.security.KeyPair;

import java.security.interfaces.RSAPublicKey;
import java.util.Map;

/**
 * 获取RSA公钥接口
 */
@RestController
public class KeyPairController {

    @Autowired
    private KeyPair keyPair;

    @GetMapping("/rsa/publicKey")
    public Map<String, Object> getKey() {
        RSAPublicKey publicKey = (RSAPublicKey) keyPair.getPublic();
        RSAKey key = new RSAKey.Builder(publicKey).build();
        return new JWKSet(key).toJSONObject();
    }

}
7.TokenConfig
package com.white.oauth2.config;

import org.springframework.context.annotation.Bean;
import org.springframework.context.annotation.Configuration;
import org.springframework.core.io.ClassPathResource;
import org.springframework.security.oauth2.provider.token.TokenStore;
import org.springframework.security.oauth2.provider.token.store.JwtAccessTokenConverter;
import org.springframework.security.oauth2.provider.token.store.JwtTokenStore;
import org.springframework.security.rsa.crypto.KeyStoreKeyFactory;

import java.security.KeyPair;

@Configuration
public class TokenConfig {
    public static String KEY="white";

    @Bean
    public TokenStore tokenStore(){
        return new JwtTokenStore(jwtAccessTokenConverter());   //  jwt令牌存储方案
    }

    /**
     * 使用非对称加密算法对token签名
     */
    @Bean
    public JwtAccessTokenConverter jwtAccessTokenConverter() {
        JwtAccessTokenConverter converter = new JwtAccessTokenConverter();
        converter.setKeyPair(keyPair());
        return converter;
    }

    /**
     * 从classpath下的密钥库中获取密钥对(公钥+私钥)
     */
    @Bean
    public KeyPair keyPair() {
        KeyStoreKeyFactory factory = new KeyStoreKeyFactory(
                new ClassPathResource("jwt.jks"), "white1".toCharArray());
        KeyPair keyPair = factory.getKeyPair(
                "jwt", "white1".toCharArray());
        return keyPair;
    }
}
8.WebSecurityConfig
package com.white.oauth2.config;

import com.white.oauth2.service.MyUserDetailService;
import org.springframework.beans.factory.annotation.Autowired;
import org.springframework.context.annotation.Bean;
import org.springframework.context.annotation.Configuration;
import org.springframework.security.authentication.AuthenticationManager;
import org.springframework.security.config.annotation.authentication.builders.AuthenticationManagerBuilder;
import org.springframework.security.config.annotation.web.builders.HttpSecurity;
import org.springframework.security.config.annotation.web.configuration.EnableWebSecurity;
import org.springframework.security.config.annotation.web.configuration.WebSecurityConfigurerAdapter;
import org.springframework.security.crypto.bcrypt.BCryptPasswordEncoder;
import org.springframework.security.crypto.password.PasswordEncoder;

@Configuration
@EnableWebSecurity
public class WebSecurityConfig extends WebSecurityConfigurerAdapter {
    @Autowired
    private MyUserDetailService myUserDetailService;

    @Bean
    public AuthenticationManager authenticationManagerBean() throws Exception {
        return super.authenticationManagerBean();
    }


    @Bean
    //配置密码加密器
    public PasswordEncoder passwordEncoder(){return new BCryptPasswordEncoder();}

    @Override
    protected void configure(AuthenticationManagerBuilder auth) throws Exception {
        auth.userDetailsService(myUserDetailService).passwordEncoder(passwordEncoder());
    }

    @Override
    protected void configure(HttpSecurity http) throws Exception {
        http.authorizeRequests()
                // 这里要对以下路径放行
                .antMatchers("/oauth/**","/login/**","/logout/**","/rsa/publicKey")
                .permitAll()
                .anyRequest().authenticated()
                .and()
                .formLogin().permitAll()
                .and()
                .csrf().disable()
                .httpBasic().disable() // 禁用弹出式认证框
        ;
    }
}
9.ResourceServerConfig
package com.white.oauth2.config;

import org.springframework.beans.factory.annotation.Autowired;
import org.springframework.context.annotation.Bean;
import org.springframework.context.annotation.Configuration;
import org.springframework.security.config.annotation.web.builders.HttpSecurity;
import org.springframework.security.config.http.SessionCreationPolicy;
import org.springframework.security.oauth2.config.annotation.web.configuration.EnableResourceServer;
import org.springframework.security.oauth2.config.annotation.web.configuration.ResourceServerConfigurerAdapter;
import org.springframework.security.oauth2.config.annotation.web.configurers.ResourceServerSecurityConfigurer;
import org.springframework.security.oauth2.provider.token.TokenStore;
import org.springframework.security.oauth2.provider.token.store.JwtAccessTokenConverter;
import org.springframework.security.oauth2.provider.token.store.JwtTokenStore;

@Configuration
@EnableResourceServer
public class ResourceServerConfig extends ResourceServerConfigurerAdapter {
    @Autowired
    TokenStore tokenStore;
    public String RESOURCE_ID="USER";

    @Override
    public void configure(ResourceServerSecurityConfigurer resources) throws Exception {
        resources.resourceId(RESOURCE_ID)
                .tokenStore(tokenStore)
                .stateless(true);
    }

    @Override
    public void configure(HttpSecurity http) throws Exception {
        //设置需要进行保护的资源路径,默认的情况下是保护资源服务的全部路径
        http
                .authorizeRequests().anyRequest()
                .authenticated()
                .and()
                // 因为查询数据库中的user,用的是feign模块下的UserFeign远程接口调用
                //      对应的就是user路径,所以需要对user路径放行
                .requestMatchers()
                .antMatchers("/user/**")
                .and()
                .formLogin().permitAll()
                //关闭跨域伪造检查
                .and().csrf().disable()
                //把session设置为无状态,意思是使用了token,那么session不再做数据的记录
                .sessionManagement().sessionCreationPolicy(SessionCreationPolicy.STATELESS);
    }
}
10.AuthorizationServerConfig
package com.white.oauth2.config;

import org.springframework.beans.factory.annotation.Autowired;
import org.springframework.context.annotation.Bean;
import org.springframework.context.annotation.Configuration;
import org.springframework.http.HttpMethod;
import org.springframework.security.authentication.AuthenticationManager;
import org.springframework.security.crypto.password.PasswordEncoder;
import org.springframework.security.oauth2.config.annotation.configurers.ClientDetailsServiceConfigurer;
import org.springframework.security.oauth2.config.annotation.web.configuration.AuthorizationServerConfigurerAdapter;
import org.springframework.security.oauth2.config.annotation.web.configuration.EnableAuthorizationServer;
import org.springframework.security.oauth2.config.annotation.web.configurers.AuthorizationServerEndpointsConfigurer;
import org.springframework.security.oauth2.config.annotation.web.configurers.AuthorizationServerSecurityConfigurer;
import org.springframework.security.oauth2.provider.ClientDetailsService;
import org.springframework.security.oauth2.provider.client.JdbcClientDetailsService;
import org.springframework.security.oauth2.provider.code.AuthorizationCodeServices;
import org.springframework.security.oauth2.provider.code.JdbcAuthorizationCodeServices;
import org.springframework.security.oauth2.provider.token.*;
import org.springframework.security.oauth2.provider.token.store.JwtAccessTokenConverter;
import org.springframework.security.oauth2.provider.token.store.JwtTokenStore;

import javax.sql.DataSource;
import java.util.Arrays;
import java.util.List;

/**
 * @AuthorizationServerConfig.java的作用:认证服务器配置
 * @author: white文
 * @time: 2023/5/22 1:02
 */
@Configuration
@EnableAuthorizationServer
public class AuthorizationServerConfig extends AuthorizationServerConfigurerAdapter {

    @Autowired
    ClientDetailsService clientDetailsService;
    @Autowired
    JwtAccessTokenConverter accessTokenConverter;
    @Autowired
    TokenStore tokenStore;
    @Autowired
    private PasswordEncoder passwordEncoder;
    @Autowired
    private AuthenticationManager authenticationManager;
    @Autowired
    private AuthorizationCodeServices authorizationCodeServices;

    @Bean
    public AuthorizationServerTokenServices tokenServices() {
        DefaultTokenServices services = new DefaultTokenServices();
        services.setClientDetailsService(clientDetailsService);
        services.setSupportRefreshToken(true);
        services.setTokenStore(tokenStore);
        TokenEnhancerChain tokenEnhancerChain = new TokenEnhancerChain();
        tokenEnhancerChain.setTokenEnhancers(Arrays.<TokenEnhancer>asList(accessTokenConverter));
        services.setTokenEnhancer(tokenEnhancerChain);
        services.setAccessTokenValiditySeconds(7200);
        services.setRefreshTokenValiditySeconds(259200);
        return services;
    }


    @Bean
    public ClientDetailsService clientDetailsService(DataSource dataSource) {
        ClientDetailsService clientDetailsService = new JdbcClientDetailsService(dataSource);
        ((JdbcClientDetailsService) clientDetailsService).setPasswordEncoder(passwordEncoder);
        return clientDetailsService;
    }

    //  配置令牌的访问端点
    @Bean
    public AuthorizationCodeServices authorizationCodeServices(DataSource dataSource) {
        //设置授权码模式的授权码如何存取
        return new JdbcAuthorizationCodeServices(dataSource);
    }

    /*
     * 1 用来配置客户端详情服务
     * */
    @Override
    public void configure(ClientDetailsServiceConfigurer clients) throws Exception {
        clients.withClientDetails(clientDetailsService);
    }

    /*
     * 2 配置令牌(token)的访问端点和令牌服务
     * */
    @Override
    public void configure(AuthorizationServerEndpointsConfigurer endpoints) throws Exception {
        endpoints
                .authenticationManager(authenticationManager)
                .authorizationCodeServices(authorizationCodeServices)
                .tokenServices(tokenServices())
                .allowedTokenEndpointRequestMethods(HttpMethod.POST);
    }

    /*
     * 3 配置令牌端点的安全约束
     *   授权服务安全配置:配置哪些路径放行(检查token的路径要放行)
     * */
    @Override
    public void configure(AuthorizationServerSecurityConfigurer security) throws Exception {
        security.checkTokenAccess("permitAll()")   //对应/oauth/check_token ,路径公开
                .tokenKeyAccess("permitAll()")  // 当使用JwtToken且使用非对称加密时,资源服务用于获取公钥而开放的,这里指这个 endpoint完全公开
                .allowFormAuthenticationForClients(); //允许客户端进行表单身份验证,使用表单认证申请令牌
    }
}
11.授权码模式说明与创建数据表
在这里,授权码模式是基于数据库的,而不是基于内存的,如果基于内存需要写死,这不符合灵活性的要求,所以上面的授权码认证都是基于数据库的,而在上面的application我们已经指定数据库的地址,接下来在指定的数据库中 创建两个数据表 就行,oauth会自动到数据库中找到指定两个数据表名称,并对其进行操作。
CREATE TABLE `oauth_client_details` (
  `client_id` VARCHAR(256) CHARACTER SET utf8 NOT NULL COMMENT '客户端唯一标识ID',
  `resource_ids` VARCHAR(256) CHARACTER SET utf8 DEFAULT NULL COMMENT '客户端所能访问的资源id集合',
  `client_secret` VARCHAR(256) CHARACTER SET utf8 DEFAULT NULL COMMENT '客户端访问密匙',
  `scope` VARCHAR(256) CHARACTER SET utf8 DEFAULT NULL COMMENT '客户端申请的权限范围',
  `authorized_grant_types` VARCHAR(256) CHARACTER SET utf8 DEFAULT NULL COMMENT '客户端授权类型',
  `web_server_redirect_uri` VAR`pay_system`CHAR(256) CHARACTER SET utf8 DEFAULT NULL COMMENT '客户端的重定向URI',
  `authorities` VARCHAR(256) CHARACTER SET utf8 DEFAULT NULL COMMENT '客户端所拥有的权限值',
  `access_token_validity` INT(11) DEFAULT NULL COMMENT '客户端access_token的有效时间(单位:秒)',
  `refresh_token_validity` INT(11) DEFAULT NULL,
  `additional_information` VARCHAR(4096) CHARACTER SET utf8 DEFAULT NULL COMMENT '预留的字段',
  `autoapprove` VARCHAR(256) CHARACTER SET utf8 DEFAULT NULL COMMENT '是否跳过授权(true是,false否)',
  PRIMARY KEY (`client_id`)
) ENGINE=INNODB DEFAULT CHARSET=utf8mb4 COMMENT='客户端授权表'

CREATE TABLE `oauth_code` (
`create_time` TIMESTAMP(0) NOT NULL DEFAULT CURRENT_TIMESTAMP,
`code` VARCHAR(255) CHARACTER SET utf8 COLLATE utf8_general_ci NULL DEFAULT NULL,
`authentication` BLOB NULL,
INDEX `code_index`(`code`) USING BTREE
) ENGINE = INNODB CHARACTER SET = utf8 COLLATE = utf8_general_ci ROW_FORMAT = COMPACT;并且新增一条oauth_client_details表的测试数据:client_secret的明文:111
| client_id | resource_ids | client_secret |
| 123 | USER | $2a$10$1fAQjm5L.1a52uYklwiIMOKgZpye2ctD6Wv/V1Er8LWh1uyv1wRDG |
| scope | authorized_grant_types | web_server_redirect_uri | authorities | access_token_validity |
| all | authorization_code,refresh_token | http://localhost:10000 | null | 7200 |
| refresh_token_validity | additional_information | autoapprove |
| null | null | true |
12.测试
到这里,授权服务器就做好了,我们可以进行测试,注意:在数据表中的测试数据跟请求的链接相关:
(1)获取授权码
- 输入以下地址(该地址的相关信息跟数据表必须保持一致),自动跳转到login路径下
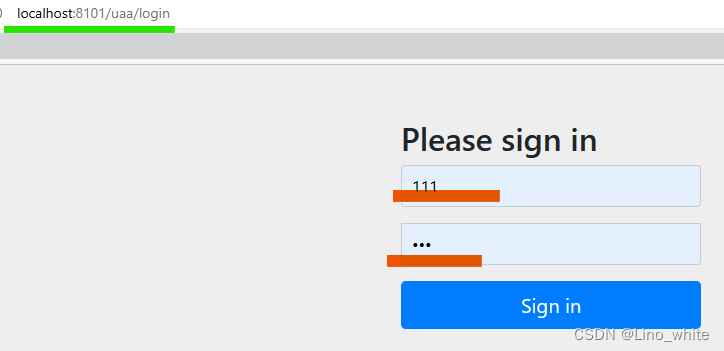
- 输入用户名和密码,这里是指你自己的微服务中的用户模块,输入后会通过远程调用UserFeign中指定的服务模块,其下的指定接口。也就是说,在做授权服务器outh2之前,你自己得用user模块,做一个简单的接口即可,查询数据库中指定的用户名
- 登录成功后就会跳转到指定的重定向路径,并在其尾部有着code参数,即授权码
![]()
(2)获取令牌
- 接下来将授权码代入该地址,来 获取令牌 token

这里的access_token是我们去请求资源时使用的token,而refresh_token只有在我们需要刷新token的时候才用得到。
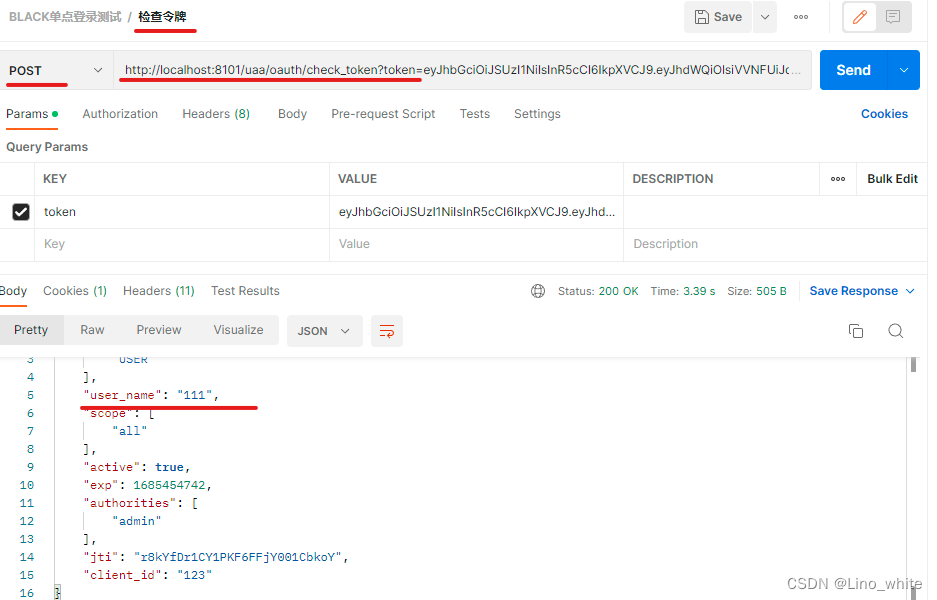
(3)检查令牌
- 可以拿着access_token值去以下地址 检查令牌 ,得到令牌中包含的数据
http://localhost:8101/uaa/oauth/check_token?token=eyJhbGciOiJSUzI1NiIsInR5cCI6IkpXVCJ9.eyJhdWQiOlsiVVNFUiJdLCJ1c2VyX25hbWUiOiIxMTEiLCJzY29wZSI6WyJhbGwiXSwiZXhwIjoxNjg1NjI5MTU4LCJhdXRob3JpdGllcyI6WyJhZG1pbiJdLCJqdGkiOiJjMlVWSHhPekR6TjFvd3pDMjJRazQwZEktTFEiLCJjbGllbnRfaWQiOiIxMjMifQ.eNpZ9hjAP8MpWIVYzlVeBYhqAbBI9MU5yH8m1kc8EpnCERJtR9cdTbe-1YtqYDFrpgMYpxU2qW8OQDXr74FKj75CCB6Ik-411sGU91Ue7PSa_GKDWujT-0eJavDmDPGRKxS1lhgNdXL1BXGgS38miSa_tNnDoPOx_bydte-Mhi9m9PGBPCyF3taXXV_ARyzBXu183S5Dmv8B_CBNrAk6o7AJPBBBDyNq_puIzR_-HviOHVVsfb1-4qk8wXinS8dZMSJGycay4DKIS7PX8So1IWdXbr4l6SEddFQpnUJ70Af-zNtsFoWUIw_udv4YUZjSlW0IrjqEpXmv2rkGjYMlbQ
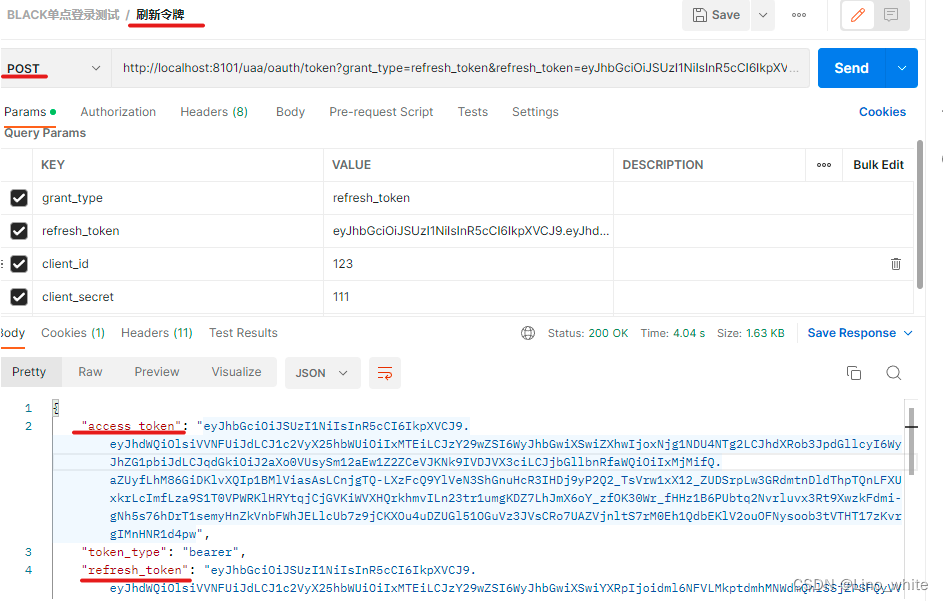
(4)刷新令牌
- 当令牌过期时,拿着refresh_token去以下地址 刷新令牌,即可拿到新的令牌token
http://localhost:8101/uaa/oauth/token?grant_type=refresh_token&refresh_token=eyJhbGciOiJSUzI1NiIsInR5cCI6IkpXVCJ9.eyJhdWQiOlsiVVNFUiJdLCJ1c2VyX25hbWUiOiIxMTEiLCJzY29wZSI6WyJhbGwiXSwiYXRpIjoicjhrWWZEcjFDWTFQS0Y2RkZqWTAwMUNia29ZIiwiZXhwIjoxNjg1NzA2NzQyLCJhdXRob3JpdGllcyI6WyJhZG1pbiJdLCJqdGkiOiJhNjNGVkV4N3RHX194UXJDQi05YnBmUWxWakUiLCJjbGllbnRfaWQiOiIxMjMifQ.arUqGU9gpyjZ3g4RsaJDtHHq7jDUgjTfdHwpzdWydM4v7kmvusYb_E9NV7It9GkcRwdpFZBYELaUgM2VIbmon6pMC1TE7LZXb44anSRcUYI8OfiYoSQ8XiJlY8CgNC9wrspWLkw4fXypGUUDUSY6yVS3l_8-kkVi0-EirBFVzNq0rBjlWr1mhGdHZib7JLqPfAdIqC0MDYhXgv4v0ikthkTjz1iDQEDVpJYpx9QXmITnxXCxFtKTSNluzv7M8gJJaJophV1jGF4A6Q8Kt2U_dmxRd07AUSb4dCyik_LOhATPhYYSp9aP7DLnF9bU0u_3_ocp90dxXy3GJwRLQrQ-rQ&client_id=123&client_secret=111
四、user-service模块与feign模块
由于user-service模块跟feign模块没有涉及到oauth2,也没有导入相关依赖包。
user-service模块作为一个普通的资源模块,feign模块也只是远程调用了user-service模块中的根据用户名查询用户信息给上面的outh2模块而已。
所以,这不是该文章的重点,故不做展示。
五、gateway模块 资源服务器
到此,我们的授权管理器已经结束了,资源服务器在实际开发有两种实现方式:
(1)gateway做网关转发,不做资源服务器,由各个微服务模块自己去做资源服务器;
(2)gateway做网关转发并且做资源服务器。
前者方案使得每一个微服务模块都需要导入oauth2相关依赖,并且做处理,过于繁琐且耦合高。
所以本文章在接下来会采用后者方案进行介绍,也就是文章的重点,并且会介绍到如何解决通过gateway去认证授权,跳转到oauth2认证授权后,跳转不回或重定向不到gatway的bug。
至于我们的gateway模块,会放在下一个文章进行介绍,文章地址将在评论区中展示。
最后,祝大家六一儿童节快乐~~~~~,谁还不是一个宝宝呢!!!


 1万+
1万+


 被折叠的 条评论
为什么被折叠?
被折叠的 条评论
为什么被折叠?
 到【灌水乐园】发言


