一、搭建父工程
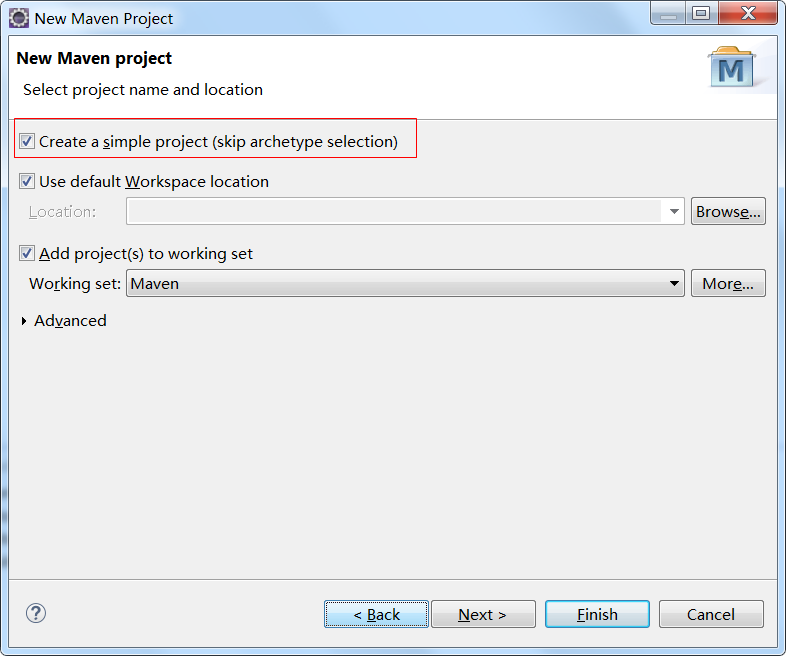
1、选择新建maven project
2、跳过骨架选择
3、选择打包方式为pom
4、在pom.xml中导入必要的jar包坐标
<project xmlns="http://maven.apache.org/POM/4.0.0" xmlns:xsi="http://www.w3.org/2001/XMLSchema-instance" xsi:schemaLocation="http://maven.apache.org/POM/4.0.0 http://maven.apache.org/xsd/maven-4.0.0.xsd">
  <modelVersion>4.0.0</modelVersion>
  <groupId>cn.itcast.crm</groupId>
  <artifactId>ssh_parent</artifactId>
  <version>0.0.1-SNAPSHOT</version>
  <packaging>pom</packaging>
  <!-- 属性 -->
	<properties>
		<spring.version>4.2.4.RELEASE</spring.version>
		<hibernate.version>5.0.7.Final</hibernate.version>
		<struts.version>2.3.24</struts.version>
	</properties>

	<!-- 锁定版本,struts2-2.3.24、spring4.2.4、hibernate5.0.7 -->
	<dependencyManagement>
		<dependencies>
			<dependency>
				<groupId>org.springframework</groupId>
				<artifactId>spring-context</artifactId>
				<version>${spring.version}</version>
			</dependency>
			<dependency>
				<groupId>org.springframework</groupId>
				<artifactId>spring-aspects</artifactId>
				<version>${spring.version}</version>
			</dependency>
			<dependency>
				<groupId>org.springframework</groupId>
				<artifactId>spring-orm</artifactId>
				<version>${spring.version}</version>
			</dependency>
			<dependency>
				<groupId>org.springframework</groupId>
				<artifactId>spring-test</artifactId>
				<version>${spring.version}</version>
			</dependency>
			<dependency>
				<groupId>org.springframework</groupId>
				<artifactId>spring-web</artifactId>
				<version>${spring.version}</version>
			</dependency>
			<dependency>
				<groupId>org.hibernate</groupId>
				<artifactId>hibernate-core</artifactId>
				<version>${hibernate.version}</version>
			</dependency>
			<dependency>
				<groupId>org.apache.struts</groupId>
				<artifactId>struts2-core</artifactId>
				<version>${struts.version}</version>
			</dependency>
			<dependency>
				<groupId>org.apache.struts</groupId>
				<artifactId>struts2-spring-plugin</artifactId>
				<version>${struts.version}</version>
			</dependency>
		</dependencies>
	</dependencyManagement>
	<!-- 依赖管理 -->
	<dependencies>
		<!-- spring -->
		<dependency>
			<groupId>org.springframework</groupId>
			<artifactId>spring-context</artifactId>
		</dependency>
		<dependency>
			<groupId>org.springframework</groupId>
			<artifactId>spring-aspects</artifactId>
		</dependency>
		<dependency>
			<groupId>org.springframework</groupId>
			<artifactId>spring-orm</artifactId>
		</dependency>
		<dependency>
			<groupId>org.springframework</groupId>
			<artifactId>spring-test</artifactId>
		</dependency>
		<dependency>
			<groupId>org.springframework</groupId>
			<artifactId>spring-web</artifactId>
		</dependency>
		<!-- hibernate -->
		<dependency>
			<groupId>org.hibernate</groupId>
			<artifactId>hibernate-core</artifactId>
		</dependency>

		<!-- 数据库驱动 -->
		<dependency>
			<groupId>mysql</groupId>
			<artifactId>mysql-connector-java</artifactId>
			<version>5.1.6</version>
			<scope>runtime</scope>
		</dependency>
		<!-- c3p0 -->

		<dependency>
			<groupId>c3p0</groupId>
			<artifactId>c3p0</artifactId>
			<version>0.9.1.2</version>
		</dependency>


		<!-- 导入 struts2 -->
		<dependency>
			<groupId>org.apache.struts</groupId>
			<artifactId>struts2-core</artifactId>
		</dependency>
		<dependency>
			<groupId>org.apache.struts</groupId>
			<artifactId>struts2-spring-plugin</artifactId>
		</dependency>

		<!-- servlet jsp -->
		<dependency>
			<groupId>javax.servlet</groupId>
			<artifactId>servlet-api</artifactId>
			<version>2.5</version>
			<scope>provided</scope>
		</dependency>
		<dependency>
			<groupId>javax.servlet</groupId>
			<artifactId>jsp-api</artifactId>
			<version>2.0</version>
			<scope>provided</scope>
		</dependency>
		<!-- 日志 -->
		<dependency>
			<groupId>org.slf4j</groupId>
			<artifactId>slf4j-log4j12</artifactId>
			<version>1.7.2</version>
		</dependency>
		<!-- junit -->
		<dependency>
			<groupId>junit</groupId>
			<artifactId>junit</artifactId>
			<version>4.9</version>
			<scope>test</scope>
		</dependency>
		<!-- jstl -->
		<dependency>
			<groupId>javax.servlet</groupId>
			<artifactId>jstl</artifactId>
			<version>1.2</version>
		</dependency>
	</dependencies>

	<build>
		<plugins>
			<!-- 设置编译版本为1.7 -->
			<plugin>
				<groupId>org.apache.maven.plugins</groupId>
				<artifactId>maven-compiler-plugin</artifactId>
				<configuration>
					<source>1.7</source>
					<target>1.7</target>
					<encoding>UTF-8</encoding>
				</configuration>
			</plugin>

			<!-- maven内置 的tomcat6插件 -->
			<plugin>
				<groupId>org.codehaus.mojo</groupId>
				<artifactId>tomcat-maven-plugin</artifactId>
				<version>1.1</version>
				<configuration>
					<!-- 可以灵活配置工程路径 -->
					<path>/ssh</path>
					<!-- 可以灵活配置端口号 -->
					<port>8080</port>
				</configuration>
			</plugin>

		</plugins>
	</build>


	<modules>
		<module>ssh_dao</module>
		<module>ssh_service</module>
		<module>ssh_web</module>
	</modules>
</project>
二、创建子模块
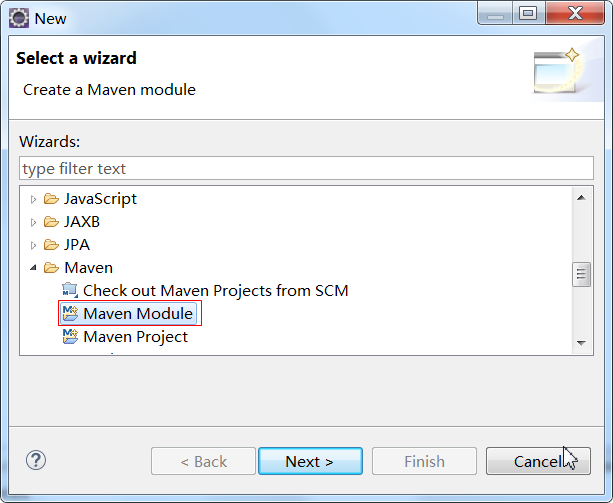
1、右键父工程,选择创建maven module
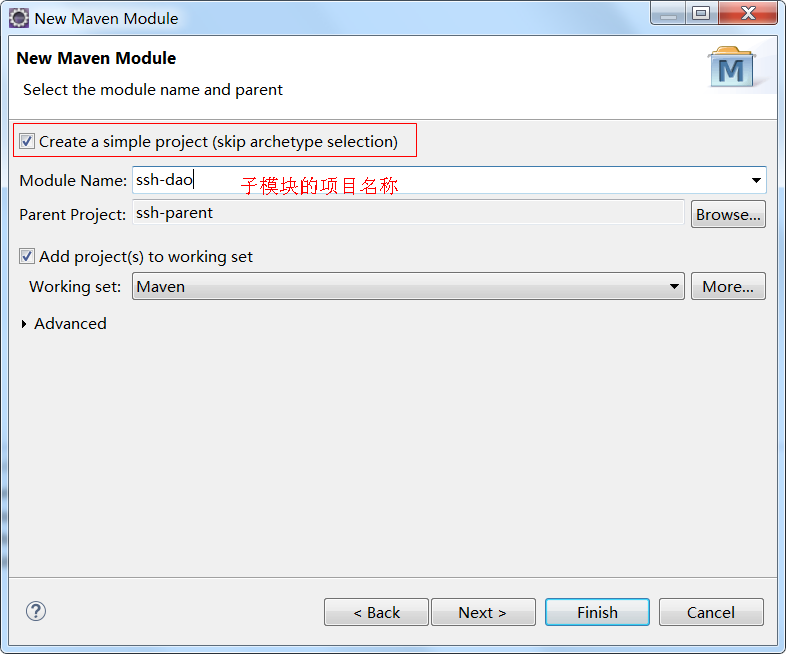
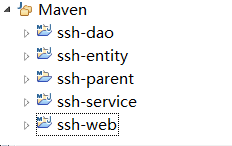
2、创建子模块
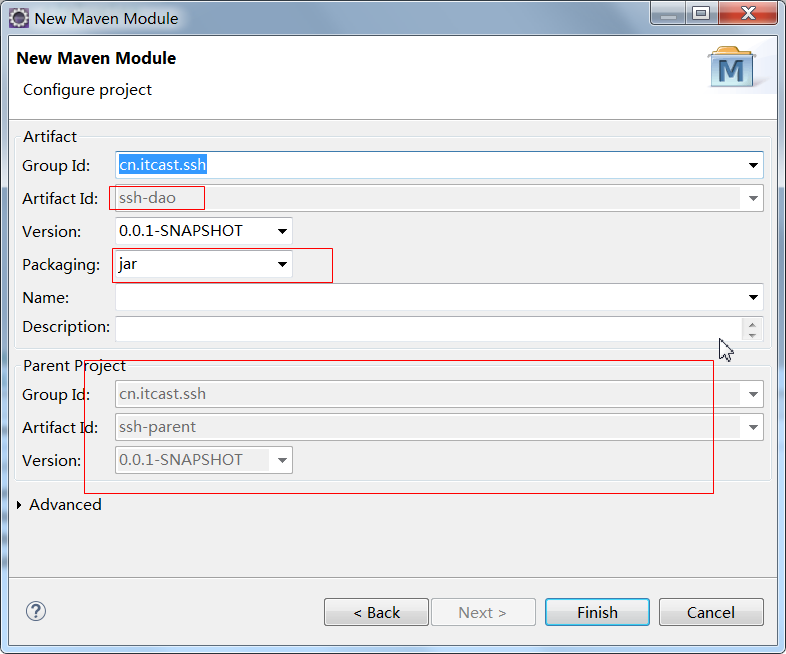
3、选择打包方式
注意:dao、service、entity等项目需要打成jar包的方式,web等项目需要打成war包的方式
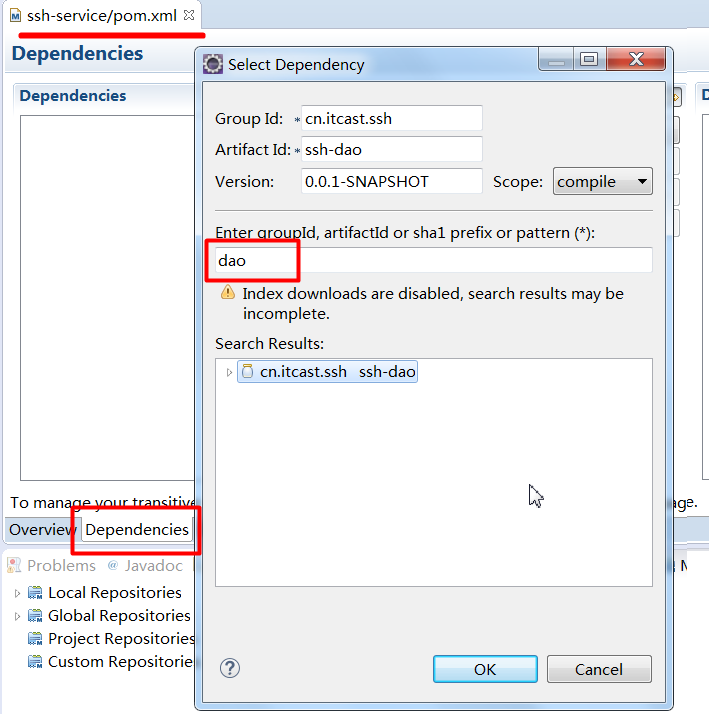
4、建立子模块之间的相互依赖关系
注意:在web项目中引入service,在servcie项目中引入dao,在dao中引入entity
5、在各个模块中写入相应的代码即可
注意:在web工程的web.xml中配置spring监听的配置文件位置及方式如下
<?xml version="1.0" encoding="UTF-8"?>
<web-app xmlns:xsi="http://www.w3.org/2001/XMLSchema-instance"
	xmlns="http://java.sun.com/xml/ns/javaee"
	xsi:schemaLocation="http://java.sun.com/xml/ns/javaee http://java.sun.com/xml/ns/javaee/web-app_2_5.xsd"
	version="2.5">
	<display-name>ssh-web</display-name>
	<welcome-file-list>
		<welcome-file>index.html</welcome-file>
		<welcome-file>index.htm</welcome-file>
		<welcome-file>index.jsp</welcome-file>
		<welcome-file>default.html</welcome-file>
		<welcome-file>default.htm</welcome-file>
		<welcome-file>default.jsp</welcome-file>
	</welcome-file-list>

	<!-- 监听器 -->
	<listener>
		<listener-class>org.springframework.web.context.ContextLoaderListener</listener-class>
	</listener>
	<context-param>
		<param-name>contextConfigLocation</param-name>
		<!-- classpath*:
				* 代表的是可以从web项目中引入的jar包的class下读取配置文件,不加*则只能从本项目中读取配置文件 -->
		<param-value>classpath*:applicationContext-*.xml</param-value>
	</context-param>

	<!-- 过滤器 -->
	<filter>
		<filter-name>struts2</filter-name>
		<filter-class>org.apache.struts2.dispatcher.ng.filter.StrutsPrepareAndExecuteFilter</filter-class>
	</filter>
	<filter-mapping>
		<filter-name>struts2</filter-name>
		<url-pattern>/*</url-pattern>
	</filter-mapping>
</web-app>






 239
239

 被折叠的 条评论
为什么被折叠?


