


版本介绍
ELK指的是什么 看下面链接
Free and Open Search: The Creators of Elasticsearch, ELK & Kibana | Elastic
CentOS版本
CentOS 8.0.1905 x86_64(Py3.7.9)
JAVA
ELK会自己使用内置版本的JDK
ElasticSearch
8.3.2 下载页面 Download Elasticsearch | Elastic
Kinbana
Logstash
安装ElasticSearch8
加入资源
rpm --import https://artifacts.elastic.co/GPG-KEY-elasticsearch在/etc/yum.repos.d/位置创建文件elasticsearch.repo并输入如下内容
[elasticsearch]
name=Elasticsearch repository for 8.x packages
baseurl=https://artifacts.elastic.co/packages/8.x/yum
gpgcheck=1
gpgkey=https://artifacts.elastic.co/GPG-KEY-elasticsearch
enabled=0
autorefresh=1
type=rpm-md
执行yum命令完成安装
yum install --enablerepo=elasticsearch elasticsearch安装完毕会给出账号密码和一些必要的命令 保存到记事本 方便以后使用
Authentication and authorization are enabled.
TLS for the transport and HTTP layers is enabled and configured.

The generated password for the elastic built-in superuser is : xxxxxxxxx

If this node should join an existing cluster, you can reconfigure this with
'/usr/share/elasticsearch/bin/elasticsearch-reconfigure-node --enrollment-token <token-here>'
after creating an enrollment token on your existing cluster.

You can complete the following actions at any time:

Reset the password of the elastic built-in superuser with
'/usr/share/elasticsearch/bin/elasticsearch-reset-password -u elastic'.

Generate an enrollment token for Kibana instances with
 '/usr/share/elasticsearch/bin/elasticsearch-create-enrollment-token -s kibana'.

Generate an enrollment token for Elasticsearch nodes with
'/usr/share/elasticsearch/bin/elasticsearch-create-enrollment-token -s node'.
因为Es不允许ROOT用户执行启动,所以添加用户和用户组 es 并未用户组提供文件夹权限
groupadd es
useradd es -g es -p password

chown es:es -R /usr/share/elasticsearch
chown es:es -R /etc/elasticsearch
chown es:es -R /var/lib/elasticsearch
chown es:es -R /var/log/elasticsearch
打开/etc/elasticsearch中的 elasticsearch.yml配置文件 配置如下信息
network.host: 0.0.0.0
http.port: 9200
使用我们自己的账号启动ElasticSearch
su es
bin/elasticsearch -d
打开防火墙保证9200端口畅通 使用浏览器打开 https://<内网|外网IP>:9200/
如果遇到安全提示则选择继续访问,并输入用户名密码 这个用到的用户名密码是安装Es后我们保存的哪个,不是自己创建的es那个,成功后,会看到如下JSON数据代表成功
{
  "name" : "iZ8vb2y0cdlrio8meaph6xZ",
  "cluster_name" : "elasticsearch",
  "cluster_uuid" : "Z2_s_RKHRRGE_4p8u4HHYQ",
  "version" : {
    "number" : "8.3.2",
    "build_type" : "rpm",
    "build_hash" : "8b0b1f23fbebecc3c88e4464319dea8989f374fd",
    "build_date" : "2022-07-06T15:15:15.901688194Z",
    "build_snapshot" : false,
    "lucene_version" : "9.2.0",
    "minimum_wire_compatibility_version" : "7.17.0",
    "minimum_index_compatibility_version" : "7.0.0"
  },
  "tagline" : "You Know, for Search"
}
至此ElasticSearch安装完毕
安装Kibana8
在/etc/yum.repos.d/位置创建文件kibana.repo并输入如下内容
[kibana-8.x]
name=Kibana repository for 8.x packages
baseurl=https://artifacts.elastic.co/packages/8.x/yum
gpgcheck=1
gpgkey=https://artifacts.elastic.co/GPG-KEY-elasticsearch
enabled=1
autorefresh=1
type=rpm-md
执行yum命令完成安装
yum install kibana打开/etc/kibana/kibana.yml配置文件
server.host: "0.0.0.0"执行以下命令以root账号启动服务
/usr/share/kibana/bin/kibana --allow-root在Es安装目录 执行如下代码获取token
/usr/share/elasticsearch/bin/elasticsearch-create-enrollment-token -s kibana打开各种防火墙的5601端口 并使用浏览器访问
http://IP:5601/输入上一步生成的token并进行配置
使用用户名密码登录即可

至此Kibana8安装完毕
安装Logstash8
在/etc/yum.repos.d/位置创建文件logstash.repo并输入如下内容
[logstash-8.x]
name=Elastic repository for 8.x packages
baseurl=https://artifacts.elastic.co/packages/8.x/yum
gpgcheck=1
gpgkey=https://artifacts.elastic.co/GPG-KEY-elasticsearch
enabled=1
autorefresh=1
type=rpm-md
执行yum命令完成安装
yum install logstash先将Es的CA证书拷贝的Log目录中
copy /etc/elasticsearch/certs/http_ca.crt TO /etc/logstash/certs 目录接下来在/etc/logstash目录中创建一个test.conf文件 修改你自己的hosts和对应密码
我这里是使用了seata的log日志做为例子
# Sample Logstash configuration for creating a simple
# Beats -> Logstash -> Elasticsearch pipeline.

input {
  file {
    path => "/root/logs/seata/seata-server.8091.all.log"
    start_position => beginning
  }
}

output {
  stdout{
     codec=>rubydebug
  }
  elasticsearch {
    hosts => ["https://172.24.209.49:9200"]
    index => "[seata]"
    cacert => "/etc/logstash/certs/http_ca.crt"
    user => "elastic"
    password => "xxxxxxxxxxxx"
  }
}
启动服务
./logstash -f /etc/logstash/test.conf回到kibana的开发者工具中 查看数据已经将日志成功同步到到ES中
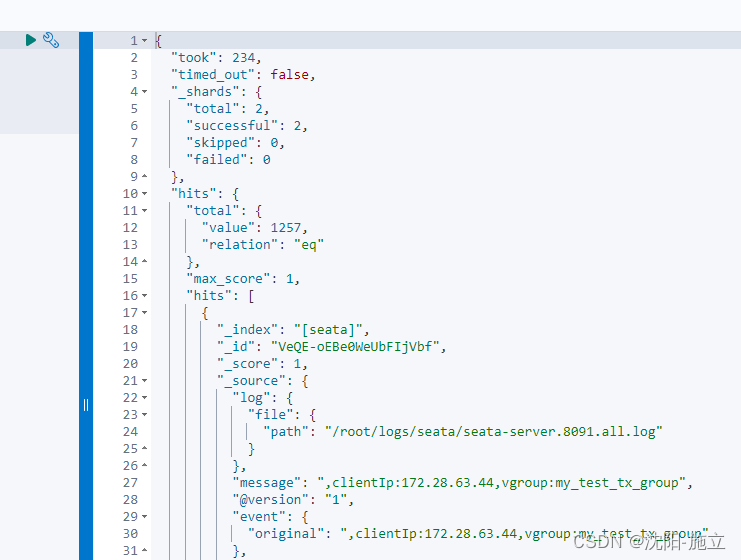
logstash插件功能很强大,祝大家玩的开心
结束语
到这里ELK搭建环境已经结束了,感兴趣的小伙伴点个赞支持下
如果想让JAVA连接 生成证书连接等等 请参考下一篇文章


 3107
3107


 被折叠的 条评论
为什么被折叠?
被折叠的 条评论
为什么被折叠?
 到【灌水乐园】发言


