


1.说明
本节介绍如何使用sdbusplus,用来对应不同的场景。
可以参考之前的文章: https://blog.csdn.net/wit_yuan/article/details/145192471
建议阅读本篇文章一定要仔细阅读sd-bus specification
2.说明
这一篇可以参考代码:
2.1 简单server服务注册
本节参考: https://gitee.com/wit_yuan/openbmc_testcode/blob/yuan_test_sdbusplus_1/recipe-example/files/test_add_interface.cpp
简单的注册服务,可以只需要使用几个api即可,基本代码如下:
#include <xyz/openbmc_project/net/Calculator/client.hpp>
#include <xyz/openbmc_project/net/Calculator/server.hpp>
#include <sdbusplus/server.hpp>

#include <iostream>
#include <string_view>

#include <sdbusplus/asio/connection.hpp>
#include <sdbusplus/asio/object_server.hpp>
#include <sdbusplus/asio/property.hpp>

#include <sys/sysinfo.h>
#include <systemd/sd-journal.h>

static std::string busServiceName = "xyz.openbmc_project.test.MyTestService";
int main()
{
    std::shared_ptr<sdbusplus::asio::connection> conn;
    boost::asio::io_context io;
    conn = std::make_shared<sdbusplus::asio::connection>(io);
    conn->request_name(busServiceName.c_str());
    io.run();
    return 0;
}
简单说一下调用实际的功能:
std::make_shared<sdbusplus::asio::connection>(io)
在文件build/evb-ast2500/workspace/sources/sdbusplus/include/sdbusplus/asio/connection.hpp中有定义:
    connection(boost::asio::io_context& io) :
        sdbusplus::bus_t(sdbusplus::bus::new_default()), io_(io),
        socket(io_.get_executor(), get_fd())
    {
        read_immediate();
    }
因此,默认其实调用了函数:
sdbusplus::bus::new_default()
另外:sdbusplus::bus_t(sdbusplus::bus::new_default())实际调用了文件:build/evb-ast2500/workspace/sources/sdbusplus/src/bus.cpp中的函数内容:
bus::bus(busp_t b) :
    _intf(&sdbus_impl),
    _bus(_intf->sd_bus_ref(b), details::BusDeleter(&sdbus_impl))
{
    // Emitting object added causes a message to get the properties
    // which can trigger a 'transaction' in the server bindings.  If
    // the bus isn't up far enough, this causes an assert deep in
    // sd-bus code.  Get the 'unique_name' to ensure the bus is up far
    // enough to avoid the assert.
    if (b != nullptr)
    {
        get_unique_name();
    }
}
因此:
_intf = &sdbus_impl,
_bus = _intf->sd_bus_ref(b)
在文件build/evb-ast2500/workspace/sources/sdbusplus/include/sdbusplus/sdbus.hpp:中可以看到:
class SdBusImpl : public SdBusInterface
{
int sd_bus_add_object_manager(...)
int sd_bus_add_object_vtable(...)
int sd_bus_add_match(...)
int sd_bus_attach_event( ...)
int sd_bus_call(...)
int sd_bus_call_async(...)
int sd_bus_detach_event(...)
int sd_bus_emit_interfaces_added_strv(...)
...
int sd_bus_emit_object_added(...)
int sd_bus_get_fd(...)
int sd_bus_message_enter_container(...)
sd_bus* sd_bus_message_get_bus(...)
const char* sd_bus_message_get_interface(...)
const char* sd_bus_message_get_path(...)
int sd_bus_message_is_method_call(..)
int sd_bus_message_new_method_call(...)
int sd_bus_message_new_signal(...)
int sd_bus_process(...)
int sd_bus_request_name(...)
void sd_bus_close(...)
int sd_bus_is_open(...)
int sd_bus_wait(...)
}
extern SdBusImpl sdbus_impl;
以及文件:build/evb-ast2500/workspace/sources/sdbusplus/src/sdbus.cpp中定义的:
#include <sdbusplus/sdbus.hpp>

namespace sdbusplus
{
SdBusImpl sdbus_impl;
}
包含的均为sd-bus接口的调用封装。
注意函数read_immediate()调用函数:
    void read_immediate()
    {
        boost::asio::post(io_, [&] {
            if (process_discard())
            {
                read_immediate();
            }
            else
            {
                read_wait();
            }
        });
    }
因此,函数调用:
conn->request_name(busServiceName.c_str());
实际执行了文件build/evb-ast2500/workspace/sources/sdbusplus/include/sdbusplus/bus.hpp中的:
    void request_name(const char* service)
    {
        int r = _intf->sd_bus_request_name(
            _bus.get(), service,
            (SD_BUS_NAME_ALLOW_REPLACEMENT | SD_BUS_NAME_REPLACE_EXISTING));
        if (r < 0)
        {
            throw exception::SdBusError(-r, "sd_bus_request_name");
        }
    }
qemu启动之后,可以看到这个例子只是一个简单的例子,并无实际的意义,因为并不能找到相关的接口功能。执行结果如下:

2.2 添加接口
添加接口与相关的属性,才具初始的功能。
先分析2行代码:
    sdbusplus::asio::object_server obj_server = sdbusplus::asio::object_server(conn);
    Iface = obj_server.add_interface("/org/freedesktop" , busServiceName);
    Iface->initialize();
在文件:build/evb-ast2500/workspace/sources/sdbusplus/include/sdbusplus/asio/object_server.hpp中定义了:
    object_server(const std::shared_ptr<sdbusplus::asio::connection>& conn,
                  const bool skipManager = false) : conn_(conn)
    {
        if (!skipManager)
        {
            add_manager("/");
        }
    }
因此默认skipManager = false,会调用add_manager("/");
Iface = obj_server.add_interface("/org/freedesktop" , busServiceName);
调用文件:build/evb-ast2500/workspace/sources/sdbusplus/include/sdbusplus/asio/object_server.hpp中的函数:
    std::shared_ptr<dbus_interface>
        add_interface(const std::string& path, const std::string& name)
    {
        auto dbusIface = std::make_shared<dbus_interface>(conn_, path, name);
        interfaces_.emplace_back(dbusIface);
        return dbusIface;
    }
只需要注意:interfaces_是被定义在类中的私有变量:
  private:
    std::shared_ptr<sdbusplus::asio::connection> conn_;
    std::vector<std::shared_ptr<dbus_interface>> interfaces_;
    std::vector<server::manager_t> managers_;
另外,dbus_interface有在build/evb-ast2500/workspace/sources/sdbusplus/include/sdbusplus/asio/object_server.hpp中定义了:
    dbus_interface(std::shared_ptr<sdbusplus::asio::connection> conn,
                   const std::string& path, const std::string& name) :
        conn_(conn), path_(path), name_(name)

    {}
所以,在这里只完成了基本的赋值与将定义的接口放入vector(数组)中。
要留意一个定义:
class dbus_interface
{
  public:
      dbus_interface(std::shared_ptr<sdbusplus::asio::connection> conn,
                   const std::string& path, const std::string& name) :
        conn_(conn),
        path_(path), name_(name)

    {}

    std::string get_interface_name(void)
    {
        return name_;
    }

  private:
    std::shared_ptr<sdbusplus::asio::connection> conn_;
    std::string path_;
    std::string name_;

    std::vector<signal> signals_;
    std::vector<property_callback> property_callbacks_;
    std::vector<method_callback> method_callbacks_;

    std::vector<sd_bus_vtable> vtable_;
    std::optional<sdbusplus::server::interface_t> interface_;
因此,add_interface()定义内容:
auto dbusIface = std::make_shared<dbus_interface>(conn_, path, name);
故而:
name_(name)
即:
std::string get_interface_name(void)
所以,name是接口名字。
最后,需要调用:Iface->initialize();,可以看到调用了文件build/evb-ast2500/workspace/sources/sdbusplus/include/sdbusplus/asio/object_server.hpp中的:
    bool initialize(const bool skipPropertyChangedSignal = false)
    {
        // can only register once
        if (is_initialized())
        {
            return false;
        }
        vtable_.reserve(2 + property_callbacks_.size() +
                        method_callbacks_.size() + signals_.size());
        vtable_.emplace_back(vtable::start());
        property_callbacks_.shrink_to_fit();
        for (auto& element : property_callbacks_)
        {
            if (element.on_set_message_)
            {
                vtable_.emplace_back(vtable::property_o(
                    element.name_.c_str(), element.signature_, get_handler,
                    set_handler, reinterpret_cast<size_t>(&element),
                    element.flags_ | SD_BUS_VTABLE_ABSOLUTE_OFFSET));
            }
            else
            {
                vtable_.emplace_back(vtable::property_o(
                    element.name_.c_str(), element.signature_, get_handler,
                    reinterpret_cast<size_t>(&element),
                    element.flags_ | SD_BUS_VTABLE_ABSOLUTE_OFFSET));
            }
        }

        method_callbacks_.shrink_to_fit();
        for (auto& element : method_callbacks_)
        {
            vtable_.emplace_back(vtable::method_o(
                element.name_.c_str(), element.arg_signature_,
                element.return_signature_, method_handler,
                reinterpret_cast<size_t>(&element),
                element.flags_ | SD_BUS_VTABLE_ABSOLUTE_OFFSET));
        }

        signals_.shrink_to_fit();
        for (const auto& element : signals_)
        {
            vtable_.emplace_back(
                vtable::signal(element.name_.c_str(), element.signature_));
        }

        vtable_.emplace_back(vtable::end());
        vtable_.shrink_to_fit();

        interface_.emplace(static_cast<sdbusplus::bus_t&>(*conn_),
                           path_.c_str(), name_.c_str(),
                           static_cast<const sd_bus_vtable*>(&vtable_[0]),
                           nullptr);
        conn_->emit_interfaces_added(path_.c_str(),
                                     std::vector<std::string>{name_});
        if (!skipPropertyChangedSignal)
        {
            for (const auto& element : property_callbacks_)
            {
                signal_property(element.name_);
            }
        }
        return true;
    }
另外,分析一下内容:
vtable_.reserve(2 + property_callbacks_.size() +
                        method_callbacks_.size() + signals_.size());
可以看到代码是在vtable是针对property、method、signals的执行操作,由于SD_BUS_VTABLE_START(0)和SD_BUS_VTABLE_END占用2个空间,故加2。
需要之前的hello服务器程序运行起来。

同样,可以看到设置和获取property值的变化:

因此,要注意,initialize()操作是在所有的property、method和signals注册完成之后,只需要调用一次就行了,万不可多次调用。如果多次调用,实际后面的注册接口也不会生效。
2.3 添加匹配关系,调用对应函数
本节参考代码: https://gitee.com/wit_yuan/openbmc_testcode/tree/yuan_test_match/
整个sdbus架构中,需要关心如果属性值改变了,就需要执行操作。例如,在管理系统电源操作,如果设置了属性值On/Off,就需要设置power button等执行开关机操作。这就需要匹配属性变化。
例外,如果关心某一个接口发生了添加/删除,就需要执行某些操作,因此也需要监听该事件。
添加文件:test_add_interface_match.cpp,修改文件:test_add_interface.cpp:
可以按照如下步骤执行测试:
- 1.启动bus monitor
执行如下命令:
# busctl monitor --match=member='InterfacesAdded' &
- 2.启动
test_add_interface_match
# test_add_interface_match &
- 3.启动
test_add_interface
# test_add_interface &
可以看到最终结果如下:
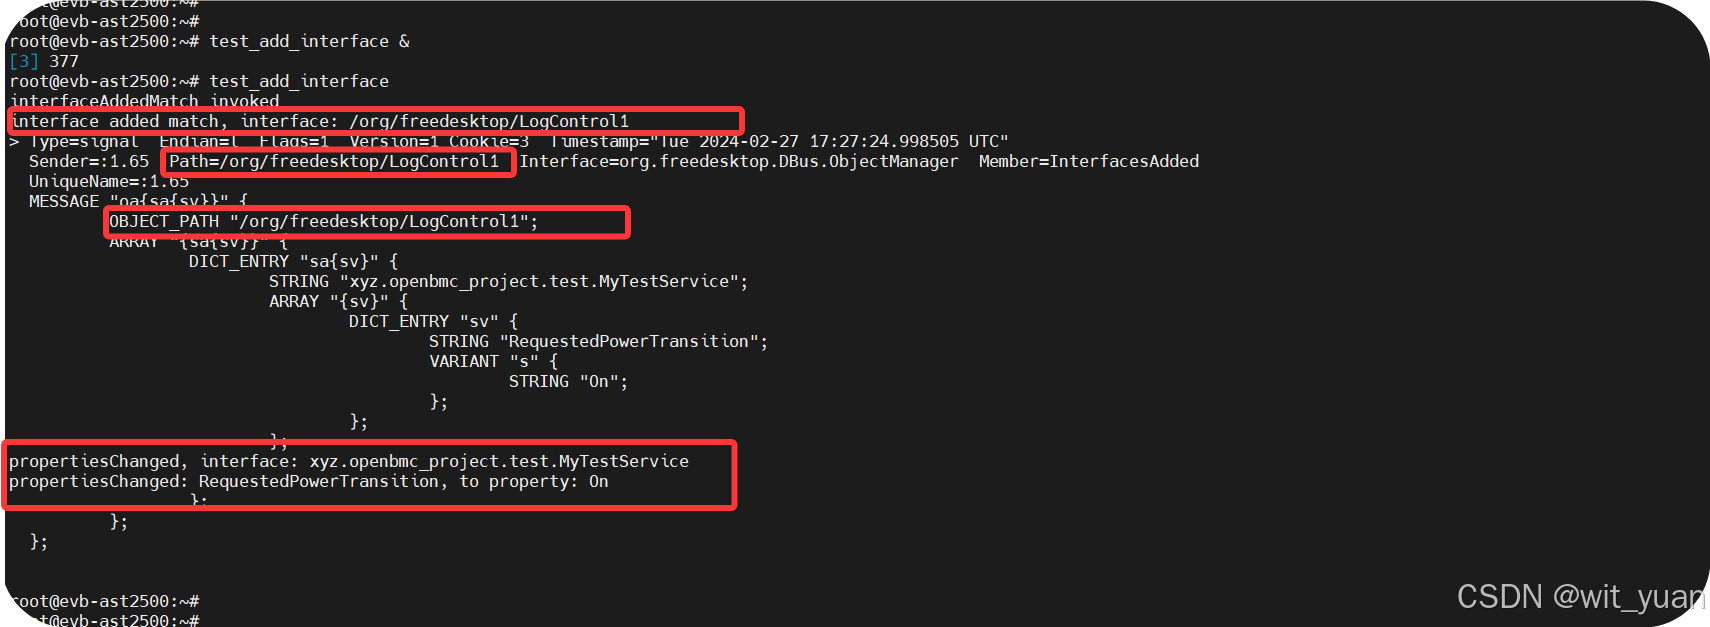
另外,sender来自于:
需要注意:
- 1.
Sender=:1.65 Path=/org/freedesktop/LogControl1 Interface=org.freedesktop.DBus.ObjectManager Member=InterfacesAdded中的Path指定的是ObjectManager的匹配Path,这就需要server端调用函数:obj_server.add_manager("/org/freedesktop/LogControl1")留意。
2.4 添加多个interface
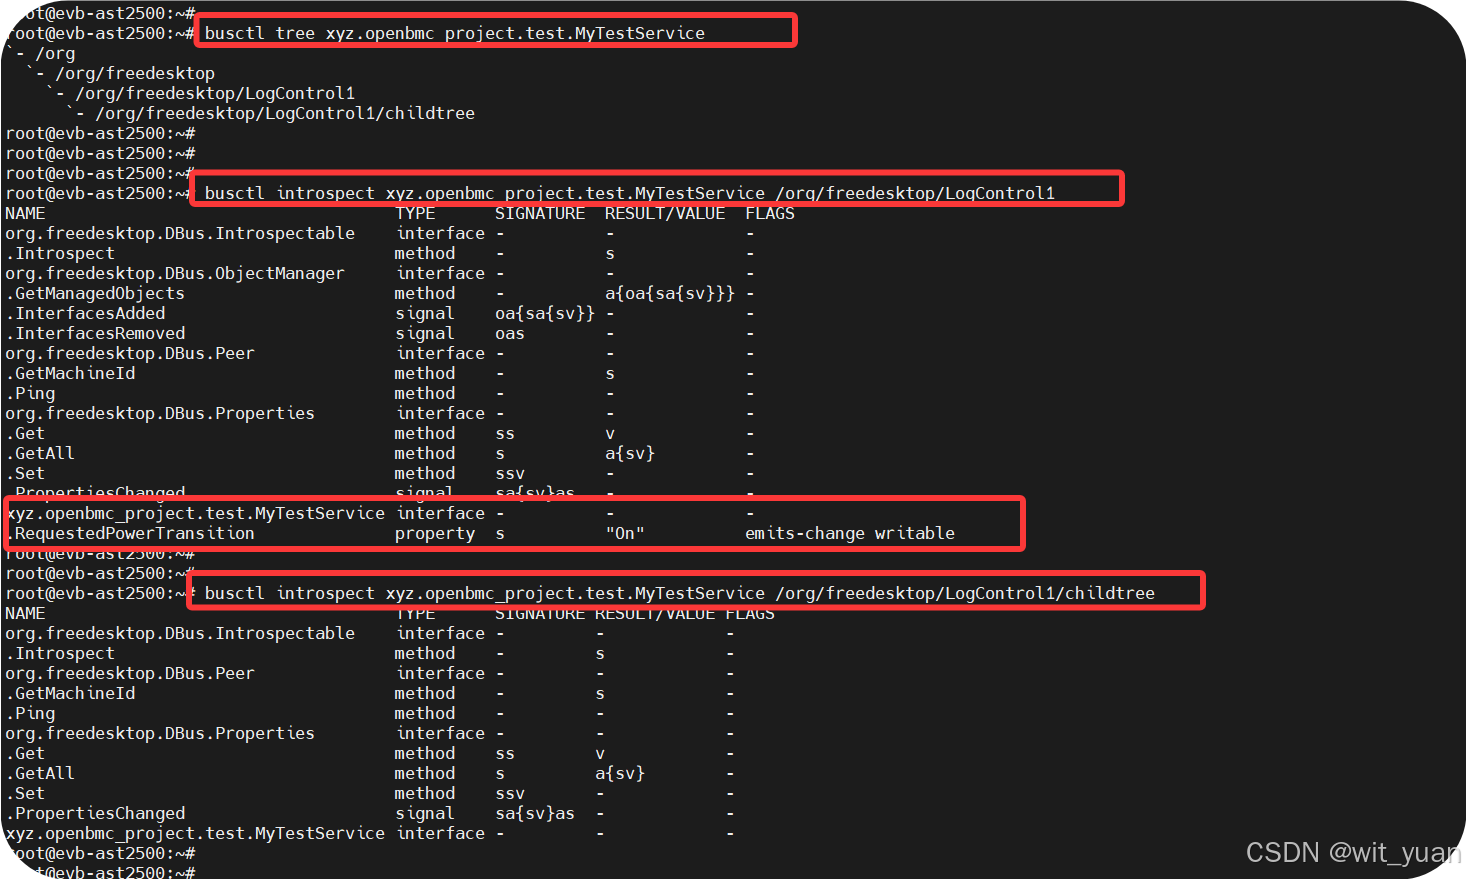
有需求需要在一个父path下添加子path,父path需要有属性,并且子path也需要有属性。
本节代码链接: https://gitee.com/wit_yuan/openbmc_testcode/tree/yuan_add_multi_interface/
主要代码为:
auto Iface = obj_server.add_interface(path , busServiceName);
auto IfaceChild = obj_server.add_interface(pathChild , busServiceName);
测试方法为:
- 1.启动程序
# test_add_interface &
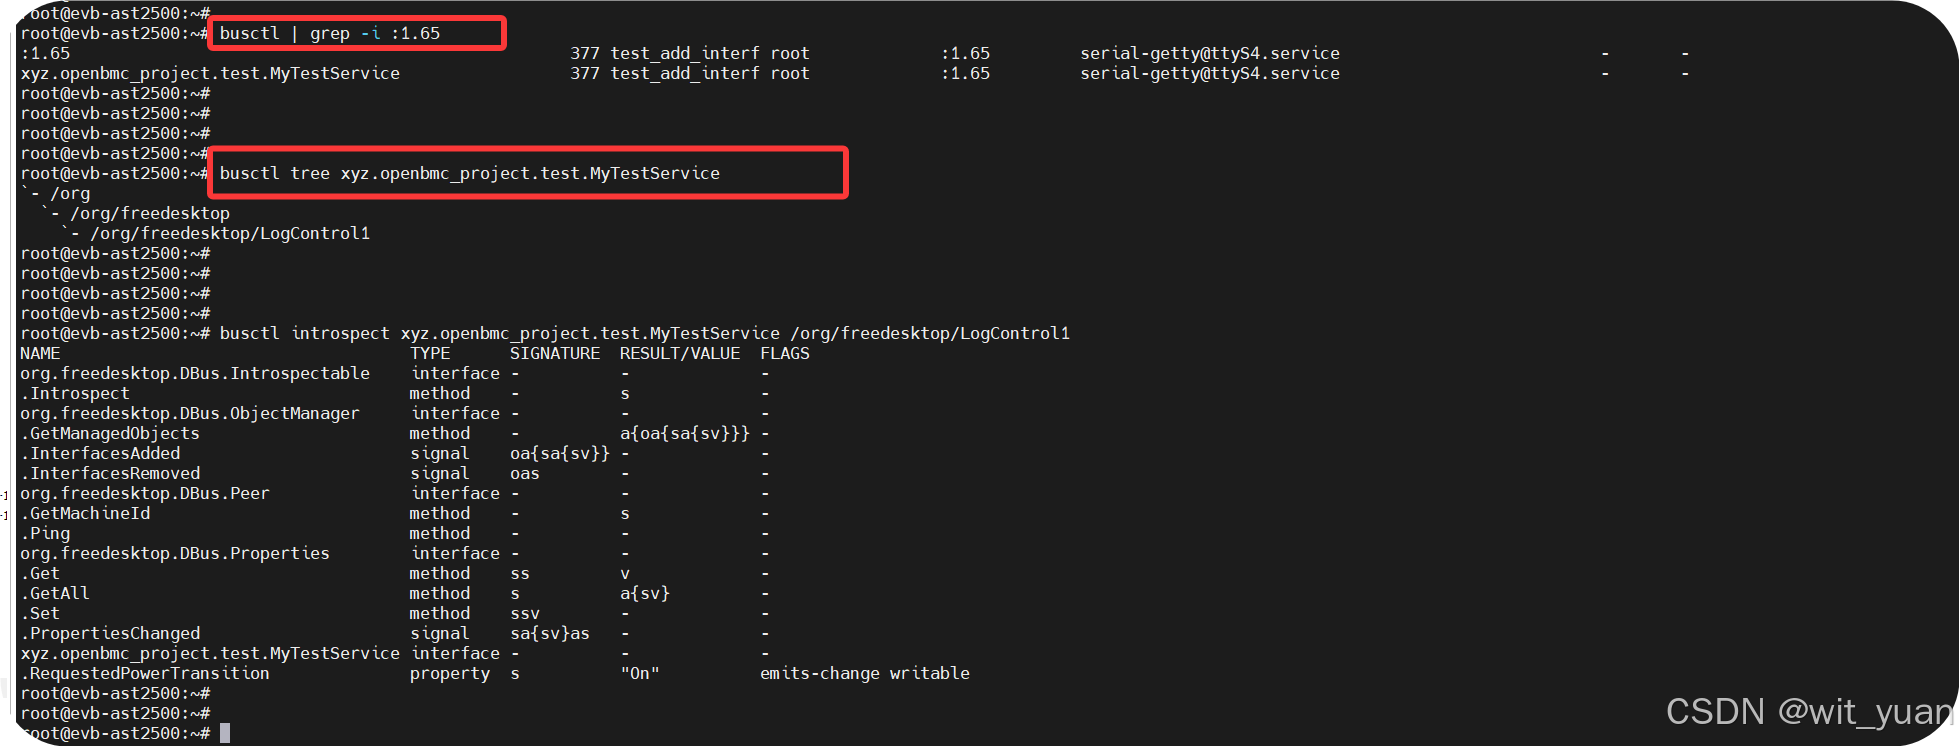
- 2.查看结果


 被折叠的 条评论
为什么被折叠?
被折叠的 条评论
为什么被折叠?
 到【灌水乐园】发言


