


前言
学习Android也有几周了,这是我的第一篇Android博客,写博客的目的就是为了能学好安卓,同时总结记录知识,并且分享学习过程和心得体会给需要的人。从Java转Android没有我想象的那么简单(也许是我智商不高,确实挺笨的),不过只要能坚持学习,多练习多实践,并且有较为扎实的Java基本功,整体上来讲也不算困难吧。没错我是处女男,有着处女座的通病,追求完美和强迫症,所以我的博客也希望能精益求精。我没有很牛的学历和背景、没有很聪明的脑子和思维,但是我会很努力的去学习和记录,并希望终有一天能成为一个合格的Android Developer。我学Android主要是通过视频教程、电子书以及大牛们的博客为主,以“会用”为首要目的,后期会读源码去了解一些原理性的以及更深层次的知识。不过现在作为一个Android新手,记录的知识也比较基础一些,不过我写每个例子肯定都会经过测试,并且文字介绍通俗易懂,保证看了就懂,就会用,每一篇Blog也会根据我的学习进度不定时的编辑更新,废话不多说,开始第一篇,关于Configuration类的介绍。
一、Configuration对象的获取方式和常用属性
1.获取方式
Configuration类专门用于描述手机设备上的配置信息,程序中可调用Activity的如下方法来获取Configuration对象:
Configuration cfg = getResources().getConfiguration();
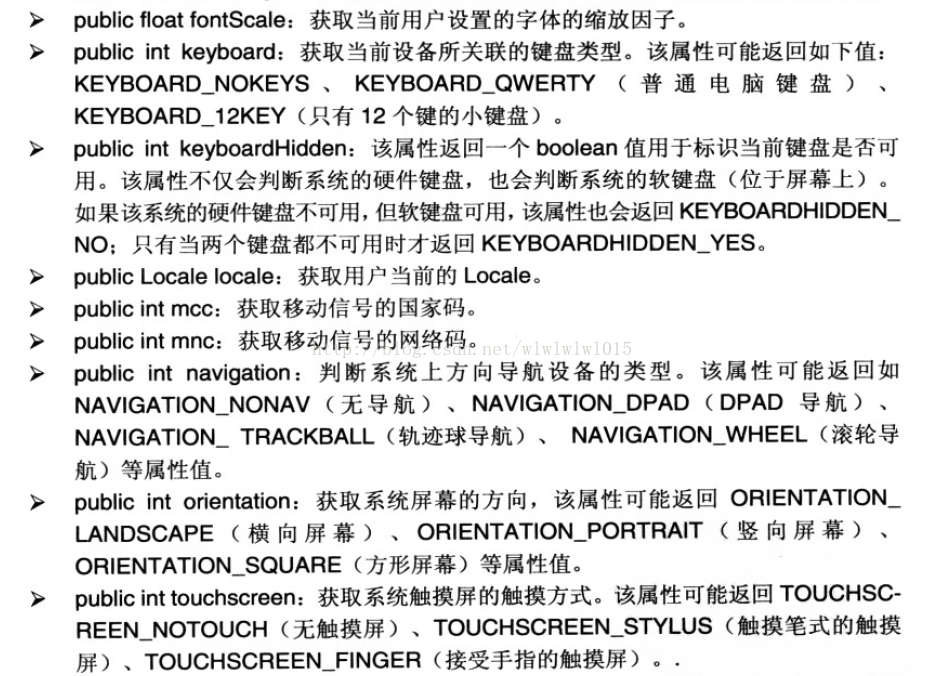
2.常用属性
二、Configuration对象的应用实例
下面通过一个程序实例来看看Configuration对象的,功能是显示系统设备状态和更改屏幕方向并予以提示。
Layout代码(activity_main.xml):
<LinearLayout xmlns:android="http://schemas.android.com/apk/res/android"
    xmlns:tools="http://schemas.android.com/tools"
    android:layout_width="match_parent"
    android:layout_height="match_parent"
	android:orientation="vertical"
	>

    <LinearLayout
        android:layout_width="match_parent"
        android:layout_height="0dp"
        android:layout_weight="1.0"
        android:orientation="vertical"
        >

    <EditText
        android:id="@+id/edt_screenOrientation"
        android:layout_width="match_parent"
        android:layout_height="wrap_content"
        android:hint="屏幕方向"
        />

    <EditText
        android:id="@+id/edt_mncCode"
        android:layout_width="match_parent"
        android:layout_height="wrap_content"
        android:hint="移动信号网络码"
        />

    <EditText
        android:id="@+id/edt_navigation"
        android:layout_width="match_parent"
        android:layout_height="wrap_content"
        android:hint="导航设备类型"
        />

    <EditText
        android:id="@+id/edt_touchStyle"
        android:layout_width="match_parent"
        android:layout_height="wrap_content"
        android:hint="触摸方式"
        />

    </LinearLayout>

    <Button
        android:id="@+id/btn_getSystemStatus"
        android:layout_width="match_parent"
        android:layout_height="wrap_content"
        android:text="获取系统设备状态"
        android:gravity="center"
        />

    <Button
        android:id="@+id/btn_changeScreenOrientation"
        android:layout_width="match_parent"
        android:layout_height="wrap_content"
        android:text="更改屏幕方向"
        android:gravity="center"
        />

</LinearLayout>
Activity代码:
package com.example.configurationtest;

import android.content.Context;
import android.content.pm.ActivityInfo;
import android.content.res.Configuration;
import android.os.Bundle;
import android.support.v7.app.ActionBarActivity;
import android.view.View;
import android.view.View.OnClickListener;
import android.widget.Button;
import android.widget.EditText;
import android.widget.Toast;

public class MainActivity extends ActionBarActivity {

	private EditText editText1;
	private EditText editText2;
	private EditText editText3;
	private EditText editText4;
	private Button button1;
	private Button button2;

	private Context context;

	@Override
	protected void onCreate(Bundle savedInstanceState) {
		super.onCreate(savedInstanceState);
		setContentView(R.layout.activity_main);
		context=this;

		editText1 = (EditText) findViewById(R.id.edt_screenOrientation);
		editText2 = (EditText) findViewById(R.id.edt_mncCode);
		editText3 = (EditText) findViewById(R.id.edt_navigation);
		editText4 = (EditText) findViewById(R.id.edt_touchStyle);
		button1 = (Button) findViewById(R.id.btn_getSystemStatus);
		//点击“获取系统设备状态”
		button1.setOnClickListener(new OnClickListener() {
			@Override
			public void onClick(View v) {
				// 得到Configuration对象
				Configuration cfg = getResources().getConfiguration();

				//设置屏幕方向
				String screen = cfg.orientation == Configuration.ORIENTATION_LANDSCAPE ? "横向屏幕"
						: "竖向屏幕";
				editText1.setText(screen);

				//设置mnc码
				String mncCode = cfg.mnc + "";
				editText2.setText(mncCode);

				//设置导航设备类型
				String naviName = cfg.orientation == Configuration.NAVIGATION_NONAV ? "没有方向控制"
						: cfg.orientation == Configuration.NAVIGATION_WHEEL ? "滚轮控制方向"
								: cfg.orientation == Configuration.NAVIGATION_DPAD ? "方向键控制方向"
										: "轨迹球控制方向";
				editText3.setText(naviName);

				//设置触摸方式
				String touchName = cfg.touchscreen == Configuration.TOUCHSCREEN_NOTOUCH ? "无触摸屏"
						: "支持触摸屏";
				editText4.setText(touchName);

			}
		});

		button2 = (Button) findViewById(R.id.btn_changeScreenOrientation);
		//点击“更改屏幕方向”
		button2.setOnClickListener(new OnClickListener() {
			@Override
			public void onClick(View v) {
				Configuration cfg = getResources().getConfiguration();
				// 如果是横屏
				if (cfg.orientation == Configuration.ORIENTATION_LANDSCAPE) {
					// 设置为竖屏
					setRequestedOrientation(ActivityInfo.SCREEN_ORIENTATION_PORTRAIT);
				}
				// 如果是竖屏
				if (cfg.orientation == Configuration.ORIENTATION_PORTRAIT) {
					// 设置为横屏
					setRequestedOrientation(ActivityInfo.SCREEN_ORIENTATION_LANDSCAPE);
				}
			}
		});
	}

	@Override
	//当系统设置发生更改时会自动触发此回调方法,用于监听屏幕方向并弹框提示
	public void onConfigurationChanged(Configuration newConfig) {
		// TODO Auto-generated method stub
		super.onConfigurationChanged(newConfig);
		String screen = newConfig.orientation == Configuration.ORIENTATION_LANDSCAPE ? "横向屏幕"
				: "竖向屏幕";
		Toast.makeText(context, "系统的屏幕方向发生更改" + "\n修改后的屏幕方向为:" + screen,
				Toast.LENGTH_LONG).show();
		;
	}

}
需要注意的一点是需要在AndroidManifest.xml文件中指定Activity的android:configChanges=“orientation”属性,这样onConfigurationChanged方法才能正常监听事件。当<uses-sdk..>的targetSdkVersion版本高于12时,需要增加配置:
android:configChanges="orientation|screenSize"或android:configChanges="orientation|screenSize|layoutDirection",具体根据调试情况适当更改。
三、运行效果


 557
557

 被折叠的 条评论
为什么被折叠?
被折叠的 条评论
为什么被折叠?
 到【灌水乐园】发言


