


Because some our systems need two-step-verification to login, for example Bitbucket, it’s different from login by username and password.
This article can help you be familiar with two-step-verification, what is it and how to setup it.
And our Redis and Mongo DB in China project, our VPN and so on, need use two-step-verification, so this article also is help for them.
Instructions
Step 1. Set up your default identity
-
From the terminal
Open “Spotlight Search” by keyboard shortcuts “command+space“, input

and open terminal,
Then input ssh-keygen at the command line.
The command prompts you for a file to save the key in:
$ ssh-keygenGenerating public/private rsa key pair.Enter file in which to save the key (/Users/emmap1/.ssh/id_rsa):
2. Press the Enter or Return key to accept the default location.
We recommend you keep the default key name unless you have a reason to change it.
3. Enter and re-enter a passphrase when prompted.
The command creates your default identity with its public and private keys. The whole interaction will look similar to the following:
$ ssh-keygen Generating public/private rsa key pair.Enter file in which to save the key (/Users/emmap1/.ssh/id_rsa):Created directory '/Users/emmap1/.ssh'.Enter passphrase (empty for no passphrase):Enter same passphrase again:Your identification has been saved in /Users/emmap1/.ssh/id_rsa.Your public key has been saved in /Users/emmap1/.ssh/id_rsa.pub.The key fingerprint is:4c:80:61:2c:00:3f:9d:dc:08:41:2e:c0:cf:b9:17:69 emmap1@myhost.local The key's randomart image is:+--[ RSA 2048]----+|*o+ooo. ||.+.=o+ . ||. *.* o . || . = E o || o . S || . . || . || || |+-----------------+
4. List the contents of
~/.ssh to view the key files.
$ ls ~/.ssh id_rsa id_rsa.pub
The command displays two files, one for the public key (for example id_rsa.pub) and one for the private key (for example, id_rsa).
Step 2. Add the key to the ssh-agent
If you don't want to type your password each time you use the key, you'll need to add it to the ssh-agent.
-
To start the agent, run the following:
$ eval `ssh-agent`Agent pid 9700 -
Enter
ssh-addfollowed by the path to the private key file:$ ssh-add -K ~/.ssh/<private_key_file> -
So that your computer remembers your password each time it restarts, open (or create) the
~/.ssh/configfile and add these lines to the file:1Host * 2UseKeychain yes 3
Step 3. Add the public key to your Account settings
-
From Bitbucket, choose Personal settings from your avatar in the lower left.
-
Click SSH keys.
If you've already added keys, you'll see them on this page. -
In your terminal window, copy the contents of your public key file. If you renamed the key, replace
id_rsa.pubwith the public key file name.the following command copies the output to the clipboard:
$ pbcopy < ~/.ssh/id_rsa.pub -
Select and copy the key output in the clipboard.
If you have problems with copy and paste, you can open the file directly with Notepad. Select the contents of the file (just avoid selecting the end-of-file characters). -
From Bitbucket, click Add key.
-
Enter a Label for your new key, for example,
Default public key. -
Paste the copied public key into the SSH Key field.
You may see an email address on the last line when you paste. It doesn't matter whether or not you include the email address in the Key. -
Click Save.
Bitbucket sends you an email to confirm the addition of the key. -
Return to the terminal window and verify your configuration and username by entering the following command:
$ ssh -T git@bitbucket.orgThe command message tells you which of your Bitbucket accounts can log in with that key.
1 2 3 conq: logged in as emmap1. 4You can use git or hg to connect to Bitbucket. Shell access is disabled. 5 6 7If you get an error message with
Permission denied (publickey), check the Troubleshoot SSH issues page for help.
Now that you've got an SSH key set up, use the SSH URL the next time you clone a repository. If you already have a repository that you cloned over HTTPS, change the remote URL for your repository to use its SSH URL.
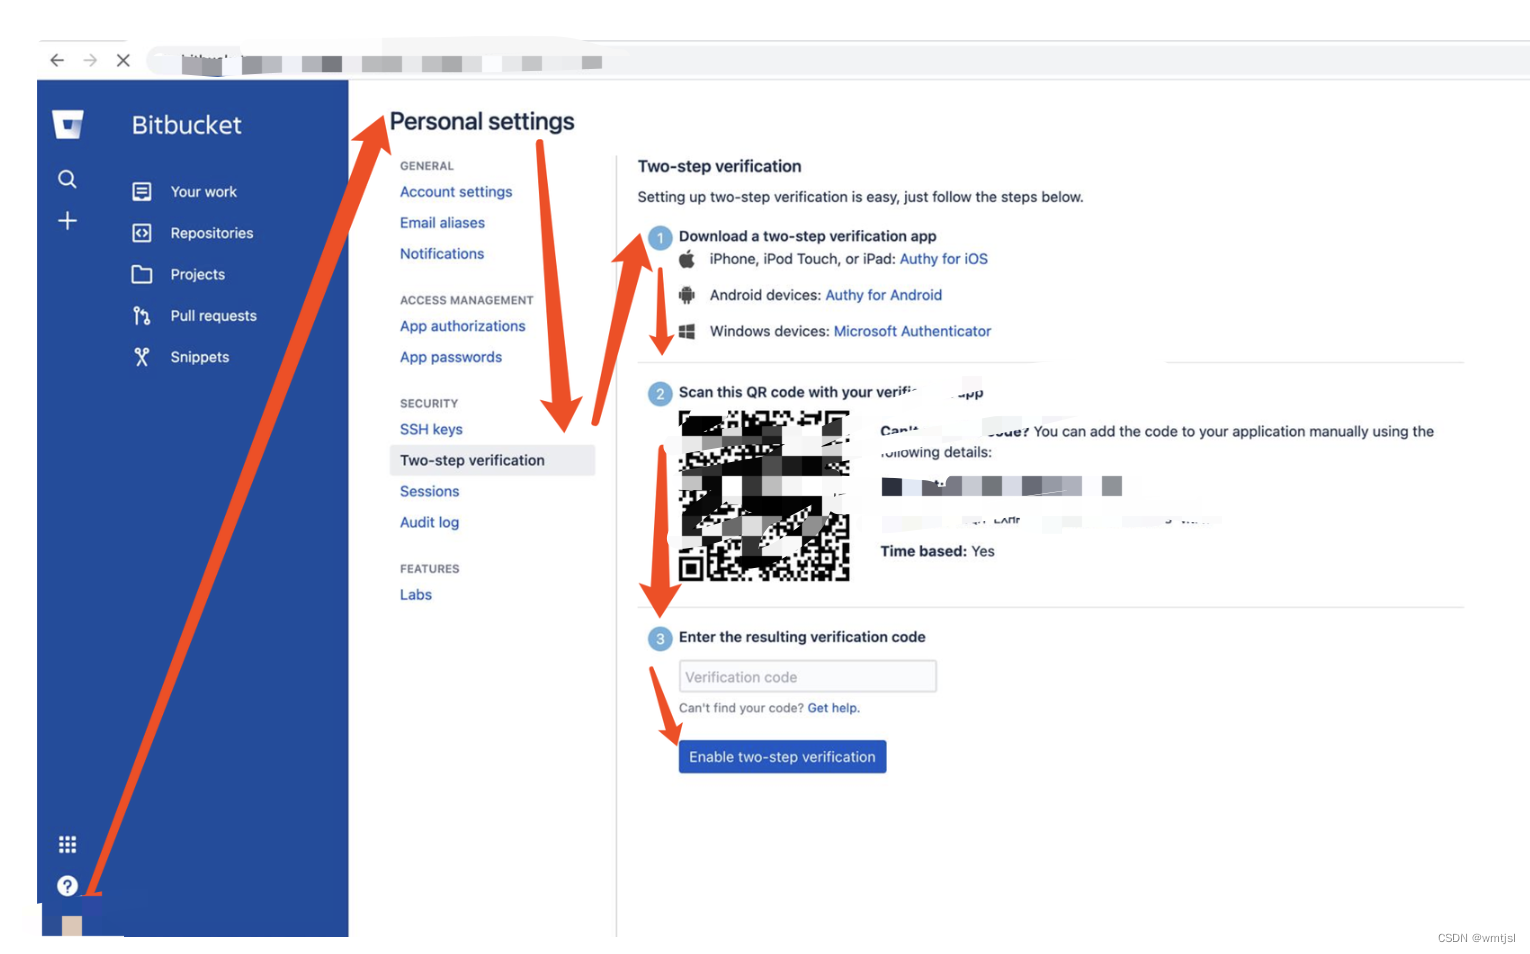
Step 4. Enable two-step verification
From your avatar in the bottom left:


 7914
7914


 被折叠的 条评论
为什么被折叠?
被折叠的 条评论
为什么被折叠?
 到【灌水乐园】发言


