


使用位置、尺寸和可见性基本就可以在现代浏览器中模拟绝大多数常见的用户效果了。元素的位置是实现交互效果的基础。在CSS中,元素使用偏移量来定位,它是通过元素到它父元素的左上角的偏移量来计算。CSS的坐标系如下图

<html>
<head>
<style>
p {
border: 3px solid red;
padding: 10px;
width: 400px;
background: #FFF;
}
p.odd {
/* 定位信息 */
position: static;
top: 0px;
left: 0px;
}
</style>
</head>
<body>
<p>Lorem ipsum dolor sit amet, consectetuer adipiscing elit. Etiam ...</p>
<p class='odd'>Phasellus dictum dignissim justo. Duis nec risus id nunc ...</p>
<p>Sed vel leo. Nulla iaculis, tortor non laoreet dictum, turpis diam ...</p>
</body>
</html>
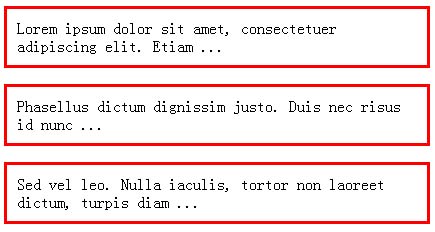
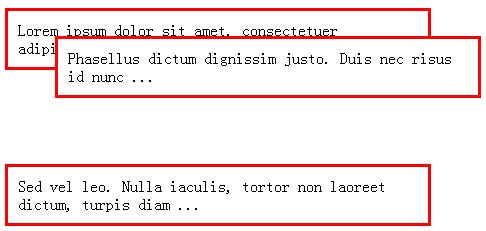
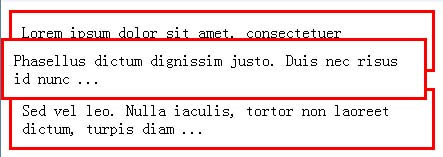
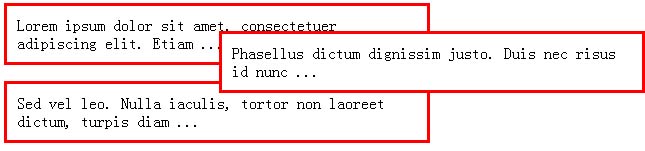
通过对第二个段落的定位,分析一下CSS的定位方式。
□ 静态定位:这是默认方式。它遵循文档的普通流动(flow)。当静态定位中,top和left属性无效。下图的定位代码是 position:static; top:0px; left:0px; 的效果:
□ 相对定位:和静态定位类似,同样遵循文档的普通流动。如果设置了top和left属性则会产生相应的偏移。下图的定位代码是:position:relative; top:-50px; left:50px;
□ 绝对定位:绝对定位会使元素完全跳出页面布局的普通流动,会相对于它的第一个非静态定位的祖先元素而定位。如果没有这样的祖先元素,则相对于整个文档。下图的定位代码是:position:absolute; top:20px; left:0px;
□ 固定定位:固定定位相对于浏览器窗口而定位。设置top和left为0会使它在浏览器的左上角显示,而且不受滚动条的影响。下图的定位代码是:position:fixed; top:20px; right:0px;
元素的位置取决于CSS设置,同时又受其它因素的影响。所以单纯的访问CSS属性并不能获取元素的精确位置。为了获取元素相对于页面的位置,有一些CSS属性可以利用,在现代浏览器中都支持以下3个属性:
□ offsetParent : 理论上,这是元素的父元素,元素相对于它定位
□ offsetLeft 和 offfsetTop : 在 offsetParent 环境中的水平和垂直偏移量
为了获取元素相对于页面的精确位置,可以遍历DOM,使用offsetParent属性并累加它们的偏移量来计算元素的位置。下面是连个确定元素相对于整个文档的x和y位置的辅助函数:
// 获取元素的水平位置
function pageX(elem) {
var p = 0;
// 累加每一个父元素的偏移量
while ( elem.offsetParent ) {
// 增加偏移量
p += elem.offsetLeft;
// 遍历下一个父元素
elem = elem.offsetParent;
}
return p;
}
// 获取元素的垂直位置
function pageY(elem) {
var p = 0;
// 累加每一个父元素的偏移量
while ( elem.offsetParent ) {
// 增加偏移量
p += elem.offsetTop;
// 遍历下一个父元素
elem = elem.offsetParent;
}
return p;
}
接下来是获取元素相对于它的父元素的水品和垂直位置。简单地使用 style.left 或 style.top 并不够,因为需要处理的元素可能尚未经过JavaScript或CSS的格式化。要找到元素相对于它的父元素的位置,可以利用offsetParent属性,但该属性并不保证能够反追指定元素的真实父元素,所以还需要使用前面的pageX和pageY函数来计算父元素和子元素之间的差。在下面的函数中,如果是当前元素的父元素,则使用offsetParent;否则继续遍历DOM,使用pageX和pageY函数来确定它的真实位置。
// 获取相对于父元素的水平位置
function parentX(elem) {
// 如果 offsetParent 是元素的父元素,则返回
return elem.parentNode == elem.offsetParent ?
elem.offsetLeft :
// 否则计算元素和其父元素的水平差值
pageX( elem ) - pageX( elem.parentNode );
}
// 获取相对于父元素的垂直位置
function parentY(elem) {
// 如果 offsetParent 是元素的父元素,则返回
return elem.parentNode == elem.offsetParent ?
elem.offsetTop :
// 否则计算元素和其父元素的水平差值
pageY( elem ) - pageY( elem.parentNode );
}
最后是获取元素相对于它的CSS容器的位置。在CSS定位方式的讨论中我么知道,即使元素包含在另一个元素内,它也可以相对于其他的父元素定位(使用相对和绝对定位)。这种情形可以使用getStyle函数得到CSS偏移的最终值,这等于元素的位置值。
// 左侧位置
function posX(elem) {
// 获取样式并得到数值
return parseInt( getStyle( elem, "left" ) );
}
// 顶端位置
function posY(elem) {
// 获取样式并得到数值
return parseInt( getStyle( elem, "top" ) );
}
设置位置
调整元素位置的唯一方法就是修改它的CSS属性,仅需要修改left和top属性即可(尽管还有right和bottom属性)。这样就可以设置元素的位置,不管元素的当前位置在哪儿里。
// 设置元素的水平位置
function setX(elem, pos) {
// 设置CSS的 'left' 属性
elem.style.left = pos + "px";
}
// 设置元素的垂直位置
function setY(elem, pos) {
// 设置CSS的 'top' 属性
elem.style.top = pos + "px";
}
最后,实现一对函数用来增加相对于当前位置的偏移量。利用这个函数可以调整元素的位置向上偏移5像素,从而实现各种动画效果。
// 增加水平偏移量
function addX(elem,pos) {
setX( posX(elem) + pos );
}
// 增加垂直偏移量
function addY(elem,pos) {
setY( posY(elem) + pos );
}
===============================================坐标系文一=================================
在JavaScript中有三种不同的坐标系:屏幕坐标,窗口(viewport)坐标和文档(document)坐标。其中要注意的是文档坐标和窗口坐标的关系。窗口坐标的原点是其视口的作上角,由于窗口具有滚动条,文档的坐标原点可能会滚动到窗口以外,这时要注意两者的关系。在代码的书写过程中要注意的是JavaScript的AIP返回的值是基于什么坐标系的。在利用javaScript来操纵css style的时候中的时候absolute的坐标是相对于document坐标系的。
以下是一些常见的坐标问题
1.document中elemenet的位置和大小
每个element都有四个属性:offsetleft,offsetTop,OffsetHeight,offsetWidth,这四个属性分别代表的是element的左上角和高宽。
最初是由IE4引入的,后来也得到了其他浏览器的支持。但是这些属性值相对于该element的offsetParent的坐标.在<html>文件中中<body>的offsetParent为null,因此要得到一个elment的坐标的正确方法是
getElementX(e)
{
var x=0;
while(e)
{
x+=e.offsetLeft;
e=e.offsetParent;
}
return x;
}
这个方法的返回值是相对于document的坐标的,它不会受到窗口是否滚动的影响。
但是这种方法还有一个小问题,那就是一个element通过设置它的css属性overflow可以拥有自身的滚动条,这时以这种方法得到的只是不正确的。这时正确的方法如下
function getY(element)
{
// Iterate the offsetParents
// Add up offsetTop values
var y = 0;
for(var e = element; e; e = e.offsetParent)
y += e.offsetTop;
// any that have scrollTop set. Subtract these scrolling values from
// the total offset. However, we must be sure to stop the loop before
// we reach document.body, or we'll take document scrolling into account
// and end up converting our offset to window coordinates.
// subtract scrollbar values
if (e.scrollTop) y -= e.scrollTop;
return y;
}
在DOM2的时间模型中的MouseEvent对象和IE的时间模型中的Event对象都有一对属性clinetX和clientY属性,它们表明的是鼠标事件发生时鼠标在viewport坐标中的位置,他们都没有考虑doucument的滚动。如果要得到docuemnt做坐标系下的位置,则应加上windows.pageOffsetX和windows.pageOffsetY的值.
====================================坐标系文二========================================
Window Geometry
窗口几何关系
Screen坐标系是描述浏览器窗口和桌面之间的几何关系的,其坐标是相对于桌面左上角的。
Window坐标系描述了浏览器页面可视区域的几何关系,其坐标是相对于可视区域的左上角。
Document坐标系描述了HTML元素与document文档的几何关系,其坐标是相对于document对象的左上角的。
当document足够长而产生滚动条,document坐标系和window坐标系就会产生差异,两个坐标系之间就要考虑转换的方法。
IE在默认状态下将这些相关属性放在document.body下,但如果有<!DOCTYPE>声明,那么就会放在document.documentElement下。
| 浏览器 | window对象坐标大小 | 可视区域大小 | 滚动条 | document对象坐标大小 |
| FF | screenX/Y | innerWidth/Height | pageXOffset/YOffset | documentElement.scrollLeft/Top |
| IE with doctype | screenLeft/Top | documentElement.clientWidth | documentElement.scrollLeft/Top/Height | documentElement.scrollLeft/Top |
以下是一个获取几何参数的函数

- /**
- * Geometry.js: portable functions for querying window and document geometry
- *
- * This module defines functions for querying window and document geometry.
- *
- * getWindowX/Y( ): return the position of the window on the screen
- * getViewportWidth/Height( ): return the size of the browser viewport area
- * getDocumentWidth/Height( ): return the size of the document
- * getHorizontalScroll( ): return the position of the horizontal scrollbar
- * getVerticalScroll( ): return the position of the vertical scrollbar
- *
- * Note that there is no portable way to query the overall size of the
- * browser window, so there are no getWindowWidth/Height( ) functions.
- *
- * IMPORTANT: This module must be included in the <body> of a document
- * instead of the <head> of the document.
- */
- var Geometry = {};
- if (window.screenLeft) { // IE and others
- Geometry.getWindowX = function( ) { return window.screenLeft; };
- Geometry.getWindowY = function( ) { return window.screenTop; };
- }
- else if (window.screenX) { // Firefox and others
- Geometry.getWindowX = function( ) { return window.screenX; };
- Geometry.getWindowY = function( ) { return window.screenY; };
- }
- if (window.innerWidth) { // All browsers but IE
- Geometry.getViewportWidth = function( ) { return window.innerWidth; };
- Geometry.getViewportHeight = function( ) { return window.innerHeight; };
- Geometry.getHorizontalScroll = function( ) { return window.pageXOffset; };
- Geometry.getVerticalScroll = function( ) { return window.pageYOffset; };
- }
- else if (document.documentElement && document.documentElement.clientWidth) {
- // These functions are for IE 6 when there is a DOCTYPE
- Geometry.getViewportWidth =
- function( ) { return document.documentElement.clientWidth; };
- Geometry.getViewportHeight =
- function( ) { return document.documentElement.clientHeight; };
- Geometry.getHorizontalScroll =
- function( ) { return document.documentElement.scrollLeft; };
- Geometry.getVerticalScroll =
- function( ) { return document.documentElement.scrollTop; };
- }
- else if (document.body.clientWidth) {
- // These are for IE4, IE5, and IE6 without a DOCTYPE
- Geometry.getViewportWidth =
- function( ) { return document.body.clientWidth; };
- Geometry.getViewportHeight =
- function( ) { return document.body.clientHeight; };
- Geometry.getHorizontalScroll =
- function( ) { return document.body.scrollLeft; };
- Geometry.getVerticalScroll =
- function( ) { return document.body.scrollTop; };
- }
- // These functions return the size of the document. They are not window
- // related, but they are useful to have here anyway.
- if (document.documentElement && document.documentElemnet.scrollWidth) {
- Geometry.getDocumentWidth =
- function( ) { return document.documentElement.scrollWidth; };
- Geometry.getDocumentHeight =
- function( ) { return document.documentElement.scrollHeight; };
- }
- else if (document.body.scrollWidth) {
- Geometry.getDocumentWidth =
- function( ) { return document.body.scrollWidth; };
- Geometry.getDocumentHeight =
- function( ) { return document.body.scrollHeight; };
- }


 286
286

 被折叠的 条评论
为什么被折叠?
被折叠的 条评论
为什么被折叠?
 到【灌水乐园】发言


