


本文目录
1. 什么是授权
先解释下什么是授权,授权是指微信用户,授权网页获取用户相关的信息。
也就是说,微信官方为了保护用户隐私权益,默认是不允许咱们开发的网页,获取用户的信息的,我们需要让用户授权。
2. 两种授权方式
有两种授权方式,snsapi_base和snsapi_userinfo。
snsapi_base静默授权,不需要用户手工同意,但是该授权方式只能获取access_token和openID。
snsapi_userinfo可以获取更多用户信息,如头像、性别、昵称,但是需要用户手工确认授权。另外注意,如果用户已关注公众号,那么在进入公众号网页时,使用snsapi_userinfo也是静默授权。微信官方认为既然关注了公众号,公众号就有权力获取用户信息。
3. 网页授权access_token和普通access_token
这个是非常容易混淆的概念,普通access_token是公众号接口使用的,网页授权access_token是调用网页接口使用的,它俩不是一个,功能也不同。
此处吐槽下微信,搞一个名字,太容易误导开发者了。
4. 网页授权流程
微信网页授权是通过OAuth2.0实现的,熟悉OAuth2.0的容易理解流程,不熟悉的此处我再解释下,确实不好理解。
第一步,构造一个url,引导用户授权,用户授权后,会向我们指定的回调地址发送授权码code。
第二步,通过code获取网页授权access_token、openid。
第三步,获取JSSDK配置信息,以便调用各种微信JS接口。
5. 网页授权代码开发
5.1 项目搭建
创建SpringBoot项目,并引入微信公众号、微信支付依赖。
<project xmlns="http://maven.apache.org/POM/4.0.0"
	xmlns:xsi="http://www.w3.org/2001/XMLSchema-instance"
	xsi:schemaLocation="http://maven.apache.org/POM/4.0.0 https://maven.apache.org/xsd/maven-4.0.0.xsd">
	<modelVersion>4.0.0</modelVersion>
	<parent>
		<groupId>org.springframework.boot</groupId>
		<artifactId>spring-boot-starter-parent</artifactId>
		<version>2.2.5.RELEASE</version>
		<relativePath /> <!-- lookup parent from repository -->
	</parent>
	<groupId>cn.pandabrother</groupId>
	<artifactId>wx-server</artifactId>
	<version>0.0.1-SNAPSHOT</version>
	<packaging>war</packaging>
	<properties>
		<project.build.sourceEncoding>UTF-8</project.build.sourceEncoding>
		<project.reporting.outputEncoding>UTF-8</project.reporting.outputEncoding>
		<java.version>1.8</java.version>
		<maven-jar-plugin.version>3.0.0</maven-jar-plugin.version>
	</properties>
	<dependencies>
		<dependency>
			<groupId>org.springframework.boot</groupId>
			<artifactId>spring-boot-starter-web</artifactId>
		</dependency>
		<dependency>
			<groupId>org.projectlombok</groupId>
			<artifactId>lombok</artifactId>
		</dependency>
		<dependency>
			<groupId>org.springframework.boot</groupId>
			<artifactId>spring-boot-devtools</artifactId>
		</dependency>
		<!-- 添加swagger2相关功能 -->
		<dependency>
			<groupId>io.springfox</groupId>
			<artifactId>springfox-swagger2</artifactId>
			<version>2.9.2</version>
		</dependency>
		<!-- 添加swagger-ui相关功能 -->
		<dependency>
			<groupId>io.springfox</groupId>
			<artifactId>springfox-swagger-ui</artifactId>
			<version>2.9.2</version>
		</dependency>
		<!-- 微信公众号 -->
		<dependency>
			<groupId>com.github.binarywang</groupId>
			<artifactId>weixin-java-mp</artifactId>
			<version>4.1.0</version>
		</dependency>
		<!-- 微信支付 -->
		<dependency>
			<groupId>com.github.binarywang</groupId>
			<artifactId>weixin-java-pay</artifactId>
			<version>4.1.0</version>
		</dependency>
	</dependencies>
	<build>
		<plugins>
			<plugin>
				<groupId>org.springframework.boot</groupId>
				<artifactId>spring-boot-maven-plugin</artifactId>
			</plugin>
		</plugins>
	</build>
</project>
5.2 修改配置文件
修改配置文件application.yml,设置启动端口即访问路径。
server:
   port: 80 #端口
   servlet:
      context-path: /wx-server
5.3 开发启动类
/**
 * SpringBoot启动类
 */
@SpringBootApplication
public class WxServerApplication {
	public static void main(String[] args) {
		SpringApplication.run(WxServerApplication.class, args);
	}
}
5.4 开发公众号配置类
开发供公众号配置类,将公众号的appid、appsecret等参数注入容器。注意代码中xxx需要替换为实际参数。
/**
 * 微信公众平台配置
 */
@Configuration
public class WxMpConfig {

	@Bean
	public WxMpDefaultConfigImpl wxMpDefaultConfigImpl() {
		WxMpDefaultConfigImpl config = new WxMpDefaultConfigImpl();
		config.setAppId("xxx"); // 设置微信公众号的appid
		config.setSecret("xxx"); // 设置微信公众号的app corpSecret
		config.setToken("xxx"); // 设置微信公众号的token
		config.setAesKey("xxx"); // 设置微信公众号的EncodingAESKey
		return config;
	}

	@Bean
	public WxMpService wxMpService() {
		WxMpService wxMpService = new WxMpServiceImpl();// 实际项目中请注意要保持单例,不要在每次请求时构造实例,具体可以参考demo项目
		wxMpService.setWxMpConfigStorage(wxMpDefaultConfigImpl());
		return wxMpService;
	}
}
5.5 开发控制器
开发微信网页相关的后端控制器WxPageController:
/**
 * 微信网页控制器
 */
@Controller
public class WxPageController {
	@Autowired
	private WxMpService wxMpService;

	/**
	 * 第一步,引导用户授权
	 */
	@GetMapping("/wxAuth")
	public String wxAuth(HttpServletRequest request) throws Exception {
		String url = "http://easypanda.oicp.io/wx-server/wxUserInfo";
		String redirectUrl = wxMpService.getOAuth2Service().buildAuthorizationUrl(url, WxConsts.OAuth2Scope.SNSAPI_USERINFO, null);
		return "redirect:" + redirectUrl;
	}

	/**
	 * 第二步,用户授权后,回调该方法,拿到code换取access_token
	 */
	@GetMapping("/wxUserInfo")
	public String userInfo(@RequestParam("code") String code, @RequestParam("state") String state) throws Exception {
		WxOAuth2AccessToken wxOAuth2AccessToken = wxMpService.getOAuth2Service().getAccessToken(code);
		String openId = wxOAuth2AccessToken.getOpenId();
		// 返回我们开发的网页
		return "redirect:" + "http://easypanda.oicp.io/wx-server/wxpage.html?openid=" + openId;
	}

	/**
	 * 第三步,获取JSSDK配置信息
	 */
	@GetMapping("/wxJsapiSignature")
	@ResponseBody
	public WxJsapiSignature wxJsapiSignature(String url) throws Exception {
		return wxMpService.createJsapiSignature(url);
	}

}
此处需要注意的是,此处网页地址我均使用的公网可访问的域名地址,此处使用的是内网穿透。有公网服务器的也可以选择直接使用公网服务器测试。
5.6 开发测试网页
为了便于测试,我们在resource目录下创建static文件夹,并开发wxpage.html页面:
<html>
<head>
<meta charset="utf-8">
</head>
<body>
	hello
</body>
</html>
6. 测试
6.1 网页授权测试
打开开发者工具,输入地址http://easypanda.oicp.io/wx-server/wxAuth引导用户授权,此时开发者工具提示:
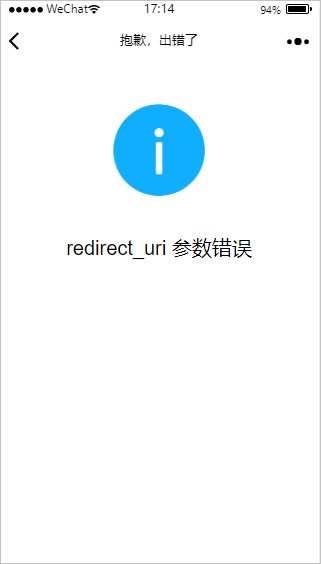
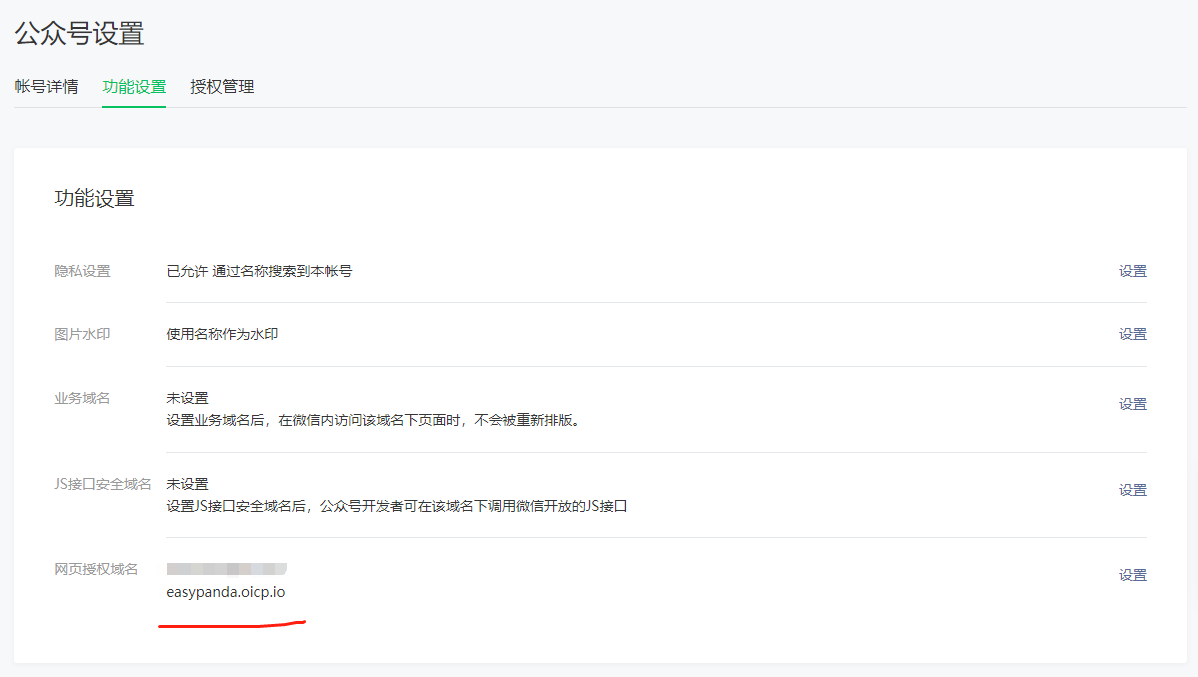
我们登录公众号,在【设置与开发】-【公众号设置】-【功能设置】-【网页授权域名】中添加当前域名。注意此处需要下载txt文件,放到域名根目录。
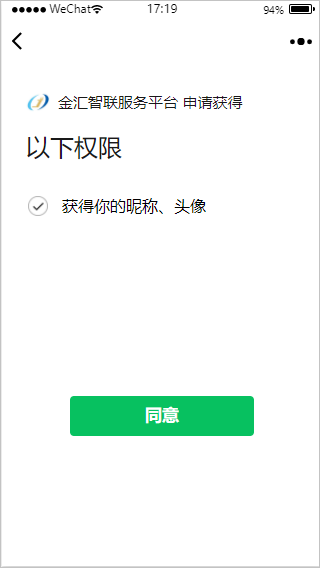
此时再次尝试,注意此时方式为SNSAPI_USERINFO,微信提醒用户授权:
我们更换为SNSAPI_BASE,再次请求授权:此时可以直接进入我们指定的网页。
6.2 获取用户code测试
进入我们指定网页后,我们将地址栏的重定向地址拷贝出来:
http://easypanda.oicp.io/wx-server/wxpage.html?openid=oINiq6UqTiKqfXN3H6RmeKvvRnmw
可见已经成功获取到用户的openid,也就是说,用户授权后,会自动定向到wxUserInfo方法并传递code参数。
6.3 获取JSSDK配置信息测试
此时访问http://easypanda.oicp.io/wx-server/wxJsapiSignature,可以获取JSSDK配置信息,如下:
{"appId":"wxa0168d6e3b5547ff","nonceStr":"AbMcd6UcZNgmBcSa","timestamp":1643016353,"url":null,"signature":"91073ffc3ef83f88908356be7fbee0c01a65c5ff"}
我们可以通过该配置信息,调用JSSDK啦。
7. 本地地址测试问题
我们可以访问http://127.0.0.1/wx-server/wxAuth,但是如果回调地址填写本地地址微信会提示redirect_uri参数错误,所以使用本地地址测试是不方便的。
8. 小结
微信网页授权的过程确实比较绕,但是该功能比较重要,包括后续的微信公众号支付开发,也需要借助网页授权。
另外在大多数情况下,可以采用SNSAPI_BASE授权方式,静默的体验比弹窗提示授权更好!


 7414
7414


 被折叠的 条评论
为什么被折叠?
被折叠的 条评论
为什么被折叠?
 到【灌水乐园】发言


