


 本文详细解读了VSCode的启动逻辑,主进程与Renderer进程的关系,以及它们之间的通信机制,包括性能追踪和服务实例化。重点讲解了Electron框架的应用和VSCode的工作流程,适合初识者和深入研究者。
vscode的依赖安装还是挺费劲的,反反复复安装了半天才成功,公司wifi,手机热点、科学上网工具各种切换。我下载的vscode版本是1.63.0,node版本 v14.18.1
依赖环境参照文档:https://github.com/microsoft/vscode/wiki/How-to-Contribute?_blank
安装依赖:yarn
自动编译:yarn watch
启动窗口:./scripts/code.sh
Main 和 Renderer
倘若你之前没有 Electron 的开发经验,这个段落不容错过。
如果你可以建一个网站,你就可以建一个桌面应用程序。 Electron 是一个使用 JavaScript, HTML 和 CSS 等 Web 技术创建原生程序的框架,它负责比较难搞的部分,你只需把精力放在你的应用的核心上即可。
Electron 是个什么东西?官方对它的定义是:“使用 JavaScript, HTML 和 CSS 构建跨平台的桌面应用”。
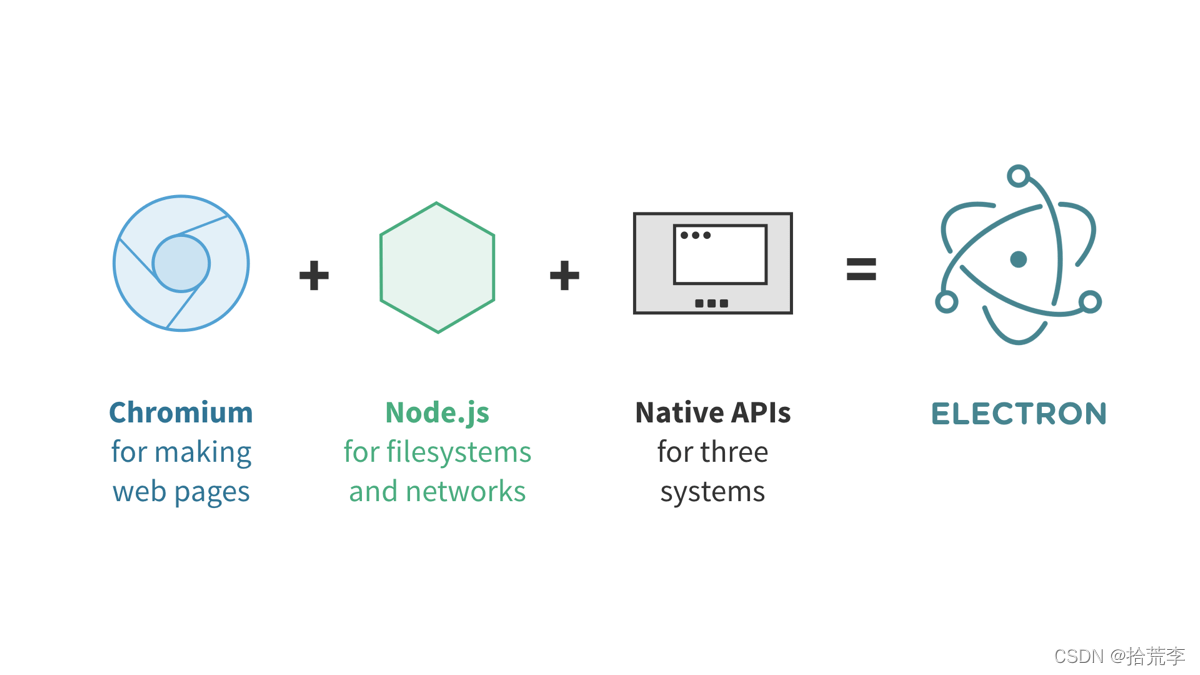
两个核心文件,一个是 main.js,另外一个是 index.html,你完全可以这么理解:前者跑的是 Main Process,它的执行环境是一个 Node 环境;后者跑的是 Renderer Process,它的执行环境是一个 Chromium + Node 环境,也就是说,我们写的 index.html 中可以去调用 Node.js 的模块,这也是 Electron 与普通浏览器的主要差别。
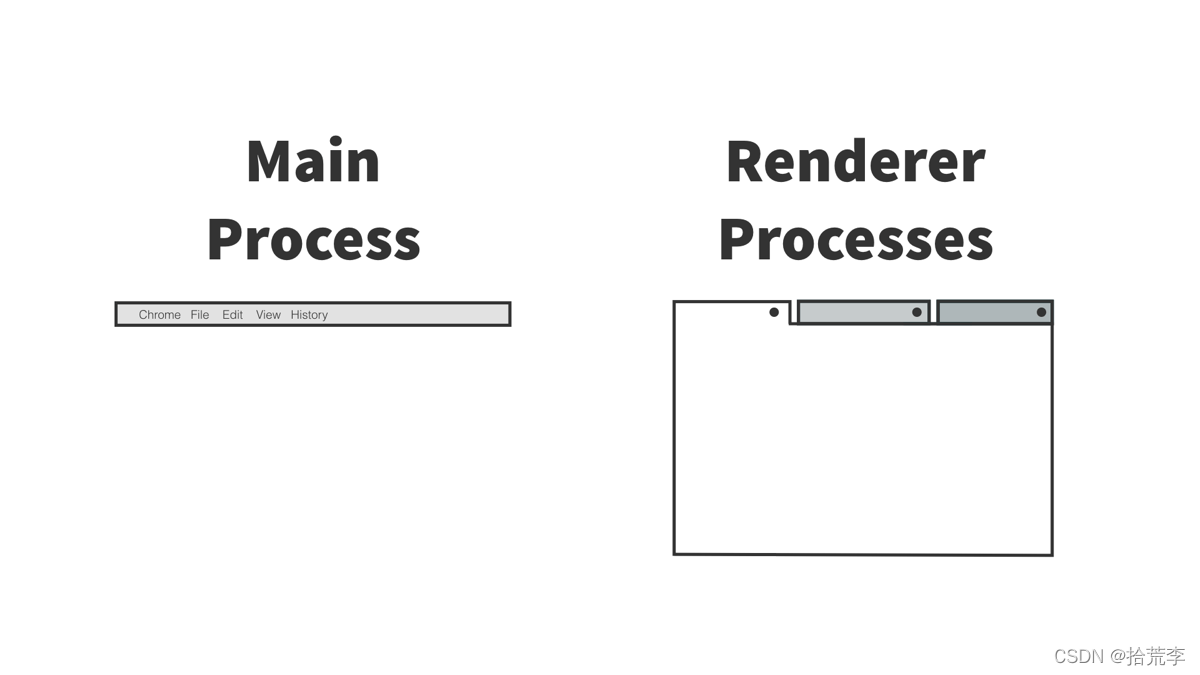
Main 进程中可以通过 BrowserWindow 实例化多个 Renderer 进程,且每个 Renderer 进程相关独立,在复杂的项目中会涉及到了很多通信问题,比如 Main-Renderer 通讯,Renderer-Main 通讯,Renderer-Renderer 通讯.
Main 和 Renderer 之间的关系,可以用这种图来形容
对于 Electron,先了解这么多知识,如果你期望了解更多,可以移步Electron 官方文档。
一、初识 VS Code
很多同学对 VS Code 已经熟悉得不能再熟悉了,谈不上初识,不过我们这里说的“初识”是针对它的架构和源码,相信对大多数人来说,它依然是陌生的。
先看看项目的整体目录结果,过滤了几个次要项:
├── bootstrap-amd.js # 子进程实际入口
├── bootstrap-fork.js #
├── bootstrap-window.js #
├── bootstrap.js # 子进程环境初始化
├── buildfile.js # 构建config
├── cli.js # CLI入口
├── main.js # 主进程入口
├── paths.js # AppDataPath与DefaultUserDataPath
├── typings
│ └── xxx.d.ts # ts类型声明
└── vs
├── base # 通用工具/协议和基础 DOM UI 控件
│ ├── browser # 基础UI组件,DOM操作、交互事件、DnD等
│ ├── common # diff描述,markdown解析器,worker协议,各种工具函数
│ ├── node # Node工具函数
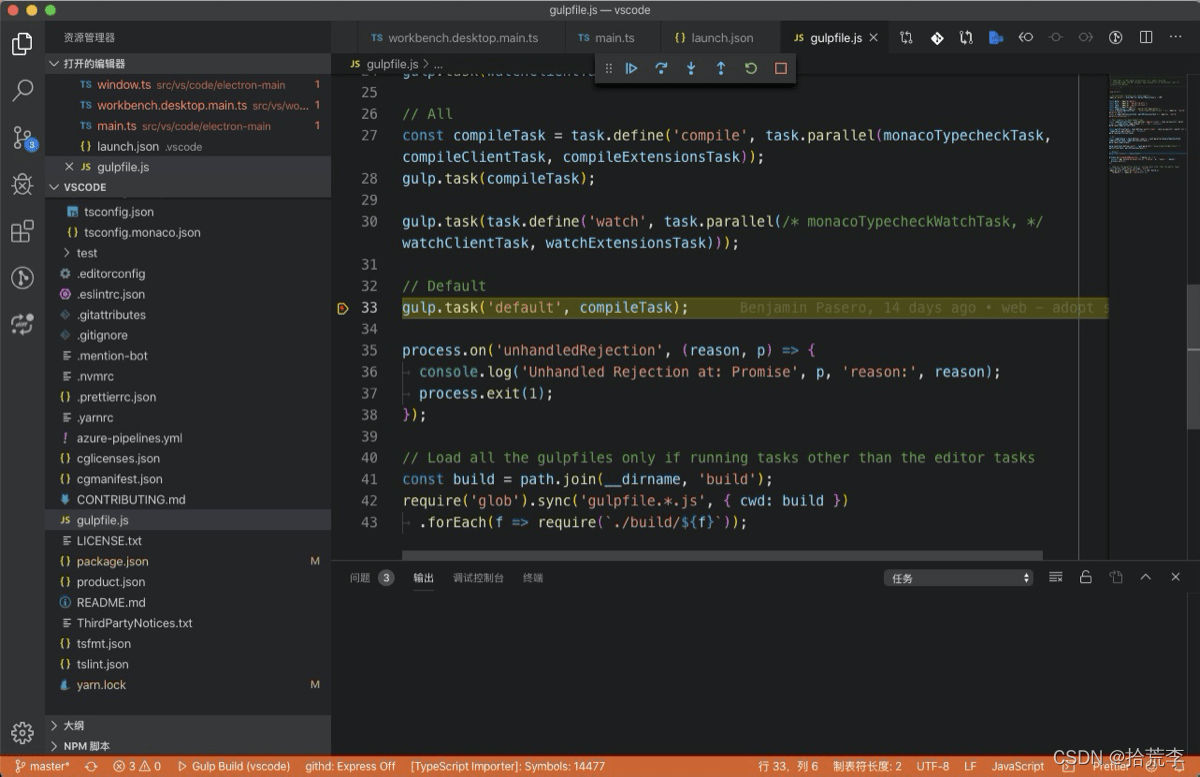
│ ├── parts # IPC协议(Electron、Node),quickopen、tree组件
│ ├── test # base单测用例
│ └── worker # Worker factory 和 main Worker(运行IDE Core:Monaco)
├── code # vscode主窗体相关
| ├── electron-browser # 需要 Electron 渲染器处理API的源代码(可以使用 common, browser, node)
| ├── electron-main # 需要Electron主进程API的源代码(可以使用 common, node)
| ├── node # 需要Electron主进程API的源代码(可以使用 common, node)
| ├── test
| └── code.main.ts
├── editor # 对接 IDE Core(读取编辑/交互状态),提供命令、上下文菜单、hover、snippet等支持
| ├── browser # 代码编辑器核心
| ├── common # 代码编辑器核心
| ├── contrib # vscode 与独立 IDE共享的代码
| ├── standalone # 独立 IDE 独有的代码
| ├── test
| ├── editor.all.ts
| ├── editor.api.ts
| ├── editor.main.ts
| └── editor.worker.ts
├── platform # 支持注入服务和平台相关基础服务(文件、剪切板、窗体、状态栏)
├── workbench # 协调editor并给viewlets提供框架,比如目录查看器、状态栏等,全局搜索,集成Git、Debug
├── buildunit.json
├── css.build.js # 用于插件构建的CSS loader
├── css.js # CSS loader
├── loader.js # AMD loader(用于异步加载AMD模块,类似于require.js)
├── nls.build.js # 用于插件构建的 NLS loader
└── nls.js # NLS(National Language Support)多语言loader
二、调试
Main 进程调试
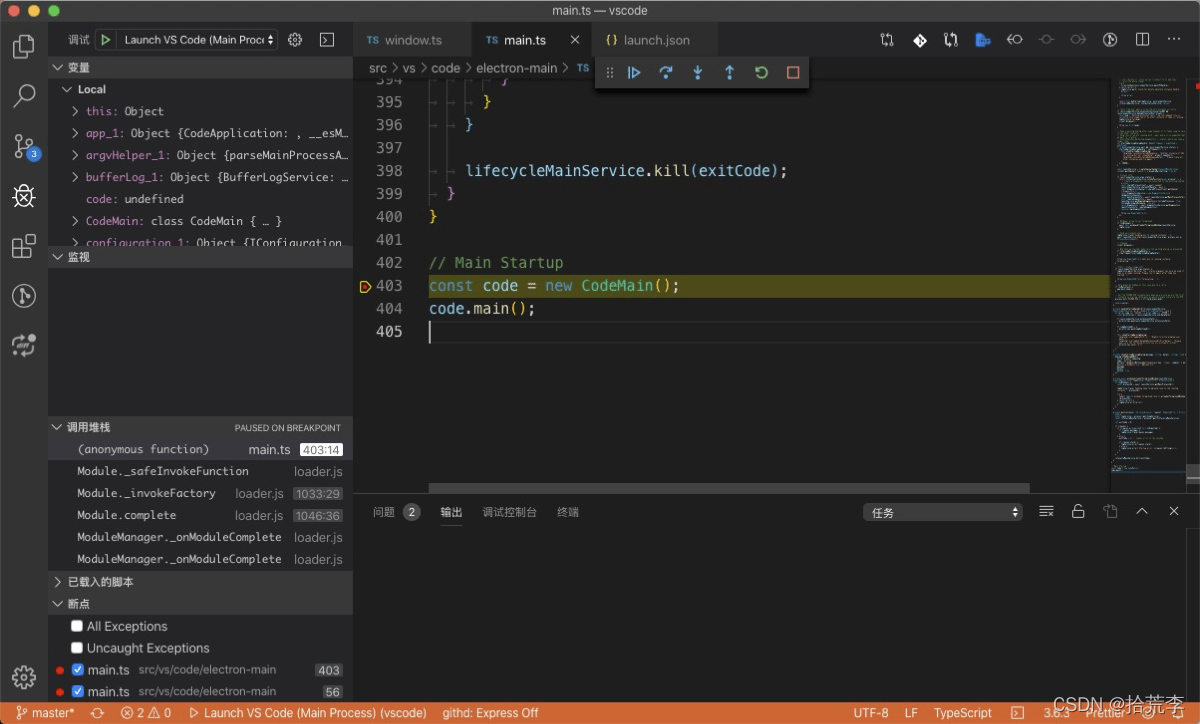
先进入到一个 Main 进程会执行到的代码区域,打一个断点,如 vs/code/electron-main/main.ts:404:0,然后选择 launch.json 中的 Launch VS Code (Main Process) 配置:
{
  "type": "node",
  "request": "launch",
  "name": "Launch VS Code (Main Process)",
  "runtimeExecutable": "${workspaceFolder}/scripts/code.sh",
  "windows": {
    "runtimeExecutable": "${workspaceFolder}/scripts/code.bat",
  },
  "runtimeArgs": [
    "--no-cached-data"
  ],
  "outFiles": [
    "${workspaceFolder}/out/**/*.js"
  ]
}
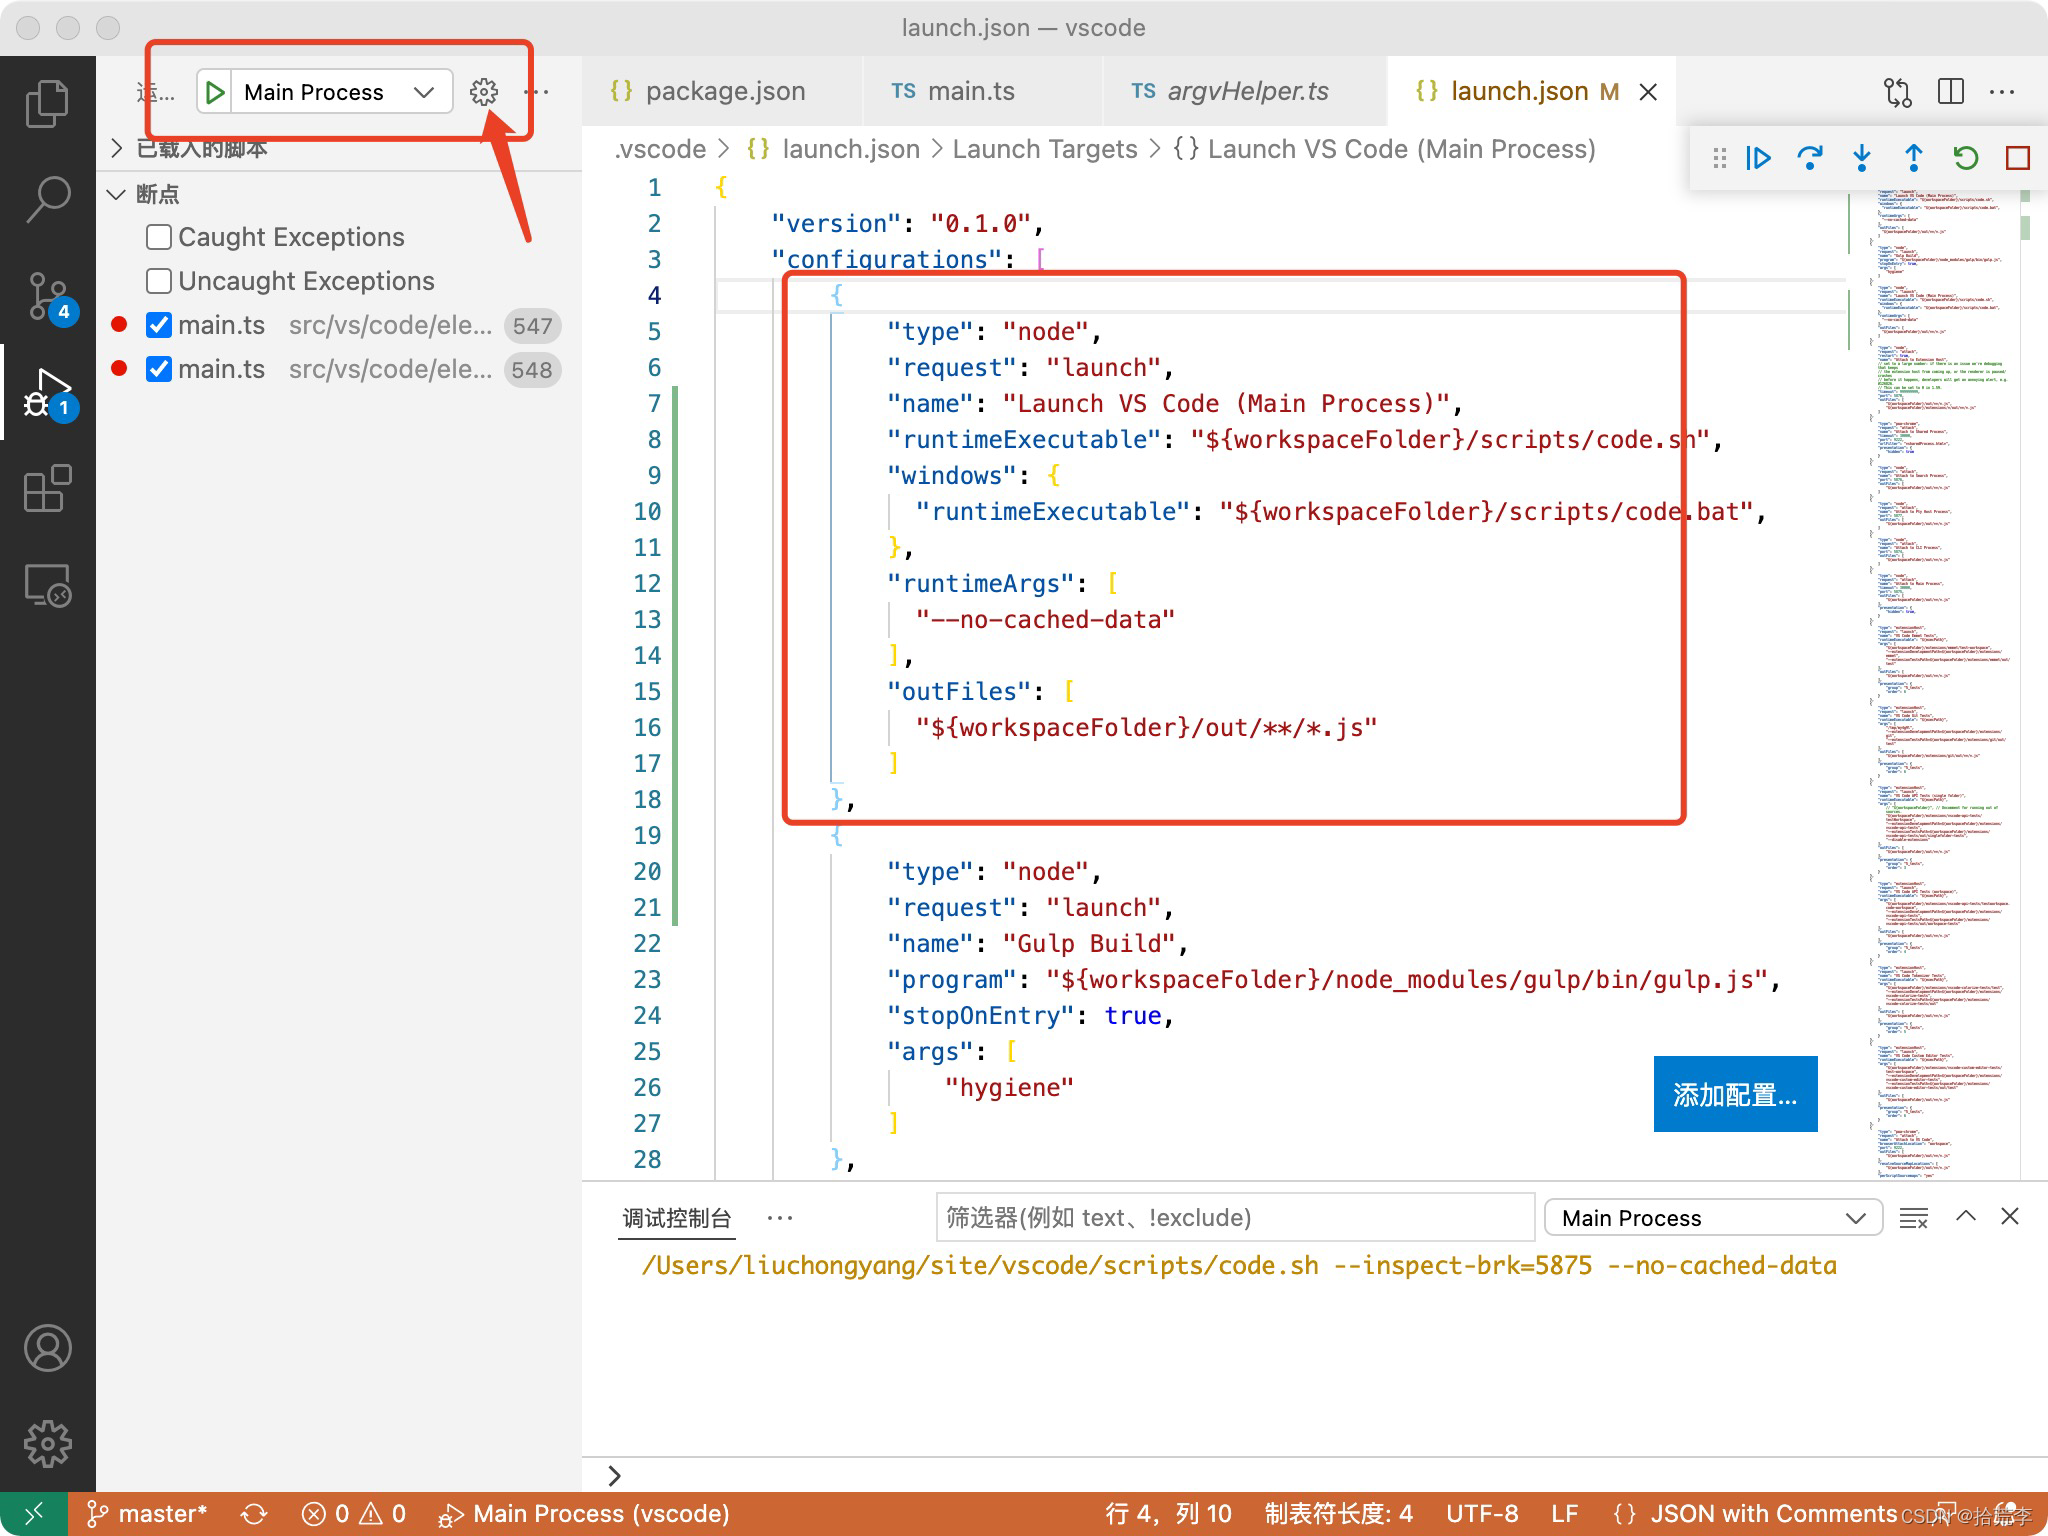
启动的默认端口是 5875,点击开始调试按钮,或者按下快捷键 F5,便会进入调试模块,在 VS Code 上也有体现:
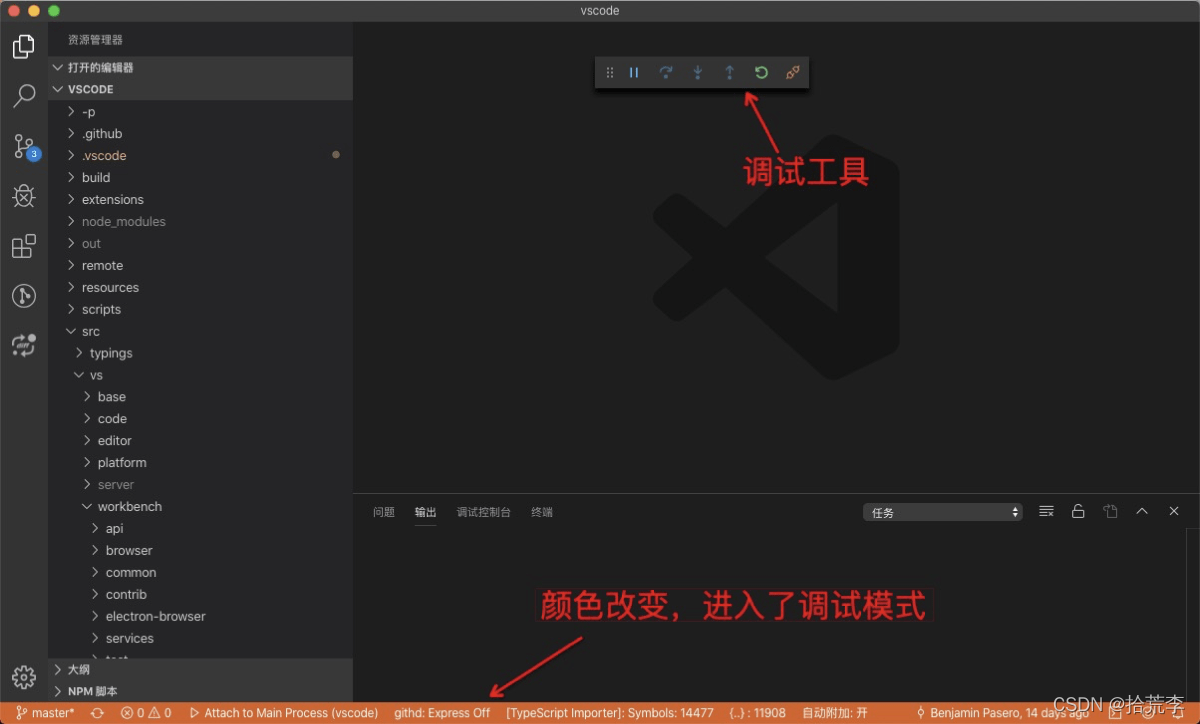
可以看到我们打点的位置也已经亮了起来,阻塞了 VS Code Dev 的启动:
Renderer 进程的调试
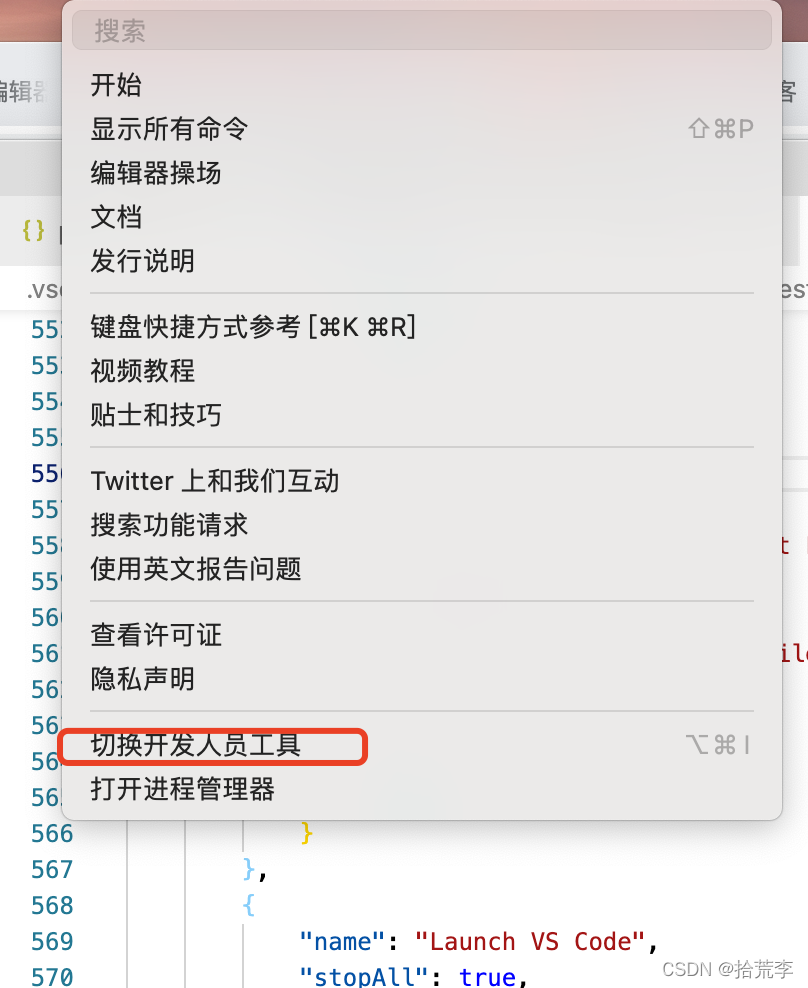
打开开发者工具,在调试代码的地方加上debugger
或者
选择 launch.json 中的 Launch VS Code,它的内容是:
{
  "type": "chrome",
  "request": "launch",
  "name": "Launch VS Code",
  "windows": {
    "runtimeExecutable": "${workspaceFolder}/scripts/code.bat"
  },
  "osx": {
    "runtimeExecutable": "${workspaceFolder}/scripts/code.sh"
  },
  "linux": {
    "runtimeExecutable": "${workspaceFolder}/scripts/code.sh"
  },
  "timeout": 20000,
  "env": {
    "VSCODE_EXTHOST_WILL_SEND_SOCKET": null
  },
  "breakOnLoad": false,
  "urlFilter": "*workbench.html*",
  "runtimeArgs": [
    "--inspect=5875",
    "--no-cached-data"
  ],
  "webRoot": "${workspaceFolder}"
}
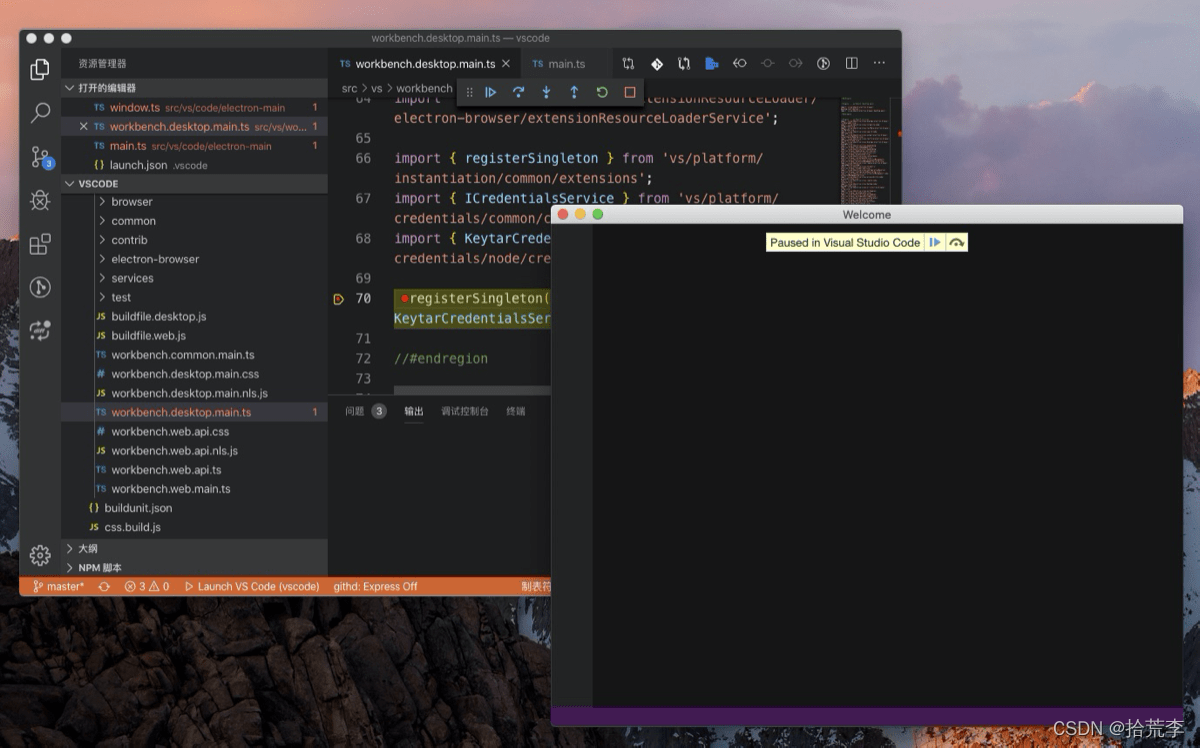
同样,开启调试后,找个 Renderer 进程会执行到的代码块进行断点,如 vs/workbench/workbench.desktop.main.ts,如果你的 VS Code Dev 已经启动了,可以在 VS Code Dev 的界面中按下 cmd+r,它会自动刷新 Renderer 进程(刷新页面),重新进入你的断点:
构建脚本调试
知道了如何对软件本身的代码进行调试,大部分情况下已经够用了,但是如果你在启动 VS Code 的时候失败了,报了个错,或者当你打包 VS Code 的时候,抛出个异常,需要怎么排查问题呢?
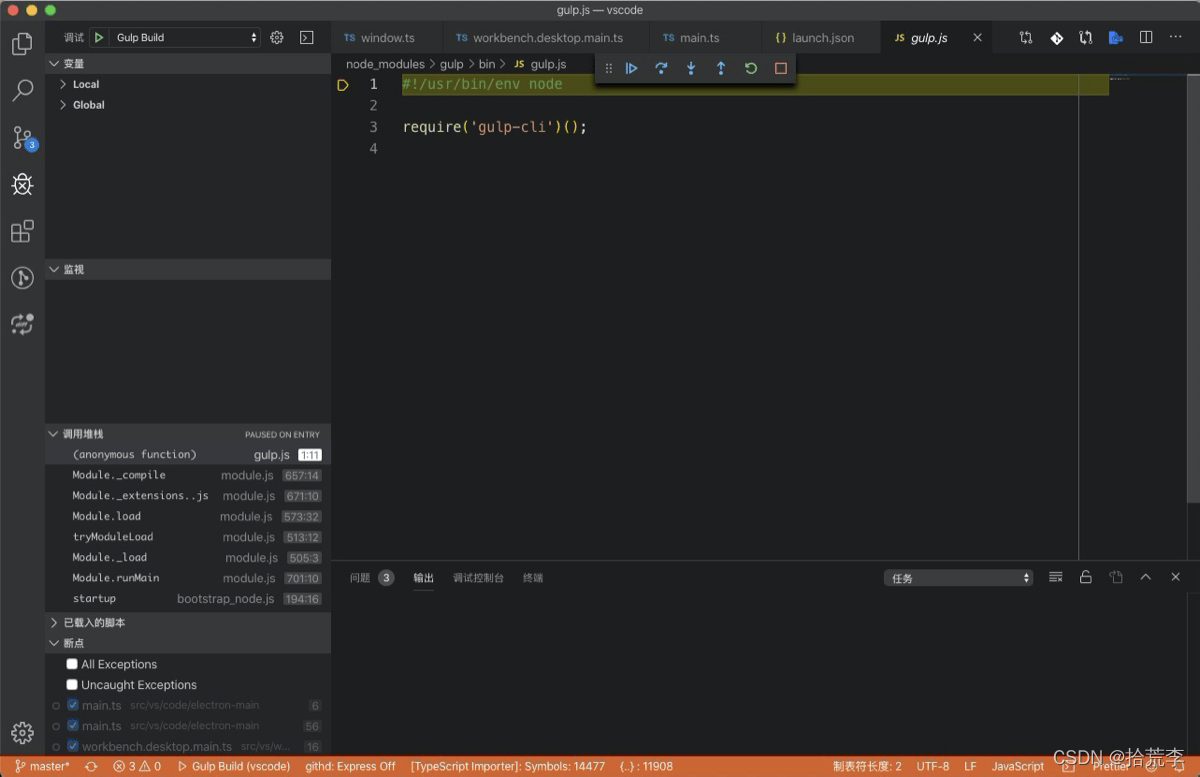
这里,我们可以了解下构建脚本的调试,虽说构建脚本我们可以随时写一句 console.log 打印日志,但是 VS Code 的 build 脚本是非常多,而且每一次的构建都特别漫长,还是更加推荐你使用它提供的构建脚本调试能力进行 Debug,在 launch.json 中有一个 Gulp Build配置:
{
  "type": "node",
  "request": "launch",
  "name": "Gulp Build",
  "program": "${workspaceFolder}/node_modules/gulp/bin/gulp.js",
  "stopOnEntry": true,
  "args": [
    "hygiene"
  ]
}
通过这个配置启动 gulp,这样就可以对构建脚本进行断点了,由于配置中加了 stopOnEntry,当进入调试的时候,第一行就会断住:
你也可以去掉这个参数,不过需要你在执行 gulp 之前在程序中提前断一个点:
三、程序的启动逻辑,第一个窗口是如何创建的
我们在package.json里能找到他的入口文件;
"main": "./out/main",
electron是分主进程和渲染进程的;
渲染进程是主进程启动的;
./out/main.js显然这就是主进程的入口程序;
确实不假
但别着急去分析这个文件;
因为它是在out目录下,明显是什么东西输出出来的;
我们先打扫一遍src目录下的东西;
发现了tsconfig.json
"outDir": "../out",
这是typescript代码,编译后输出到./out/目录下的;
那么我们来看src下的main.js
分析代码最主要的就是目的明确,我们的目的是看看他的启动逻辑(主窗口是怎么打开的)
无关的东西先不管,要不然很容易迷失…;
我们在main.js里找electron的ready事件
app.once('ready', function () {
	//启动追踪,跟性能检测优化相关。
	if (args['trace']) {
		// @ts-ignore
		const contentTracing = require('electron').contentTracing;

		const traceOptions = {
			categoryFilter: args['trace-category-filter'] || '*',
			traceOptions: args['trace-options'] || 'record-until-full,enable-sampling'
		};

		contentTracing.startRecording(traceOptions, () => onReady());
	} else {
		onReady();
	}
});
先去看onReady方法
onReady里主要就是执行这个方法:
function startup(codeCachePath, nlsConfig) {
	nlsConfig._languagePackSupport = true;

	process.env['VSCODE_NLS_CONFIG'] = JSON.stringify(nlsConfig);
	process.env['VSCODE_CODE_CACHE_PATH'] = codeCachePath || '';

	// Load main in AMD
	perf.mark('code/willLoadMainBundle');
	require('./bootstrap-amd').load('vs/code/electron-main/main', () => {
		perf.mark('code/didLoadMainBundle');
	});
}
到这里,我们先看看bootstrap-amd都干了啥
发现他其实调用了/vs/loader里的方法
loader([entrypoint], onLoad, onError);
loader是微软自家的AMD模块加载开源项目:
https://github.com/Microsoft/vscode-loader/
我们接着来看vs/code/electron-main/main.ts的代码,
发现它一开始就加载了一大堆模块,头大!
先不管它加载的这些模块都是干嘛的,我们看它本身的入口,代码拉到末尾,发现:
const code = new CodeMain();
code.main();
马上去看这个模块的main函数;发现main函数对于我们唯一有用的就是:
this.startup();
这个函数启动了一堆服务之后,就执行了:
return instantiationService.createInstance(CodeApplication, mainProcessNodeIpcServer, instanceEnvironment).startup();
instantiationService.ts在vs/platform/instantiation/common/instantiationService.ts
他的createInstance是个工厂函数,第一个参数是类型(或构造函数),后面的参数都是这个类型的构造函数所需要的参数。
那么我们主要看第一个参数CodeApplication,这个类型的代码在这里:vs/code/electron-main/app.ts
我们找到CodeApplication的startup方法,看到这一句:
// Open Windows
const windows = appInstantiationService.invokeFunction(accessor => this.openFirstWindow(accessor, electronIpcServer, sharedProcessClient));
这应该就是我们找的启动主窗口的方法了,跟进去看看:
一开始是一大堆IPC通信相关的代码(主线程和渲染线程通信的代码)
之后创建了IWindowsMainservice的实例
跳进this.openFirstWindow方法
const windowsMainService = this.windowsMainService = accessor.get(IWindowsMainService);
accessor.get(IWindowsMainService)方法做了数据缓存,缓存到了map对象里。
可以尝试令this.windowsMainService = undefined; 进行调试
接下来-然后用这个实例创建了窗口
// default: read paths from cli
return windowsMainService.open({
	context,
	cli: args,
	forceNewWindow: args['new-window'] || (!hasCliArgs && args['unity-launch']),
	diffMode: args.diff,
	noRecentEntry,
	waitMarkerFileURI,
	gotoLineMode: args.goto,
	initialStartup: true,
	remoteAuthority
});
IWindowsMainservice接口具体实例的类型是WindowsManager(可以在app.ts文件中找到下面的代码)
// Windows
services.set(IWindowsMainService, new SyncDescriptor(WindowsMainService, [machineId, this.userEnv]));
IWindowsMainservice接口的描述文件在这里:vs\platform\windows\electron-main\windows.ts)
WindowsMainService在src/vs/platform/windows/electron-main/windowsMainService.ts文件中定义,
那我们去看看WindowsMainService的open方法,发现了:
// Open based on config
const { windows: usedWindows, filesOpenedInWindow } = this.doOpen(openConfig, workspacesToOpen, foldersToOpen, emptyWindowsWithBackupsToRestore, emptyToOpen, filesToOpen, foldersToAdd);
好,再去看doOpen,发现最后的:
// Finally, if no window or folder is found, just open the files in an empty window
else {
	addUsedWindow(this.openInBrowserWindow({
		userEnv: openConfig.userEnv,
		cli: openConfig.cli,
		initialStartup: openConfig.initialStartup,
		filesToOpen,
		forceNewWindow: true,
		remoteAuthority: filesToOpen.remoteAuthority,
		forceNewTabbedWindow: openConfig.forceNewTabbedWindow
	}), true);
}
注意:这两个方法有一个重要的逻辑就是:如果已经有一个窗口了,那么就用现成的窗口打开目录(或文件)
再去看openInBrowserWindow
// Create the window
const createdWindow = window = this.instantiationService.createInstance(CodeWindow, {
	state,
	extensionDevelopmentPath: configuration.extensionDevelopmentPath,
	isExtensionTestHost: !!configuration.extensionTestsPath
});
它创建了一个CodeWindow的实例,这个类型在:vs/code/electron-main/window.ts中定义
这个类型的构造函数里调用了这个方法:
// Create the browser window
this._win = new BrowserWindow(options);
至此:VSCode窗口创建出来了
好!窗口创建出来了,那么窗口中的内容呢?按道理来说应该加载一个页面用于展现UI的呀?
复习结束,下面是新的内容
我们接着去看openInBrowserWindow方法的后面的内容,发现有这么一句:
src/vs/platform/windows/electron-main/windowsMainService.ts
if (window.isReady) {
	this.lifecycleService.unload(window, UnloadReason.LOAD).then(veto => {
		if (!veto) {
			this.doOpenInBrowserWindow(window!, configuration, options);
		}
	});
} else {
	this.doOpenInBrowserWindow(window, configuration, options);
}
在doOpenInBrowserWindow里,调用了
window.load(configuration);
OK!我们再回到CodeWindow的类型里去,看看load方法做了什么
我们看到了这一句:
// Load URL
this._win.loadURL(FileAccess.asBrowserUri(this.environmentMainService.sandbox ?
	'vs/code/electron-sandbox/workbench/workbench.html' :
	'vs/code/electron-browser/workbench/workbench.html', require
).toString(true));
至此,这个窗口总算显示出了一个画面!
这个页面body里并没有任何东西
<!-- Init Bootstrap Helpers -->
<script src="../../../../bootstrap.js"></script>
<script src="../../../../vs/loader.js"></script>
<script src="../../../../bootstrap-window.js"></script>

<!-- Startup via workbench.js -->
<script src="workbench.js"></script>
这里加载了一个workbench.js
(src\vs\code\electron-browser\workbench\workbench.js)
这个文件中执行了:
bootstrapWindow.load([
	'vs/workbench/workbench.desktop.sandbox.main',
	'vs/nls!vs/workbench/workbench.desktop.main',
	'vs/css!vs/workbench/workbench.desktop.main'
],
'vs/nls!vs/workbench/workbench.desktop.main.ts’里,执行了:
//#region --- workbench (desktop main)

import 'vs/workbench/electron-browser/desktop.main';
这句代码很重要
我们看看这个类的main方法;它执行了:
const workbench = new DesktopMain(configuration);
return workbench.open();
CodeRendererMain类也在同一个文件里
(src\vs\workbench\electron-browser\main.ts)
它的构造函数里做了一些初始化工作(界面缩放事件设置、文件读写库的设置等),先看open方法:
// Create Workbench
const workbench = new Workbench(document.body, { extraClasses: this.getExtraClasses() }, services.serviceCollection, services.logService);
...
// Startup
const instantiationService = workbench.startup();
你看到,我们把body传给了workbench的实例
workbench的构造函数里,并没有用这个body做什么事情;
而是把他传递给了它的父类:Layout(src\vs\workbench\browser\layout.ts),存储在父类parent属性里
现在我们看看workbench的startup方法
// Layout
this.initLayout(accessor);

// Registries
Registry.as<IWorkbenchContributionsRegistry>(WorkbenchExtensions.Workbench).start(accessor);
Registry.as<IEditorFactoryRegistry>(EditorExtensions.EditorFactory).start(accessor);

// Context Keys
this._register(instantiationService.createInstance(WorkbenchContextKeysHandler));

// Register Listeners
this.registerListeners(lifecycleService, storageService, configurationService, hostService);

// Render Workbench
this.renderWorkbench(instantiationService, accessor.get(INotificationService) as NotificationService, storageService, configurationService);

// Workbench Layout
this.createWorkbenchLayout();

// Layout
this.layout();
initLayout方法,初始化了一堆服务(environmentService,lifecycleService等),监听了一堆事件(全屏、编辑器显隐等)
renderWorkbench方法(最重要!),给body和一个叫container的元素加了一系列的样式;
container元素是在父类Layout里初始化的,这个元素最终会是所有组件的父亲;
src/vs/workbench/browser/workbench.ts
this.container.classList.add(...workbenchClasses);
document.body.classList.add(platformClass); // used by our fonts

if (isWeb) {
	document.body.classList.add('web');
}
之后,给container元素加了几个子元素:
// Create Parts
[
	{ id: Parts.TITLEBAR_PART, role: 'contentinfo', classes: ['titlebar'] },
	{ id: Parts.BANNER_PART, role: 'banner', classes: ['banner'] },
	{ id: Parts.ACTIVITYBAR_PART, role: 'none', classes: ['activitybar', this.state.sideBar.position === Position.LEFT ? 'left' : 'right'] }, // Use role 'none' for some parts to make screen readers less chatty #114892
	{ id: Parts.SIDEBAR_PART, role: 'none', classes: ['sidebar', this.state.sideBar.position === Position.LEFT ? 'left' : 'right'] },
	{ id: Parts.EDITOR_PART, role: 'main', classes: ['editor'], options: { restorePreviousState: this.state.editor.restoreEditors } },
	{ id: Parts.PANEL_PART, role: 'none', classes: ['panel', 'basepanel', positionToString(this.state.panel.position)] },
	{ id: Parts.AUXILIARYBAR_PART, role: 'none', classes: ['auxiliarybar', 'basepanel', this.state.sideBar.position === Position.LEFT ? 'right' : 'left'] },
	{ id: Parts.STATUSBAR_PART, role: 'status', classes: ['statusbar'] }
].forEach(({ id, role, classes, options }) => {
	const partContainer = this.createPart(id, role, classes);

	this.getPart(id).create(partContainer, options);
});
这几个子元素分别是最左侧的ACTIVITYBAR_PART,中间的EDITOR_PART,等等(注意:窗口的菜单栏也是他自己渲染的)
这些元素创建出来之后,就加入到container里去了;
然后把container加入到body里去了(parent存的是body)
// Add Workbench to DOM
this.parent.appendChild(this.container);
在startup方法里还调用了this.layout()方法
src/vs/workbench/browser/layout.ts
position(this.container, 0, 0, 0, 0, 'relative');
size(this.container, this._dimension.width, this._dimension.height);

// Layout the grid widget
this.workbenchGrid.layout(this._dimension.width, this._dimension.height);

// Emit as event
this._onDidLayout.fire(this._dimension);
在这里把container放到到最大,占据整个body
至此界面主要元素渲染完成!
四、性能问题的追踪
代码文件:src\main.js
// Load our code once ready
app.once('ready', function () {
	if (args['trace']) {
		const contentTracing = require('electron').contentTracing;

		const traceOptions = {
			categoryFilter: args['trace-category-filter'] || '*',
			traceOptions: args['trace-options'] || 'record-until-full,enable-sampling'
		};

		contentTracing.startRecording(traceOptions).finally(() => onReady());
	} else {
		onReady();
	}
});
如果指定了特定的启动参数:trace
vscode会在启动之初,执行下面的代码:
const contentTracing = require('electron').contentTracing;
const traceOptions = {
	categoryFilter: args['trace-category-filter'] || '*',
	traceOptions: args['trace-options'] || 'record-until-full,enable-sampling'
};
这段代码的主要目的是:从Chromium的内容模块收集跟踪数据,以查找性能瓶颈和程序执行缓慢的操作。
注意,这个操作只能在app.ready事件触发之后才能执行; startRecoding会异步请求所有子进程开始执行追踪操作;
一旦所有子进程都确认了主进程的请求,主进程就会执行startRecoding的回调方法;
结束追踪
在窗口成功启动之后,vscode结束了性能问题的追踪(如果30秒窗口还没启动,那么也会结束性能问题的追踪)
代码文件:vs\code\electron-main\app.ts(在上一篇博文中,启动第一个窗口,也是在这里执行的)
const windows = appInstantiationService.invokeFunction(accessor => this.openFirstWindow(accessor, electronIpcServer, sharedProcessClient));
stopTracingEventually方法src/vs/code/electron-main/app.ts 的代码为:
private stopTracingEventually(accessor: ServicesAccessor, windows: ICodeWindow[]): void {
	this.logService.info(`Tracing: waiting for windows to get ready...`);

	const dialogMainService = accessor.get(IDialogMainService);

	let recordingStopped = false;
	const stopRecording = async (timeout: boolean) => {
		if (recordingStopped) {
			return;
		}

		recordingStopped = true; // only once

		const path = await contentTracing.stopRecording(joinPath(this.environmentMainService.userHome, `${this.productService.applicationName}-${Math.random().toString(16).slice(-4)}.trace.txt`).fsPath);

		if (!timeout) {
			dialogMainService.showMessageBox({
				title: this.productService.nameLong,
				type: 'info',
				message: localize('trace.message', "Successfully created trace."),
				detail: localize('trace.detail', "Please create an issue and manually attach the following file:\n{0}", path),
				buttons: [mnemonicButtonLabel(localize({ key: 'trace.ok', comment: ['&& denotes a mnemonic'] }, "&&OK"))],
				defaultId: 0,
				noLink: true
			}, withNullAsUndefined(BrowserWindow.getFocusedWindow()));
		} else {
			this.logService.info(`Tracing: data recorded (after 30s timeout) to ${path}`);
		}
	};

	// Wait up to 30s before creating the trace anyways
	const timeoutHandle = setTimeout(() => stopRecording(true), 30000);

	// Wait for all windows to get ready and stop tracing then
	Promise.all(windows.map(window => window.ready())).then(() => {
		clearTimeout(timeoutHandle);
		stopRecording(false);
	});
}
子进程会缓存跟踪数据,一般不会把跟踪数据发送给主进程(避免发送数据再造成性能消耗),
所以,结束跟踪也是主进程异步地要求所有子进程持久化跟踪数据的。
跟踪结束后,会执行stopRecording的回调函数。
在这里会显示一个提示框,提示用户性能追踪的结果;(如果超了30秒,那么就只记日志了)
五、最初创建的服务
在第一节中提到的startup函数里(src\vs\code\electron-main\main.ts)
有一个createServices的调用:
private createServices(): [IInstantiationService, IProcessEnvironment, IEnvironmentMainService, ConfigurationService, StateMainService, BufferLogService, IProductService] {
		const services = new ServiceCollection();

		// Product
		const productService = { _serviceBrand: undefined, ...product };
		services.set(IProductService, productService);

		// Environment
		const environmentMainService = new EnvironmentMainService(this.resolveArgs(), productService);
		const instanceEnvironment = this.patchEnvironment(environmentMainService); // Patch `process.env` with the instance's environment
		services.set(IEnvironmentMainService, environmentMainService);

		// Log: We need to buffer the spdlog logs until we are sure
		// we are the only instance running, otherwise we'll have concurrent
		// log file access on Windows (https://github.com/microsoft/vscode/issues/41218)
		const bufferLogService = new BufferLogService();
		const logService = new MultiplexLogService([new ConsoleMainLogger(getLogLevel(environmentMainService)), bufferLogService]);
		process.once('exit', () => logService.dispose());
		services.set(ILogService, logService);

		// Files
		const fileService = new FileService(logService);
		services.set(IFileService, fileService);
		const diskFileSystemProvider = new DiskFileSystemProvider(logService);
		fileService.registerProvider(Schemas.file, diskFileSystemProvider);

		// Logger
		services.set(ILoggerService, new LoggerService(logService, fileService));

		// Configuration
		const configurationService = new ConfigurationService(environmentMainService.settingsResource, fileService);
		services.set(IConfigurationService, configurationService);

		// Lifecycle
		services.set(ILifecycleMainService, new SyncDescriptor(LifecycleMainService));

		// State
		const stateMainService = new StateMainService(environmentMainService, logService, fileService);
		services.set(IStateMainService, stateMainService);

		// Request
		services.set(IRequestService, new SyncDescriptor(RequestMainService));

		// Themes
		services.set(IThemeMainService, new SyncDescriptor(ThemeMainService));

		// Signing
		services.set(ISignService, new SyncDescriptor(SignService));

		// Tunnel
		services.set(ITunnelService, new SyncDescriptor(TunnelService));

		// Protocol
		services.set(IProtocolMainService, new SyncDescriptor(ProtocolMainService));

		return [new InstantiationService(services, true), instanceEnvironment, environmentMainService, configurationService, stateMainService, bufferLogService, productService];
	}
在这个方法里,首先创建了一个ServiceCollection(src\vs\platform\instantiation\common\serviceCollection.ts)
这个ServiceCollection内部其实就是一个map对象;
我们先看看这些service都是干嘛的
运行环境服务:EnvironmentService
路径:src\vs\platform\environment\node\environmentService.ts
这是一个工具类,
通过这个类可以获取程序的:
启动目录、日志目录、操作系统、配置文件目录、快捷键绑定配置路径…
非常多!
多路日志服务:MultiplexLogService
路径:src\vs\platform\log\common\log.ts
默认是用的控制台输出日志(ConsoleLogMainService)
也是一个工具类
包含trace(查看调用堆栈的),debug,info,warn,error,critical
还有dispose(释放日志服务,进程退出的时候回被调用)和setLevel(设置日志级别)的方法;
在同一个文件里,除了ConsoleLogMainService,
还实现了其他几种日志记录方式,不多做介绍了;
配置服务:ConfigurationService
路径:src\vs\platform\configuration\node\configurationService.ts
从运行环境服务(environmentService)里,拿到配置文件的路径
读出配置文件的内容,然后提供配置项的读写功能;
配置项变更的时候,会有相应的事件触发出来;
生命周期服务:LifecycleService
路径:src\vs\platform\lifecycle\electron-main\lifecycleMain.ts
在这里监听了一系列的electron的事件
比如:
before-quit、window-all-closed、will-quit等
事件被触发的时候,做了下面一些事情
记日志、屏蔽electron默认的处理逻辑、执行自己的逻辑
状态服务:StateService
路径:src\vs\platform\state\node\stateService.ts
在storage.json里记录一些与程序运行状态有关的键值对(也可以删除)
请求服务:RequestService
路径:src\vs\platform\request\electron-main\requestService.ts
使用electron提供的net.request方法,发起请求(支持代理和SSL)
诊断服务:DiagnosticsService
路径:src\vs\platform\diagnostics\electron-main\diagnosticsService.ts
根据不同的操作系统,计算CPU消耗、内存消耗、GPU消耗等
界面主题服务:ThemeMainService
路径:src\vs\platform\theme\electron-main\themeMainService.ts
获取背景色、设置背景色
数据通过stateService保存
程序签名服务:SignService
路径:src\vs\platform\lifecycle\electron-main\lifecycleMain.ts
这个服务为程序的签名提供帮助
缓存了一个vsda的import,目的是为了解决签名时的一个BUG
实例化服务:InstantiationService
这个服务比较特殊,不是在本文一开始所讲的代码里设置的
前面的代码中有这么一行:
return [new InstantiationService(services, true), instanceEnvironment];
这个服务就是在它自身的内部保存到ServiceCollection
constructor(services: ServiceCollection = new ServiceCollection(), strict: boolean = false, parent?: InstantiationService) {
		this._services = services;
		this._strict = strict;
		this._parent = parent;
		this._services.set(IInstantiationService, this);
	}
这个服务提供了反射、实例化的一些方法;
用于创建具体的类型的实例
服务的初始化工作
服务的对象创建出来之后,有些服务需要完成初始化才能使用
这是在main.ts的initServices中完成的(src\vs\code\electron-main\main.ts)
// Environment service (paths)
const environmentServiceInitialization = Promise.all<void | undefined>([
	environmentService.extensionsPath,
	environmentService.nodeCachedDataDir,
	environmentService.logsPath,
	environmentService.globalStorageHome,
	environmentService.workspaceStorageHome,
	environmentService.backupHome
].map((path): undefined | Promise<void> => path ? mkdirp(path) : undefined));

// Configuration service
const configurationServiceInitialization = configurationService.initialize();

// State service
const stateServiceInitialization = stateService.init();

return Promise.all([environmentServiceInitialization, configurationServiceInitialization, stateServiceInitialization]);
可以看到这个方法里创建了一大堆目录;
创建目录的方法是:(src\vs\base\node\pfs.ts)
const mkdir = async () => {
	try {
		await promisify(fs.mkdir)(path, mode);
	} catch (error) {

		// ENOENT: a parent folder does not exist yet
		if (error.code === 'ENOENT') {
			return Promise.reject(error);
		}

		// Any other error: check if folder exists and
		// return normally in that case if its a folder
		try {
			const fileStat = await stat(path);
			if (!fileStat.isDirectory()) {
				return Promise.reject(new Error(`'${path}' exists and is not a directory.`));
			}
		} catch (statError) {
			throw error; // rethrow original error
		}
	}
};
另外:
最后几个服务的创建(严格说还没有创建)都用到了SyncDescriptor(src\vs\platform\instantiation\common\descriptors.ts)
这里我们解释一下SyncDescriptor,是个简单的泛型类型;
一个它的实例,可以持有一个类型(传入构造函数的类型),这个类型可以等到用的时候再实例化;
六、事件分发机制
在上一篇中,我们看到lifecycleService监听了很多electron原生的事件,
监听了之后,一旦事件被触发,vscode是怎么派发这些事件的呢?
在入口程序的startup方法中(src\vs\code\electron-main\main.ts),有这么一句:
// Lifecycle
once(lifecycleMainService.onWillShutdown)(evt => {
	fileService.dispose();
	configurationService.dispose();
	evt.join(FSPromises.unlink(environmentMainService.mainLockfile).catch(() => { /* ignored */ }));
});
上面这句话语义 一旦lifecycle里发生了willShutdown的事件,就执行后面的回调函数!
那我们看看lifecycle里的这个onWillShutdown(src\vs\platform\lifecycle\electron-main\lifecycleMain.ts)
private readonly _onWillShutdown = this._register(new Emitter<ShutdownEvent>());
readonly onWillShutdown = this._onWillShutdown.event;
发现它是被_register注册的,这个文件里并没有_register函数,函数在它的父类Disposable里(src\vs\base\common\lifecycle.ts)
protected _register<T extends IDisposable>(o: T): T {
	if ((o as unknown as Disposable) === this) {
		throw new Error('Cannot register a disposable on itself!');
	}
	return this._store.add(o);
}
看来,还得看DisposableStore的add方法:
public add<T extends IDisposable>(o: T): T {
		if (!o) {
			return o;
		}
		if ((o as unknown as DisposableStore) === this) {
			throw new Error('Cannot register a disposable on itself!');
		}

		setParentOfDisposable(o, this);
		if (this._isDisposed) {
			if (!DisposableStore.DISABLE_DISPOSED_WARNING) {
				console.warn(new Error('Trying to add a disposable to a DisposableStore that has already been disposed of. The added object will be leaked!').stack);
			}
		} else {
			this._toDispose.add(o);
		}

		return o;
	}
markTracked这个方法不用管,里面什么也没干!
_toDispose就是个set,用来存你传入的事件的;
另外,这个函数有个特别之处,就是你喂了它什么它就拉了什么出来!
因为我们喂了它一个Emitter的实例,那我们就去看看Emitter(src\vs\base\common\event.ts)
这是个泛型类型
有个get属性:
get event(): Event<T> {
	if (!this._event) {
		this._event = (listener: (e: T) => any, thisArgs?: any, disposables?: IDisposable[] | DisposableStore) => {
			if (!this._listeners) {
				this._listeners = new LinkedList();
			}

			const firstListener = this._listeners.isEmpty();

			if (firstListener && this._options && this._options.onFirstListenerAdd) {
				this._options.onFirstListenerAdd(this);
			}

			const remove = this._listeners.push(!thisArgs ? listener : [listener, thisArgs]);

			if (firstListener && this._options && this._options.onFirstListenerDidAdd) {
				this._options.onFirstListenerDidAdd(this);
			}

			if (this._options && this._options.onListenerDidAdd) {
				this._options.onListenerDidAdd(this, listener, thisArgs);
			}

			// check and record this emitter for potential leakage
			const removeMonitor = this._leakageMon?.check(this._listeners.size);

			const result = toDisposable(() => {
				if (removeMonitor) {
					removeMonitor();
				}
				if (!this._disposed) {
					remove();
					if (this._options && this._options.onLastListenerRemove) {
						const hasListeners = (this._listeners && !this._listeners.isEmpty());
						if (!hasListeners) {
							this._options.onLastListenerRemove(this);
						}
					}
				}
			});

			if (disposables instanceof DisposableStore) {
				disposables.add(result);
			} else if (Array.isArray(disposables)) {
				disposables.push(result);
			}

			return result;
		};
	}
	return this._event;
}
上面说的:
this._onWillShutdown.event;
取.event的时候,执行的就是这里,它其实返回了一个方法:
this._event = (listener: (e: T) => any, thisArgs?: any, disposables?: IDisposable[] | DisposableStore) => { //......
好!打住!看到这里我们先不去看这个方法的具体逻辑,
先返回头来看最开始时main.ts里的那个once方法:(src\vs\base\common\functional.ts)
export function once<T extends Function>(this: unknown, fn: T): T {
	const _this = this;
	let didCall = false;
	let result: unknown;

	return function () {
		if (didCall) {
			return result;
		}

		didCall = true;
		result = fn.apply(_this, arguments);

		return result;
	} as unknown as T;
}
很好理解,传入一个方法,返回一个方法,
我们知道,我们传入的是:
lifecycleService.onWillShutdown
前面我们说了,它确实是一个方法;
这个once还返回了一个匿名函数;
我们通过这个匿名函数,把我们的事件处理逻辑,绑定给了:lifecycleService.onWillShutdown
这是绑定的关键代码:
result = fn.apply(_this, arguments);
OK!我们再去看那个this._event返回的方法具体干了啥?!
传入的参数,listener是我们的匿名回调函数
() => (configurationService as ConfigurationService).dispose()
Emitter实例的_listeners属性已经在别处初始化成了LinkedList的实例;
const remove = this._listeners.push(!thisArgs ? listener : [listener, thisArgs]);
这句话把我们的匿名回调函数加到这个LinkedList中去了
好,以上是绑定事件,
我们再来看看这个事件被触发的时候是怎样的
this._onWillShutdown.fire({
			join(promise) {
				if (promise) {
					joiners.push(promise);
				}
			}
		});
在这个fire方法中:
fire(event: T): void {
	if (this._listeners) {
		// put all [listener,event]-pairs into delivery queue
		// then emit all event. an inner/nested event might be
		// the driver of this

		if (!this._deliveryQueue) {
			this._deliveryQueue = new LinkedList();
		}

		for (let listener of this._listeners) {
			this._deliveryQueue.push([listener, event]);
		}

		// start/stop performance insight collection
		this._perfMon?.start(this._deliveryQueue.size);

		while (this._deliveryQueue.size > 0) {
			const [listener, event] = this._deliveryQueue.shift()!;
			try {
				if (typeof listener === 'function') {
					listener.call(undefined, event);
				} else {
					listener[0].call(listener[1], event);
				}
			} catch (e) {
				onUnexpectedError(e);
			}
		}

		this._perfMon?.stop();
	}
}
循环派发了所有注册的事件
七、服务实例化和单例的实现
细心的读者可能会发现,在第四篇文章中的createService方法中,并没有把所有的服务实例化,下面这些服务,只是记了他们的类型:
src\vs\code\electron-main\main.ts
services.set(ILifecycleService, new SyncDescriptor(LifecycleService));
services.set(IStateService, new SyncDescriptor(StateService));
services.set(IRequestService, new SyncDescriptor(RequestService));
services.set(IDiagnosticsService, new SyncDescriptor(DiagnosticsService));
services.set(IThemeMainService, new SyncDescriptor(ThemeMainService));
services.set(ISignService, new SyncDescriptor(SignService));
SyncDescriptor负责记录这些服务的类型,以供后续使用
src\vs\platform\instantiation\common\descriptors.ts
export class SyncDescriptor<T> {
	readonly ctor: any;
	readonly staticArguments: any[];
	readonly supportsDelayedInstantiation: boolean;

	constructor(ctor: new (...args: any[]) => T, staticArguments: any[] = [], supportsDelayedInstantiation: boolean = false) {
		this.ctor = ctor;
		this.staticArguments = staticArguments;
		this.supportsDelayedInstantiation = supportsDelayedInstantiation;
	}
}
接下来,main.ts的startup方法内,就实例化了这些服务
await instantiationService.invokeFunction(async accessor => {
	const environmentService = accessor.get(IEnvironmentService);
	const configurationService = accessor.get(IConfigurationService);
	const stateService = accessor.get(IStateService);
	try {
		await this.initServices(environmentService, configurationService as ConfigurationService, stateService as StateService);
	} catch (error) {

		// Show a dialog for errors that can be resolved by the user
		this.handleStartupDataDirError(environmentService, error);

		throw error;
	}
});
这里accessor的get方法如下:(src\vs\platform\instantiation\common\instantiationService.ts)
get: <T>(id: ServiceIdentifier<T>, isOptional?: typeof optional) => {

	if (_done) {
		throw illegalState('service accessor is only valid during the invocation of its target method');
	}

	const result = this._getOrCreateServiceInstance(id, _trace);
	if (!result && isOptional !== optional) {
		throw new Error(`[invokeFunction] unknown service '${id}'`);
	}
	return result;
}
有个_getOrCreateServiceInstance方法:
private _getOrCreateServiceInstance<T>(id: ServiceIdentifier<T>, _trace: Trace): T {
	let thing = this._getServiceInstanceOrDescriptor(id);
	if (thing instanceof SyncDescriptor) {
		return this._createAndCacheServiceInstance(id, thing, _trace.branch(id, true));
	} else {
		_trace.branch(id, false);
		return thing;
	}
}
你发现,如果它想获取的对象是SyncDescriptor类型的,就会创建并缓存相应的对象
这个方法_createAndCacheServiceInstance负责创建对象的实例(暂时先不解释)
下次获取这个对象的时候,就直接从缓存中获取了
八、主进程启动消息通信服务
mainProcessNodeIpcServer = await nodeIPCServe(environmentMainService.mainIPCHandle);
once(lifecycleMainService.onWillShutdown)(() => mainProcessNodeIpcServer.dispose());
传入的environmentMainService.mainIPCHandle是命名管道的识别路径,
创建服务的代码(serve):
src/vs/base/parts/ipc/node/ipc.net.ts
export function serve(hook: any): Promise<Server> {
	return new Promise<Server>((c, e) => {
		const server = createServer();

		server.on('error', e);
		server.listen(hook, () => {
			server.removeListener('error', e);
			c(new Server(server));
		});
	});
}
这个方法返回了一个Promise的对象,
c和e是Promise的参数,c代表成功时的回调,e代表失败时的回调(有点类似es6的Promise)
匿名函数内createServer就是nodejs里的原生接口,
Server类绑定了连接和断开的事件,暂时不细说;
回头看看main.ts startup方法里有这么一句:
instantiationService.createInstance(CodeApplication, mainProcessNodeIpcServer, instanceEnvironment).startup();
这句显然是创建了CodeApplication的实例,然后执行了实例的startup方法
注意:创建这个实例的时候,把我们前面创建的mainIpcServer传递进去了;
CodeApplication(src\vs\code\electron-main\app.ts)的startup方法,还启动了Electron的IPCServer
const mainProcessElectronServer = new ElectronIPCServer();
vscode把electron默认的通信机制也接入到了自己的事件体系内,有消息过来,会触发事件;
具体先不细说,后面再讲.
接着就跳转到同类型里的initChannels方法(是不是很熟悉,我们在第一篇文章中讲到过这里)
在这里,给这两个服务(mainIpcServer和electronIpcServer ),创建了一堆信道:
src/vs/code/electron-main/app.ts
// Launch: this one is explicitly registered to the node.js
// server because when a second instance starts up, that is
// the only possible connection between the first and the
// second instance. Electron IPC does not work across apps.
const launchChannel = ProxyChannel.fromService(accessor.get(ILaunchMainService), { disableMarshalling: true });
this.mainProcessNodeIpcServer.registerChannel('launch', launchChannel);

// Local Files
const diskFileSystemProvider = this.fileService.getProvider(Schemas.file);
assertType(diskFileSystemProvider instanceof DiskFileSystemProvider);
const fileSystemProviderChannel = new DiskFileSystemProviderChannel(diskFileSystemProvider, this.logService);
mainProcessElectronServer.registerChannel('localFilesystem', fileSystemProviderChannel);

// User Configuration File
const userConfigurationFileService = new UserConfigurationFileService(this.environmentMainService, this.fileService, this.logService);
mainProcessElectronServer.registerChannel(UserConfigurationFileServiceId, ProxyChannel.fromService(userConfigurationFileService));
sharedProcessClient.then(client => client.registerChannel(UserConfigurationFileServiceId, ProxyChannel.fromService(userConfigurationFileService)));

// Update
const updateChannel = new UpdateChannel(accessor.get(IUpdateService));
mainProcessElectronServer.registerChannel('update', updateChannel);

// Issues
const issueChannel = ProxyChannel.fromService(accessor.get(IIssueMainService));
mainProcessElectronServer.registerChannel('issue', issueChannel);

// Encryption
const encryptionChannel = ProxyChannel.fromService(accessor.get(IEncryptionMainService));
mainProcessElectronServer.registerChannel('encryption', encryptionChannel);

// Signing
const signChannel = ProxyChannel.fromService(accessor.get(ISignService));
mainProcessElectronServer.registerChannel('sign', signChannel);

// Keyboard Layout
const keyboardLayoutChannel = ProxyChannel.fromService(accessor.get(IKeyboardLayoutMainService));
mainProcessElectronServer.registerChannel('keyboardLayout', keyboardLayoutChannel);

// Native host (main & shared process)
this.nativeHostMainService = accessor.get(INativeHostMainService);
const nativeHostChannel = ProxyChannel.fromService(this.nativeHostMainService);
mainProcessElectronServer.registerChannel('nativeHost', nativeHostChannel);
sharedProcessClient.then(client => client.registerChannel('nativeHost', nativeHostChannel));

// Workspaces
const workspacesChannel = ProxyChannel.fromService(accessor.get(IWorkspacesService));
mainProcessElectronServer.registerChannel('workspaces', workspacesChannel);

// Menubar
const menubarChannel = ProxyChannel.fromService(accessor.get(IMenubarMainService));
mainProcessElectronServer.registerChannel('menubar', menubarChannel);

// URL handling
const urlChannel = ProxyChannel.fromService(accessor.get(IURLService));
mainProcessElectronServer.registerChannel('url', urlChannel);

// Extension URL Trust
const extensionUrlTrustChannel = ProxyChannel.fromService(accessor.get(IExtensionUrlTrustService));
mainProcessElectronServer.registerChannel('extensionUrlTrust', extensionUrlTrustChannel);

// Webview Manager
const webviewChannel = ProxyChannel.fromService(accessor.get(IWebviewManagerService));
mainProcessElectronServer.registerChannel('webview', webviewChannel);

// Storage (main & shared process)
const storageChannel = this._register(new StorageDatabaseChannel(this.logService, accessor.get(IStorageMainService)));
mainProcessElectronServer.registerChannel('storage', storageChannel);
sharedProcessClient.then(client => client.registerChannel('storage', storageChannel));

// External Terminal
const externalTerminalChannel = ProxyChannel.fromService(accessor.get(IExternalTerminalMainService));
mainProcessElectronServer.registerChannel('externalTerminal', externalTerminalChannel);

// Log Level (main & shared process)
const logLevelChannel = new LogLevelChannel(accessor.get(ILogService));
mainProcessElectronServer.registerChannel('logLevel', logLevelChannel);
sharedProcessClient.then(client => client.registerChannel('logLevel', logLevelChannel));

// Logger
const loggerChannel = new LoggerChannel(accessor.get(ILoggerService),);
mainProcessElectronServer.registerChannel('logger', loggerChannel);
sharedProcessClient.then(client => client.registerChannel('logger', loggerChannel));

// Extension Host Debug Broadcasting
const electronExtensionHostDebugBroadcastChannel = new ElectronExtensionHostDebugBroadcastChannel(accessor.get(IWindowsMainService));
mainProcessElectronServer.registerChannel('extensionhostdebugservice', electronExtensionHostDebugBroadcastChannel);

// Extension Host Starter
const extensionHostStarterChannel = ProxyChannel.fromService(accessor.get(IExtensionHostStarter));
mainProcessElectronServer.registerChannel(ipcExtensionHostStarterChannelName, extensionHostStarterChannel);
有存储、日志、菜单栏、工作台、升级…等等
主要的通信还是用electronIpcServer 来干的,mainIpcServer只有一个launch信道;
参考原文:https://cloud.tencent.com/developer/article/1454977
liulun


 1388
1388

 被折叠的 条评论
为什么被折叠?
被折叠的 条评论
为什么被折叠?
 到【灌水乐园】发言


