


 本文通过Linq to SQL技术,演示了在MVC框架下如何进行增删查改操作。首先介绍了所需的数据库表Product和Category,然后详细说明了如何创建列表页面,包括在Linq to sql基础上建立TestDB文件与数据库Test的连接,并将数据表导入。接着,逐步讲解了添加页面的代码实现过程。
本实例使用Linq to sql.
DB所需要的表:1.Product,2.Category 如下图

1.先创建列表页面
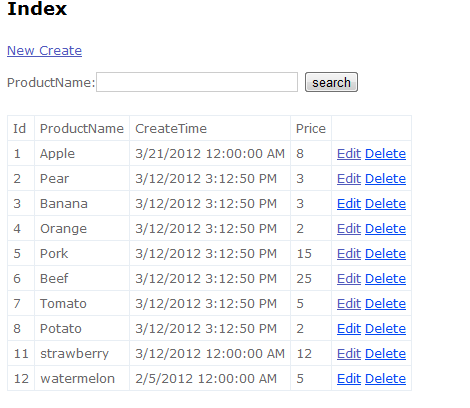
先创建Index 的Control,在Control文件夹下创建ProductControl 文件(在这之前你要使用Linq to sql 创建TestDB文件与DB通信,我这里使用的数据库是Test,并将Product,category 添加到TestDB.dbml文件中)
    public class ProductController : Controller
    {
        //
        // GET: /Product/
        //TESTEntities dbConnect = new TESTEntities();
        TestDBDataContext context = new TestDBDataContext();
        ProductModelView productView = new ProductModelView();

        public ActionResult Index(string searchString)
        {
            var products = from product in context.Products
                           select product;
            if (!string.IsNullOrEmpty(searchString))
            {
                products = products.Where(p => p.ProductName == searchString);
            }
            return View(products.ToList());
        }
} public class ProductModelView
{
public Product productList { get; set; }
}@model List<MusicStore.Product>
@{
ViewBag.Title = "Index";
}
<h2>Index</h2>
@Html.ActionLink("New Create", "Create")
@using (Html.BeginForm("Index","Product","Index"))
{
<p>ProductName:@Html.TextBox("searchString")
<input type="submit" value ="search" />
</p>
}
<table>
<tr>
<td>Id</td>
<td>ProductName</td>
<td>CreateTime</td>
<td>Price</td>
<td></td>
</tr>
@foreach (var item in Model)
{
<tr>
<td>@item.Id</td>
<td>@item.ProductName</td>
<td>@item.CreateTime</td>
<td>@item.Price</td>
<td>
@Html.ActionLink("Edit", "Edit", new { id = item.Id })
@Html.ActionLink("Delete", "Delete", new { id = item.Id})
</td>
</tr>
}
</table>2.创建添加页面
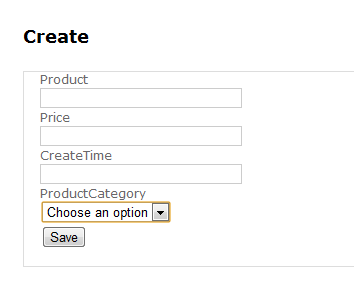
进入ProductControl文件,添加如下代码
        public ActionResult Create()
        {
            ViewBag.categoryList = GetCategoryitems();
            return View();
        }
        [HttpPost]
        public ActionResult AddProduct(Product product)
        {
            context.Products.InsertOnSubmit(product);
            context.SubmitChanges();
            return RedirectToAction("Index");
        }

        public List<SelectListItem> GetCategoryitems()
        {
            var categorys = from category in context.Categories.ToList()
                            select new SelectListItem()
                            {
                                Text = category.CategoryName,
                                Value = category.Id.ToString()
                            };
            List<SelectListItem> items = new List<SelectListItem>();
            items.Add(new SelectListItem() { Text = "Choose an option" });
            items.AddRange(categorys);
            return items;
}然后鼠标放在Create上面创建View@model MusicStore.Product
@{
ViewBag.Title = "Create";
}
<h2>Create</h2>
@using (Html.BeginForm("AddProduct","Product"))
{
<fieldset>
<div>
@Html.Label("Product")
</div>
<div>
@Html.EditorFor(p =>p.ProductName)
</div>
<div>
@Html.Label("Price")
</div>
<div>
@Html.EditorFor(p =>p.Price)
</div>
<div>
@Html.Label("CreateTime")
</div>
<div>
@Html.EditorFor(p =>p.CreateTime)
</div>
<div>
@Html.Label("ProductCategory")
</div>
<div>
@Html.DropDownListFor(m =>m.ParentId,ViewBag.categoryList as List<SelectListItem>)
</div>
<input type="submit" value="Save" />
</fieldset>
}
进入ProductControl文件,添加如下代码
public ActionResult Edit(int Id)
{
productView.productList = (from p in context.Products
select p).First(c => c.Id == Id);
ViewBag.categoryList = GetCategoryitems();
return View(productView);
}
[HttpPost]
public ActionResult Update(ProductModelView productModel)
{
Product product = context.Products.First(p => p.Id == productModel.productList.Id);
product.ProductName = productModel.productList.ProductName;
product.Price = productModel.productList.Price;
product.CreateTime = productModel.productList.CreateTime;
product.ParentId = productModel.productList.ParentId;
context.SubmitChanges();
return RedirectToAction("Index");
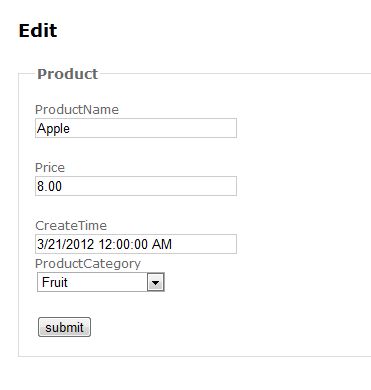
}然后添加Edit 的View
@model MusicStore.Models.ProductModelView

@{
    ViewBag.Title = "Edit";
}

<h2>Edit</h2>

@using (Html.BeginForm("Update", "Product"))
{
    <fieldset>
    <legend>Product</legend>
       @Html.HiddenFor(p =>p.productList.Id)
    <p>
        <div>
    @Html.LabelFor(p => p.productList.ProductName)
    </div>
    <div>
    @Html.EditorFor(p => p.productList.ProductName)
    </div>
    </p>

<p>
    <div>
    @Html.LabelFor(p => p.productList.Price)
    </div>
    <div>
    @Html.EditorFor(p => p.productList.Price)
    </div>
</p>

<p>
    <div>
    @Html.LabelFor(p => p.productList.CreateTime)
    </div>
    <div>
    @Html.EditorFor(p => p.productList.CreateTime)
    </div>

    <div>
    @Html.Label("ProductCategory")
    </div>
    <div>
    @Html.DropDownListFor(m => m.productList.ParentId, ViewBag.categoryList as List<SelectListItem>)
    </div>
</p>
    <input type="submit" value="submit" />
    </fieldset>
}进入ProductControl添加如下代码即可
        public ActionResult Delete(int id)
        {
            Product produt = context.Products.First(p => p.Id == id);
            context.Products.DeleteOnSubmit(produt);
            context.SubmitChanges();
            return RedirectToAction("Index");
        }
此 Demo下载地址请点击 here


 175
175

 被折叠的 条评论
为什么被折叠?
被折叠的 条评论
为什么被折叠?
 到【灌水乐园】发言


