


基础
SpringBoot本质就是帮助我们简化开发,换句话说SpringBoot是面向用户的、其实现是基于Spring;有了这个概念之后,首先Spring的缺点:首先毫无疑问就是需要大量通用的配置:比如开启aop要配置、使用mybatis要配置、甚至就是使用springMVC都要大量的配置,无论是使用xml还是配置类都非常的繁琐且重复;**针对这个问题(需要简化配置)就有了自动配置; ** 既然是基于spring,那么实现自动配置很容易想到@Condition和@Configuration,先提前写好配置和配置过滤(事实上也确实时这么实现的)
然后就是如果要用外部jar包作为bean怎么办?难道和spring一样手动注册全部类或加上扫描路径?我们知道SpringBoot默认包扫描时扫描启动类的包及其子目录,如果要扫描其他包的话需要通过覆盖@ComponentScan,加上该路径;很显然,这就导致如果使用外部jar包,尽管其也通过springboot托管但是却不能扫描到它导致其中全部注解失效,但是显然不可能不断修改@ComponentScan【这样和Spring的配置由什么区别?】,所以就有了stater+自动配置(spring的spi)机制;stater就是帮助我们自动导入的;和上面一样既然是基于spring,显然可以通过配置@Import引入,把@Import的@Configuration配置类写在每次自动扫描的文件上或类上不就可以了(确实也是这么实现的)
到这里可以说SpringBoot的核心已经复习完了。下面主要就是介绍:1.SpringBoot启动流程;2.SpringBoot的强大扩展能力;
设计思想
SpringBoot基于约定大于配置的思想创建的,主要体现在其自动配置和各种starter上。基本上可以认为SpringBoot是在Spring的基础上运行的,SpringBoot本身仅仅只是一个应用容器、旨在简化开发,各种和java交互依靠Spring实现;

常用知识
-
什么是约定大于配置:
- 约定优于配置(convention over configuration),也称作按约定编程,是一种软件设计范式,旨在减少软件开发人员需做决定的数量,获得简单的好处,而又不失灵活性。
- springboot在其中的体现是:使用application作为配置文件,可以通过application-dev application-test等配置某一环境的配置文件(很明显就是SpringBoot帮我们写了资源导入为@ImportResource(applicationXXX)
- maven项目结构
- 所有自动配置类配置在和基于spring的扩展能力配置在:/META-INF/spring.factories;
- 各种注解
-
springboot的注解:
-
基于spring的注解:
- @configuration:前面介绍spring的IOC说过可以通过java类配置容器管理的bean,显然这个就是和@Bean结合向容器注册bean的
- @ComponentScan:注册了@Controller,@Service,@Repository、@Component
- @Conditional:同样是spring提供的强大注解:这个注解组要是根据代码中设置的条件装载不同的bean,不过由于spring的时间比较复杂(需要先在设置条件注解之前,先要把装载的bean类去实现Condition接口,然后对该实现接口的类设置是否装载的条件);所以springboot提供了简单的注解:@ConditionalOnXXX、@ConditionalXXX;
- @Import:这个也是和@Bean一样注册bean,不过不同的是@Import是类上的注解、换句话说其实现注册bean不一定依靠@Configuration,@Bean和@Configuration绑定使用;
- 方法1:直接和@Configuration绑定,直接导入类,例如@Import( xxx.class)
- 方法2:和ImportSelector实现类结合使用的方法,尽管还是在@Configuration上,但是更灵活@Import(XXXXXImportSelect.Class);这种是最常用的方法;
- 方法三和方法2一样,只不过是ImportBeanDefinitionRegistrar(注册器接口,如果我们需要动态代理或者进行一切附加操作)这个接口,略
-
集成spring的:
-
@SpringBootApplication:**@Configuration ,@EnableAutoConfiguration ,@ComponentScan **三个注解的组合;
-
@ConditionalOnXXXX:主要就是校验是否符合条件,符合才执行;一般用在注册bean上
-
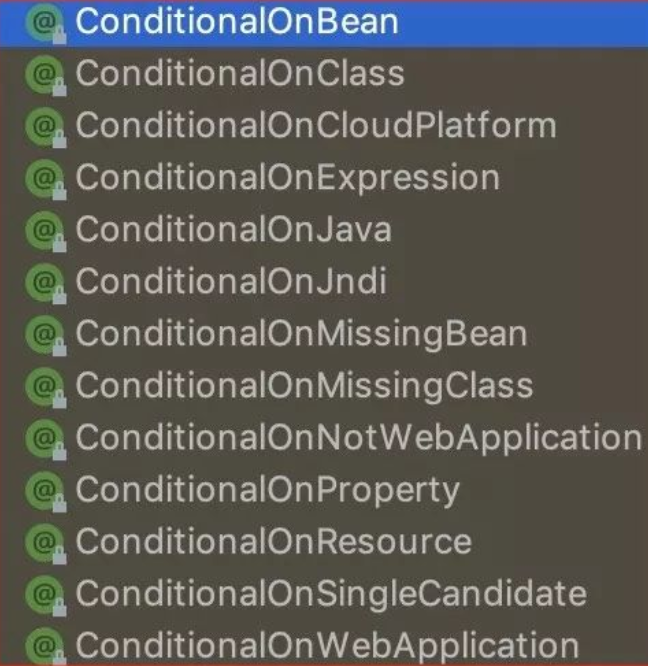
- @ConditionalOnBean(仅仅在当前上下文中存在某个对象时,才会实例化一个Bean)
@ConditionalOnClass(某个class位于类路径上,才会实例化一个Bean),该注解的参数对应的类必须存在,否则不解析该注解修饰的配置类;
@ConditionalOnExpression(当表达式为true的时候,才会实例化一个Bean)
@ConditionalOnMissingBean(仅仅在当前上下文中不存在某个对象时,才会实例化一个Bean), 该注解表示,如果存在它修饰的类的bean,则不需要再创建这个bean;可以给该注解传入参数例如@ConditionOnMissingBean(name = “example”),这个表示如果name为“example”的bean存在,这该注解修饰的代码块不执行。
@ConditionalOnMissingClass(某个class类路径上不存在的时候,才会实例化一个Bean)
@ConditionalOnNotWebApplication(不是web应用)
@ConditionalOnProperty是指在application.yml里配置的属性是否为true,其他的几个都是对class的判断
-
-
@AutoConfigureXXX:用在自动配置类上面,主要有以下三个
-
@AutoConfigureAfter:表示该自动配置类需要在另外指定的自动配置类配置完之后。
-
//如 Mybatis 的自动配置类,需要在数据源自动配置类之后。
@AutoConfigureAfter(DataSourceAutoConfiguration.class)
@Configuration
public class MybatisAutoConfiguration {
	……
}
-
-
@AutoConfigureBefore:表示该自动配置类需要在另外指定的自动配置类配置之前。
-
@AutoConfigureOrder:用于确定配置加载的优先级顺序
-
-
-
核心
SpringBoot启动流程
基础
Spring的拓展
Spring的其他注解
-
@AliasFor注解:这个注解的最大作用就是实现注解的派生:1.让value的值等于attribute;【这个一般用在同一个注解接口中】2.让annotation的值等于加上注解该位置的值【这一般用在俩个不同的注解中,通过这个使得注解好像继承一样让相同名的属性有相同的值】;
-
AliasFor
public @interface AliasFor { //这就是第一种让value等于attribute的示例,实际就可以直接通过value='XX' attribute='YY'让xx、yy互相相等 @AliasFor("attribute") String value() default ""; @AliasFor("value") String attribute() default ""; Class<? extends Annotation> annotation() default Annotation.class; } -
例子
public @interface A {
    //这里就让A、B可以共同有a属性的值,相当于B继承了A一样(个人猜测其实现是通过反射,所以要求要么同名,要么配置该名称)
    @AliasFor(annotation = B.class)
	String[] a() default {};
}

public @interface B {
	String[] a() default {};
}
-
-
@ComponentScans和@ComponentScan:很明显就是配置扫描的注解,@ComponentScans用来配置多个@ComponentScan,所以主要关注@ComponentScan
@Repeatable(ComponentScans.class) public @interface ComponentScan { //这三个是同一组就是配置扫描包名或类名的 @AliasFor("basePackages") String[] value() default {}; @AliasFor("value") String[] basePackages() default {}; Class<?>[] basePackageClasses() default {}; //扫描到的处理,一般默认就行 //用于命名 Spring 容器中检测到的组件的BeanNameGenerator类。 Class<? extends BeanNameGenerator> nameGenerator() default BeanNameGenerator.class; //ScopeMetadataResolver实现,默认情况下检查 bean 类上是否存在 Spring 的@Scope注释。 Class<? extends ScopeMetadataResolver> scopeResolver() default AnnotationScopeMetadataResolver.class; //指示是否应该为检测到的组件生成代理 ScopedProxyMode scopedProxy() default ScopedProxyMode.DEFAULT; String resourcePattern() default ClassPathScanningCandidateComponentProvider.DEFAULT_RESOURCE_PATTERN; //指示是否应启用对使用@Component @Repository 、 @Service或@Controller注释的类的自动检测。 boolean useDefaultFilters() default true; //过滤器,我们用的比较多就是这个 //指定哪些类型有资格进行组件扫描 Filter[] includeFilters() default {}; //在没有资格 Filter[] excludeFilters() default {}; //是否懒加载,单例模式有用 boolean lazyInit() default false; @Retention(RetentionPolicy.RUNTIME) @Target({}) @interface Filter { //这三个就是最常用的,string或Class类型 @AliasFor("classes") Class<?>[] value() default {}; @AliasFor("value") Class<?>[] classes() default {}; //代替前面的模式,可以通过指定表达式形式,主要是表达式形式比较适合复杂情况;由于SpringBoot用到就简单展开(下文) //要使用的过滤器类型。如果想要其他类型在查,目前没用过; FilterType type() default FilterType.ANNOTATION; //用于过滤器的模式(或模式),作为指定 Class value的替代方法。 String[] pattern() default {}; } }- FilterType主要有5种:
- ANNOTATION:用给定的注解标记的过滤器候选。
- ASSIGNABLE_TYPE:可分配给给定类型的过滤器候选。
- ASPECTJ:基于aspectJ语法的过滤器,个人比较喜欢;此类型过滤器的一个关键实现细节是它不会加载正在检查的类以匹配类型模式。
- REGEX:正则表达式
- CUSTOM:这个是使用自定义的过滤器
- FilterType主要有5种:
-
@Configuration
@Component public @interface Configuration { //就是设置bean名嘛 @AliasFor(annotation = Component.class) String value() default ""; //这个稍微注意一下:是是否设置@Bean使用CGLIB通过代理,默认true;如果@Bean ,因为每个特定配置的@Bean方法都是自包含的,并且设计为容器使用的普通工厂方法,请将此标志切换为false以避免 CGLIB 子类处理。 boolean proxyBeanMethods() default true; } -
@value和@PropertySource:很明显这俩个注解就是为了实现Spring再用存注解的情况下对于属性的配置,示例如下,很明显SpringBoot大量的使用了这个功能;
-
//在@Configuration文件中加入@PropertySource:意思就是将@PropertySource对应的文件导入到Spring环境后面就可以在Spring中通过@Value使用
//@PropertySource支持${}占位符
-
自动配置的启动过程
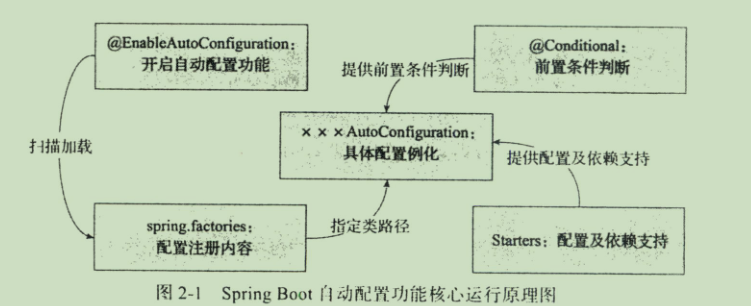
简单来说就是:通过@EnableAutoConfiguration扫描所有在spring.factories的所有@Configuration类配置,完成过滤和自定义排除后,配合@Condition和Stater导入的依赖确定可以加载的外部Bean,然后通过@ComponentScan扫描配置自身注解注册的bean;
-
@EnableAutoConfiguration:自动配置注解,其导入了AutoConfigurationImportSelector类(很显然就是实现Spring的ImportSelect的类)、开启了自动包扫描AutoConfigurationPackage
-
@AutoConfigurationPackage:**有俩个属性exclude、excludeName分别是排除指定配置类、指定名;**还有一个字符串:启用自动配置时可用于覆盖的环境属性
-
AutoConfigurationPackages.Registrar类:显然是一个注册类,注册导入@Configuration类的bean的;所以这个类什么时候使用就是什么使用注册外部bean,(知道了在哪注册还差知道注册哪些类,下面就是选择注册哪些类)
-
	static class Registrar implements ImportBeanDefinitionRegistrar, DeterminableImports {
		@Override
        //根据导入@Configuration类的给定注释元数据,根据需要注册 bean 定义。
        //ImportBeanDefinitionRegistrar接口的方法,实现该方法可以拥有注册bean的能力
        //这里的metadata就是我们自定义的资源传入run方法的配置类(这也是为什么如果我们自定义传入的run方法不加@EnableAutoConfiguration将不会使用自动配置)
        //所以在这一步采取注册我们的自动配置的bean
		public void registerBeanDefinitions
            (AnnotationMetadata metadata, BeanDefinitionRegistry registry)
        {
			register(registry, new PackageImports(metadata).getPackageNames().toArray(new String[0]));
		}
		@Override
		public Set<Object> determineImports(AnnotationMetadata metadata) {
			return Collections.singleton(new PackageImports(metadata));
		}
	}
-
-
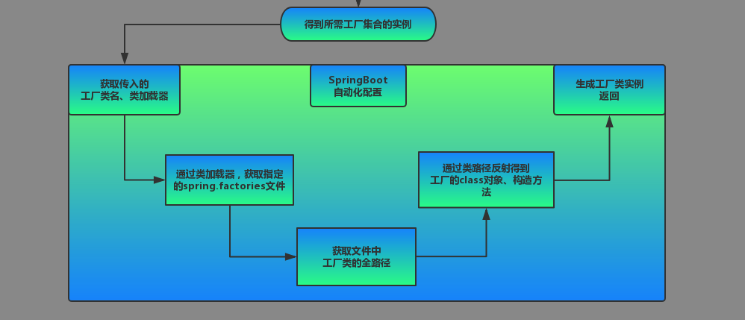
AutoConfigurationImportSelector类:前面我们已经说过SpringBoot通过让**@Import对应一个实现ImportSelect接口的selectImports方法来增加加载的灵活性**,但是SpringBoot没有直接用ImportSelect接口而是使用其子接口:**DeferredImportSelector,这个接口的selectImports是在Configuration类加载完后才加载,而不是和前者那样先加载;而且其加载顺序可以通过@Order或者Order接口指定; ** 不知道还记不记得Spring的ApplicationContext容器提供了更多的扩展:通过aware接口让感知提级【类似实例化后bean可以通过aware设置其factory】,在SpringBoot中用到了四个Aware分别是设置:类加载器、资源加载器、类加载工厂和通知的环境,BeanClassLoaderAware, ResourceLoaderAware, BeanFactoryAware, EnvironmentAware;重点分析selectImports;
-
selectImports返回的就是有效的@Configuration自动配置类:通过getCandidateConfigurations使用Spring的loadFactoryNames加载所有EnableAutoConfiguration的类,然后去除需要去除的;(到这一步就连加载哪些Configuration类也设置了,前面又有了注册方法,这个组合就差调用注册了)
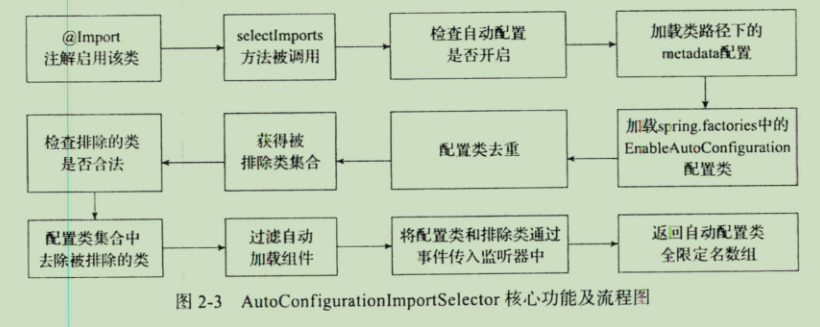
-
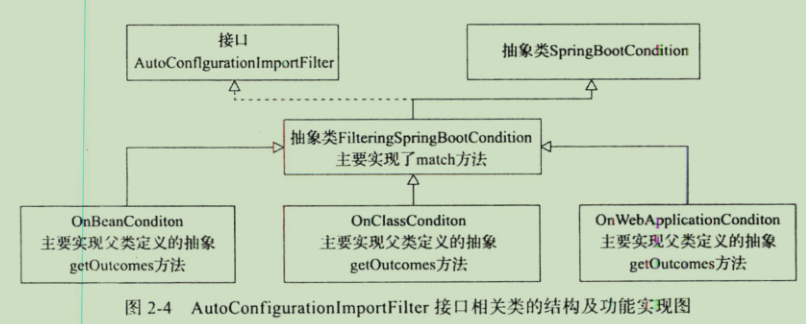
public String[] selectImports(AnnotationMetadata annotationMetadata) { //检查是否开启自动配置 if (!isEnabled(annotationMetadata)) { return NO_IMPORTS; } //一看就是自动配置实体,所以重点到getAutoConfigurationEntry AutoConfigurationEntry autoConfigurationEntry = getAutoConfigurationEntry(annotationMetadata); return StringUtils.toStringArray(autoConfigurationEntry.getConfigurations()); } protected AutoConfigurationEntry getAutoConfigurationEntry(AnnotationMetadata annotationMetadata) { if (!isEnabled(annotationMetadata)) { return EMPTY_ENTRY; } //通过AnnotationMetadata返回相应的AnnotationAttributes AnnotationAttributes attributes = getAttributes(annotationMetadata); //获取配置,这一步应该是到spring.favtories中获取配置 List<String> configurations = getCandidateConfigurations(annotationMetadata, attributes); //下面是去除重复的 configurations = removeDuplicates(configurations); //获取指定去除的 Set<String> exclusions = getExclusions(annotationMetadata, attributes); //检查指定去除是否有异常 checkExcludedClasses(configurations, exclusions); //去除指定去除的 configurations.removeAll(exclusions); //过滤器过滤:@ConditionOnBean、@ConditionOnClass、@ConditionOnWebApplication、 configurations = getConfigurationClassFilter().filter(configurations); ///将筛选完威的配置类和排查的配置类构建为事件类.并传入监听嚣、槛听器的配置在于Spring.factory文件中,通过AutoConfigurationImportL1Stener指定 fireAutoConfigurationImportEvents(configurations, exclusions); //包装为AutoConfigurationEntry对象 return new AutoConfigurationEntry(configurations, exclusions); } //毫无疑问获取所有的EnableAutoConfiguration类型的类全限定名称 protected List<String> getCandidateConfigurations(AnnotationMetadata metadata, AnnotationAttributes attributes) { List<String> configurations = SpringFactoriesLoader.loadFactoryNames (EnableAutoConfiguration.class, getBeanClassLoader()); return configurations; }过滤:除了前面说到的exclude、excludeName、后面还会根据条件在过滤;过滤后就是所有有效的自动配置类
-
总结:自动配置是通过Spring的ConfigurationClassPostProcessor(这个类同样是一个在beanDefinition已经扫描注册完成、但是还未开始注册bean的时候调用)进行扫描所有@Configuration,所以SpringBoot利用该机制进行自动装配(即调用@EnableAutoConfiguration完成自动装配),这里就到了所谓的starter了,starter就是通过maven项目导入的gav坐标,或者说就是jar包(你甚至不用给他们起名叫starter);
<dependency>
    <groupId>xxx.xxxx.xxxx</groupId>
    <artifactId>xxx</artifactId>
    <version>1.0</version>
</dependency>
所以整个自动配置到这基本结束了;
-
附录
public @interface SpringBootApplication {
//这里个是@EnableAutoConfiguration的
    //分别是排除指定类、指定名
	@AliasFor(annotation = EnableAutoConfiguration.class)
	Class<?>[] exclude() default {};
	@AliasFor(annotation = EnableAutoConfiguration.class)
	String[] excludeName() default {};

//这俩个是@ComponentScan,
    //用于扫描带注释组件的基本包,这个显然是通过全限定名
	@AliasFor(annotation = ComponentScan.class, attribute = "basePackages")
	String[] scanBasePackages() default {};
    //basePackages类型安全替代品,用于指定要扫描带注释组件的包,这个则是通过Class对象
	@AliasFor(annotation = ComponentScan.class, attribute = "basePackageClasses")
	Class<?>[] scanBasePackageClasses() default {};

//这个显然是Spring的,就是是否设置@Bean使用CGLIB通过代理,默认true;如果@Bean ,因为每个特定配置的@Bean方法都是自包含的,并且设计为容器使用的普通工厂方法,请将此标志切换为false以避免 CGLIB 子类处理。
	@AliasFor(annotation = Configuration.class)
	boolean proxyBeanMethods() default true;

}
启动流程
流程总结

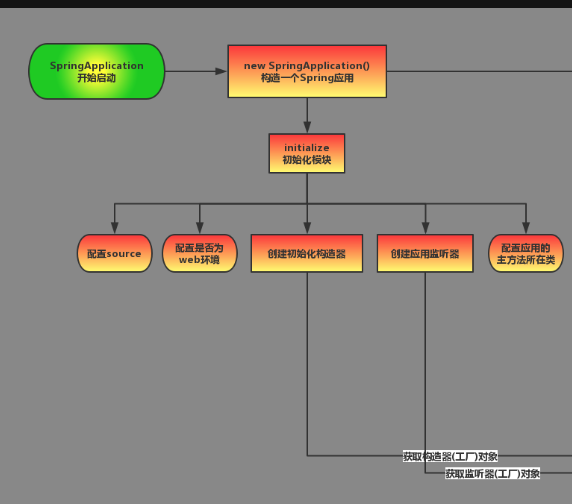
(上图为网图)
先总结后深入
- 首先再次强调SpringBoot就是封装了Spring,所以无论SpringBoot怎么启动,我们可以断定他就是在创建ApplicationContext,基于这个思想开始探讨SpringBoot;
- SpringBoot自定义了一系列启动规则,而不是直接使用创建容器的构造函数的refresh方法;主要围绕俩个位置展开:
- 创建SpringApplication类(所以首先要认识这个类的作用:保存信息)
- 保存信息
- 通过run方法进行SpringBoot的ApplicationContext的启动(这里提供了监听器允许我们监听启动过程)
- **SpringApplicationRunListener,**run方法主要就是围绕这个监听器展开
- 创建SpringApplication类(所以首先要认识这个类的作用:保存信息)
- 主要流程:
- 首先初始化SpringApplication
- 如果我们使用该类静态run方法,那么就是进行下面步骤后就到实例run方法
- 设置主bean来源的configuration(class)
- 推断web类型
- 设置所有配置在spring.factories的ApplicationContext级别的和所有ApplicationContextInitializer、注册器BootstrapRegistry
- 推断main
- 如果我们不是使用静态bean还可以操作SpringApplication然后再调用实例run方法
- 如果我们使用该类静态run方法,那么就是进行下面步骤后就到实例run方法
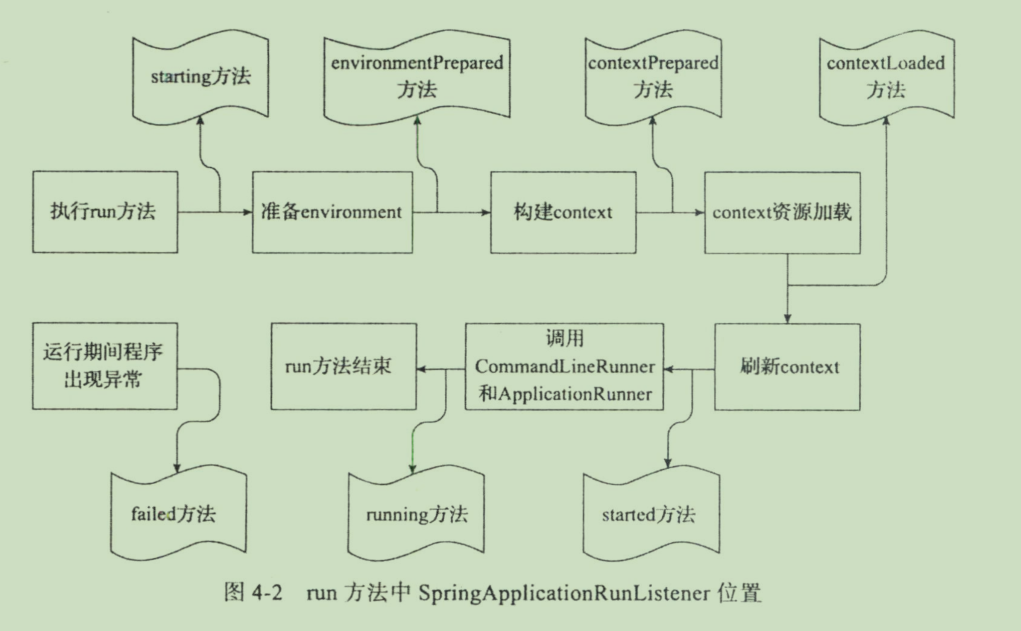
- 实例run方法主要围绕SpringApplicationRunListener的7个阶段
- starting:开始阶段
- 在进入开始阶段前主要是开始计时、获取和开启所有SpringApplicationRunListener监听器
- environmentPrepared:上下文环境准备阶段
- 在开始阶段到这个阶段主要就是解析启动参数 args并保存在ApplicationArguments(就是我们在通过java语言执行的时候可以在后面传入的启动参数)
- contextPrepared:容器准备(refresh前)
- 上下文环境准备阶段到这个阶段主要是:
- 首先是否在配置文件开启忽略BeanInfo加快启动速度
- 打印banner图标
- 利用前面推断web类型,在这里调用的applicationContextFactory的create(响应式编程方法)创建容器
- 设置开始标记
- 上下文环境准备阶段到这个阶段主要是:
- contextLoaded:容器加载完成(refresh后)
- 容器准备阶段到这个阶段就是调用:refresh
- started:已经开始
- 上一阶段到这个阶段主要是停止计时
- 触发CommandLineRunner前
- CommandLineRunner、ApplicationRunner 接口是在容器启动成功后的最后一步回调(类似开机自启动),一般用于数据库连接和无效缓存清除或者对于生成的单例bean进行检查和属性修改
- ready和running:容器允许中,即将返回前调用
- 触发CommandLineRunner后
- 显然这俩个阶段之间就是调用所有CommandLineRunner
- 后面将就是即将完成整个run方法,返回ApplicationContext、容器启动完成;
- failed:失败
- 如果失败来到这里
- starting:开始阶段
- 首先初始化SpringApplication
基础
容器
和Spring一样先认识容器,在研究其他,SB使用ConfigurableApplicationContext作为容器,这个和Spring没有太大区别最后都是使用其实现类:ClassPathXmlApplicationContext、FileSystemXmlApplicationContext、AnnotationConfigApplicationContext,如果还记得Spring得容器的话或许还记得Spring有另外一套容器BeanFactory
SpringApplication
基础
- 这个是SpringBoot的启动入口(SB通过run方法启动),大多数时候我们都不需要更改里面的设置;其会可用于从 Java 主方法引导和启动 Spring 应用程序的类。 默认情况下,类将执行以下步骤来引导您的应用程序:
- 创建一个合适的ApplicationContext实例(取决于你的类路径)
- 注册CommandLinePropertySource以将命令行参数公开为 Spring 属性
- 刷新应用程序上下文,加载所有单例 bean
- 触发任何CommandLineRunner bean
- 如果我们希望自定义启动配置的话显然可以通过设置这个ApplicationContext的属性:例如修改修改是否懒加载等具体可以直接看ApplicationContext,一般不需要设置
属性
排除一些banner、log之后看重点
//主要bean来源,一般是一个带有@EnableAutoConfiguration的类以保证可以自动配置
//默认就是main、@SpringBootApplication所在的类
	private Set<Class<?>> primarySources;
    private Set<String> sources;
		//main
    private Class<?> mainApplicationClass;
//是否添加命令行属性(默认为true)
    private boolean addCommandLineProperties;
    private boolean addConversionService;
		//资源加载器
    private ResourceLoader resourceLoader;
		//bean名称生成器
    private BeanNameGenerator beanNameGenerator;
//应用环境
    private ConfigurableEnvironment environment;
//web类型
    private WebApplicationType webApplicationType;
//用于在refresh之前初始化 Spring ConfigurableApplicationContext回调接口
    private List<ApplicationContextInitializer<?>> initializers;
//ApplicationListener监听器
    private List<ApplicationListener<?>> listeners;
//默认属性
    private Map<String, Object> defaultProperties;
//BootstrapRegistryInitializer列表,这个保存BootstrapRegistry用于注册一些需要在applicationContext开始前注册的单例bean或者比较耗时的bean
    private List<BootstrapRegistryInitializer> bootstrapRegistryInitializers;
//附加配置文件,很明显我们有时候除了主配置文件application.yaml外还有application-xxx.yaml,这时可以通过设置spring.profiles.active,也可以直接设置,总之会保存在这里
    private Set<String> additionalProfiles;
		//允许 Bean 定义覆盖
    private boolean allowBeanDefinitionOverriding;
		//循环依赖
    private boolean allowCircularReferences;
		//是否为自定义环境
    private boolean isCustomEnvironment;
		//延迟加载bean
    private boolean lazyInitialization;
    private String environmentPrefix;
//ApplicationContext类型,通过ApplicationContextFactory自动生成
    private ApplicationContextFactory applicationContextFactory;
		//ApplicationStartup设置start类
    private ApplicationStartup applicationStartup;
从上面不难看出SpringApplication类主要用来保持信息和一些信息扩展
- 保存所有ApplicationListener级别的监听器
- 保存所有BootstrapRegistry,以允许我们先行注册一些bean
- 保存additionalProfiles,以允许使用更多的配置文件
- 保存primarySources,以允许我们可以自定义主要bean来源
所以SpringApplication主要用来保存信息,他的核心方法就是run方法
初始run
毫无疑问,springboot启动是在主启动类开始的:就是调用了run方法
public static ConfigurableApplicationContext run(Class<?>[] primarySources, String[] args) {
		return new SpringApplication(primarySources).run(args);
	}
然后创建SpringApplication,再调用这个的run方法,获取到ConfigurableApplicationContext;注意这里是那不就是applicationContext嘛;所以run方法作为核心方法就是创建容器的,在进入run前先看看SpringApplication构造器做了啥
- 首先获取主启动要加载的primarySources(就是我们可以在run自动扫描创建的bean)
- 就是前面说的一般是一个@EnableAutoConfiguration类型的类(一般项目的包,即main中的类即可,如果其他包包含主要的bean可以自定义这个项目的主配置类的class为primarySources)
- 判断web类型
- 三种类型:非web、reactor(响应式、netty)、Servlet(servlet模式、一般tomcat服务器)
- 设置监听容器启动过程的监听器和ApplicationContextInitializer
- 在spring.factories配置的ApplicationListener和ApplicationContextInitializer
- 推断主启动类
- main
实例化SpringApplication
public SpringApplication(Class<?>... primarySources) {
		this(null, primarySources);
	}
/**
创建一个新的SpringApplication实例。 应用程序上下文将从指定的主要来源加载 bean(有关详细信息,请参阅class-level文档。可以在调用run(String...)之前自定义实例。
参数:
    resourceLoader – 要使用的资源加载器
    primarySources – 主要的 bean 来源
*/
public SpringApplication(ResourceLoader resourceLoader , Class<?>... primarySources) {
    //资源加载器,没有回使用默认的资源加载器;
		this.resourceLoader = resourceLoader;
    //这里仅仅检查primarySources是否为空,说明我们可以写自己的primarySources,如果我们主要bean来源不在当前项目中;
		Assert.notNull(primarySources, "PrimarySources must not be null");
		this.primarySources = new LinkedHashSet<>(Arrays.asList(primarySources));
    //推断web应用类型:就三种:响应式、servlet、非web(本质就是Spring提供了俩种web编程形式)
		this.webApplicationType = WebApplicationType.deduceFromClasspath();
    //从SpringFactorys获取bootstrapregistry初始值设定项
    	//BootstrapRegistry:一个简单的对象注册表,在启动和Environment后处理期间可用,直到准备好ApplicationContext。可用于注册创建成本高的实例,或需要在ApplicationContext可用之前共享的实例。注册表使用Class作为键,这意味着只能存储给定类型的单个实例。
		this.bootstrapRegistryInitializers = getBootstrapRegistryInitializersFromSpringFactories();
    //设置应用上下文初始化相关实例
    //ApplicationContextInitializer:用于在刷新之前初始化 Spring ConfigurableApplicationContext回调接口
	setInitializers( (Collection) getSpringFactoriesInstances(ApplicationContextInitializer.class) );
	//设置监听器
    setListeners( (Collection) getSpringFactoriesInstances(ApplicationListener.class) );
    //deduce以看就是推断,推断主启动类
		this.mainApplicationClass = deduceMainApplicationClass();
	}
我们在这里可以看到SpringApplication初始化做了最重要的四件事:1.得到主启动类、2.设置监听器、3.设置应用上下文初始化相关实例、4.判断web应用类型;
-
先看最简单的判断web应用类型:这里使用classPath方式推断:见到那来说就是通过ClassUtils的isPresent利用反射尝试创建实例如果失败说明依赖不存在或缺失
static WebApplicationType deduceFromClasspath() { //ClassUtils是Spring提供的专门进行测试class的; //isParent:确定由提供的名称标识的Class是否存在并且可以加载。 如果该类或其依赖项之一不存在或无法加载,则将返回false。 //检查是否是响应式编程类型的web if (ClassUtils.isPresent(WEBFLUX_INDICATOR_CLASS, null) && !ClassUtils.isPresent(WEBMVC_INDICATOR_CLASS, null) && !ClassUtils.isPresent(JERSEY_INDICATOR_CLASS, null)) { return WebApplicationType.REACTIVE; } //检查是否为servlet形式的web for (String className : SERVLET_INDICATOR_CLASSES) { //只要有一个不满足直接返回不是web if (!ClassUtils.isPresent(className, null)) { return WebApplicationType.NONE; } } return WebApplicationType.SERVLET; } -
设置监听器和设置上下文应用其实都是通过:SPI方式;利用Spring提供的接口(ApplicationContextInitializer和ApplicationListener),然后在spring.factories注册服务商(SpringBoot)提供得实现类;可以通过Spring实现的SPI方法进行实例化;不过这里并没有使用Spring的直接实例化而是获取名称自己实例化;
-
推断入口类:这个可以参考学习:其通过获取运行时异常的栈得到栈元素数组然后检查是否有main方法
到底有哪些上下文相关实例和监听器呢?
默认的上下文相关实例和监听器
很明显我们可以自己配置自己的上下文相关实例和监听器,那么相应的SpringBoot整合的服务商也可以、SpringBoot自己也可以,我们看看SB到底配置力哪些实例和监听器;
spring上下文容器的事件接口(4个)
-
ContextRefreshedEvent:调用refersh
-
ContextStartedEvent:调用ApplicationContext的start
-
ContextStopedEvent:调用stop
-
ContextClosedEvent:所有bean都被销毁后、但是容器彻底关闭前
-
LazyInitializationBeanFactoryPostProcessor:设置多有单例bean为懒加载
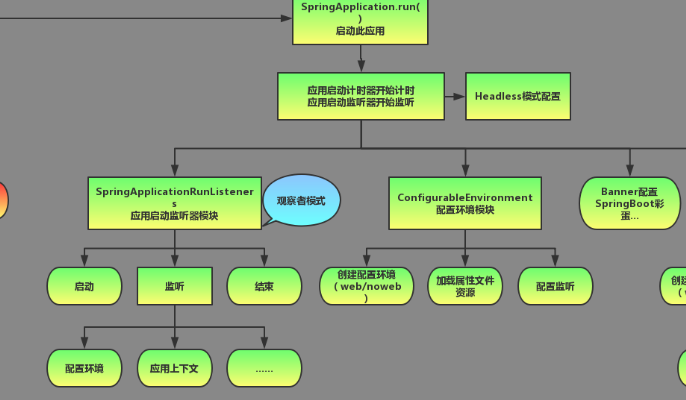
run方法
通过前面我们已经知道了创建SpringAppliaction实例化时会引入spring.factories设置的监听器和上下文初始化修改实例,
	public ConfigurableApplicationContext run(String... args) {
        //统计计时
		StopWatch stopWatch = new StopWatch();
		stopWatch.start();
        //前面说过;用于注册创建成本高的实例
		DefaultBootstrapContext bootstrapContext = createBootstrapContext();
		ConfigurableApplicationContext context = null;
        //配置Headless属性
		configureHeadlessProperty();
        //获取SpringApplicationRunListener数组
        //SpringApplicationRunListeners显然就是获取SpringApplicationRunListener数组的封装,
        	//这里的listener同样配置在spring.factories中,这意味着我们可以实现自己的listener
        	//默认有一个很重要的listener:EventPublishingRu∩Listener;专门监听事件发布;
		SpringApplicationRunListeners listeners = getRunListeners(args);
        ///启动监听,遍历SpringApplicationRunListener数组每个元素,并执行
		listeners.starting(bootstrapContext, this.mainApplicationClass);
		try {
            //ApplicationArguments对象:提供对用于运行SpringApplication的参数的访问
			ApplicationArguments applicationArguments = new DefaultApplicationArguments(args);
            //加载属性application的设置
			ConfigurableEnvironment environment = prepareEnvironment(listeners, bootstrapContext, applicationArguments);
			configureIgnoreBeanInfo(environment);
            	//打印Banner
			Banner printedBanner = printBanner(environment);
            //创建空容器,里面会推断需要的ApplicationContext容器的类型
			context = createApplicationContext();
            //开启标识ApplicationContext启动
			context.setApplicationStartup(this.applicationStartup);
            //容器的前置准备工作
			prepareContext(bootstrapContext, context, environment, listeners, applicationArguments, printedBanner);
            //refresh:这里就会调用Spring的refresh容器的方法
			refreshContext(context);
            //容器refres后置工作
            	//还记得spring得applicationContext,Spring得扩展就是再者实现得
			afterRefresh(context, applicationArguments);
            //停止计时
			stopWatch.stop();
            //是否打印log日志
			if (this.logStartupInfo) {
				new StartupInfoLogger(this.mainApplicationClass).logStarted(getApplicationLog(), stopWatch);
			}
            //广播容器启动完成
			listeners.started(context);
            //触发CommandLineRunner
			callRunners(context, applicationArguments);
		}
		catch (Throwable ex) {
			handleRunFailure(context, ex, listeners);
			throw new IllegalStateException(ex);
		}
		try {
            //广播容器正在运行
			listeners.running(context);
		}
		catch (Throwable ex) {
			handleRunFailure(context, ex, null);
			throw new IllegalStateException(ex);
		}
        //初始化的容器
		return context;
	}
SpringApplicationRunListener
public interface SpringApplicationRunListener {
	//监听器一运行旧会调用,即容器进入锁之前
	default void starting(ConfigurableBootstrapContext bootstrapContext) {
		starting();
	}
	@Deprecated
	default void starting() {
	}
//环境准备好之前
	default void environmentPrepared(ConfigurableBootstrapContext bootstrapContext,
			ConfigurableEnvironment environment) {
		environmentPrepared(environment);
	}
	@Deprecated
	default void environmentPrepared(ConfigurableEnvironment environment) {
	}
//容器的前置准备工作之前
	default void contextPrepared(ConfigurableApplicationContext context) {
	}
//容器refresh之前
	default void contextLoaded(ConfigurableApplicationContext context) {
	}

//callRunners之前
	default void started(ConfigurableApplicationContext context) {
	}
//已经准备好
    default void ready(ConfigurableApplicationContext context, Duration timeTaken) {
		running(context);
	}

//容器标记为可运行后,run结束前
	default void running(ConfigurableApplicationContext context) {
	}

//失败
	default void failed(ConfigurableApplicationContext context, Throwable exception) {
	}

}
prepareContext
	private void prepareContext(DefaultBootstrapContext bootstrapContext, ConfigurableApplicationContext context,ConfigurableEnvironment environment, SpringApplicationRunListeners listeners, ApplicationArguments applicationArguments, Banner printedBanner) {
        //设置上下文环境
		context.setEnvironment(environment);
        //应用上下文后置处理器
		postProcessApplicationContext(context);
        //初始化ApplicationContext
		applyInitializers(context);
        ///逾知监听器context准备完
		listeners.contextPrepared(context);
		bootstrapContext.close(context);
        	//日志
		if (this.logStartupInfo) {
			logStartupInfo(context.getParent() == null);
			logStartupProfileInfo(context);
		}
		//添加启动特定的单例 bean
		ConfigurableListableBeanFactory beanFactory = context.getBeanFactory();
        	//注册单例运行参数访问类
		beanFactory.registerSingleton("springApplicationArguments", applicationArguments);
        	//Banner图标
		if (printedBanner != null) {
			beanFactory.registerSingleton("springBootBanner", printedBanner);
		}
        //设置允许同id或者name得bean替换,默认为真
		if (beanFactory instanceof DefaultListableBeanFactory) {
			((DefaultListableBeanFactory) beanFactory)
					.setAllowBeanDefinitionOverriding(this.allowBeanDefinitionOverriding);
		}
        //设置是否懒加载,懒加载得话就是使用一个容器级别的BeanFactoryPostProcessor让所有单例bean不提前初始化
		if (this.lazyInitialization) {
			context.addBeanFactoryPostProcessor(new LazyInitializationBeanFactoryPostProcessor());
		}
		//加载源,就是加载前面我们设置的primarySources
		Set<Object> sources = getAllSources();
		Assert.notEmpty(sources, "Sources must not be empty");
		load(context, sources.toArray(new Object[0]));
		listeners.contextLoaded(context);
	}
SpringBoot内置组件
前面我们主要基于Spring角度思考SpringBoot,下面基于所谓的约定大于配置来思考:
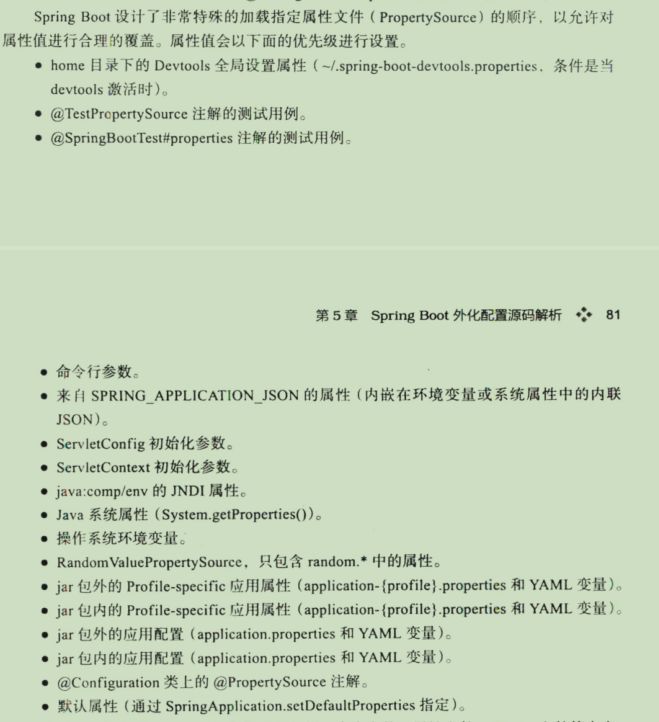
配置文件
我们经常在SpringBoot中通过配置文件配置大量的属性,配置文件的优先级如下:(下面是优先级由高到低,优先级高的会覆盖优先级低的)
另外就是SpringCloud的boostrap配置文件
日志
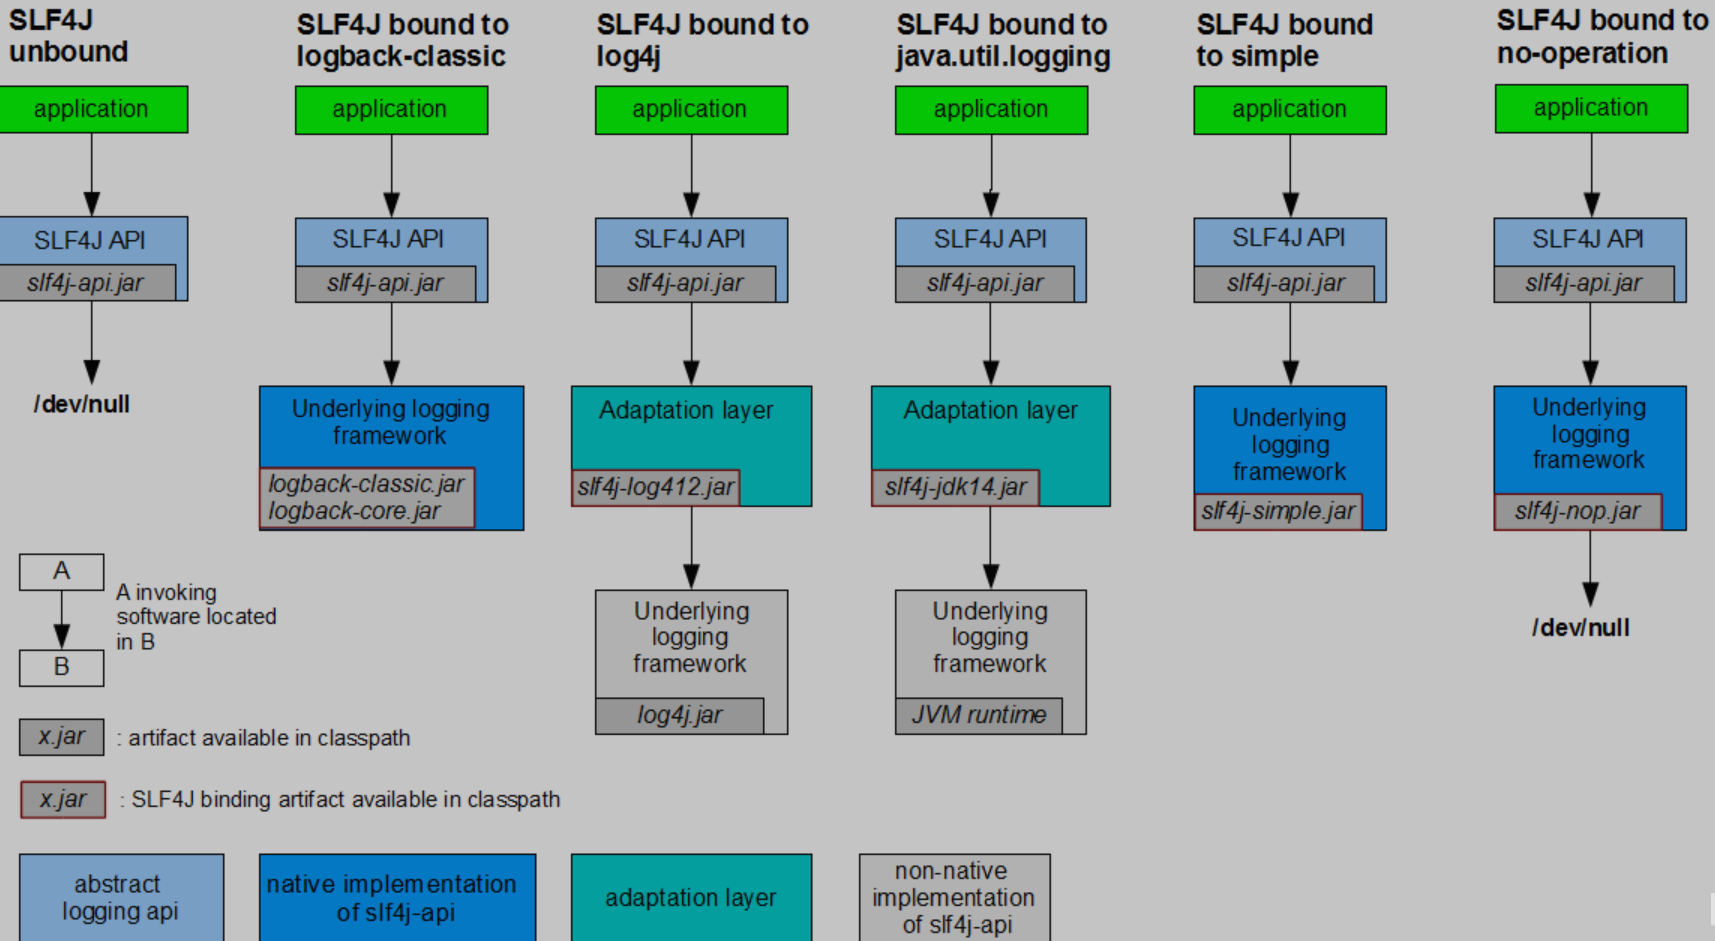
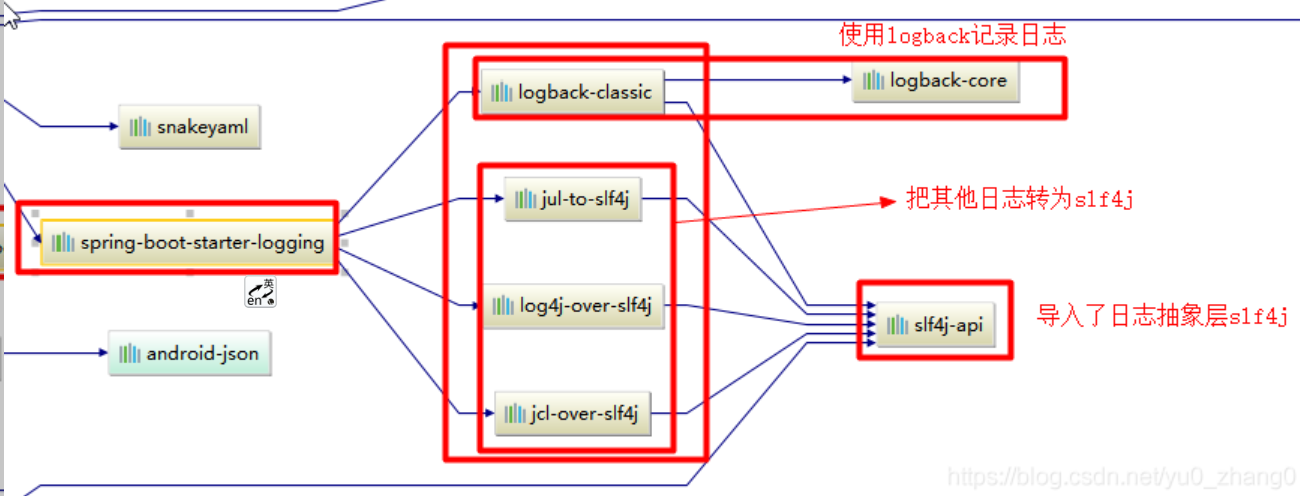
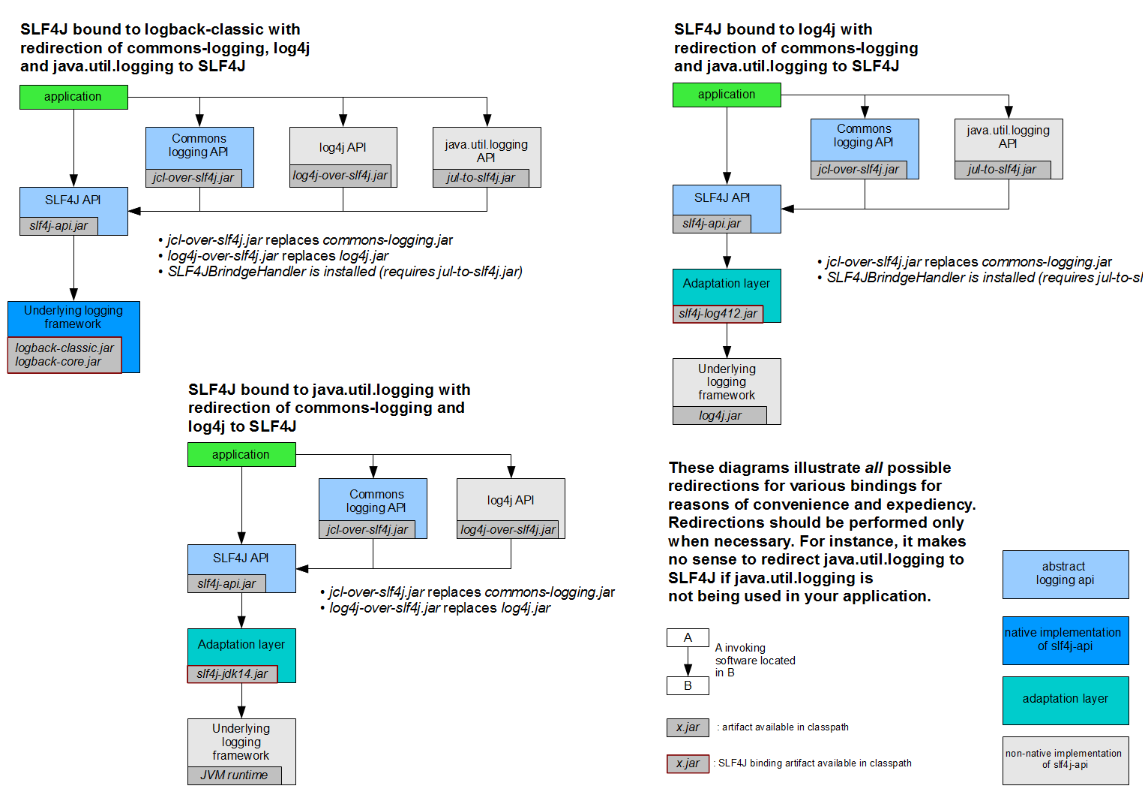
SLF4j日志抽象框架,SpringBoot默认使用SLF4J+Logback作为日志实现(我们知道Spring默认使用JCL作为日志抽象框架),主要体现在spring-boot-starter其除了导入核心的spring-core包外还导入了spring-boot-starter-logging;怎么使用SLF4J下图为官网的方法:
-
作为日志抽象层,自然使用的是SPI思想
- 首先所有的应用application均通过SLF4J使用日志;
- 所有应用提供方均通过SLF4J实现接口,提供服务;
-
SLF4J推荐使用统一日志格式(或者说XXX-spring.xml作为日志格式,以实现SpringBoot对于日志文件的一些功能扩展),例如logback的logback-spring.xml
-
SLF4j如果需要将其他日志转换为另一种日志需要通过以下方法(SpringBoot已经帮我们实现了)
-
-
SpringBoot提供了所有日志的空实现转换类,自动适配所有的日志,而且底层使用slf4j+logback的方式记录日志,引入其他框架的时候,只需要把这个框架依赖的日志框架排除掉即可;
-
-
//例如对于SpringBoot不使用logback,使用log4j2
<dependency>
  <groupId>org.springframework.boot</groupId>
  <artifactId>spring-boot-starter</artifactId>
  <exclusions>
    <exclusion>
      <artifactId>logback-classic</artifactId>
      <groupId>ch.qos.logback</groupId>
    </exclusion>
    <exclusion>
      <artifactId>log4j-over-slf4j</artifactId>
      <groupId>org.slf4j</groupId>
    </exclusion>
  </exclusions>
</dependency>
<dependency>
  <groupId>org.slf4j</groupId>
  <artifactId>slf4j-log4j2</artifactId>
</dependency>
-
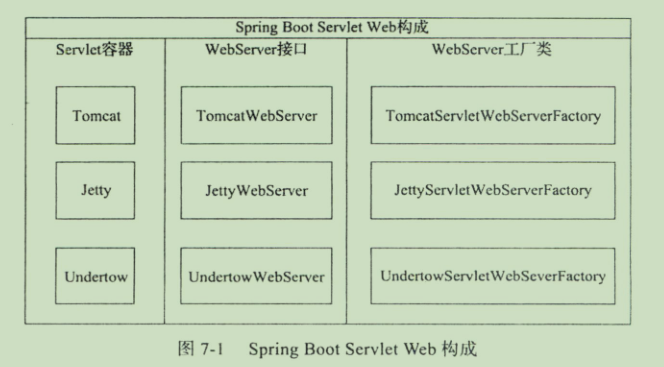
内置Servlet容器
Spring内置了3个java容器:Tomcat(默认使用)、Jetty、Undertow;
扩展
actuator
Spring Boot Actuator就是一款可以帮助你监控系统数据的框架,其可以监控很多很多的系统数据,它有对应用系统的自省和监控的集成功能,可以查看应用配置的详细信息,如:
- 显示应用程序员的Health健康信息
- 显示Info应用信息
- 显示HTTP Request跟踪信息
- 显示当前应用程序的“Metrics”信息
- 显示所有的@RequestMapping的路径信息
- 显示应用程序的各种配置信息
- 显示你的程序请求的次数 时间 等各种信息
可以监控的端点,需要开启仅仅只需要设置端点id+enable为true


内省机制
所谓的内省机制就是:java通过方法为get、set可以知道类的属性有哪些(理论上只要是getXX、setYY就是类的属性XX和YY,所以可以通过内省机制操作javaBean;所以内省(Introspector)是专门用来操作JavaBean属性的;
- field和属性的区别:俩者最根本的区别在于属性可以认为就是java的类的任意字段(类变量、实例变量);而属性则是根据get和set方法确定的,理论上属性可能不存在这个字段(
- 只有某些字段具有getXXX或setXXX方法的才能称之为属性,当然要称为是一个Bean还需要有一个无参的构造器,而内省就是对这些属性进行操作。


 1085
1085


 被折叠的 条评论
为什么被折叠?
被折叠的 条评论
为什么被折叠?
 到【灌水乐园】发言


