


springboot高级
本文分别从缓存、消息、检索、任务、安全、分布式、热部署和监控管理方面,对spring boot高级部分做了简单总结,内容不深但覆盖全。
(一) Spring Boot与缓存
一、 JSR107
Java Caching定义了5个核心接口
-
CachingProvider
定义了创建、配置、获取、管理和控制多个CacheManager。一个应用可以在运行期访问多个CachingProvider。
-
CacheManager
定义了创建、配置、获取、管理和控制多个唯一命名的Cache,这些Cache
存在于CacheManager的上下文中。一个CacheManager仅被一个CachingProvider所拥有。 -
Cache
一个类似Map的数据结构并临时存储以Key为索引的值。一个Cache仅被一个
CacheManager所拥有。 -
Entry
一个存储在Cache中的key-value对。
-
Expiry
每一个存储在Cache中的条目有一个定义的有效期。一旦超过这个时间,条目为过期的状态。一旦过期,条目将不可访问、更新和删除。缓存有效期可以通过ExpiryPolicy设置
二、 Spring缓存抽象
Spring从3.1开始定义了org.springframework.cache.Cache
和org.springframework.cache.CacheManager接口来统一不同的缓存技术;
并支持使用JCache(JSR-107)注解简化我们开发;Cache接口有以下功能:
- 为缓存的组件规范定义,包含缓存的各种操作集合;
-
Spring提供了各种xxxCache的实现;如RedisCache,EhCacheCache ,
ConcurrentMapCache等;
三、 重要缓存注解及概念
| Cache | 缓存接口,定义缓存操作。实现有:RedisCache、EhCacheCache、ConcurrentMapCache等 |
|---|---|
| CacheManager | 缓存管理器,管理各种缓存(Cache)组件 |
| @Cacheable | 根据方法的请求参数对其结果进行缓存 |
| @CacheEvict | 清空缓存 |
| @CachePut | 更新缓存 |
| @EnableCaching | 开启基于注解的缓存 |
| keyGenerator | 缓存数据时key生成策略 |
| serialize | 缓存数据时value序列化策略 |
1 . @Cacheable/@CachePut/@CacheEvict 主要的参数
-
value
缓存名称,字符串/字符数组形式;
如@Cacheable(value=”mycache”) 或者@Cacheable(value={”cache1”,”cache2”}
-
key
缓存的key,需要按照SpEL表达式编写,如果不指定则按照方法所有参数进行组合;
如@Cacheable(value=”testcache”,key=”#userName”)
-

-
keyGenerator
key的生成器;可以自己指定key的生成器的组件id
注意:key/keyGenerator:二选一使用;
-
condition
缓存条件,使用SpEL编写,在调用方法之前之后都能判断;
如@Cacheable(value=”testcache”,condition=”#userName.length()>2”)
-
unless(@CachePut、@Cacheable)
用于否决缓存的条件,只在方法执行之后判断;
如@Cacheable(value=”testcache”,unless=”#result ==null”)
-
beforeInvocation(@CacheEvict)
是否在执行前清空缓存,默认为false,false情况下方法执行异常则不会清空;
如@CachEvict(value=”testcache”,beforeInvocation=true)
-
allEntries(@CacheEvict)
是否清空所有缓存内容,默认为false;
如@CachEvict(value=”testcache”,allEntries=true)
2 . 缓存可用的SpEL表达式
root
表示根对象,不可省略
-
被调用方法名 methodName
如 #root.methodName
-
被调用方法 method
如 #root.method.name
-
目标对象 target
如 #root.target
-
被调用的目标对象类 targetClass
如 #root.targetClass
-
被调用的方法的参数列表 args
如 #root.args[0]
-
方法调用使用的缓存列表 caches
如 #root.caches[0].name
参数名
方法参数的名字. 可以直接 #参数名 ,也可以使用 #p0或#a0 的形式,0代表参数的索引;
如 #iban 、 #a0 、 #p0
返回值
方法执行后的返回值(仅当方法执行之后的判断有效,如‘unless’ , @CachePut、@CacheEvict’的表达式beforeInvocation=false )
如 #result
四、 缓存使用
1. 基本使用步骤
- 引入spring-boot-starter-cache模块
<dependency>
    <groupId>org.springframework.boot</groupId>
    <artifactId>spring-boot-starter-cache</artifactId>
</dependency>-
@EnableCaching开启缓存
在主配置类上标注
-
使用缓存注解
如@Cacheable、@CachePut
-
切换为其他缓存
2. 搭建实验环境
-
导入数据库文件 创建出department和employee表
-- ---------------------------- -- Table structure for department -- ---------------------------- DROP TABLE IF EXISTS `department`; CREATE TABLE `department` ( `id` int(11) NOT NULL AUTO_INCREMENT, `departmentName` varchar(255) DEFAULT NULL, PRIMARY KEY (`id`) ) ENGINE=InnoDB DEFAULT CHARSET=utf8; -- ---------------------------- -- Table structure for employee -- ---------------------------- DROP TABLE IF EXISTS `employee`; CREATE TABLE `employee` ( `id` int(11) NOT NULL AUTO_INCREMENT, `lastName` varchar(255) DEFAULT NULL, `email` varchar(255) DEFAULT NULL, `gender` int(2) DEFAULT NULL, `d_id` int(11) DEFAULT NULL, PRIMARY KEY (`id`) ) ENGINE=InnoDB DEFAULT CHARSET=utf8; -
创建javaBean封装数据
-
整合MyBatis操作数据库
配置数据源信息
spring.datasource.url=jdbc:mysql://localhost:3306/springboot_cache
spring.datasource.username=root
spring.datasource.password=
spring.datasource.driver-class-name=com.mysql.jdbc.Driver
#开启驼峰命名匹配规则
mybatis.configuration.map-underscore-to-camel-case=true
#开启日志  打印com.atguigu.cache包下的日志
logging.level.com.atguigu.cache.mapper=debug
#打开自动配置报告
debug=true
使用注解版的MyBatis;
@MapperScan指定需要扫描的mapper接口所在的包
-
主配置类开启@EnableCaching
3. 快速体验缓存
@Cacheable、@CachePut、@CacheEvict的使用
@Service
public class EmployeeService {
    @Autowired
    private EmployeeMapper employeeMapper;

    @Cacheable(value={"emp"},
            key = "#id+#root.methodName+#root.caches[0].name",
            condition = "#a0>1",
            unless = "#p0==2"
    )
    public Employee getEmpById(Integer id) {
        System.out.println("查询员工:"+id);
        return employeeMapper.getEmpById(id);
    }

    @CachePut(value = {"emp"},key = "#employee.id" )
    public Employee updateEmp(Employee employee) {
        System.out.println("更新员工"+employee);
        employeeMapper.updateEmp(employee);
        return employee;
    }

    @CacheEvict(value = {"emp"},allEntries = true,beforeInvocation = true)
    public Integer delEmp(Integer id){
        int i=1/0;
        System.out.println("删除员工:"+id);
        employeeMapper.delEmp(id);
        return id;
    }
}
自定义KeyGenerator
使用时在注解属性内指定KeyGenerator=“myKeyGenerator”
@Configuration
public class MyCacheConfig {
    @Bean("myKeyGenerator")
    public KeyGenerator myKeyGenerator() {
        return new KeyGenerator(){
            @Override
            public Object generate(Object target, Method method, Object... params) {
                return method.getName()+"["+ Arrays.asList(params).toString()+target+"]";
            }
        };
    }
}
@CacheConfig
标注在类上,用于抽取@Cacheable的公共属性
由于一个类中可能会使用多次@Cacheable等注解,所以各项属性可以抽取到@CacheConfig
@CacheConfig(cacheNames = "emp",cacheManager = "employeeCacheManager") //抽取缓存的公共配置@Caching
组合使用@Cacheable、@CachePut、@CacheEvict
@Caching(
       cacheable = {
           @Cacheable(/*value="emp",*/key = "#lastName")
       },
       put = {
           @CachePut(/*value="emp",*/key = "#result.id"),
           @CachePut(/*value="emp",*/key = "#result.email")
       }
  )
  public Employee getEmpByLastName(String lastName){
      return employeeMapper.getEmpByLastName(lastName);
  }
4. 工作原理
缓存的自动配置类CacheAutoConfiguration向容器中导入了CacheConfigurationImportSelector,此类的selectImports()方法添加了许多配置类,其中SimpleCacheConfiguration默认生效
org.springframework.boot.autoconfigure.cache.GenericCacheConfiguration
org.springframework.boot.autoconfigure.cache.JCacheCacheConfiguration
org.springframework.boot.autoconfigure.cache.EhCacheCacheConfiguration
org.springframework.boot.autoconfigure.cache.HazelcastCacheConfiguration
org.springframework.boot.autoconfigure.cache.InfinispanCacheConfiguration
org.springframework.boot.autoconfigure.cache.CouchbaseCacheConfiguration
org.springframework.boot.autoconfigure.cache.RedisCacheConfiguration
org.springframework.boot.autoconfigure.cache.CaffeineCacheConfiguration
org.springframework.boot.autoconfigure.cache.SimpleCacheConfiguration【默认】
org.springframework.boot.autoconfigure.cache.NoOpCacheConfiguration
@Import({ CacheConfigurationImportSelector.class, CacheManagerEntityManagerFactoryDependsOnPostProcessor.class })
public class CacheAutoConfiguration {
    static class CacheConfigurationImportSelector implements ImportSelector {

		@Override
		public String[] selectImports(AnnotationMetadata importingClassMetadata) {
			CacheType[] types = CacheType.values();
			String[] imports = new String[types.length];
			for (int i = 0; i < types.length; i++) {
                //将即将导入的各配置类存入字符数组内
				imports[i] = CacheConfigurations.getConfigurationClass(types[i]);
			}
			return imports;
		}

	}
}
SimpleCacheConfiguration向容器中导入了ConcurrentMapCacheManager
@Configuration(proxyBeanMethods = false)
@ConditionalOnMissingBean(CacheManager.class)
@Conditional(CacheCondition.class)
class SimpleCacheConfiguration {
    //向容器中导入ConcurrentMapCacheManager
	@Bean
	ConcurrentMapCacheManager cacheManager(CacheProperties cacheProperties,
			CacheManagerCustomizers cacheManagerCustomizers) {
		ConcurrentMapCacheManager cacheManager = new ConcurrentMapCacheManager();
		List<String> cacheNames = cacheProperties.getCacheNames();
		if (!cacheNames.isEmpty()) {
			cacheManager.setCacheNames(cacheNames);
		}
		return cacheManagerCustomizers.customize(cacheManager);
	}
}
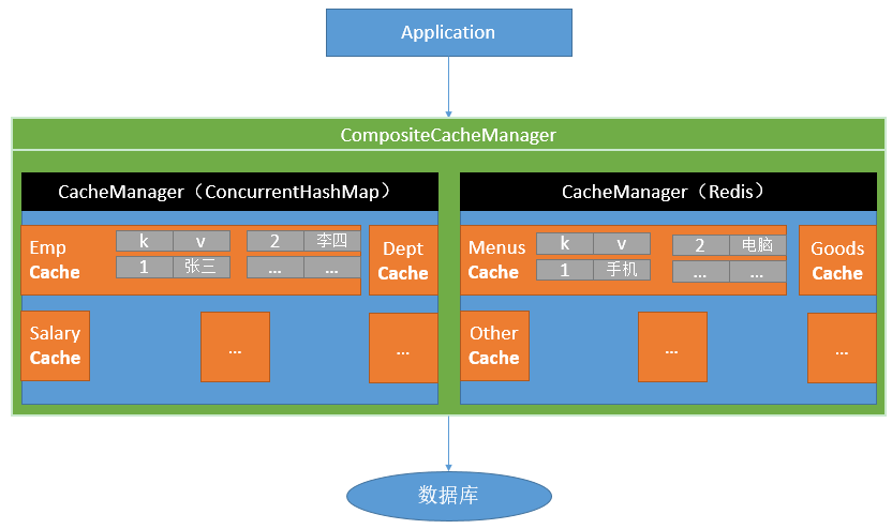
ConcurrentMapCacheManager使用ConcurrentMap以k-v的方式存储缓存缓存,下面以@Cacheable的运行流程为例说明ConcurrentMapCacheManager的作用。
==@Cacheable的运行流程==
-
方法运行之前,先去查询Cache(缓存组件),按照cacheNames指定的名字获取;
(CacheManager先获取相应的缓存),第一次获取缓存如果没有Cache组件会自动创建,并以cacheNames-cache对放入ConcurrentMap。 -
去Cache中查找缓存的内容,使用一个key,默认就是方法的参数;
key是按照某种策略生成的;默认是使用keyGenerator生成的,默认使用SimpleKeyGenerator生成key; SimpleKeyGenerator生成key的默认策略;
如果没有参数;key=new SimpleKey();
如果有一个参数:key=参数的值
如果有多个参数:key=new SimpleKey(params); -
没有查到缓存就调用目标方法;
-
将目标方法返回的结果,放进缓存中
@Cacheable标注的方法执行之前先来检查缓存中有没有这个数据,默认按照参数的值作为key去查询缓存,
如果没有就运行方法并将结果放入缓存;以后再来调用就可以直接使用缓存中的数据;
核心:
1)、使用CacheManager【ConcurrentMapCacheManager】按照名字得到Cache【ConcurrentMapCache】组件
2)、key使用keyGenerator生成的,默认是SimpleKeyGenerator
源码分析
默认使用ConcurrentMapCacheManager管理缓存,该类使用ConcurrentMap保存缓存,获取缓存如果没有Cache组件会自动创建,并以cacheNames-cache对放入ConcurrentMap。
public class ConcurrentMapCacheManager implements CacheManager, BeanClassLoaderAware {

	private final ConcurrentMap<String, Cache> cacheMap = new ConcurrentHashMap<>();

	private boolean dynamic = true;

   //获取缓存
	public Cache getCache(String name) {
		Cache cache = this.cacheMap.get(name);
        //如果没有缓存会自动创建
		if (cache == null && this.dynamic) {
			synchronized (this.cacheMap) {
				cache = this.cacheMap.get(name);
				if (cache == null) {
					cache = createConcurrentMapCache(name);
					this.cacheMap.put(name, cache);
				}
			}
		}
		return cache;
	}
}
在@Cacheable标注方法执行前执行CacheAspectSupport的execute()方法,在该方法中会以一定的规则生成key,并尝试在缓存中通过该key获取值,若通过key获取到值则直接返回,不用执行@Cacheable标注方法,否则执行该方法获得返回值。
public abstract class CacheAspectSupport extends AbstractCacheInvoker
		implements BeanFactoryAware, InitializingBean, SmartInitializingSingleton {
    //在执行@Cacheable标注的方法前执行此方法
    @Nullable
	private Object execute(final CacheOperationInvoker invoker, Method method, CacheOperationContexts contexts) {
		if (contexts.isSynchronized()) {
			CacheOperationContext context = contexts.get(CacheableOperation.class).iterator().next();
			if (isConditionPassing(context, CacheOperationExpressionEvaluator.NO_RESULT)) {
				Object key = generateKey(context, CacheOperationExpressionEvaluator.NO_RESULT);
				Cache cache = context.getCaches().iterator().next();
				try {
					return wrapCacheValue(method, cache.get(key, () -> unwrapReturnValue(invokeOperation(invoker))));
				}
				catch (Cache.ValueRetrievalException ex) {
					throw (CacheOperationInvoker.ThrowableWrapper) ex.getCause();
				}
			}
			else {
				return invokeOperation(invoker);
			}
		}

		processCacheEvicts(contexts.get(CacheEvictOperation.class), true,
				CacheOperationExpressionEvaluator.NO_RESULT);

        // 见findCachedItem方法
        //此方法通过一定规则生成的key找cache,若没找到则返回null
		Cache.ValueWrapper cacheHit = findCachedItem(contexts.get(CacheableOperation.class));

		List<CachePutRequest> cachePutRequests = new LinkedList<>();
		if (cacheHit == null) {
			collectPutRequests(contexts.get(CacheableOperation.class),
					CacheOperationExpressionEvaluator.NO_RESULT, cachePutRequests);
		}

		Object cacheValue;
		Object returnValue;

		if (cacheHit != null && !hasCachePut(contexts)) {
			// 如果通过该key找到缓存,且无@cacheput,则直接返回cacheValue
			cacheValue = cacheHit.get();
			returnValue = wrapCacheValue(method, cacheValue);
		}
		else {
			// 若通过该key未找到缓存,则执行@cacheable标注方法
			returnValue = invokeOperation(invoker);
			cacheValue = unwrapReturnValue(returnValue);
		}

		// Collect any explicit @CachePuts
		collectPutRequests(contexts.get(CachePutOperation.class), cacheValue, cachePutRequests);

		// Process any collected put requests, either from @CachePut or a @Cacheable miss
		for (CachePutRequest cachePutRequest : cachePutRequests) {
			cachePutRequest.apply(cacheValue);
		}

		// Process any late evictions
		processCacheEvicts(contexts.get(CacheEvictOperation.class), false, cacheValue);

		return returnValue;
	}

    @Nullable
	private Cache.ValueWrapper findCachedItem(Collection<CacheOperationContext> contexts) {
		Object result = CacheOperationExpressionEvaluator.NO_RESULT;
		for (CacheOperationContext context : contexts) {
			if (isConditionPassing(context, result)) {
                //通过一定规则生成key值(生成规则见generateKey方法)
				Object key = generateKey(context, result);
                //通过生成的key寻找缓存
				Cache.ValueWrapper cached = findInCaches(context, key);
				if (cached != null) {
					return cached;
				}
				else {
					if (logger.isTraceEnabled()) {
						logger.trace("No cache entry for key '" + key + "' in cache(s) " + context.getCacheNames());
					}
				}
			}
		}
		return null;
	}

    //key的生成策略
    @Nullable
    protected Object generateKey(@Nullable Object result) {
        //如果@Cacheable设置了属性key,则根据设置值生成key
        if (StringUtils.hasText(this.metadata.operation.getKey())) {
            EvaluationContext evaluationContext = createEvaluationContext(result);
            return evaluator.key(this.metadata.operation.getKey(), this.metadata.methodKey, evaluationContext);
        }
        //否则使用keyGenerator生成key,默认keyGenerator为SimpleKeyGenerator
        return this.metadata.keyGenerator.generate(this.target, this.metadata.method, this.args);
    }
默认情况下使用SimpleKeyGenerator生成key
public class SimpleKeyGenerator implements KeyGenerator {
    //SimpleKeyGenerator的生成规则
    public static Object generateKey(Object... params) {
        //若无参,则返回空key
		if (params.length == 0) {
			return SimpleKey.EMPTY;
		}
		if (params.length == 1) {
			Object param = params[0];
			if (param != null && !param.getClass().isArray()) {
                //1个参数,则直接返回该参数
				return param;
			}
		}
          //多个参数返回数组
		return new SimpleKey(params);
	}
}
默认的缓存类ConcurrentMapCache,使用ConcurrentMap存储k-v
public class ConcurrentMapCache extends AbstractValueAdaptingCache {

	private final String name;

    //存储key-cacheValue
	private final ConcurrentMap<Object, Object> store;

    //通过key查找cacheValue
	protected Object lookup(Object key) {
		return this.store.get(key);
	}

    //方法调用完后将结果存入缓存中
    public void put(Object key, @Nullable Object value) {
		this.store.put(key, toStoreValue(value));
	}
}
五、Redis与缓存
0. docker安装redis
1、下载镜像
docker pull reids
2、启动镜像
docker run -d -p 6379:6379 --name myredis docker.io/redis
3. 查看运行状况
docker ps -a
1. 环境搭建
导入依赖
<dependency>
     <groupId>org.springframework.boot</groupId>
     <artifactId>spring-boot-starter-data-redis</artifactId>
 </dependency>
在spring.properties指定Redis服务器地址
#redis服务器主机地址
spring.redis.host=192.168.31.162
2. RedisTemplate
RedisAutoConfiguration向容器中导入了两个类RedisTemplate<Object, Object> redisTemplate和StringRedisTemplate,作为Redis客户端分别操作k-v都为对象和k-v都为字符串的值
Redis常见的五大数据类型
String(字符串)、List(列表)、Set(集合)、Hash(散列)、ZSet(有序集合)
stringRedisTemplate.opsForValue()[String(字符串)]
stringRedisTemplate.opsForList()[List(列表)]
stringRedisTemplate.opsForSet()[Set(集合)]
stringRedisTemplate.opsForHash()[Hash(散列)]
stringRedisTemplate.opsForZSet()[ZSet(有序集合)]
3. Redis缓存使用
在导入redis依赖后RedisCacheConfiguration类就会自动生效,创建RedisCacheManager,并使用RedisCache进行缓存数据,缓存的对象的类要实现Serializable接口,默认情况下是以jdk序列化数据存在redis中,如下:
k:"emp::1"
v:
\xAC\xED\x00\x05sr\x00$cn.edu.ustc.springboot.bean.Employeeuqf\x03p\x9A\xCF\xE0\x02\x00\x05L\x00\x03dIdt\x00\x13Ljava/lang/Integer;L\x00\x05emailt\x00\x12Ljava/lang/String;L\x00\x06genderq\x00~\x00\x01L\x00\x02idq\x00~\x00\x01L\x00\x08lastNameq\x00~\x00\x02xpsr\x00\x11java.lang.Integer\x12\xE2\xA0\xA4\xF7\x81\x878\x02\x00\x01I\x00\x05valuexr\x00\x10java.lang.Number\x86\xAC\x95\x1D\x0B\x94\xE0\x8B\x02\x00\x00xp\x00\x00\x00\x03t\x00\x07cch@aaasq\x00~\x00\x04\x00\x00\x00\x01q\x00~\x00\x08t\x00\x03cch要想让对象以json形式存储在redis中,需要自定义RedisCacheManager,使用GenericJackson2JsonRedisSerializer类对value进行序列化
@Configuration
public class MyRedisConfig extends CachingConfigurerSupport {
    //以json的形式存入缓存并序列化
    @Bean
    public RedisTemplate<Object, Employee> empRedisTemplate(RedisConnectionFactory redisConnectionFactory) throws UnknownHostException {
        RedisTemplate<Object, Employee> template = new RedisTemplate();
        template.setConnectionFactory(redisConnectionFactory);
        // 使用Jackson2JsonRedisSerialize 替换默认序列化
        Jackson2JsonRedisSerializer<Employee> serializer = new Jackson2JsonRedisSerializer<Employee>(Employee.class);
        template.setDefaultSerializer(serializer);
        return template;
    }
    //从缓存中读取数据反序列化
    @Bean
    public RedisCacheManager cacheManager(RedisConnectionFactory connectionFactory) {
        //初始化一个RedisCacheWriter输出流
        RedisCacheWriter redisCacheWriter = RedisCacheWriter.nonLockingRedisCacheWriter(connectionFactory);
        //采用Jackson2JsonRedisSerializer序列化机制
        Jackson2JsonRedisSerializer<Employee> serializer = new Jackson2JsonRedisSerializer<Employee>(Employee.class);
        //创建一个RedisSerializationContext.SerializationPair给定的适配器pair
        RedisSerializationContext.SerializationPair<Employee> pair = RedisSerializationContext.SerializationPair.fromSerializer(serializer);
        //创建CacheConfig
        RedisCacheConfiguration defaultCacheConfig = RedisCacheConfiguration.defaultCacheConfig().serializeValuesWith(pair);
        //设置默认超过期时间是30秒
        //defaultCacheConfig.entryTtl(Duration.ofSeconds(60*60));
        //初始化RedisCacheManager
        return new RedisCacheManager(redisCacheWriter, defaultCacheConfig);
    }
}
序列化数据如下:
k:"emp::3"

v:
{
  "@class": "cn.edu.ustc.springboot.bean.Employee",
  "id": 3,
  "lastName": "aaa",
  "email": "aaaa",
  "gender": 1,
  "dId": 5
}注意,这里必须用GenericJackson2JsonRedisSerializer进行value的序列化解析,如果使用Jackson2JsonRedisSerializer,序列化的json没有"@class": "cn.edu.ustc.springboot.bean.Employee",在读取缓存时会报类型转换异常。
4. Redis缓存原理
配置类RedisCacheConfiguration向容器中导入了其定制的RedisCacheManager,在默认的RedisCacheManager的配置中,是使用jdk序列化value值
@Configuration(proxyBeanMethods = false)
@ConditionalOnClass(RedisConnectionFactory.class)
@AutoConfigureAfter(RedisAutoConfiguration.class)
@ConditionalOnBean(RedisConnectionFactory.class)
@ConditionalOnMissingBean(CacheManager.class)
@Conditional(CacheCondition.class)
class RedisCacheConfiguration {

    //向容器中导入RedisCacheManager
	@Bean
	RedisCacheManager cacheManager(CacheProperties cacheProperties, CacheManagerCustomizers cacheManagerCustomizers,
			ObjectProvider<org.springframework.data.redis.cache.RedisCacheConfiguration> redisCacheConfiguration,
			ObjectProvider<RedisCacheManagerBuilderCustomizer> redisCacheManagerBuilderCustomizers,
			RedisConnectionFactory redisConnectionFactory, ResourceLoader resourceLoader) {
		//使用determineConfiguration()的返回值生成RedisCacheManagerBuilder
        //调用了RedisCacheManagerBuilder的cacheDefaults()方法(见下一代码块)
        RedisCacheManagerBuilder builder = RedisCacheManager.builder(redisConnectionFactory).cacheDefaults(
				determineConfiguration(cacheProperties, redisCacheConfiguration, resourceLoader.getClassLoader()));
		List<String> cacheNames = cacheProperties.getCacheNames();
		if (!cacheNames.isEmpty()) {
			builder.initialCacheNames(new LinkedHashSet<>(cacheNames));
		}
		redisCacheManagerBuilderCustomizers.orderedStream().forEach((customizer) -> customizer.customize(builder));
        //使用RedisCacheManagerBuilder的build()方法创建RedisCacheManager并进行定制操作
		return cacheManagerCustomizers.customize(builder.build());
	}


	private org.springframework.data.redis.cache.RedisCacheConfiguration determineConfiguration(
			CacheProperties cacheProperties,
			ObjectProvider<org.springframework.data.redis.cache.RedisCacheConfiguration> redisCacheConfiguration,
			ClassLoader classLoader) {
        //determineConfiguration()调用了createConfiguration()
		return redisCacheConfiguration.getIfAvailable(() -> createConfiguration(cacheProperties, classLoader));
	}


    //createConfiguration()定义了其序列化value的规则
	private org.springframework.data.redis.cache.RedisCacheConfiguration createConfiguration(
			CacheProperties cacheProperties, ClassLoader classLoader) {
		Redis redisProperties = cacheProperties.getRedis();
		org.springframework.data.redis.cache.RedisCacheConfiguration config = org.springframework.data.redis.cache.RedisCacheConfiguration
				.defaultCacheConfig();
        //使用jdk序列化器对value进行序列化
		config = config.serializeValuesWith(
				SerializationPair.fromSerializer(new JdkSerializationRedisSerializer(classLoader)));
        //设置properties文件中设置的各项属性
		if (redisProperties.getTimeToLive() != null) {
			config = config.entryTtl(redisProperties.getTimeToLive());
		}
		if (redisProperties.getKeyPrefix() != null) {
			config = config.prefixKeysWith(redisProperties.getKeyPrefix());
		}
		if (!redisProperties.isCacheNullValues()) {
			config = config.disableCachingNullValues();
		}
		if (!redisProperties.isUseKeyPrefix()) {
			config = config.disableKeyPrefix();
		}
		return config;
	}

}
RedisCacheManager的直接构造类,该类保存了配置类RedisCacheConfiguration,该配置在会传递给RedisCacheManager
public static class RedisCacheManagerBuilder {

		private final RedisCacheWriter cacheWriter;
    	//默认缓存配置使用RedisCacheConfiguration的默认配置
    	//该默认配置缓存时默认将k按字符串存储,v按jdk序列化数据存储(见下一代码块)
		private RedisCacheConfiguration defaultCacheConfiguration = RedisCacheConfiguration.defaultCacheConfig();
		private final Map<String, RedisCacheConfiguration> initialCaches = new LinkedHashMap<>();
		private boolean enableTransactions;
		boolean allowInFlightCacheCreation = true;

		private RedisCacheManagerBuilder(RedisCacheWriter cacheWriter) {
			this.cacheWriter = cacheWriter;
		}


    	//传入RedisCacheManagerBuilder使用的缓存配置规则RedisCacheConfiguration类
		public RedisCacheManagerBuilder cacheDefaults(RedisCacheConfiguration defaultCacheConfiguration) {

			Assert.notNull(defaultCacheConfiguration, "DefaultCacheConfiguration must not be null!");

			this.defaultCacheConfiguration = defaultCacheConfiguration;

			return this;
		}


    //使用默认defaultCacheConfiguration创建RedisCacheManager
    public RedisCacheManager build() {

			RedisCacheManager cm = new RedisCacheManager(cacheWriter, defaultCacheConfiguration, initialCaches,
					allowInFlightCacheCreation);

			cm.setTransactionAware(enableTransactions);

			return cm;
		}
RedisCacheConfiguration保存了许多缓存规则,这些规则都保存在RedisCacheManagerBuilder的RedisCacheConfiguration defaultCacheConfiguration属性中,并且当RedisCacheManagerBuilder创建RedisCacheManager传递过去
public class RedisCacheConfiguration {

	private final Duration ttl;
	private final boolean cacheNullValues;
	private final CacheKeyPrefix keyPrefix;
	private final boolean usePrefix;

	private final SerializationPair<String> keySerializationPair;
	private final SerializationPair<Object> valueSerializationPair;

	private final ConversionService conversionService;

    //默认缓存配置
    public static RedisCacheConfiguration defaultCacheConfig(@Nullable ClassLoader classLoader) {

            DefaultFormattingConversionService conversionService = new DefaultFormattingConversionService();

            registerDefaultConverters(conversionService);

            return new RedisCacheConfiguration(Duration.ZERO, true, true, CacheKeyPrefix.simple(),
                                     SerializationPair.fromSerializer(RedisSerializer.string()),//key使用字符串
                                               SerializationPair.fromSerializer(RedisSerializer.java(classLoader)), conversionService);
        //value按jdk序列化存储
    }
RedisCacheManager在创建RedisCache时将RedisCacheConfiguration传递过去,并在创建RedisCache时通过createRedisCache()起作用
public class RedisCacheManager extends AbstractTransactionSupportingCacheManager {

	private final RedisCacheWriter cacheWriter;
	private final RedisCacheConfiguration defaultCacheConfig;
	private final Map<String, RedisCacheConfiguration> initialCacheConfiguration;
	private final boolean allowInFlightCacheCreation;

    	protected RedisCache createRedisCache(String name, @Nullable RedisCacheConfiguration cacheConfig) {
        //如果调用该方法时RedisCacheConfiguration有值则使用定制的,否则则使用默认的RedisCacheConfiguration defaultCacheConfig,即RedisCacheManagerBuilder传递过来的配置
		return new RedisCache(name, cacheWriter, cacheConfig != null ? cacheConfig : defaultCacheConfig);
	}
RedisCache,Redis缓存,具体负责将缓存数据序列化的地方,将RedisCacheConfiguration的序列化对SerializationPair提取出来并使用其定义的序列化方式分别对k和v进行序列化操作
public class RedisCache extends AbstractValueAdaptingCache {

    private static final byte[] BINARY_NULL_VALUE = RedisSerializer.java().serialize(NullValue.INSTANCE);

	private final String name;
	private final RedisCacheWriter cacheWriter;
	private final RedisCacheConfiguration cacheConfig;
	private final ConversionService conversionService;

    public void put(Object key, @Nullable Object value) {

		Object cacheValue = preProcessCacheValue(value);

		if (!isAllowNullValues() && cacheValue == null) {

			throw new IllegalArgumentException(String.format(
					"Cache '%s' does not allow 'null' values. Avoid storing null via '@Cacheable(unless=\"#result == null\")' or configure RedisCache to allow 'null' via RedisCacheConfiguration.",
					name));
		}

        //在put k-v时使用cacheConfig中的k-v序列化器分别对k-v进行序列化
		cacheWriter.put(name, createAndConvertCacheKey(key), serializeCacheValue(cacheValue), cacheConfig.getTtl());
	}

    //从cacheConfig(即RedisCacheConfiguration)中获取KeySerializationPair并写入key值
    protected byte[] serializeCacheKey(String cacheKey) {
		return ByteUtils.getBytes(cacheConfig.getKeySerializationPair().write(cacheKey));
	}


    //从cacheConfig(即RedisCacheConfiguration)中获取ValueSerializationPair并写入key值
    protected byte[] serializeCacheValue(Object value) {

        if (isAllowNullValues() && value instanceof NullValue) {
            return BINARY_NULL_VALUE;
        }

        return ByteUtils.getBytes(cacheConfig.getValueSerializationPair().write(value));
    }
分析到这也就不难理解,要使用json保存序列化数据时,需要自定义RedisCacheManager,在RedisCacheConfiguration中定义序列化转化规则,并向RedisCacheManager传入我们自己定制的RedisCacheConfiguration了,我定制的序列化规则会跟随RedisCacheConfiguration一直传递到RedisCache,并在序列化时发挥作用。
(二) Spring Boot与消息
一、消息简介
消息代理规范
- JMS(Java Message Service)JAVA消息服务
- 基于JVM消息代理的规范。ActiveMQ、HornetMQ是JMS实现
- AMQP(Advanced Message Queuing Protocol)
- 高级消息队列协议,也是一个消息代理的规范,兼容JMS
- RabbitMQ是AMQP的实现

作用
通过消息服务中间件来提升系统异步通信、扩展解耦能力
当消息发送者发送消息以后,将由消息代理接管,消息代理保证消息传递到指定目的地
应用场景
- 异步处理
用户注册操作和消息处理并行,提高响应速度


应用解耦
在下单时库存系统不能正常使用。也不影响正常下单,因为下单后,订单系统写入消息队列就不再关心其他的后续操作了。实现订单系统与库存系统的应用解耦

流量削峰
用户的请求,服务器接收后,首先写入消息队列。假如消息队列长度超过最大数量,则直接抛弃用户请求或跳转到错误页面
秒杀业务根据消息队列中的请求信息,再做后续处理

二、RabbitMQ
RabbitMQ是一个由erlang开发的AMQP(Advanved Message Queue Protocol)的开源实现。
1. 核心概念
-
Message
- 消息,消息是不具名的,它由消息头和消息体组成
- 消息头,包括routing-key(路由键)、priority(相对于其他消息的优先权)、delivery-mode(指出该消息可能需要持久性存储)等
-
Publisher
- 消息的生产者,也是一个向交换器发布消息的客户端应用程序
-
Exchange
- 交换器,将生产者消息路由给服务器中的队列
- 类型有direct(默认),fanout, topic, 和headers,具有不同转发策略
-
Queue
- 消息队列,保存消息直到发送给消费者
-
Binding
- 绑定,用于消息队列和交换器之间的关联
-
Connection
- 网络连接,比如一个TCP连接
-
Consumer
- 消息的消费者,表示一个从消息队列中取得消息的客户端应用程序
-
Virtual Host
- 虚拟主机,表示一批交换器、消息队列和相关对象。
- vhost 是 AMQP 概念的基础,必须在连接时指定
- RabbitMQ 默认的 vhost 是 /
-
Broker
- 消息队列服务器实体
2. 运行机制
消息路由
AMQP 中增加了Exchange 和 Binding 的角色, Binding 决定交换器的消息应该发送到那个队列
Exchange 类型
- direct
点对点模式,消息中的路由键(routing key)如果和 Binding 中的 binding
key 一致, 交换器就将消息发到对应的队列中。

- fanout
广播模式,每个发到 fanout 类型交换器的消息都会分到所有绑定的队列上去
- topic
将路由键和某个模式进行匹配,此时队列需要绑定到一个模式上。它将路由键和绑定键的字符串切分成单词,这些单词之间用点隔开。
识别通配符: # 匹配 0 个或多个单词, *匹配一个单词

三、 Springboot中的RabbitMQ
1. 环境准备
在docker中安装rabbitmq并运行
# 5672为服务端口,15672为web控制台端口
docker run -d --name myrabbitmq -p 5672:5672 -p 15672:15672 38e57f281891
消息管理页面使用
地址:l192.168.31.46:15672
用户名:guest
密码:guest
解决----Docker安装RabbitMQ后Web管理页面拒绝访问
今天安装rabbitmq死活访问不了web管理页面,
首先确定服务是运行的,
端口是正常监听的,
防火墙也是开放了端口的,
 于是网上一顿乱搜,记录一下解决办法:
需要进去docker容器中运行
rabbitmq-plugins enable rabbitmq_management
此命令会启动三个插件,然后就可以正常访问了


创建交换器

添加队列

导入依赖
 <dependency>
       <groupId>org.springframework.boot</groupId>
       <artifactId>spring-boot-starter-amqp</artifactId>
   </dependency>
<!--自定义消息转化器Jackson2JsonMessageConverter所需依赖-->
   <dependency>
       <groupId>com.fasterxml.jackson.core</groupId>
       <artifactId>jackson-databind</artifactId>
   </dependency>
配置文件
# 指定rebbitmq服务器主机
spring.rabbitmq.host=192.168.31.162
#spring.rabbitmq.username=guest  默认值为guest
#spring.rabbitmq.password=guest	 默认值为guest
2. RabbitMQ的使用
RabbitAutoConfiguration中有内部类RabbitTemplateConfiguration,在该类中向容器中分别导入了RabbitTemplate和AmqpAdmin
在测试类中分别注入
@Autowired
   private RabbitTemplate rabbitTemplate;

   @Autowired
   private AmqpAdmin amqpAdmin;
-
RabbitTemplate消息发送处理组件
可用来发送和接收消息
| |
默认的消息转化器是SimpleMessageConverter,对于对象以jdk序列化方式存储,若要以Json方式存储对象,就要自定义消息转换器
//发送消息
rabbitTemplate.convertAndSend("amq.direct","ustc","aaaa");
      Book book = new Book();
      book.setName("西游记");
      book.setPrice(23.2f);
//Book要实现Serializable接口
      rabbitTemplate.convertAndSend("amq.direct","ustc",book);

//接收消息
Object o = rabbitTemplate.receiveAndConvert("ustc");
      System.out.println(o.getClass());  //class cn.edu.ustc.springboot.bean.Book
      System.out.println(o);			//Book{name='西游记', price=23.2}
-
AmqpAdmin管理组件
可用于创建和删除exchange、binding和queue
//创建Direct类型的Exchange
amqpAdmin.declareExchange(new DirectExchange("admin.direct"));
//创建Queue
amqpAdmin.declareQueue(new Queue("admin.test"));
//将创建的队列与Exchange绑定
amqpAdmin.declareBinding(new Binding("admin.test", Binding.DestinationType.QUEUE,"admin.direct","admin.test",null));
消息的监听
在回调方法上标注@RabbitListener注解,并设置其属性queues,注册监听队列,当该队列收到消息时,标注方法遍会调用
可分别使用Message和保存消息所属对象进行消息接收,若使用Object对象进行消息接收,实际上接收到的也是Message
@Service
public class BookService {
    @RabbitListener(queues = {"admin.test"})
    public void receive1(Book book){
        System.out.println("收到消息:"+book);
    }

    @RabbitListener(queues = {"admin.test"})
    public void receive1(Object object){
        System.out.println("收到消息:"+object.getClass());
        //收到消息:class org.springframework.amqp.core.Message
    }

    @RabbitListener(queues = {"admin.test"})
    public void receive2(Message message){
        System.out.println("收到消息"+message.getHeaders()+"---"+message.getPayload());
    }
}
(三) Spring boot与检索
一、 ElasticSearch入门
1. ES的简介
简介
我们的应用经常需要添加检索功能,开源的 ElasticSearch 是目前全文搜索引擎的首选。他可以快速的存储、搜索和分析海量数据。Spring Boot通过整合Spring Data ElasticSearch为我们提供了非常便捷的检索功能支持;
Elasticsearch是一个分布式搜索服务,提供Restful API,底层基于Lucene,采用多shard(分片)的方式保证数据安全,并且提供自动resharding的功能,github等大型的站点也是采用了ElasticSearch作为其搜索服务。
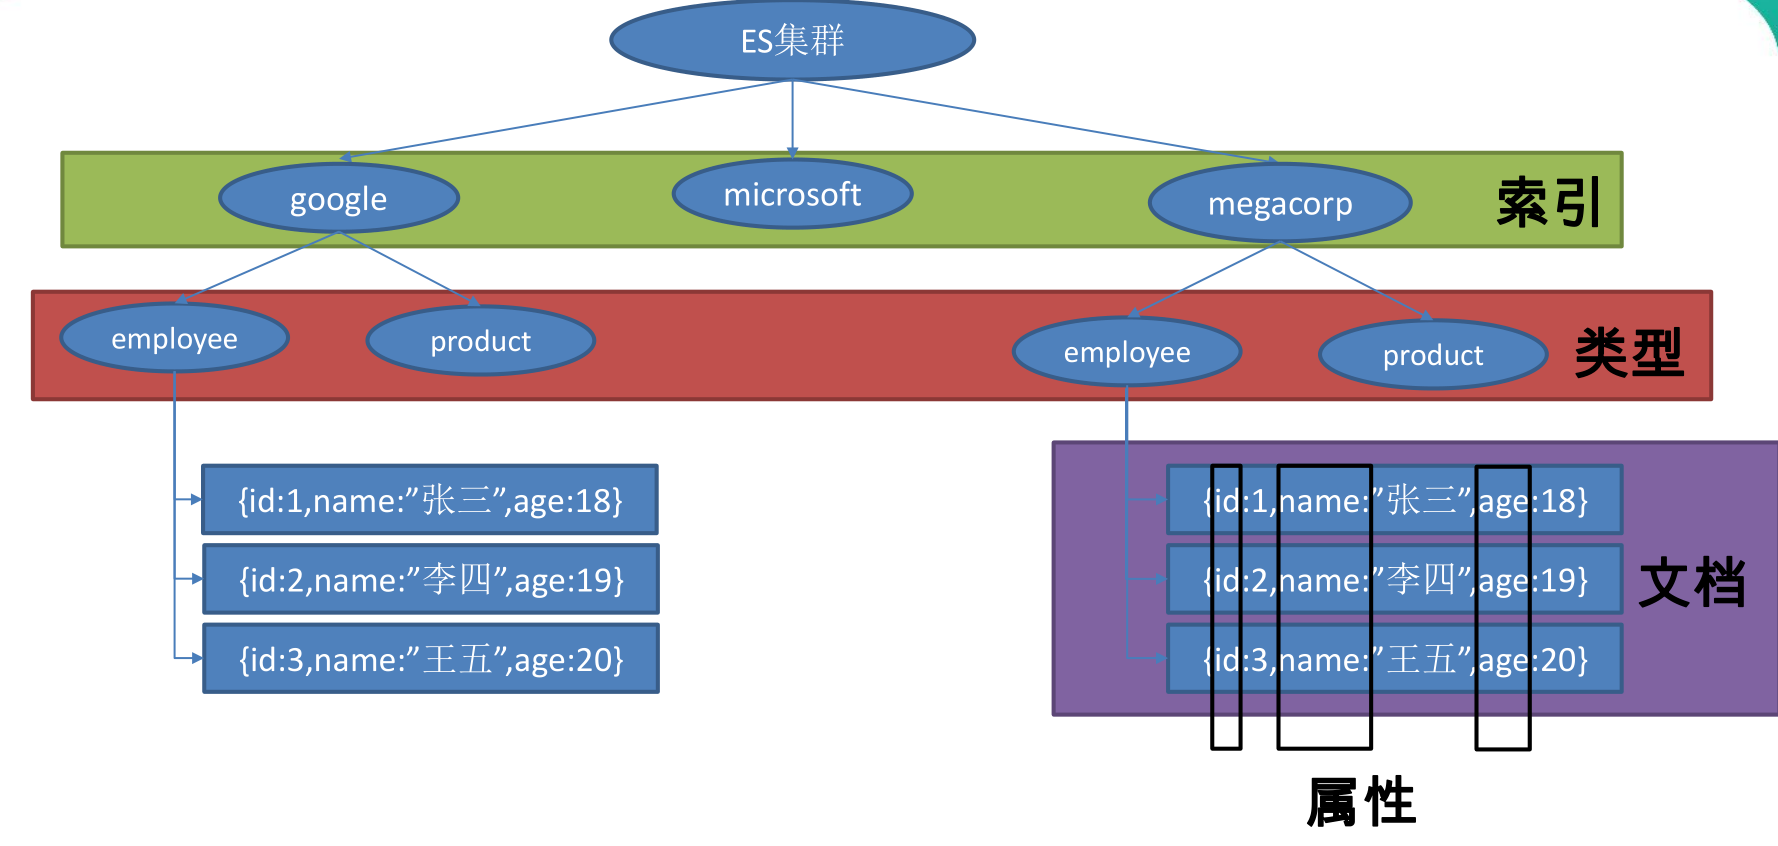
概念
员工文档 的形式存储为例:一个文档代表一个员工数据。存储数据到ElasticSearch 的行为叫做 索引 ,但在索引一个文档之前,需要确定将文档存储在哪里。
一个 ElasticSearch 集群可以包含多个 索引 ,相应的每个索引可以包含多个 类型 。 这些不同的类型存储着多个 文档 ,每个文档又有 多个 属性 。
索引(名词):
如前所述,一个 *索引* 类似于传统关系数据库中的一个 *数据库* ,是一个存储关系型文档的地方。 *索引* (*index*) 的复数词为 *indices* 或 *indexes* 。
索引(动词):
*索引一个文档* 就是存储一个文档到一个 *索引* (名词)中以便被检索和查询。这非常类似于 SQL 语句中的 `INSERT` 关键词,除了文档已存在时,新文档会替换旧文档情况之外。
类似关系:
- 索引---数据库
- 类型---表
- 文档---表中的记录
- 属性---列
2. ES的安装与运行
与ES交互
-
9200端口
RESTful API通过HTTP通信
-
9300端口
Java客户端与ES的原生传输协议和集群交互
# 拉取ES镜像
docker pull elasticsearch:7.6.1
#运行ES
docker run -e "discovery.type=single-node" -e ES_JAVA_OPTS="-Xms256m -Xmx256m" -d -p 9200:9200 -p 9300:9300 --name ES03 41072cdeebc5
ES_JAVA_OPTS指定java虚拟机相关参数
-Xms256m 初始堆内存大小为256m
-Xmx256m 最大堆内存大小为256m
discovery.type=single-node 设置为单点启动
3. ES的基础入门
案例:创建一个员工目录,并支持各类型检索
索引员工文档
对于员工目录,我们将做如下操作:
- 每个员工索引一个文档,文档包含该员工的所有信息。
- 每个文档都将是
employee类型 。 - 该类型位于 索引
megacorp内。
PUT /megacorp/employee/1
{
    "first_name" : "John",
    "last_name" :  "Smith",
    "age" :        25,
    "about" :      "I love to go rock climbing",
    "interests": [ "sports", "music" ]
}
注意,路径 /megacorp/employee/1 包含了三部分的信息:
-
megacorp索引名称
-
employee类型名称
-
1特定雇员的ID
请求体 —— JSON 文档 —— 包含了这位员工的所有详细信息
| |
同理,添加更多员工
| |
检索文档
HTTP GET 请求并指定文档的地址——索引库、类型和ID。
| |
返回数据
| |
将 HTTP 命令由 PUT 改为 GET 可以用来检索文档,同样的,可以使用 DELETE 命令来删除文档,以及使用 HEAD 指令来检查文档是否存在。如果想更新已存在的文档,只需再次 PUT 。
轻量搜索
搜索所有雇员:
| |
返回数据
| |
返回结果包括三个文档,放在数据hits中。
搜索姓氏为 Smith 的雇员
| |
在请求路径中使用 _search 端点,并将查询本身赋值给参数 q= 。返回结果给出了所有的 Smith:
| |
使用查询表达式搜索
Query-string 搜索通过命令非常方便地进行临时性的即席搜索 ,但它有自身的局限性。Elasticsearch 提供一个丰富灵活的查询语言叫做 查询表达式 , 它支持构建更加复杂和健壮的查询。
| |
返回效果与之前一样
更复杂的搜索
同样搜索姓氏为 Smith 的员工,但这次我们只需要年龄大于 30 的
| |
全文搜索
搜索下所有喜欢攀岩(rock climbing)的员工:
| |
返回结果
| |
可以看到返回结果还带有相关性得分_score
短语搜索
精确匹配一系列单词或者短语 。 比如, 执行这样一个查询,短语 “rock climbing” 的形式紧挨着的雇员记录。
为此对 match 查询稍作调整,使用一个叫做 match_phrase 的查询
| |
高亮搜索
每个搜索结果中 高亮 部分文本片段
再次执行前面的查询,并增加一个新的 highlight 参数:
| |
返回结果
| |
结果中还多了一个叫做 highlight 的部分。这个部分包含了 about 属性匹配的文本片段,并以 HTML 标签 <em> 封装
二、 Springboot整合ElasticSearch
1. 概述
SpringBoot默认支持两种技术来和ES交互;
-
Jest(默认不生效)
- 需要导入jest的工具包(io.searchbox.client.JestClient)
- 从springboot 2.2.0以后被弃用
-
SpringData ElasticSearch
版本适配说明
| Spring Data Elasticsearch | Elasticsearch |
|---|---|
| 3.2.x | 6.8.1 |
| 3.1.x | 6.2.2 |
| 3.0.x | 5.5.0 |
| 2.1.x | 2.4.0 |
| 2.0.x | 2.2.0 |
| 1.3.x | 1.5.2 |
Springboot 2.2.6对应于 Spring Data Elasticsearch 3.2.6,即适配Elasticsearch 6.8.1
2. 环境搭建
编写文件对应Javabean,指定索引名和类型
| |
3. ElasticSearch客户端
-
Transport Client
在ES7中已经被弃用,将在ES8被移除
-
High Level REST Client
ES的默认客户端
-
Reactive Client
非官方驱动,基于WebClient
下面以REST客户端为例说明ES的使用
配置主机地址
方式一 配置类配置
注意:这种方式底层依赖于Http相关类,因此要导入web相关jar包
| |
方式二 spring配置文件指定
| |
在测试类中注入客户端
| |
创建索引
| |
下面为创建索引
| |
得到索引
| |
4. ElasticsearchRestTemplate
ES有两个模板,分别为ElasticsearchRestTemplate和ElasticsearchTemplate
分别对应于High Level REST Client和Transport Client(弃用),两个模板都实现了ElasticsearchOperations接口,因此使用时我们一般使用ElasticsearchOperations,具体实现方式由底层决定。
由于在AbstractElasticsearchConfiguration中已经向容器中导入了ElasticsearchRestTemplate,因此我们使用时可以直接注入
注入模板
| |
保存索引
| |
查询索引
| |
5. Elasticsearch Repositories
编写相关Repository并继承Repository或ElasticsearchRepository,泛型分别为<查询类,主键>
| |
查询的方法仅需按照一定规则命名即可实现功能,无需编写实现,如上findByBookNameAndAuthor()方法相当于ES的json查询
| |
@Query
此外,还可以使用@Query自定义请求json
| |
若参数为John,相当于请求体为
| |
更多ES与springboot整合内容见官方文档
(四) Spring boot与任务
一、异步任务
在Java应用中,绝大多数情况下都是通过同步的方式来实现交互处理的;但是在处理与第三方系统交互的时候,容易造成响应迟缓的情况,之前大部分都是使用多线程来完成此类任务,springboot中可以用异步任务解决。
两个注解:
@Async 在需要异步执行的方法上标注注解
@EnableAsync 在主类上标注开启异步任务支持
开启异步任务后,当controller层调用该方法会直接返回结果,该任务异步执行
| |
二、 定时任务
项目开发中经常需要执行一些定时任务,比如需要在每天凌晨时候,分析一次前一天的日志信息。Spring为我们提供了异步执行任务调度的方式,提供TaskExecutor 、TaskScheduler 接口。
两个注解:
@EnableScheduling 标注在主类,开启对定时任务支持
@Scheduled 标注在执行的方法上,并制定cron属性
| |
cron表达式:
second(秒), minute(分), hour(时), day of month(日), month(月), day of week(周几).
0 0/5 14,18 * * ? 每天14点整,和18点整,每隔5分钟执行一次
0 15 10 ? * 1-6 每个月的周一至周六10:15分执行一次
0 0 2 ? * 6L 每个月的最后一个周六凌晨2点执行一次
0 0 2 LW * ? 每个月的最后一个工作日凌晨2点执行一次
0 0 2-4 ? * 1#1 每个月的第一个周一凌晨2点到4点期间,每个整点都执行一次;
| 字段 | 允许值 | 允许的特殊字符 |
|---|---|---|
| 秒 | 0-59 | , - * / |
| 分 | 0-59 | , - * / |
| 小时 | 0-23 | , - * / |
| 日期 | 1-31 | , - * ? / L W C |
| 月份 | 1-12 | , - * / |
| 星期 | 0-7或SUN-SAT 0,7是SUN | , - * ? / L C # |
| 特殊字符 | 代表含义 |
|---|---|
| , | 枚举 |
| - | 区间 |
| * | 任意 |
| / | 步长 |
| ? | 日/星期冲突匹配 |
| L | 最后 |
| W | 工作日 |
| C | 和calendar联系后计算过的值 |
| # | 星期,4#2,第2个星期四 |
三、 邮件任务
springboot自动配置包中MailSenderAutoConfiguration通过@Import注解向容器中导入了MailSenderJndiConfiguration,而MailSenderJndiConfiguration向容器中导入了JavaMailSenderImpl类,我们可以使用该类发送邮件
配置文件
| |
自动注入
| |
简单邮件发送
| |
复杂邮件发送
带有附件或html页面的邮件
两个设置
new MimeMessageHelper(message,true) 设置multipart=true,开启对内联元素和附件的支持
helper.setText("xxxx",true) html=ture,设置content type=text/html,默认为text/plain
| |
(五) Spring boot与安全
一、安全
应用程序的两个主要区域是“认证”和“授权”(或者访问控制),这两个主要区域是安全的两个目标。 身份验证意味着确认您自己的身份,而授权意味着授予对系统的访问权限
认证
身份验证是关于验证您的凭据,如用户名/用户ID和密码,以验证您的身份。系统确定您是否就是您所说的使用凭据。在公共和专用网络中,系统通过登录密码验证用户身份。身份验证通常通过用户名和密码完成,
授权
另一方面,授权发生在系统成功验证您的身份后,最终会授予您访问资源(如信息,文件,数据库,资金,位置,几乎任何内容)的完全权限。简单来说,授权决定了您访问系统的能力以及达到的程度。验证成功后,系统验证您的身份后,即可授权您访问系统资源。
二、Spring Security
Spring Security是针对Spring项目的安全框架,也是Spring Boot底层安全模块默认的技术选型。他可以实现强大的web安全控制。对于安全控制,我们仅需引入spring-boot-starter-security模块,进行少量的配置,即可实现强大的安全管理。
WebSecurityConfigurerAdapter:自定义Security策略
通过在配置类中继承该类重写configure(HttpSecurity http)方法来实现自定义策略
@EnableWebSecurity:开启WebSecurity模式
在配置类上标注@EnableWebSecurity开启WebSecurity模式
三、 Springboot整合security
1. 导入依赖
| |
导入spring security的包之后,默认情况所有应用访问认证授权,默认用户名user,密码为随机生成的uuid,启动时打印在控制台
2. 登录/注销
| |
此时除了主页,点击其他的页面都会自动跳转到security自动生成的登录页面,/login来到登陆页,重定向到/login?error表示登陆失败;
http.logout()开启自动配置的注销功能,向/logout发送post请求表示注销,需要在欢迎页加上注销表单,默认注销后自动跳转到登录页面,若想改变转发路径,可以通过logoutSuccessUrl(url)设置路径
| |
3. 定义认证规则
为了保证密码能安全存储,springboot内置PasswordEncoder对密码进行转码,默认密码编码器为DelegatingPasswordEncoder。在定义认证规则时,我们需要使用PasswordEncoder将密码转码,由于withDefaultPasswordEncoder()并非安全已被弃用,因此仅在测试中使用。
| |
4.自定义欢迎页
导入依赖
| |
引入命名空间
| |
根据是否登录显示游客或用户信息
| |
根据角色类型显示信息
| |
更多spring-security与thymeleaf整合教程
5. 自定义登录页/记住我
| |
通过loginPage(url)设置登录页路径后,在定制的登录页发送post url即为登录请求,并设置表单的name属性都为对应值;
通过勾选记住我,session退出后依然能通过cookie保存用户信息,下次免登陆
| |
(六) Spring boot与分布式
一、分布式应用
分布式应用(distributed application)指的是应用程序分布在不同计算机上,通过网络来共同完成一项任务的工作方式。
为什么需要分布式?
- 单一应用架构
当网站流量很小时,只需一个应用,将所有功能都部署在一起,以减少部署节点和成本。此时,用于简化增删改查工作量的数据访问框架(ORM)是关键。 - 垂直应用架构
当访问量逐渐增大,单一应用增加机器带来的加速度越来越小,将应用拆成互不相干的几个应用,以提升效率。此时,用于加速前端页面开发的Web框架(MVC)是关键。 - 分布式服务架构
当垂直应用越来越多,应用之间交互不可避免,将核心业务抽取出来,作为独立的服务,逐渐形成稳定的服务中心,使前端应用能更快速的响应多变的市场需求。此时,用于提高业务复用及整合的分布式服务框架(RPC)是关键。- 流动计算架构
当服务越来越多,容量的评估,小服务资源的浪费等问题逐渐显现,此时需增加一个调度中心基于访问压力实时管理集群容量,提高集群利用率。此时,用于提高机器利用率的资源调度和治理中心(SOA)是关键。
- 流动计算架构
在分布式系统中,国内常用zookeeper+dubbo组合,而Spring Boot推荐使用全栈的Spring,Spring Boot+Spring Cloud。
二、Zookeeper和Dubbo
1. 概述
ZooKeeper
ZooKeeper 是一个分布式的,开放源码的分布式应用程序协调服务。它是一个为分布式应用提供一致性服务的软件,提供的功能包括:配置维护、域名服务、分布式同步、组服务等。
Dubbo
Dubbo是Alibaba开源的分布式服务框架,它最大的特点是按照分层的方式来架构,使用这种方式可以使各个层之间解耦合(或者最大限度地松耦合)。从服务模型的角度来看,Dubbo采用的是一种非常简单的模型,要么是提供方提供服务,要么是消费方消费服务,所以基于这一点可以抽象出服务提供方(Provider)和服务消费方(Consumer)两个角色。
2. 整合springboot
环境搭建
分别创建provider和consumer模块并分别导入依赖
| |
provider配置文件
| |
consumer配置文件
| |
生产者服务
@EnableDubbo :
可以在指定的包名下(通过 scanBasePackages),或者指定的类中(通过 scanBasePackageClasses)扫描 Dubbo 的服务提供者(以 @Service 标注)以及 Dubbo 的服务消费者(以 Reference 标注)。
@Service:
表示服务的具体实现,被注解的类会被dubbo扫描
| |
消费者服务
编写与分布式服务类相同的接口(不必实现),并保证包结构相同
| |
@Reference 可以定义在类中的一个字段、方法上,表示一个服务的引用。通常 @Reference 定义在一个字段上
| |
此时若调用hello(),控制台将打印
| |
有关dubbo更多
三、Spring Cloud
1. 概述
Spring Cloud是一个分布式的整体解决方案。Spring Cloud 为开发者提供了在分布式系统(配置管理,服务发现,熔断,路由,微代理,控制总线,一次性token,全局琐,leader选举,分布式session,集群状态)中快速构建的工具,使用Spring Cloud的开发者可以快速的启动服务或构建应用、同时能够快速和云平台资源进行对接。
SpringCloud分布式开发五大常用组件
- 服务发现——Netflix Eureka
- 客服端负载均衡——Netflix Ribbon
- 断路器——Netflix Hystrix
- 服务网关——Netflix Zuul
- 分布式配置——Spring Cloud Config
2. 入门
Eureka注册中心
创建工程导入eureka-server模块
| |
配置文件
| |
生产者模块
创建工程导入eureka-client和web模块
| |
配置文件
| |
编写controller层和service层demo
| |
消费者模块
创建工程导入eureka-client和web模块
配置文件
| |
向容器中注入RestTemplate, 并使用@EnableDiscoveryClient开启发现服务功能
| |
编写controller并使用RestTemplate发现服务
| |
向http://localhost:8200/buy?username=zhangsan发请求,则会响应
| |
并且在使用了@LoadBalanced之后实现了负载均衡,如果创建不同端口的provider应用,则访问会被均衡到各个应用
(七) Spring boot与热部署
在开发中我们修改一个Java文件后想看到效果不得不重启应用,这导致大量时间花费,我们希望不重启应用的情况下,程序可以自动部署(热部署)。有以下四种情况,如何能实现热部署。
一、模板引擎
在Spring Boot中开发情况下禁用模板引擎的cache
页面模板改变ctrl+F9可以重新编译当前页面并生效
二、Spring Loaded
Spring官方提供的热部署程序,实现修改类文件的热部署
- 下载Spring Loaded(项目地址https://github.com/spring-projects/spring-loaded)
- 添加运行时参数;
- javaagent:C:/springloaded-1.2.5.RELEASE.jar –noverify
三、JRebel
收费的一个热部署软件
安装插件使用即可
四、 Spring Boot Devtools(推荐)
引入依赖
| |
IDEA使用ctrl+F9重新编译实现热部署
(八) Spring Boot与监控管理
通过引入spring-boot-starter-actuator,可以使用Spring Boot为我们提供的准生产环境下的应用监控和管理功能。我们可以通过HTTP,JMX,SSH协议来进行操作,自动得到审计、健康及指标信息等
一、 Actuator监控管理
导入依赖
| |
浏览器打开链接http://localhost:8080/actuator/,可以看到所有支持的连接,响应如下,默认只支持这些端点
| |
如果要看到所有支持的状态查询,需要配置
| |
bean加载情况http://localhost:8080/actuator/beans,显示了容器中各类各项属性
| |
二、 端点配置
默认情况下,除shutdown以外的所有端点均已启用。要配置单个端点的启用,请使用management.endpoint.<id>.enabled属性。以下示例启用shutdown端点:
| |
另外可以通过management.endpoints.enabled-by-default来修改全局端口默认配置,以下示例启用info端点并禁用所有其他端点:
| |
修改路径
| |


 220
220

 被折叠的 条评论
为什么被折叠?
被折叠的 条评论
为什么被折叠?
 到【灌水乐园】发言


