


SolidWorks + AI:利用 DeepSeek AI 自动生成 VBA Macro 宏,实现智能化建模!
🚀 项目简介
开发环境:Windows 10 / Visual Studio 2017 / .Net 4.7.2 / SolidWorks 2021
本教程介绍如何将 DeepSeek AI 集成到 SolidWorks 插件,实现 AI 生成 VBA Macro 代码 的自动化操作。通过 DeepSeek AI,您可以快速生成高效的 VBA 代码,提升 SolidWorks 建模效率!
💡 核心功能:
- 🤖 AI 生成并优化 VBA 代码,一键自动化
- 🛠 内置 SolidWorks UI 对话界面,无缝集成
- 🔑 支持 API Key 配置,个性化智能对话
📌 1. 申请 DeepSeek API Key
- 访问 DeepSeek API Key 页面。
- 生成并复制 API Key,用于插件调用。
🏗 2. 创建 SolidWorks AI 插件
🔹 2.1 在 SolidWorks 侧边栏创建 DeepSeek 交互 UI
使用 CreateTaskpaneView2 Method (ISldWorks) 创建 Taskpane 侧边栏。
📌 依赖库(需引用):
- SolidWorks.Interop.sldworks.dll
- SolidWorks.Interop.swpublished.dll
✅ TaskpaneIntegration.cs
using SolidWorks.Interop.sldworks;
using SolidWorks.Interop.swpublished;
using System;
using System.IO;
using System.Runtime.InteropServices;

namespace Solidworks.DeepSeekAI
{
    public class TaskpaneIntegration : ISwAddin
    {
        private int mSwCookie;
        private TaskpaneView mtaskpaneView;
        private TaskpaneHostUI mtaskpaneHost;
        public static SldWorks mSolidWorksApplication;

        public const string SWTASKPANE_PROGID = "Solidworks.DeepSeekAI.Taskpane";

        public bool ConnectToSW(object ThisSW, int Cookie)
        {
            mSolidWorksApplication = (SldWorks)ThisSW;
            mSwCookie = Cookie;
            mSolidWorksApplication.SetAddinCallbackInfo2(0, this, mSwCookie);
            LoadUI();
            return true;
        }

        public bool DisconnectFromSW()
        {
            UnloadUI();
            return true;
        }

        private void LoadUI()
        {
            string dllPath = Path.GetDirectoryName(
                typeof(TaskpaneIntegration).Assembly.CodeBase
            ).Replace(@"file:\", string.Empty);
            var imagePath = Path.Combine(dllPath, "deepseek_logo_16x.png");
            mtaskpaneView = mSolidWorksApplication.CreateTaskpaneView2(
                imagePath, "Solidworks.DeepSeekAI"
            );
            mtaskpaneHost = (TaskpaneHostUI)mtaskpaneView.AddControl(SWTASKPANE_PROGID, string.Empty);
        }

        private void UnloadUI()
        {
            mtaskpaneHost = null;
            mtaskpaneView.DeleteView();
            Marshal.FinalReleaseComObject(mtaskpaneView);
            mtaskpaneView = null;
        }
    }
}
🔹 2.2 AI 自动生成 VBA 代码
💡 功能点:
- 读取 API Key
- 发送用户输入到 DeepSeek AI
- 获取 AI 生成的 VBA 代码
- 返回结果并显示到 UI
📌 安装 NuGet 包(需安装):
- Newtonsoft.Json
- SunnyUI(可选)
✅ TaskpaneHostUI.cs
using System;
using System.Collections.Generic;
using System.Text;
using System.Threading.Tasks;
using System.Windows.Forms;
using System.Net.Http;
using Newtonsoft.Json;

namespace Solidworks.DeepSeekAI
{
    [ProgId(TaskpaneIntegration.SWTASKPANE_PROGID)]
    public partial class TaskpaneHostUI : UserControl
    {
        private async void btnSend_Click(object sender, EventArgs e)
        {
            string apiKey = Utility.ReadRegistryKey();
            if (string.IsNullOrEmpty(apiKey))
            {
                MessageBox.Show("请先配置 API Key!", "提示", MessageBoxButtons.OK, MessageBoxIcon.Asterisk);
                return;
            }
            string userInput = TxtInput.Text.Trim();
            if (string.IsNullOrEmpty(userInput))
            {
                MessageBox.Show("请输入内容!");
                return;
            }
            AppendMessage("我", userInput);
            string aiResponse = await GetAIResponse(userInput);
            TxtInput.Clear();
            AppendMessage("AI", aiResponse);
        }
    }
}
🔹 2.3 设置 DeepSeek API Key
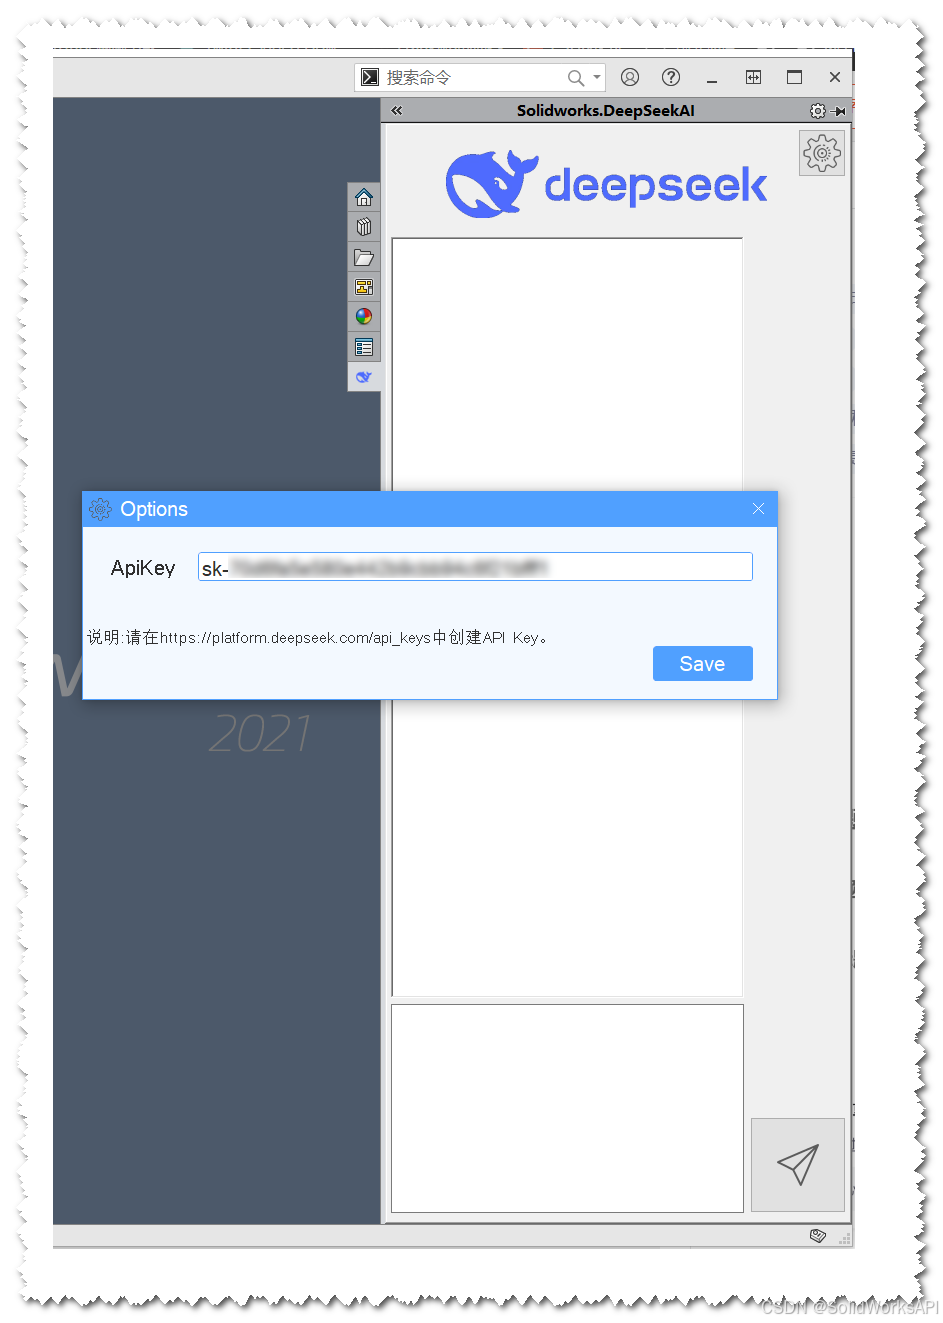
若要提供一个配置窗口,可在按钮事件中调用 OptionsForm(或类似的自定义窗体),在其中读取并更新注册表信息。
用户可以在选项表单中,将生成的 API Key 存储到注册表。示例:
✅ OptionsForm.cs
using Sunny.UI;
using System;
using System.Windows.Forms;

namespace Solidworks.DeepSeekAI
{
    public partial class OptionsForm : UIForm
    {
        public OptionsForm()
        {
            InitializeComponent();

            txtApiKey.Text = Utility.ReadRegistryKey();
        }

        private void btnSave_Click(object sender, EventArgs e)
        {
            if (txtApiKey.Text != "")
            {
                Utility.CreateRegistryKey(txtApiKey.Text);
                MessageBox.Show("API Key配置完成!", "提示", MessageBoxButtons.OK, MessageBoxIcon.Asterisk);
                this.Close();
            }
            else
            {
                MessageBox.Show("请填写正确的API Key!", "提示", MessageBoxButtons.OK, MessageBoxIcon.Asterisk);
            }
        }
    }
}
✅ Utility.cs
using Microsoft.Win32;

namespace Solidworks.DeepSeekAI
{
    public class Utility
    {
        // 创建并写入 API Key
        public static void CreateRegistryKey(
            string ApiKey,
            string path = @"SOFTWARE\Solidworks.DeepSeekAI\Settings")
        {
            var key = Registry.CurrentUser.CreateSubKey(path);
            key.SetValue("API_Key", ApiKey);
            key.Close();
        }

        // 读取 API Key
        public static string ReadRegistryKey(
            string path = @"SOFTWARE\Solidworks.DeepSeekAI\Settings")
        {
            var key = Registry.CurrentUser.OpenSubKey(path, false);
            return key?.GetValue("API_Key") as string ?? string.Empty;
        }
    }
}
🛠 3. SolidWorks AI 插件安装 & 卸载
📌 注册插件(管理员身份运行 Register.cmd)
"%windir%\Microsoft.NET\Framework64\v4.0.30319\RegAsm.exe" /codebase "%~dp0Solidworks.DeepSeekAI.dll"
📌 卸载插件(管理员身份运行 Unregister.cmd)
"%windir%\Microsoft.NET\Framework64\v4.0.30319\RegAsm.exe" /codebase "%~dp0Solidworks.DeepSeekAI.dll" /u
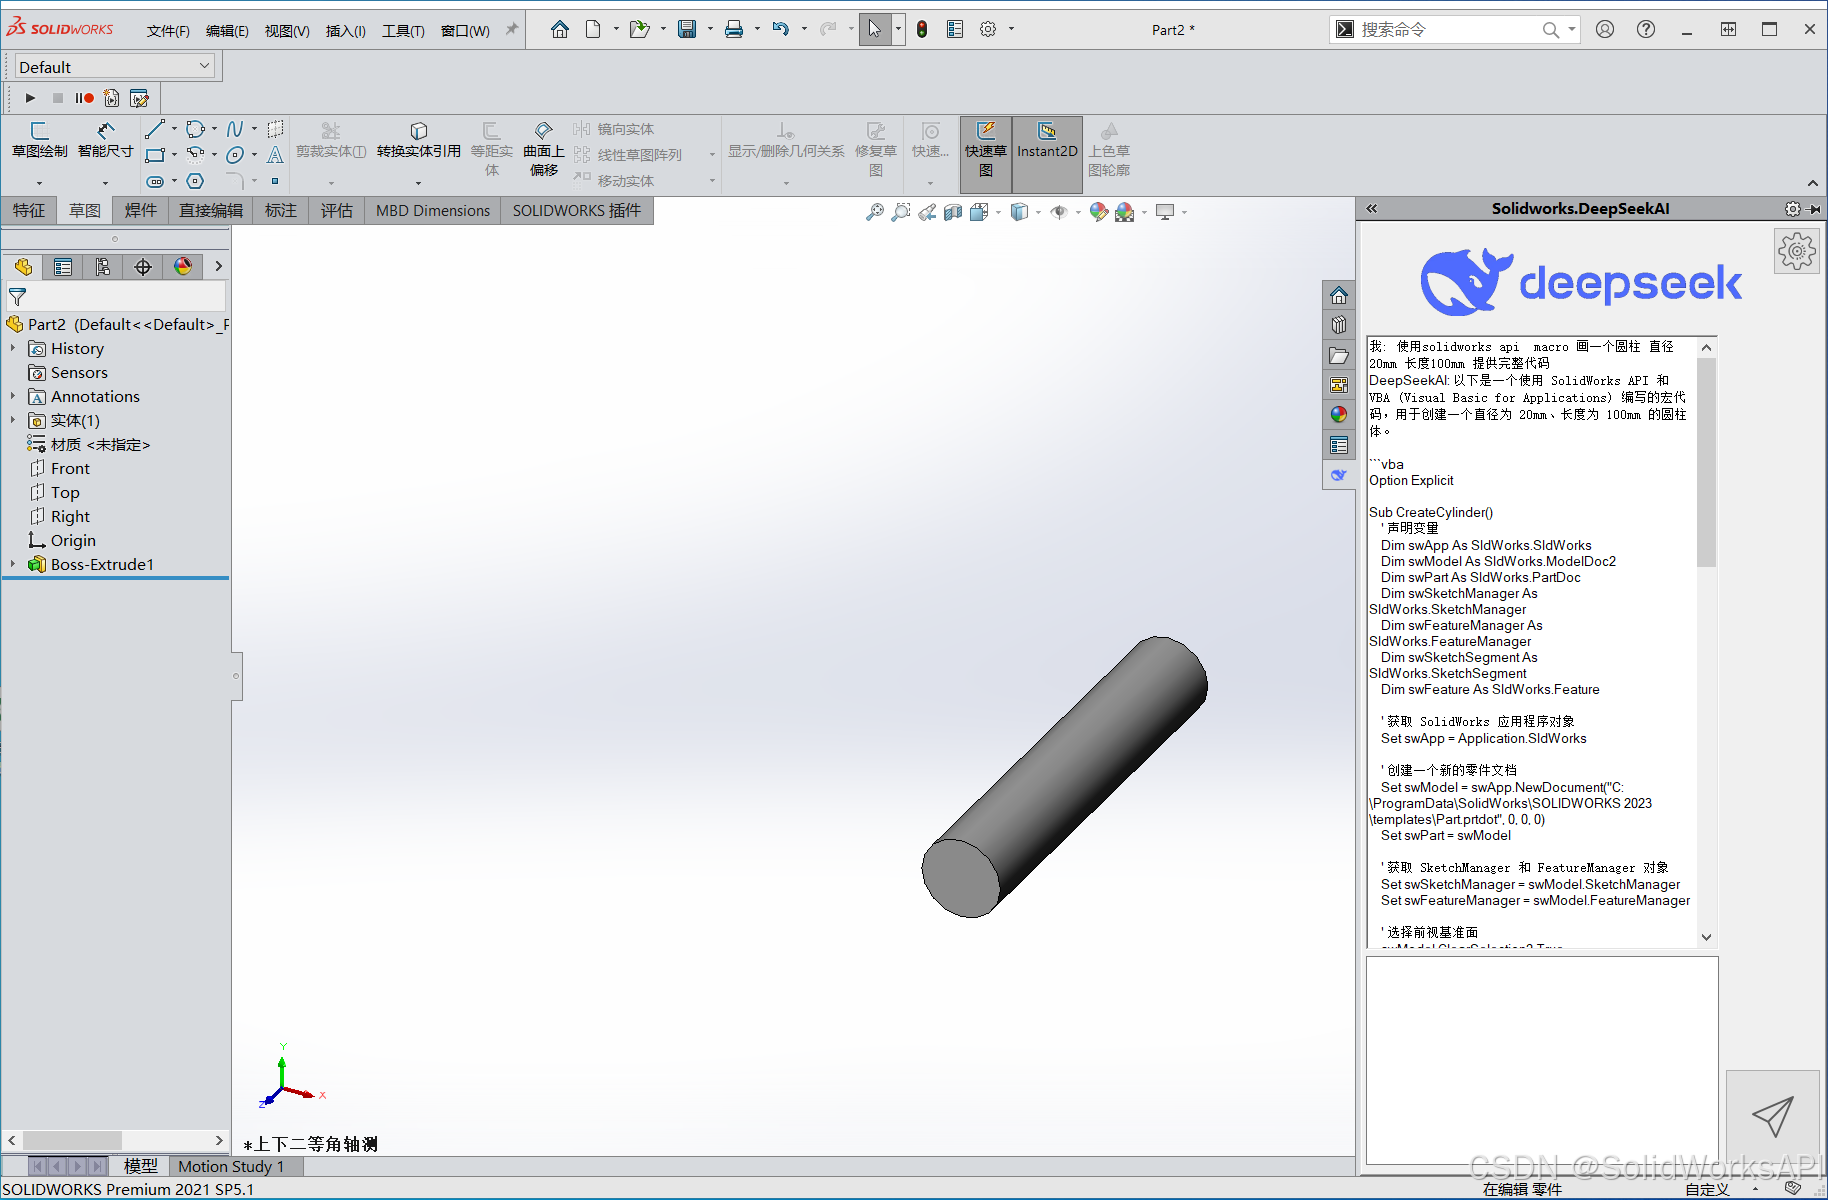
🎯 4. AI 自动生成 SolidWorks VBA 宏
📌 目标:
自动创建 直径 20mm,长度 100mm 的 圆柱体,并保存到指定目录。
✅ 生成的 VBA 代码
Option Explicit

Sub CreateCylinder()
    Dim swApp As SldWorks.SldWorks
    Dim swModel As SldWorks.ModelDoc2
    Dim swSketchMgr As SldWorks.SketchManager
    Dim swFeatMgr As SldWorks.FeatureManager

    Set swApp = Application.SldWorks
    Set swModel = swApp.NewDocument("C:\\...\\part.prtdot", 0, 0, 0)
    Set swSketchMgr = swModel.SketchManager
    Set swFeatMgr = swModel.FeatureManager

    swModel.ClearSelection2 True
    swModel.Extension.SelectByID2 "前视基准面", "PLANE", 0, 0, 0, False, 0, Nothing, 0
    swSketchMgr.InsertSketch True
    swSketchMgr.CreateCircle 0#, 0#, 0#, 0.01, 0#, 0#
    swSketchMgr.InsertSketch True
    swFeatMgr.FeatureExtrusion2 True, False, False, 0, 0, 0.1, 0.01, False
    swModel.SaveAs3 "D:\\Cylinder.SLDPRT", 0, 2
    MsgBox "圆柱创建成功!"
End Sub
⚠ 5. 重要提示
- 以管理员权限运行 SolidWorks,避免插件加载失败。
- 保持网络连接,DeepSeek AI 需要 API 访问。
- 确保 API Key 可用,避免调用失败。
🔥 通过本教程,您已成功将 AI 智能化自动编写 VBA 代码 应用于 SolidWorks,大大提升建模效率!
🎯 快来试试,让 SolidWorks 插件更智能! 🚀
交流学习:90216591


 1072
1072

 被折叠的 条评论
为什么被折叠?
被折叠的 条评论
为什么被折叠?
 到【灌水乐园】发言


