


FrameLayout–帧布局
相当于动画的一帧一帧的覆盖原来的控件
<?xml version="1.0" encoding="utf-8"?>
<FrameLayout xmlns:android="http://schemas.android.com/apk/res/android"
    android:layout_width="match_parent" android:layout_height="match_parent">
    <Button
        android:layout_height="200dp"
        android:layout_width="200dp"
        android:background="#00df00"/>
    <Button
        android:layout_width="100dp"
        android:layout_height="100dp"
        android:background="#ffee00"/>
</FrameLayout>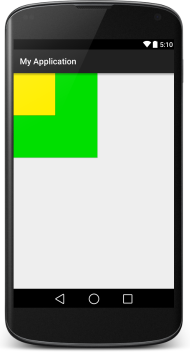
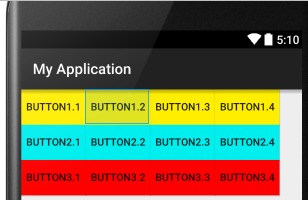
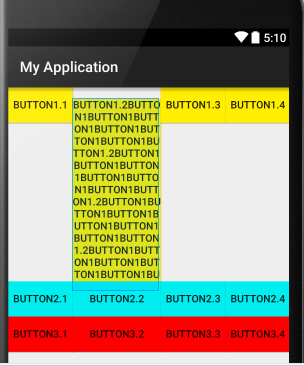
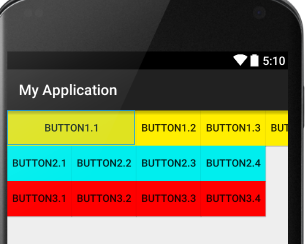
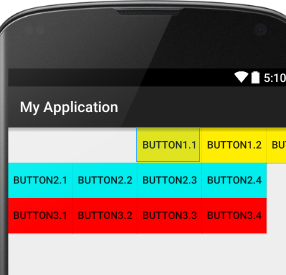
TableLayout–表格布局
属性均写在 TableLayouot 里面
<TableLayout xmlns:android="http://schemas.android.com/apk/res/android"
    android:layout_width="match_parent" android:layout_height="match_parent"
    android:collapseColumns="1"
    android:shrinkColumns="1"
    android:stretchColumns="1"
  >
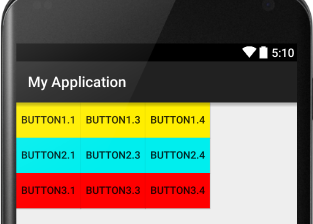
collapsColumns隐藏列,下标从0开始
android:collapseColumns=”1”
stretchColumns扩展列,下标从0开始,该列可以向行方向伸展,最多可占据一整行。
android:stretchColumns=”0”
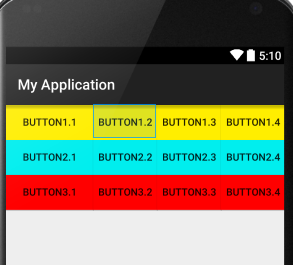
shrinkColumns收缩,下标从0开始,当该列子控件的内容太多,已经挤满所在行,那么该子控件的内容将往列方向显示。
android:shrinkColumns=”1”
单元格属性
android:layout_span=”1” 指定该单元格占据的列数(未指定时,为1)、
android:layout_column =“xx“指定该单元格在第几列显示
Activity的操作
1、直接启动activity
Intent intent=new Intent(MainActivity.this,SecondActivity.class);
startActivity(intent);
  protected void onCreate(Bundle savedInstanceState) {
        super.onCreate(savedInstanceState);
        setContentView(R.layout.activity_hide);
        Button button_next=(Button)findViewById(R.id.button_next);
        button_next.setOnClickListener(new View.OnClickListener() {
            @Override
            public void onClick(View v) {
                Intent intent_next=new Intent(ThirdActivity.this,MainActivity.class);
                startActivity(intent_next);
            }
        });
    }
>
2、带有返回值得启动activity
API中有介绍第一个界面调用startActivityForResult(intent,requestCode)
第二个界面先调用getIntent()得到启动的intent
在关闭第二个界面前先封装数据
intent.putExtra(“secondbackdata”,editText.getText().toStrig);
设置resultCode setResult(RESULT_OK,intent);
关闭第二个界面
第一个界面准备接收数据重写
onActivityResult(requestCode,resultCode,Intent data)
判断resultCode然后从data中取出数据
Intent intent=new Intent(MainActivity.this,SecondActivity.class);
startActivityForResult(intent,0x23);
 protected void onCreate(Bundle savedInstanceState) {
        super.onCreate(savedInstanceState);
        setContentView(R.layout.activity_main);
        textView=(TextView)findViewById(R.id.textView1);
        Button button=(Button)findViewById(R.id.button);
        button.setOnClickListener(new View.OnClickListener() {
            @Override
            public void onClick(View v) {
                Intent intent=new Intent(getApplicationContext(),SecondActivity.class);
                startActivityForResult(intent, 1);
            }
        });
protected void onActivityResult(int requestCode, int resultCode, Intent data) {
switch(requestCode){
case 1:if (resultCode==RESULT_OK){
String returnnddate=data.getStringExtra("respond");
Log.d("My Application",returnnddate);
textView.setText(returnnddate);
}
break;
default:
}
}setContentView(R.layout.activity_second);
final EditText editText=(EditText)findViewById(R.id.edit_text);
Button button=(Button)findViewById(R.id.button_back);
button.setOnClickListener(new View.OnClickListener() {
@Override
public void onClick(View v) {
Intent intent=new Intent();
intent.putExtra("respond",editText.getText().toString());
setResult(RESULT_OK,intent);
SecondActivity.this.finish();
}
});
设置全屏,横、竖屏切换
1、android:theme=”@android:style/Theme.NoTitleBar.Fullscreen”设置全屏
<activity
android:name=".SecondActivity"
android:theme="@android:style/Theme.NoTitleBar.Fullscreen">
<intent-filter>
<action android:name="com.example.administrator.myapplication"/>
<category android:name="android.intent.category.LAUNCHER"/>
</intent-filter>
</activity>
2、requestWindowFeature(Window.FEATURE_NO_TITLE);
getWindow().setFlags(WindowManager.LayoutParams.FLAG_FULLSCREEN,WindowManager.LayoutParams.FLAG_FULLSCREEN);
注意的是通过这种方法实现的时候需要将以上两方法执行在setContentView之前才有效。(有待。。。。)
横竖屏切换
android:screenOrientation=”xx” 设置横竖屏切换
android:screenOrientation=”landscape”设置为横屏
<activity
android:name=".SecondActivity"
android:theme="@android:style/Theme.NoTitleBar.Fullscreen"
android:screenOrientation="landscape">
<intent-filter>
<action android:name="com.example.administrator.myapplication"/>
<category android:name="android.intent.category.LAUNCHER"/>
</intent-filter>
</activity>
android:screenOrientation=”portrait”设置为竖屏
<activity
android:name=".ThirdActivity"
android:theme="@android:style/Theme.NoTitleBar.Fullscreen"
android:screenOrientation="portrait">
<intent-filter>
<action android:name="com.example.administrator.myapplication"/>
<category android:name="android.intent.category.DEFAULT"/>
</intent-filter>
</activity>
Android的四大组件
Activity Service ContentProvider BroadcastReceiver(五大组件包括Intent)
Intent Android中的进行通讯的工具,类似于包裹
属性: Component
action 启动某一个特定的应用,例如:打电话
隐式启动Activity
被启动的界面中在manifest中添加intent_filter,在intent_filter中必须添加action,action_name自己对应,category必须填写default的
在启动界面中
category
从第二个界面返回值给第一个界面
SecondActivity界面上的代码:
protected void onCreate(Bundle savedInstanceState) {
super.onCreate(savedInstanceState);
setContentView(R.layout.activity_second);
final EditText editText=(EditText)findViewById(R.id.edit_text);
Button button=(Button)findViewById(R.id.button_back);
button.setOnClickListener(new View.OnClickListener() {
@Override
public void onClick(View v) {
Intent intent=new Intent();
intent.putExtra("respond",editText.getText().toString());
setResult(RESULT_OK,intent);
SecondActivity.this.finish();
}
});
Button button5=(Button)findViewById(R.id.button_hide);
button5.setOnClickListener(new View.OnClickListener() {
@Override
public void onClick(View v) {
Intent intent=new Intent();
intent.setAction("com.example.administrator.myapplication");
intent.putExtra("respond",editText.getText().toString());
setResult(RESULT_OK,intent);
SecondActivity.this.finish();
startActivity(intent);
}
});
Log.d("My Application","第二个界面运行到onCreate");
}MainActivity 上的代码:
protected void onCreate(Bundle savedInstanceState) {
super.onCreate(savedInstanceState);
// requestWindowFeature(Window.FEATURE_NO_TITLE);
// getWindow().setFlags(WindowManager.LayoutParams.FLAG_FULLSCREEN,WindowManager.LayoutParams.FLAG_FULLSCREEN);
setContentView(R.layout.activity_main);
textView=(TextView)findViewById(R.id.textView1);
Button button=(Button)findViewById(R.id.button);
button.setOnClickListener(new View.OnClickListener() {
@Override
public void onClick(View v) {
Intent intent=new Intent(getApplicationContext(),SecondActivity.class);
startActivityForResult(intent, 1);
}
});
 protected void onActivityResult(int requestCode, int resultCode, Intent data) {
        switch(requestCode){
            case 1:if (resultCode==RESULT_OK){
                String returnnddate=data.getStringExtra("respond");
                Log.d("My Application",returnnddate);
                textView.setText(returnnddate);
            }
                break;
            default:
        }
    }
调用拨打电话界面
MainActivity 中protected void onCreate(Bundle savedInstanceState) 里的代码:
 Button button1=(Button)findViewById(R.id.button1);
        button1.setOnClickListener(new View.OnClickListener() {
            @Override
            public void onClick(View v) {
                Intent intent=new Intent();
                intent.setAction(Intent.ACTION_DIAL);
                intent.setData(Uri.parse("tel:10086"));
                startActivity(intent);
            }
        });
直接拔打电话
MainActivity 中protected void onCreate(Bundle savedInstanceState) 里的代码:
 Button button2=(Button)findViewById(R.id.button2);
        button2.setOnClickListener(new View.OnClickListener() {
            @Override
            public void onClick(View v) {
                Intent intent=new Intent();
                intent.setAction(Intent.ACTION_CALL);
                intent.setData(Uri.parse("tel:10086"));
                startActivity(intent);
            }
        });
发短信
MainActivity 中protected void onCreate(Bundle savedInstanceState) 里的代码:
 Button button3=(Button)findViewById(R.id.button3);
        button3.setOnClickListener(new View.OnClickListener() {
            @Override
            public void onClick(View v) {
                Intent intent=new Intent();
                intent.setAction(Intent.ACTION_SENDTO);
                intent.setData(Uri.parse("smsto:10086"));
                intent.putExtra("sms_body","The SMS text");
                startActivity(intent);
            }
        });
打开浏览器浏览网页
MainActivity 中protected void onCreate(Bundle savedInstanceState) 里的代码:
Button button4=(Button)findViewById(R.id.button4);
        button4.setOnClickListener(new View.OnClickListener() {
            @Override
            public void onClick(View v) {
                Intent intent=new Intent();
                intent.setAction(Intent.ACTION_VIEW);
                intent.setData(Uri.parse("http://www.baidu.com"));
                startActivity(intent);
            }
        });
隐式调用
MainActivity 中protected void onCreate(Bundle savedInstanceState) 里的代码:
 Button button5=(Button)findViewById(R.id.button5);
        button5.setOnClickListener(new View.OnClickListener() {
            @Override
            public void onClick(View v) {
                Intent intent=new Intent();
                intent.setAction("com.example.administrator.myapplication");
                startActivity(intent);
            }
        });
AndroidManifest.xml中的代码
<?xml version="1.0" encoding="utf-8"?>
<manifest xmlns:android="http://schemas.android.com/apk/res/android"
    package="com.example.administrator.myapplication"
    >
    <uses-permission android:name="android.permission.CALL_PHONE"/>
    <uses-permission android:name="android.permission.send_sms"/>
    <application
        android:allowBackup="true"
        android:icon="@mipmap/ic_launcher"
        android:label="@string/app_name"
        android:theme="@style/AppTheme"

        >
        <activity
            android:name=".MainActivity"
            android:label="@string/app_name"
            >
            <intent-filter>
                <action android:name="android.intent.action.MAIN" />
                <category android:name="android.intent.category.LAUNCHER" />
            </intent-filter>
        </activity>
        <activity
            android:name=".SecondActivity"
            android:theme="@android:style/Theme.NoTitleBar.Fullscreen"
            android:screenOrientation="portrait">

           <intent-filter>
               <action android:name="com.example.administrator.myapplication"/>
               <category android:name="android.intent.category.LAUNCHER"/>

           </intent-filter>
            </activity>
        <activity
            android:name=".ThirdActivity"
            android:theme="@android:style/Theme.NoTitleBar.Fullscreen"
            android:screenOrientation="landscape">
            <intent-filter>
                <action android:name="com.example.administrator.myapplication"/>
                <category android:name="android.intent.category.DEFAULT"/>

            </intent-filter>
        </activity>
    </application>

</manifest>
按钮组件的代码
<RelativeLayout xmlns:android="http://schemas.android.com/apk/res/android"
    xmlns:tools="http://schemas.android.com/tools" android:layout_width="match_parent"
    android:layout_height="match_parent" android:paddingLeft="@dimen/activity_horizontal_margin"
    android:paddingRight="@dimen/activity_horizontal_margin"
    android:paddingTop="@dimen/activity_vertical_margin"
    android:paddingBottom="@dimen/activity_vertical_margin" tools:context=".MainActivity"
    >

    <TextView android:text="@string/hello_world" android:layout_width="wrap_content"
        android:layout_height="wrap_content"
        android:id="@+id/textView2" />
    <TextView android:text="@string/hello_world" android:layout_width="wrap_content"
        android:layout_height="wrap_content"
        android:id="@+id/textView1"
        android:layout_below="@+id/button"
        />

    <Button
        android:layout_width="wrap_content"
        android:layout_height="wrap_content"
        android:text="点击启动第二个界面"
        android:id="@+id/button"
        android:layout_below="@+id/textView2"
        android:layout_alignParentLeft="true"
        android:layout_alignParentStart="true"
        android:layout_marginTop="22dp" />
    <Button
        android:layout_height="wrap_content"
        android:layout_width="wrap_content"
        android:text="拨打电话"
        android:layout_marginLeft="150dp"
        android:layout_marginTop="40dp"
        android:id="@+id/button1"
/>
    <Button
        android:layout_height="wrap_content"
        android:layout_width="wrap_content"
        android:text="直接拨打电话"
        android:layout_marginLeft="250dp"
        android:layout_marginTop="40dp"
        android:id="@+id/button2"
        />

    <Button
        android:layout_width="wrap_content"
        android:layout_height="wrap_content"
        android:text="发短信"
        android:id="@+id/button3"
        android:layout_below="@+id/button1"
        android:layout_toLeftOf="@+id/button4"
        android:layout_toStartOf="@+id/button4" />

    <Button
        android:layout_width="wrap_content"
        android:layout_height="wrap_content"
        android:text="web"
        android:id="@+id/button4"
        android:layout_below="@+id/button1"
        android:layout_alignParentRight="true"
        android:layout_alignParentEnd="true" />

    <Button
        android:layout_width="wrap_content"
        android:layout_height="wrap_content"
        android:text="隐式启动"
        android:id="@+id/button5"
        android:layout_below="@+id/button"
        android:layout_toLeftOf="@+id/button3"
        android:layout_toStartOf="@+id/button3" />
</RelativeLayout>


 1513
1513

 被折叠的 条评论
为什么被折叠?
被折叠的 条评论
为什么被折叠?
 到【灌水乐园】发言


