


1、拓展一个按钮
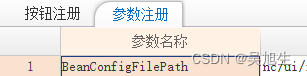
首先通过功能注册找到节点的xml文件,底层的文件为BeanConfigFilePath,拓展的文件一般命名为PluginBeanConfigFilePath_,在这里添加自己的拓展xml文件。

然后创建与拓展文件相同的xml文件,进行按钮拓展,配置按钮的bean,可以进行添加按钮、替换按钮、拦截按钮,加入监听器等事件拓展,我主要写了添加按钮的配置,列表和卡片的按钮是分开的,需要的话要都加上。以下是按钮的代码参考
<beans>

	<!-- 插入按钮配置-->
	<bean class="nc.ui.pubapp.plugin.action.InsertActionInfo">
		<property name="actionContainer" ref="actionsOfList" />
		<property name="actionType" value="notedit" />
		<property name="target" ref="addAction" />
		<property name="pos" value="after" />
		<property name="action" ref="AddTestAction" />
	</bean>

	<!-- 插入按钮配置 -->
	<bean class="nc.ui.pubapp.plugin.action.InsertActionInfo">
		<property name="actionContainer" ref="actionsOfCard" />
		<property name="actionType" value="notedit" />
		<property name="target" ref="addAction" />
		<property name="pos" value="after" />
		<property name="action" ref="AddTestAction" />
	</bean>

    <!-- 测试 按钮 -->
	<bean id="AddTestAction" class="nc.ui.extend.pubapp.action.AddTestAction">
		<property name="model" ref="bmModel" />
		<property name="editor" ref="billForm" />
		<property name="code" value="addTest" />
	</bean>

	<!-- 替换 按钮配置 -->
	<bean class="nc.ui.pubapp.plugin.action.ReplaceActionInfo">
		<property name="actionContainer" ref="actionsOfCard" />
		<property name="actionType" value="notedit" />
		<property name="target" ref="defaultRefreshAction" />
		<property name="action" ref="replaceAction" />
	</bean>

	<!--附件管理 -->
	<bean id="replaceAction" class="nc.ui.extend.pubapp.action.ExtDocManageAction">
		<property name="model" ref="bmModel" />
	</bean>

	<!-- 插入按钮配置 -->
	<bean class="nc.ui.pubapp.plugin.action.InsertActionInfo">
		<property name="actionContainer" ref="actionsOfCard" />
		<property name="actionType" value="edit" />
		<property name="target" ref="saveScriptAction" />
		<property name="pos" value="before" />
		<property name="action" ref="insertAction" />
	</bean>
	<bean id="insertAction" class="nc.ui.extend.pubapp.action.ChooseFileAction">
		<property name="model" ref="bmModel" />
	</bean>

	<!-- 拦截 按钮配置 -->
	<bean class="nc.ui.pubapp.plugin.action.ActionInterceptorInfo">
		<property name="target" ref="saveScriptAction" />
		<property name="interceptor" ref="SaveInterceptorForFile" />
	</bean>

	<bean id="SaveInterceptorForFile" class="nc.ui.extend.pubapp.action.SaveInterceptorForFile">
		<property name="billForm" ref="billForm" />
		<property name="chooseAction" ref="insertAction" />
	</bean>

	<!-- 监听事件 -->
	<bean id="ExEventHandlerMediator" class="nc.ui.pubapp.uif2app.model.AppEventHandlerMediator">
		<property name="model" ref="bmModel" />
		<property name="handlerGroup">
			<list>
				<!-- 表头表尾编辑后事件监听 -->
				<bean class="nc.ui.pubapp.uif2app.event.EventHandlerGroup">
					<property name="event" value="nc.ui.pubapp.uif2app.event.card.CardHeadTailAfterEditEvent" />
					<property name="handler">
						<bean class="nc.ui.extend.pubapp.editor.head.HeadAfterEditDistribute" />
					</property>
				</bean>
				<!-- 卡片表体汇总计算 监听 -->
				<bean class="nc.ui.pubapp.uif2app.event.EventHandlerGroup">
					<property name="event" value="nc.ui.pubapp.uif2app.event.card.CardBodyTotalEvent" />
					<property name="handler">
						<bean class="nc.ui.extend.pubapp.editor.body.CalculatorHeadFeeDistribute"></bean>
					</property>
				</bean>
				<!-- 表体编辑前监听 -->
				<bean class="nc.ui.pubapp.uif2app.event.EventHandlerGroup">
					<property name="event" value="nc.ui.pubapp.uif2app.event.card.CardBodyBeforeEditEvent" />
					<property name="handler">
						<bean class="nc.ui.extend.pubapp.editor.body.BodyBeforeEditDistribute"></bean>
					</property>
				</bean>
				<!-- 表体编辑后监听 -->
				<bean class="nc.ui.pubapp.uif2app.event.EventHandlerGroup">
					<property name="event" value="nc.ui.pubapp.uif2app.event.card.CardBodyAfterEditEvent" />
					<property name="handler">
						<bean class="nc.ui.extend.pubapp.editor.body.BodyAfterEditDistribute"></bean>
					</property>
				</bean>
			</list>
		</property>
	</bean>

</beans>
按钮配置完后,需要加上自己的action操作,需要继承NCAction类,并重写里面的doAction()、isActionEnable()和getset方法,对应的model、editor类可能不一样,需要到原有的配置文件找。如果想要调用别的按钮,也需要先申明上去。
public class AddTestAction extends NCAction {


	public AddTestAction() {
		super.setBtnName("测试自制按钮");
	}

	private static final long serialVersionUID = -4417976703049420324L;

	private BillForm editor;

	private AbstractAppModel model;

	@Override
	public void doAction(ActionEvent e) throws Exception {

		int i = MessageDialog.showOkCancelDlg(editor, "确认", "是否保存?");
		MessageDialog.showHintDlg(editor, "提示", i + "");
	}

	public BillForm getEditor() {
		return this.editor;
	}

	public AbstractAppModel getModel() {
		return this.model;
	}

	public void setEditor(BillForm editor) {
		this.editor = editor;
	}

	public void setModel(AbstractAppModel model) {
		this.model = model;
		model.addAppEventListener(this);
	}

	@Override
	protected boolean isActionEnable() {
		return this.model.getUiState() == UIState.NOT_EDIT;
	}
}
2、按钮拓展一些功能代码
2.1 获取界面数据
//MaterialVO是卡片界面对应的VO,需要自己修改
MaterialVO vo = (MaterialVO)this.model.getSelectedData();
!!!注意的是,如果要对这个VO进行操作最好是先进行拷贝,不然会直接操作到这个界面数据上
2.2 调用刷新按钮实现刷新
在action中申明刷新按钮
// 申明按钮
private RefreshSingleAction refreshCardAction;

....

doAction(e){
    ...
    // 调用刷新按钮实现刷新
    getRefreshCardAction().doAction(e);
    ...
}

public RefreshSingleAction getRefreshCardAction() {
		return refreshCardAction;
	}


	public void setRefreshCardAction(RefreshSingleAction refreshCardAction) {
		this.refreshCardAction = refreshCardAction;
	}
在xml中也要进行相关配置
<!--对应的按钮-->
<bean id="AddToGSPAction" class="nc.ui.bd.material.action.AddToGSPAction">
		...
		<property name="refreshCardAction" ref="refreshCardAction" />
        ...
</bean>
2.3导入导出按钮组
<!--======= 动作:[newActions] [导入导出] ===========-->

	<!-- 导入导出按钮-->
    <bean id="importExportMenu" class="nc.funcnode.ui.action.MenuAction">
	    <property name="code" value="importExport" />
	    <property name="name" value="导入导出" />
	    <property name="actions">
		    <list>
		        <ref bean="ImportData" />        <!-- 导入Excel -->
		        <ref bean="ExportData" />        <!-- 导出Excel -->
		        <ref bean="ExportTemplate" /> 	 <!-- 导出模板 -->
		    </list>
	    </property>
    </bean>

    <!-- 导入Excel(根据模板填充数据) -->
    <bean id="ImportData" class="nc.ui.uif2.excelimport.ImportAction">
	    <property name="model" ref="bmModel" />
	    <property name="importableEditor" ref="ImportExportEditor" />
	    <property name="btnName" value="导入Excel" />
    </bean>

    <!-- 导出模板到Excel -->
    <bean id="ExportTemplate" class="nc.ui.uif2.excelimport.ExportExcelTemplateAction">
	    <property name="model" ref="bmModel" />
	    <property name="importableEditor" ref="ImportExportEditor" />
	    <property name="btnName" value="导出模板" />
    </bean>

    <!-- 导入项目编辑器 -->
    <bean id="ImportExportEditor" class="nc.ui.uif2.excelimport.DefaultUIF2ImportableEditor">
	    <property name="billcardPanelEditor" ref="billForm" />
	    <property name="addAction" ref="addAction" />
	    <property name="cancelAction" ref="cancelAction" />
	    <property name="saveAction" ref="saveScriptAction" />
	    <property name="appModel" ref="bmModel" />
    </bean>

    <!-- 导出数据到Excel -->
    <bean id="ExportData" class="nc.ui.uif2.excelimport.ExportAction">
	    <property name="model" ref="bmModel" />
	    <property name="importableEditor" ref="ImportExportEditor" />
	    <property name="btnName" value="导出Excel" />
   </bean>
3、遇到的一些问题
3.1 在拓展界面按钮的时候,遇到了功能类名为nc.ui.bd.uitabextend.ToftPanelAdaptorNCWithExt的功能节点,这种好像是行业级的配置,所以按照正常拓展按钮的方法可能是不生效的。这个给我整了好久好久。。。
![]()
解决方法:直接去对应的xml文件中改写,在界面中加入自己的按钮,然后看看能不能通过xml转成java文件,如果遇到无法转换的话,可能要将原xml文件编译的.class文件找出来,进行改写。

改写.class文件要修改的几个地方是一下
//加入自己的按钮配置,可以参考其他按钮进行改写
public AddToGSPAction getAddToGSPAction() {
if (this.context.get("AddToGSPAction") != null) {
return (AddToGSPAction) this.context.get("AddToGSPAction");
} else {
AddToGSPAction bean = new AddToGSPAction();
this.context.put("AddToGSPAction", bean);
bean.setModel(this.getBaseinfoModel());
bean.setEditor(this.getBaseinfoEditor());
bean.setRefreshCardAction(this.getRefreshCardAction());
this.setBeanFacotryIfBeanFacatoryAware(bean);
this.invokeInitializingBean(bean);
return bean;
}
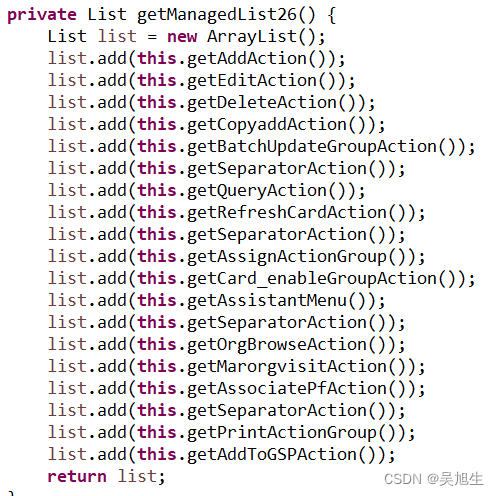
}在类似的这个方法上加入自己的按钮,即加入到列表、卡片上,具体哪个是卡片哪个是列表可以看看xml里面的按钮那些对应的。


 929
929


 被折叠的 条评论
为什么被折叠?
被折叠的 条评论
为什么被折叠?
 到【灌水乐园】发言


