


实验内容:
- 使用Vue-CLI脚手架工具搭建一个Web项目vue-photo,实现一个图片轮播预览的手机网页。
- 使用Vue组件编程方法完成主要功能,具体使用的编程技术不限。
- 模仿手机上的相机图片预览功能,实现手机内图片预览。
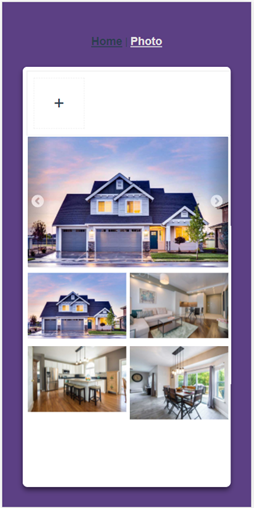
先上效果图:
| 初始界面
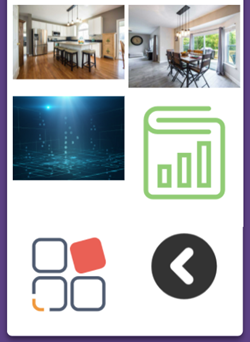
上传后图片会被添加到相册底部:
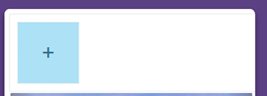
| 点击上传按钮后会打开本地文件夹:
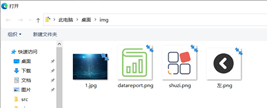
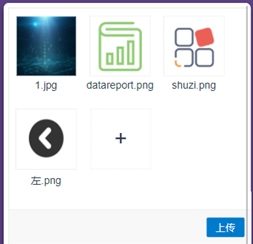
选中上传后:
可以通过上端的放大预览查看:
|

主要代码及实现方法简介:
首先在 index.js 文件里加一个路由,在主界面中通过点击 photo 进入界面,代码如下:
import Photo from '../views/Photo.vue'
{
    path: '/photo',
    name: 'Photo',
    component: Photo
  },
在component文件夹下新建一个VueGallery1.vue,作为组件完成轮播预览图片的部分,先写好页面布局,代码如下:
<template>
    <div class="vueGallery">
    <div class="activePhoto" :style="'background-image: url('+photos[activePhoto]+')'">
      <button type="button" aria-label="Previous Photo" class="previous" @click="previousPhoto()">
        <svg t="1620980045907" class="icon" viewBox="0 0 1024 1024" version="1.1" xmlns="http://www.w3.org/2000/svg" p-id="1759" width="25" height="25"><path d="M514 114.3c-219.9 0-398.8 178.9-398.8 398.8S294.1 912 514 912s398.9-178.9 398.9-398.8-179-398.9-398.9-398.9z m95.6 518.3c22.9 22.9 22.9 60.2 0 83.1-22.9 22.9-60.2 22.9-83.1 0L362.4 551.6c-22.9-22.9-22.9-60.2 0-83.1l164.1-164.1c22.9-22.9 60.2-22.9 83.1 0 11.5 11.5 17.2 26.5 17.2 41.5s-5.7 30.1-17.2 41.5L487.1 510l122.5 122.6z" p-id="1760" fill="#ffffff"></path></svg>
      </button>
      <button type="button" aria-label="Next Photo" class="next" @click="nextPhoto()">
        <svg t="1620980191292" class="icon" viewBox="0 0 1024 1024" version="1.1" xmlns="http://www.w3.org/2000/svg" p-id="1938" width="25" height="25"><path d="M514 114.3c-219.9 0-398.8 178.9-398.8 398.8 0 220 178.9 398.9 398.8 398.9s398.8-178.9 398.8-398.9c0-219.8-178.9-398.8-398.8-398.8z m152.9 440.4L502.8 718.8c-22.9 22.9-60.2 22.9-83.1 0-11.5-11.5-17.2-26.5-17.2-41.5s5.7-30.1 17.2-41.5l122.6-122.6-122.6-122.6c-22.9-22.9-22.9-60.2 0-83.1 22.9-22.9 60.2-22.9 83.1 0l164.1 164.1c23 23 23 60.2 0 83.1z" p-id="1939" fill="#ffffff"></path></svg>
      </button>
    </div>

    <div class="thumbnails">
      <img
           v-for="(photo, index) in photos"
           :src="photo"
           :key="index"
           @click="changePhoto(index)"
           :class="{'active': activePhoto == index}">
    </div>
  </div>
</template>
为轮播绑定点击事件后实现选择切换图片,用v-for遍历photos数组使其中的图片显示出来,Props 用来接收父组件传递的数据,在此接收父组件传来的图片数组,在钩子函数中加入键盘左右按键切换图片的功能,通过监听事件,接下来在 methods中写一些方法逻辑,包括点击列表切换图片,点击上一张下一张切换图片显示,代码如下:
props: {photos:{
      type :Array,
      default:()=>[]
    }
  },
  data: function () {
    return {
      activePhoto: null
    }
  },
  mounted () {
    this.changePhoto(0)
    document.addEventListener("keydown", (event) => {
      if (event.which == 37)
        this.previousPhoto()
      if (event.which == 39)
        this.nextPhoto()
    })
  },
  methods: {
    changePhoto (index) {
      this.activePhoto = index
    },
    nextPhoto () {
      this.changePhoto( this.activePhoto+1 < this.photos.length ? this.activePhoto+1 : 0 )
    },
    previousPhoto () {
      this.changePhoto( this.activePhoto-1 >= 0 ? this.activePhoto-1 : this.photos.length-1 )
    }
  }
然后新建一个Photo.vue将组件引入,同时在data中设置好以后图片的数组,代码如下:
<vue-gallery :photos="photos"></vue-gallery>

import VueGallery from "@/components/VueGallery1.vue";
components: {
    VueGallery,
  },

data: function () {
      return {
      photos: [
        require("../assets/img/lordea-home-01-min.jpg"),
        require("../assets/img/lordea-home-02-min.jpg"),
        require("../assets/img/lordea-home-03-min.jpg"),
        require("../assets/img/lordea-home-04-min.jpg"),
      ],
    };
  },
然后是访问相册上传图片的部分,在Photo.vue中写好大概页面布局,代码如下:
<div style="width: 330px">
    <div>
        <div class="vue-uploader">
          <div class="file-list">
            <section
              v-for="(file, index) of files"
              class="file-item draggable-item"
            >
              <img :src="file.src" alt="" ondragstart="return false;" />
              <p class="file-name">{{ file.name }}</p>
              <span class="file-remove" @click="remove(index)">+</span>
            </section>
            <section v-if="status == 'ready'" class="file-item">
              <div @click="add" class="add">
                <span>+</span>
              </div>
            </section>
          </div>
          <section v-if="files.length != 0" class="upload-func">
            <div class="progress-bar">
              <section v-if="uploading" :width="percent * 100 + '%'">
                {{ percent * 100 + "%" }}
              </section>
            </div>
            <div class="operation-box">
              <button v-if="status == 'ready'" @click="submit">上传</button>
            </div>
          </section>
          <input type="file" accept="image/*" @change="fileChanged" ref="file" multiple="multiple" />
      </div>
</div>
为这些布局在methods中编写事件,首先是点击加号的add事件,调用file的click事件,代码如下:
add() {
      this.$refs.file.click();
 },
然后是点击提交按钮后的事件,当点击上传按钮时,将会遍历所有选中的文件,并添加到自定义的FormData中,可以方便我们对待上传的图片进行操作。在遍历file的时候,将转码为base64格式的图片push进photo的数组,前端就会刷新出刚上传的图片可以进行预览,代码如下:
submit() {
      if (this.files.length === 0) {
        console.warn("no file!");
        return;
      }
      const formData = new FormData();
      this.files.forEach((item) => {
        formData.append(item.name, item.file);
        this.photos.push(item.src);
        console.log(item.src)
      });

      setTimeout(() => {
        this.files = [];
        this.status = "ready";
      }, 1000);
},
点击待上传图片右上角的x号可以将其删除,实际上就是从file里面删除掉对应得记录,代码如下:
remove(index) {
      this.files.splice(index, 1);
    },
实现待上传队列中图片预览,就是遍历上传的file,将其添加到数组中,再通过把图片转化成base64的格式进行输出展示,代码如下:
fileChanged() {
      const list = this.$refs.file.files;
      for (let i = 0; i < list.length; i++) {
        if (!this.isContain(list[i])) {
          const item = {
            name: list[i].name,
            size: list[i].size,
            file: list[i],
          };
          this.html5Reader(list[i], item);
          this.files.push(item);
        }
      }
      this.$refs.file.value = "";
    },
    html5Reader(file, item) {
      const reader = new FileReader();
      reader.onload = (e) => {
        this.$set(item, "src", e.target.result);
      };
      reader.readAsDataURL(file);
},
isContain(file) {
      return this.files.find(
        (item) => item.name === file.name && item.size === file.size
      );
    },
对于已上传的图片可以在前端通过点击查看预览。
项目源码:https://gitee.com/huahua_2021/vue-photo


 1054
1054


 被折叠的 条评论
为什么被折叠?
被折叠的 条评论
为什么被折叠?
 到【灌水乐园】发言


