


 本文档详细介绍了如何在Visual Studio 2019环境下,结合CUDA 11.0和cuDNN 11.0,从源码编译ONNXRuntime库。首先,你需要下载ONNXRuntime源码,然后安装Python 3.6及以上版本并配置环境变量。接着,安装Python依赖项,下载并安装CUDA和cuDNN。在命令行中使用修改后的build.bat文件进行编译,确保设置CUDA相关环境变量。最后,通过VS2019打开生成的解决方案,编译并安装项目,得到编译完成的库文件和头文件。
环境: vs2019 + cuda 11.0 + cudnn 11.0
1. 下载onnxruntime源码:
源码地址:https://gitee.com/mirrors/onnx-runtime
也可以使用github的官方地址:https://github.com/microsoft/onnxruntime
git clone --recursive https://github.com/Microsoft/onnxruntime2. 安装python 3.6版本以上,并设置环境变量:
python安装地址:https://www.python.org/downloads/
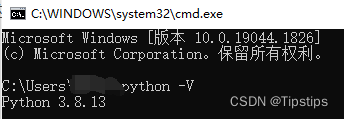
我i的python版本:
环境变量(我的是用Anaconda生成的环境名auto,将目录写到环境变量里),你安装的python直接将python根目录和scripts目录放入环境变量中即可:

设置好环境变量,打开cmd,输入python和pip命令,查看是否能得到相应版本信息:
python -V
pip -V
3. 安装python依赖项:
打开源码目录,安装onnxruntime目录里的requirements.txt.in相关项, 防止麻烦,我是下图两个都安装了:
pip install -r requirements.txt.in
pip install -r requirements-dev.txt
4. 安装cuda & cudnn:
cuda在nvidia官网上: CUDA Toolkit Archive | NVIDIA Developer
同理,cudnn在nvidia官网去找,cudnn要和cuda的版本对应上。
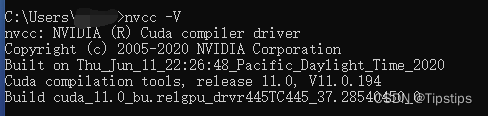
安装完成后使用nvcc -V查看是否能得到cuda信息:
5. 编译onnxruntime:
直接cmake-gui生成解决方案的话,在编译的时候,onnx-ml.proto等protobuf文件不会正确生成会导致编译错误。
正确编译方式:
1. 打开VS2019开发人员命令行并切换到onnxruntime目录:

2. 拷贝build.bat,重命名为新的new_build.bat。
3. 在new_build.bat里修改编译命令行,指定--use_cuda --parallel --cuda_version 11.0 (cuda版本根据你安装的来写):
注: 更多命令行查看build.py, 可添加--config Release指定编译Release版本。--parallel命令行为指定多线程编译。
:: Copyright (c) Microsoft Corporation. All rights reserved.
:: Licensed under the MIT License.
@echo off
rem Requires a python 3.6 or higher install to be available in your PATH
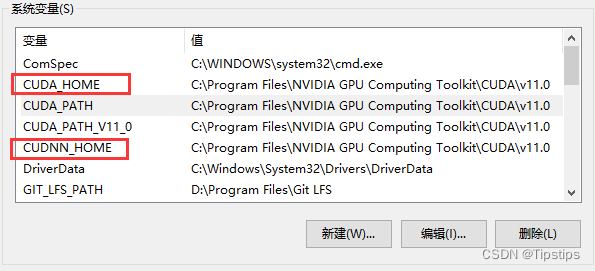
python %~dp0\tools\ci_build\build.py --build_dir %~dp0\build\WindowsSharedLib %* --build_shared_lib --use_cuda --parallel --cuda_version 11.04. 设置cuda系统环境变量(也可以在new_build.bat里设置临时环境变量,这里不做修改):
CUDA_HOME, CUDNN_HOME, 路径指向为你的cuda地址。
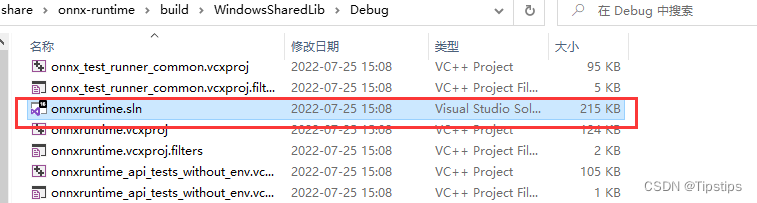
5. 在VS2019开发人员命令行里输入new_build.bat编译:
在onnxruntime\build\WindowsSharedLib\Debug里会生成onnxruntime.sln
6. 此时生成的onnxruntime.sln可以正常通过vs2019打开、编译。
编译Release版本亦可通过onnxruntime.sln编译。
7. vs打开onnxruntime.sln:
选择ALL_BUILD编译代码。
编译完成后选择INSTALL安装。
6. 编译完成:
lib文件

bin里面的文件

头文件:
important: 注意,要将 cuda_provider_factory.h拷贝到头文件里,默认安装的头文件目录里没有,
文件位置: onnxruntime\core\providers\cuda\cuda_provider_factory.h


 被折叠的 条评论
为什么被折叠?
被折叠的 条评论
为什么被折叠?
 到【灌水乐园】发言


