


java多线程详细讲解 线程的创建、线程的状态、synchronized锁、Volatile关键字、和cas锁(自旋锁 乐观锁 无锁)
此文章链接:https://blog.csdn.net/wuyuanshun/article/details/130081812
java多线程详细讲解…
一、线程的概念
每个线程可以理解为单独的任务线,可以同时执行。如烧开水和扫地两件事可以同时进行。
二、创建线程的三种方式
继承Thread类、实现Runnable接口、或者使用lambda表达式
    static class MyThread extends Thread {
        @Override
        public void run() {
            System.out.println("Thread");
        }
    }

    static class MyRunnable implements Runnable {

        @Override
        public void run() {
            System.out.println("Runnable");
        }
    }

    public static void main(String[] args) {
        new MyThread().start();
        new Thread(new MyRunnable()).start();
        new Thread(() -> System.out.println("lambda")).start();
    }
三、线程方法Sleep、Yield、Join
- Sleep是线程睡眠,cpu可以执行其他线程。睡眠时间结束继续执行。
- Yield 暂时让出执行权,当前线程和其他线程一起抢夺cpu执行权。
- Join 线程2中执行线程1.join的含义是,等线程1执行完后,继续执行线程2剩余代码。
public static void main(String[] args) {
//        testSleep();
//        testYield();
        testJoin();
        此文章链接:https://blog.csdn.net/wuyuanshun/article/details/130081812
    }

    static void testSleep() {
        new Thread(() -> {
            for (int i = 0; i < 100; i++) {
                System.out.println("A" + i);
                try {
                    Thread.sleep(500);
                } catch (InterruptedException e) {
                    e.printStackTrace();
                }
            }
        }).start();
    }

    static void testYield() {
        new Thread(() -> {
            for (int i = 0; i < 100; i++) {
                System.out.println("A" + i);
                if (i % 10 == 0) {
                    Thread.yield();
                }

            }
        }).start();

        new Thread(() -> {
            for (int i = 0; i < 100; i++) {
                System.out.println("  B  " + i);
                if (i % 10 == 0) {
                    Thread.yield();
                }

            }
        }).start();
    }

    static void testJoin() {
        Thread t1 = new Thread(() -> {
            for (int i = 0; i < 100; i++) {
                System.out.println("A" + i);
                try {
                    Thread.sleep(50);
                } catch (InterruptedException e) {
                    e.printStackTrace();
                }

            }
        });

        Thread t2 = new Thread(() -> {
            System.out.println("  b start  ");
            try {
                t1.join();
            } catch (InterruptedException e) {
                e.printStackTrace();
            }
            for (int i = 0; i < 100; i++) {
                System.out.println("b" + i);
                try {
                    Thread.sleep(50);
                } catch (InterruptedException e) {
                    e.printStackTrace();
                }

            }
            System.out.println("  b end  ");
        });
        t1.start();
        t2.start();
    }
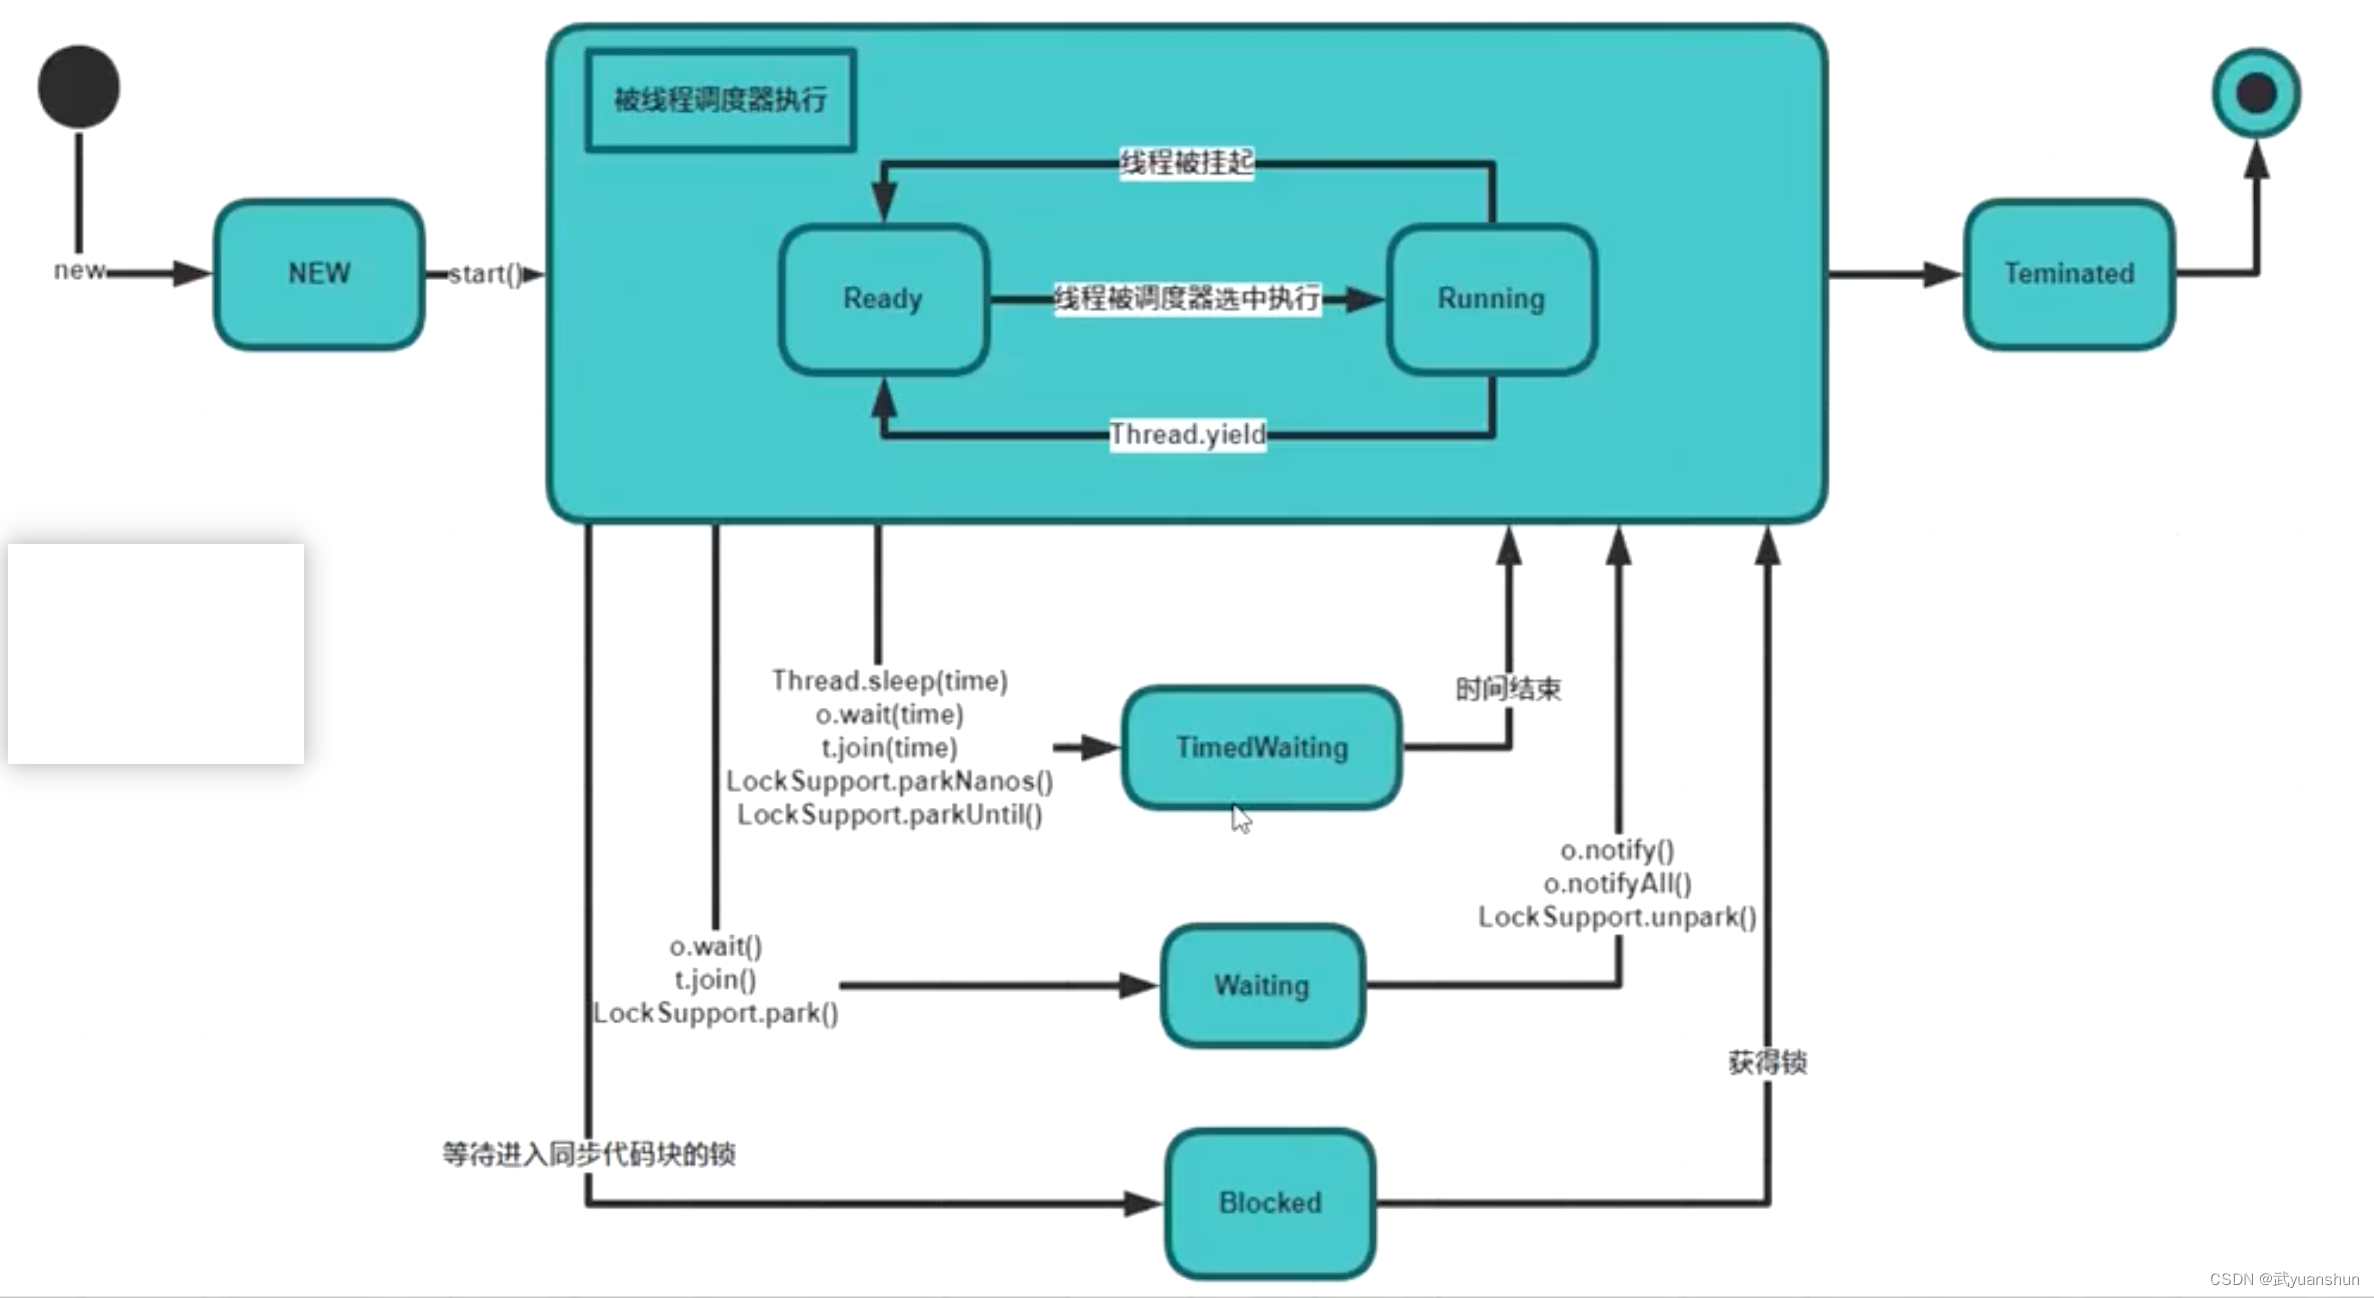
四、线程的执行状态
-
1.线程在被创建(new)还没有调用start方式时,状态为NEW。
-
2.线程被调用start方法后被线程调度器执行(Runnbale)。其中有分为两种状态:就绪状态(Ready)、运行状态(Running)(就绪状态中的线程被调度器选中执行后进入运行状态)。
-
3.线程执行结束进入线程结束状态(Teminated)【注意线程结束后不可以再次调用start方法】
-
4.除正常执行结束线程外,还有可能出现线程等待的情况。
- 如在执行同步代码块(如synchronized)没有获得锁时进入blocked,获得锁后进入线程调度器执行(Runnbale);
- 在运行时如果调用了o.wait()、t.join、LockSupport.park()方法则进入waiting状态,在调用o.notify() 、o.notifyAll()、LockSupport.unPark()进入线程调度器执行(Runnbale);
- 在运行时如果Thread.sleep(time)、o.wait(time)、t.join(time)、LockSupport.parkNanos()、LockSupport.parkUntil()进入TimedWaiting,时间结束后进入线程调度器执行(Runnbale);
五、synchronized关键字
1.为什么要上锁?
多线程访问操作相同资源时,需要加锁。如i++;由两个线程同时调用i++;正常结果是2,但是结果可能会出现1,两个线程同时读取i=0,加1后把i=1;写回。导致结果出现i=1;
2.锁定的内容是什么?
锁定的内容是对象。底层实现是对象的内存结构mark word中最后两个字节的状态00、01、10、11。
注意: 不要使用java中的常亮对象String、Long、Integer等作为锁对象。
private int count=10;
    private Object o=new Object();
    public void m(){
        synchronized(o){//任何代码要执行下面代码,必须先拿到o的锁
            count--;
            System.out.println(count);
        }
    }
3.synchronized加锁的方式
1.可以加在方法中 (代码同上)
2.也可以加在方法上。在在方法方法上锁的对象既是this对象
 public synchronized void m2(){//等同于在方法中的代码执行synchronized(this)
            count--;
            System.out.println(count);
    }
4.同步方法和非同步方法是否可以同时调用?
//同步方法指的是加锁的方法,非同步方法则反之。
可以同时调用
public class T {

    public synchronized void m() {
        System.out.println("m1 start");
        try {
            Thread.sleep(1000);
        } catch (InterruptedException e) {
            e.printStackTrace();
        }
        System.out.println("m1 end");
    }

    public void m2() {
        System.out.println("m2");
    }

    public static void main(String[] args) {
        T t=new T();
        new Thread(t::m).start();
        new Thread(t::m2).start();
    }
}
运行结果为:
m1 start
m2
m1 end
5.面试题:模拟银行账户,对业务写方法加锁,对业务读方法不加锁,这样行不行?
容易产生脏读问题(dirtyRead),如果业务逻辑中允许脏读可以读取时不加锁,如果业务不允许脏读,则需要加锁。
class Account {
        String name;
        double balance;

        public synchronized void set(String name, double balance) {
            this.name = name;
            try {
                Thread.sleep(2000);
            } catch (InterruptedException e) {
                e.printStackTrace();
            }
            this.balance = balance;
        }

        public /*synchronized*/ double getBalance(String name) {
            return this.balance;
        }

        public static void main(String[] args) {
            Account a = new Account();
            new Thread(() -> a.set("zhangsan", 100.0)).start();
            try {
                Thread.sleep(1000);
            } catch (InterruptedException e) {
                e.printStackTrace();
            }
            System.out.println(a.getBalance("zhangsan"));
            try {
                Thread.sleep(2000);
            } catch (InterruptedException e) {
                e.printStackTrace();
            }
            System.out.println(a.getBalance("zhangsan"));

        }

    }
上面代码中get方法不加锁运行结果:
0.0
100.0
get方法加synchronized锁运行结果为:
100.0
100.0
6.synchronized是否是可重入锁?
synchronized是可重入锁。
比如父类方法中加了synchronized锁,子类方法也有synchronized锁,子类方法调用super方法及调用父类方法,如果不能重入则会出现死锁。
验证代码:
public class T6 {
    public synchronized void m() {
        System.out.println("m1 start");
        try {
            Thread.sleep(1000);
        } catch (InterruptedException e) {
            e.printStackTrace();
        }
        m2();
        System.out.println("m1 end");
    }

    public synchronized void m2() {
        System.out.println("m2");
    }

    public static void main(String[] args) {
        T6 t=new T6();
        new Thread(t::m).start();
    }
}
7.程序中出现异常,锁是否会被释放?
在程序中出现异常,默认情况锁会被释放。
所以,在并发处理的过程中,有异常要多加小心,不然可能会发生不一致的情况。
比如,在一个web app处理过程中,多个servlet线程共同访问同一个资源,这时如果异常处理不合适,
在第一个线程中抛出异常,其他线程就会进入同步代码区,有可能会访问到产生时的数据,
因此要非常小心的处理同步业务逻辑中的异常。
8.synchronized的底层实现
JDK早期的 重量级 -OS
后来改进为锁升级
锁升级概念: 没错,我就是厕所所长!(一)
没错,我就是厕所所长!(二)
markword 记录这个线程ID(偏向锁)
如果有线程争用:升级为自旋锁;
自旋10次以后,升级为重量级锁 - OS
//锁不能降级
使用场景: 线程比较少且执行时间短用自旋锁;线程数量比较多或执行时间长用系统锁;
六、Volatile关键字
1.保证线程可见性
- MESI(MESI协议是基于Invalidate的高速缓存一致性协议,并且是支持回写高速缓存的最常用协议之一) 缓存一致性协议
1.1. 用volatile保持可见性
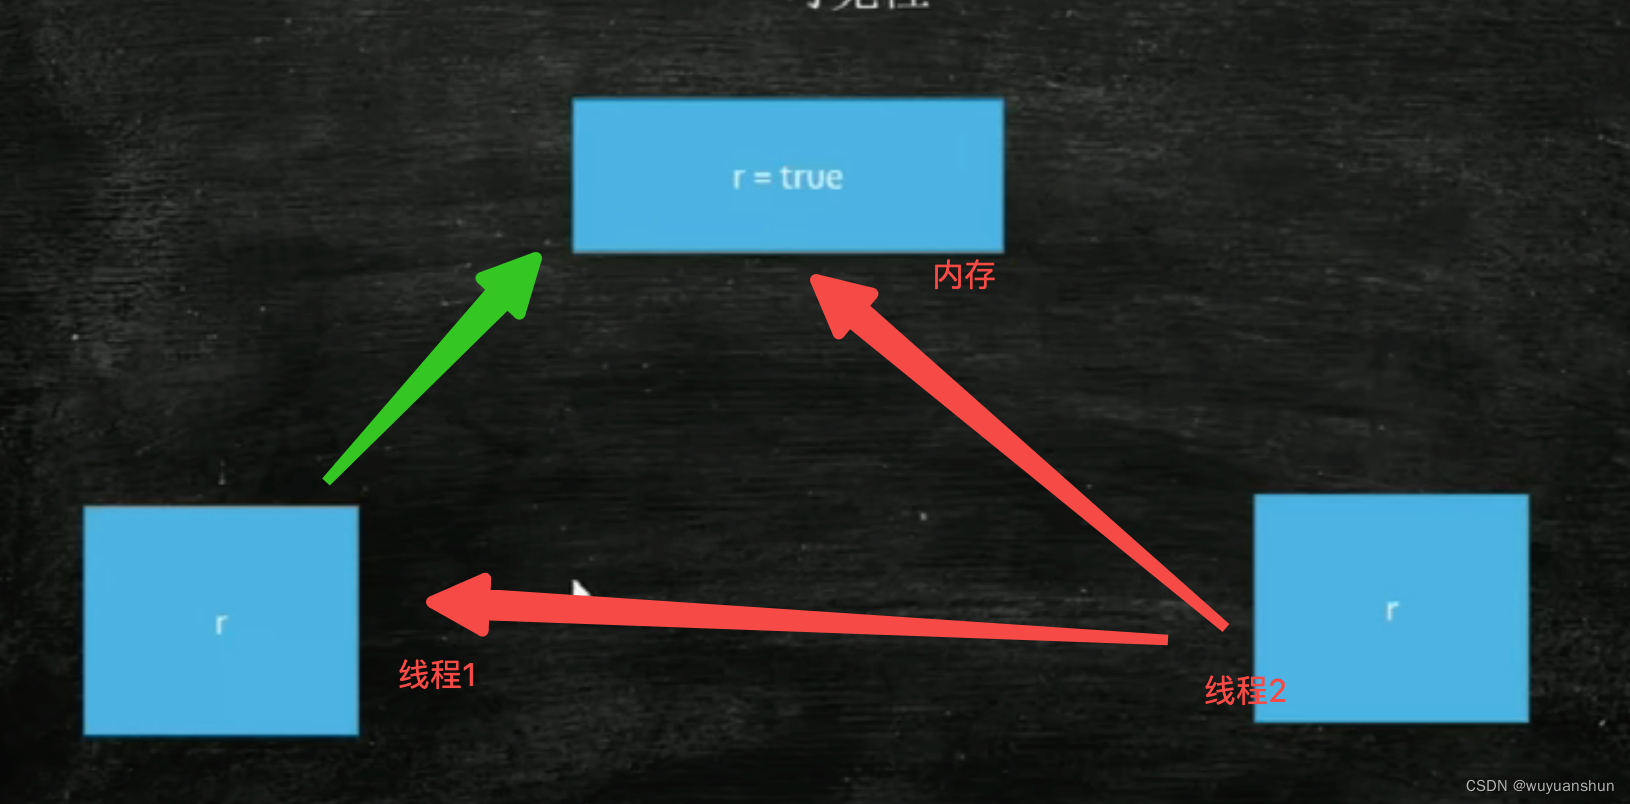
- 多线程提高效率,本地缓存数据,造成数据修改不可见,
想要保证可见,要不触发同步指令(如循环中的System.out.println),要么加上volatile,被修饰的内存,只要有修改,马上同步到每个线程
可以先看一下下面的代码,m方法while处会死循环,除非修改了running=false;
再看一main方法,它开启了一个新线程执行了方法m,之后睡眠1秒后执行running=false;,执行结果只有‘m start’没有‘m end’。
原因是cpu在执行新线程时 把资源(如running)拷贝了一份到CPU内执行,这样比从内存中取快了100倍左右。但是存在着一些问题,比如其他线程中修改了running,但是另一个线程不知道。
所以当线程2修改了变量r,要同步到内存,并且通知其他线程去内存重新获取变量。
解决方案:及boolean running = true;前加volatile关键字,实现可见性。
public class HelloVolatile {
//    volatile boolean running = true;
     boolean running = true;

    void m() {
        System.out.println("m start");
        while (running) {
//            System.out.println("hello");
        }
        System.out.println("m end");
    }

    public static void main(String[] args) {
        try {
            T01_HelloVolatile t = new T01_HelloVolatile();
            new Thread(t::m, "t1").start();
            Thread.sleep(1000);
            t.running = false;
        } catch (InterruptedException e) {
            e.printStackTrace();
        }
    }
}
2.禁止指令重排序(CPU)
2.1. 线程的as-if-serial
- 单线程,两句语句,未必是按照顺序执行
- 单线程的重排序,必须保障最终一致性
- as-if-serial:看上去像是序列化(单线程)
java代码:
public class Disorder {
    private static int x = 0, y = 0;
    private static int a = 0, b = 0;


    public static void main(String[] args) throws Exception {
        int i = 0;
        for (; ; ) {
            CountDownLatch countDownLatch = new CountDownLatch(2);

            i++;
            x = 0;
            y = 0;
            a = 0;
            b = 0;
            Thread one = new Thread(new Runnable() {
                @Override
                public void run() {
                    //由于one先启动,下面这句话让它等一等线程two,低着乐意根据自己电脑的实际性能适当调整等待时间。

                    a = 1;
                    x = b;
                    countDownLatch.countDown();
                }
            });
            Thread other = new Thread(new Runnable() {
                @Override
                public void run() {

                    b = 1;
                    y = a;
                    countDownLatch.countDown();
                }
            });
            one.start();
            other.start();
            countDownLatch.await();

            String result = "第" + i + "次(" + x + "," + y + ")";
            if (x == 0 && y == 0) {
                System.out.println(result);
                break;
            } else {
//                System.out.println(result);
            }
        }
    }
}
先说执行结果:在一段时间后 打印出来x=0 ,y=0。
通过以上代码(Disorder类),可以验证代码会发生重排序。
如果代码不会重排序则线程1中 ‘a = 1; ’一定在‘x = b;’之前,线程2‘ b = 1;’一定在‘ y = a;’之前;
则两个线程运行会出现以下几种情况
// a = 1;
// x = b;
// b = 1;
// y = a;
结果x值为0,y值为1

// a = 1;
// b = 1;
// x = b;
// y = a;
结果x值为1,y值为1

// b = 1;
// y = a;
// a = 1;
// x = b;
结果x值为1,y值为0
但是绝对不会出现( x = b;在a = 1;之前 或 y = a;在b = 1;之前),如果出现了则证明代码回重排序(x值为0,y值为0)。当然需要运行一段时间才会出来结果,可能是3-5分钟后才会出现一次。
// x = b;
// b = 1;
// y = a;
// a = 1;
结果x值为0,y值为0
2.2. CPU的乱序执行
为什么会乱序执行?
主要是为了提高效率。
比如:
{
File a=资源加载;
int b=1;
}
第一行代码和第二行代码先后执行不影响最终结果。在执行第一行代码时间过长,在等待资源加载,完全可以先执行第二行代码,充分利用cpu资源。
2.3. 使用内存屏障阻止乱序执行
内存屏障是特殊指令,前面的必须执行完,后面的才能执行
intel:Ifence sfence mfence
2.4. JVM中的内存屏障
所有实现JVM的虚拟机,必须实现四个屏障
LoadLoadBarrier LoadStore StoreLoad StoreStore
单词解释:
Load 读
Store 写
2.5. volatile的底层实现
volatile修饰的内存,不可以重新排序,对volatile修饰的变量的读写访问,都不可以换顺序
2.6. 面试题:DCL单例要不要加volatile?为什么?
java单例模式的线程安全 JAVA多线程编程中的双重检查锁定(DCL单例(Double Check Lock))
七、CAS(Compare And Swap /Set / Exchange)(自旋锁 乐观锁) (无锁)
先展示用法,再解释原理。
首先需求是用100个线程同时执行 for循环10000次i++;操作。期望结果是1000000
实现思路1:
public class IPlusPlus {
    private static long n = 0L;

    public static void main(String[] args) throws InterruptedException {
        Thread[] threads = new Thread[100];
        CountDownLatch latch = new CountDownLatch(threads.length);
        for (int i = 0; i < threads.length; i++) {
            threads[i] = new Thread(() -> {
                for (int j = 0; j < 10000; j++) {
//                    synchronized (IPlusPlus.class) {
                        n++;
//                    }
                }
                latch.countDown();
            });
        }

        for (Thread thread : threads) {
            thread.start();
        }

        latch.await();
        System.out.println(n);
    }
}
执行结果是远远达不到1000000的,这是因为n++操作没有加锁。加上synchronized锁后结果即为1000000。如果不用synchronized锁是否有其他方案呢?
以下便是使用Atomic 自旋锁:
实现思路2:
//此文章链接:https://blog.csdn.net/wuyuanshun/article/details/130081812
//[java多线程详细讲解...](https://blog.csdn.net/wuyuanshun/article/details/130081812)

public class TAtomicInteger {
   static AtomicInteger count = new AtomicInteger(0);

    /* synchronized */ void m() {
        for (int i = 0; i < 10000; i++) {
            //CAS Compare And Swap /Set / Exchange (自旋锁,乐观锁) (无锁)
            count.incrementAndGet();
        }
    }
//两种锁的效率
    //不同场景:
    //临界区执行时间比较长,等的人很多--》重量级
    //时间短,等的人少--》自旋锁
    public static void main(String[] args) {
        TAtomicInteger t = new TAtomicInteger();
        List<Thread> threadList = new ArrayList<>();
        for (int i = 0; i < 100; i++) {
            threadList.add(new Thread(t::m, "thread-" + i));
        }
        threadList.forEach(Thread::start);
        //等待线程执行完
        threadList.forEach((o) -> {
            try {
                o.join();
            } catch (InterruptedException e) {
                e.printStackTrace();
            }
        });
        //线程执行完再打印结果
        System.out.println(count);
    }
}
以上代码没有使用synchronized锁,结果也可以打印出期望值1000000。这是如何实现的呢?
我们来看一下这个incrementAndGet();方法的源码:
1.AtomicInteger类
第一层AtomicInteger类(只截取了关键代码信息)
public class AtomicInteger extends Number implements java.io.Serializable {
   /*
     * This class intended to be implemented using VarHandles, but there
     * are unresolved cyclic startup dependencies.
     * 这个类打算使用VarHandles来实现,但是是未解析的循环启动依赖项。
     */
    private static final jdk.internal.misc.Unsafe U = jdk.internal.misc.Unsafe.getUnsafe();
    private static final long VALUE = U.objectFieldOffset(AtomicInteger.class, "value");

    private volatile int value;

    /**
     * Creates a new AtomicInteger with the given initial value.
     * 使用给定的初始值创建一个新的AtomicInteger。
     * @param initialValue the initial value
     */
    public AtomicInteger(int initialValue) {
        value = initialValue;
    }

    /**
     * Creates a new AtomicInteger with initial value {@code 0}.
     * 使用初始值创建新的AtomicInteger
     */
    public AtomicInteger() {
    }

//…………………………

/**
     * Atomically increments the current value,
     * with memory effects as specified by {@link VarHandle#getAndAdd}.
     * 原子地增加当前值,具有由{@link VarHandle#getAndAdd}指定的内存效果。
     * <p>Equivalent to {@code addAndGet(1)}.
     *
     * @return the updated value 更新后的值
     */
    public final int incrementAndGet() {
        return U.getAndAddInt(this, VALUE, 1) + 1;
    }
    //…………………………
}
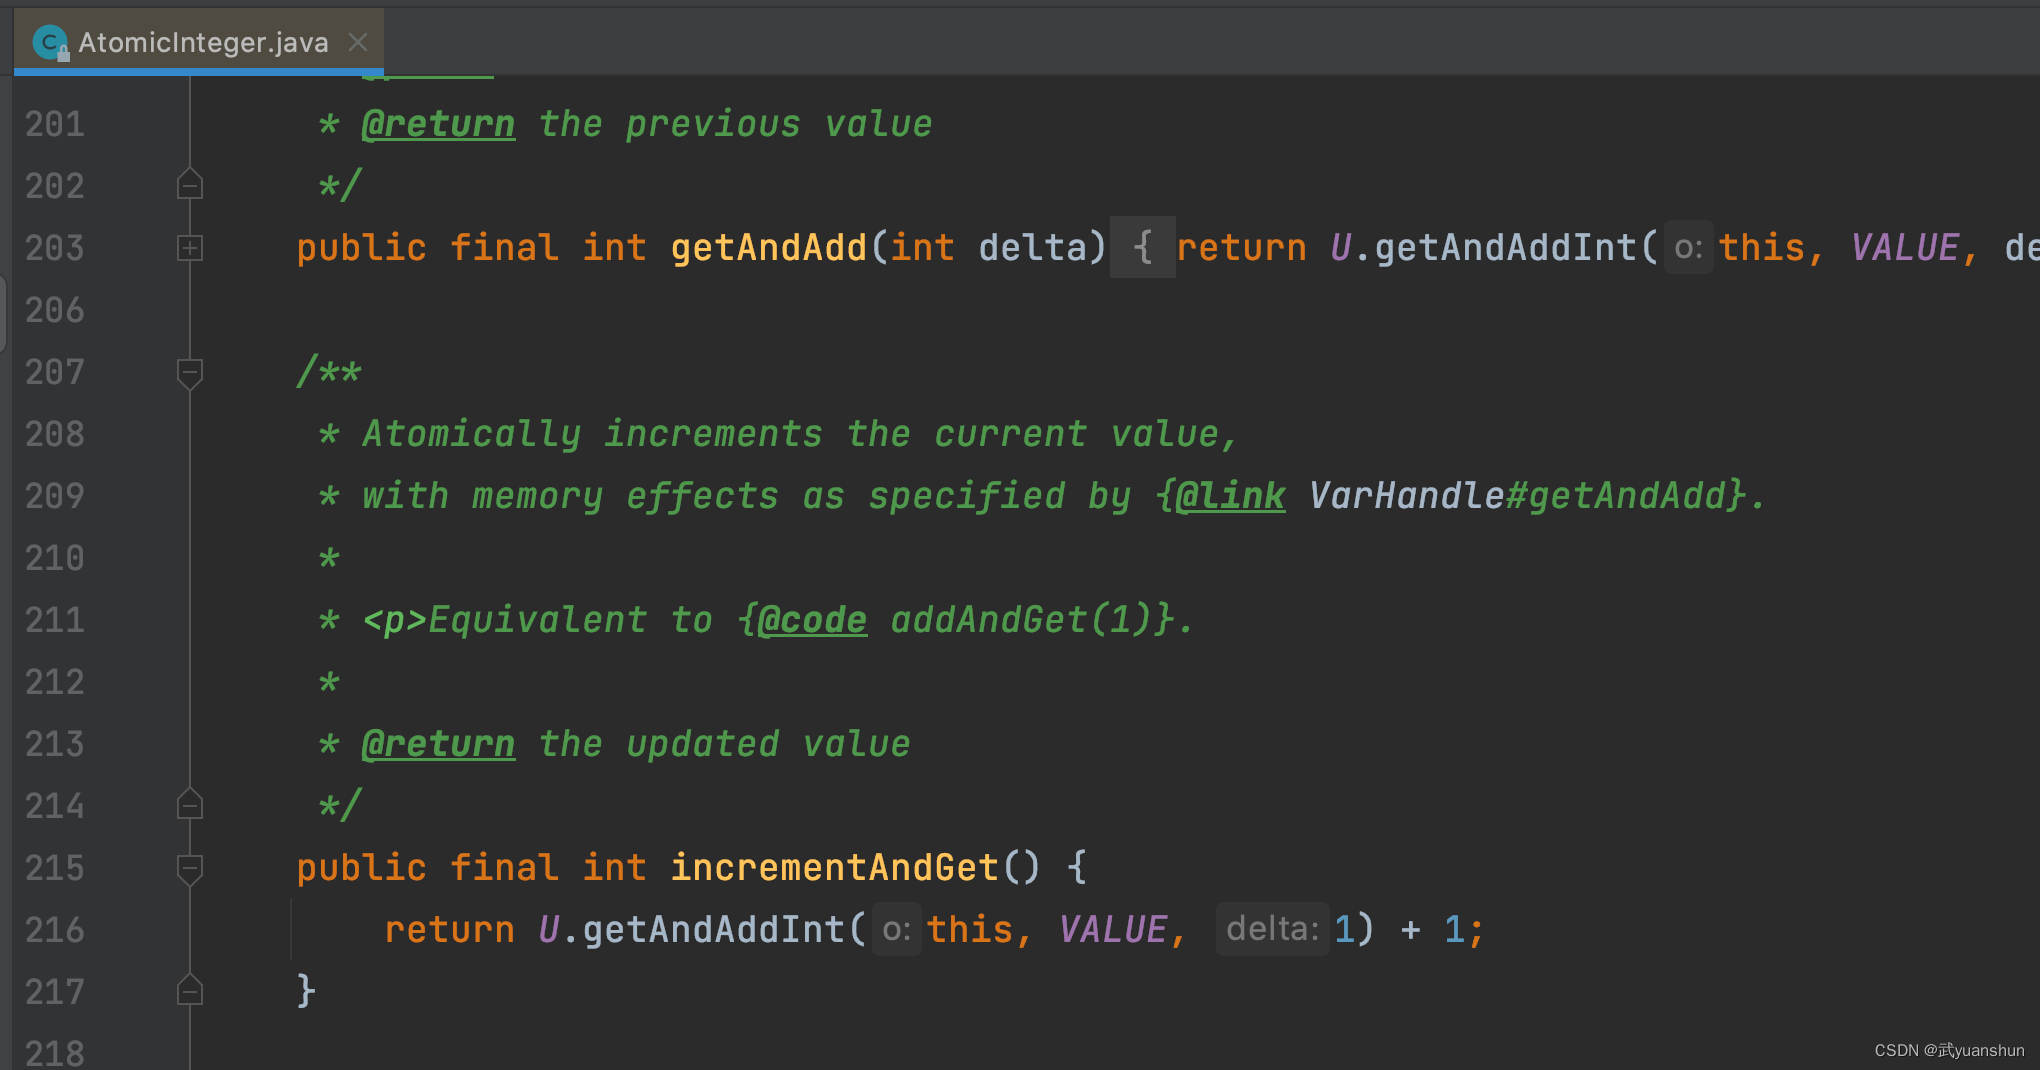
通过追踪源码可以看到incrementAndGet调用了Unsafe类的getAndAddInt();方法,下面我们继续追踪。
2.Unsafe类
通过以下代码可以看出Unsafe类是单例的,且核心方法是用native修饰的(C++实现)
/**
 * A collection of methods for performing low-level, unsafe operations.
 * Although the class and all methods are public, use of this class is
 * limited because only trusted code can obtain instances of it.
 * 用于执行低级别,unsafe操作的方法的集合。
 * 尽管该类和所有方法都是公共的,但该类的使用受限,因为只有受信任的代码才能获得它的实例。
 *
 * @author John R. Rose
 * @see #getUnsafe
 */
//此文章链接:https://blog.csdn.net/wuyuanshun/article/details/130081812


public final class Unsafe {

    private static native void registerNatives();
    static {
        registerNatives();
    }

    private Unsafe() {}

    private static final Unsafe theUnsafe = new Unsafe();

    /**
     * Provides the caller with the capability of performing unsafe
     * operations.
     * 为调用方提供执行unsafe操作的能力。
     *
     */
    public static Unsafe getUnsafe() {
        return theUnsafe;
    }
//……………………
 /** Volatile version of {@link #getInt(Object, long)}  */
    @HotSpotIntrinsicCandidate
    public native int     getIntVolatile(Object o, long offset);
    //……………………

	// The following contain CAS-based Java implementations used on
	//以下包含在上使用的基于CAS的Java实现
    // platforms not supporting native instructions
    //不支持本机指令的平台

    /**
     * Atomically adds the given value to the current value of a field
     * or array element within the given object {@code o}
     * at the given {@code offset}.
     * 将给定值原子化地添加到字段的当前值
	 * 或给定对象内的数组元素{@code o}
	 * 在给定的{@code偏移量}处。
	 *
     * @param o object/array to update the field/element in 对象/数组以更新中的字段/元素
     * @param offset field/element offset 偏移字段/元素偏移
     * @param delta the value to add 增量要添加的值
     * @return the previous value 以前的值
     * @since 1.8
     */
    @HotSpotIntrinsicCandidate
    public final int getAndAddInt(Object o, long offset, int delta) {
        int v;
        do {
            v = getIntVolatile(o, offset);
        } while (!weakCompareAndSetInt(o, offset, v, v + delta));
        return v;
    }


 @HotSpotIntrinsicCandidate
    public final boolean weakCompareAndSetInt(Object o, long offset,
                                              int expected,
                                              int x) {
        return compareAndSetInt(o, offset, expected, x);
    }

	/**
     * Atomically updates Java variable to {@code x} if it is currently
     * holding {@code expected}.
     * 如果Java变量当前持有{@code expected},则原子化地将其更新为{@code x}。
     *
     * <p>This operation has memory semantics of a {@code volatile} read
     * and write.  Corresponds to C11 atomic_compare_exchange_strong.
     * 此操作具有{@code volatile}读写的内存语义。对应于C11 atomic_compare_exchange_strong。
     *
     * @return {@code true} if successful 如果成功
     */
    @HotSpotIntrinsicCandidate
    public final native boolean compareAndSetInt(Object o, long offset,
                                                 int expected,
                                                 int x);

//……………………

}
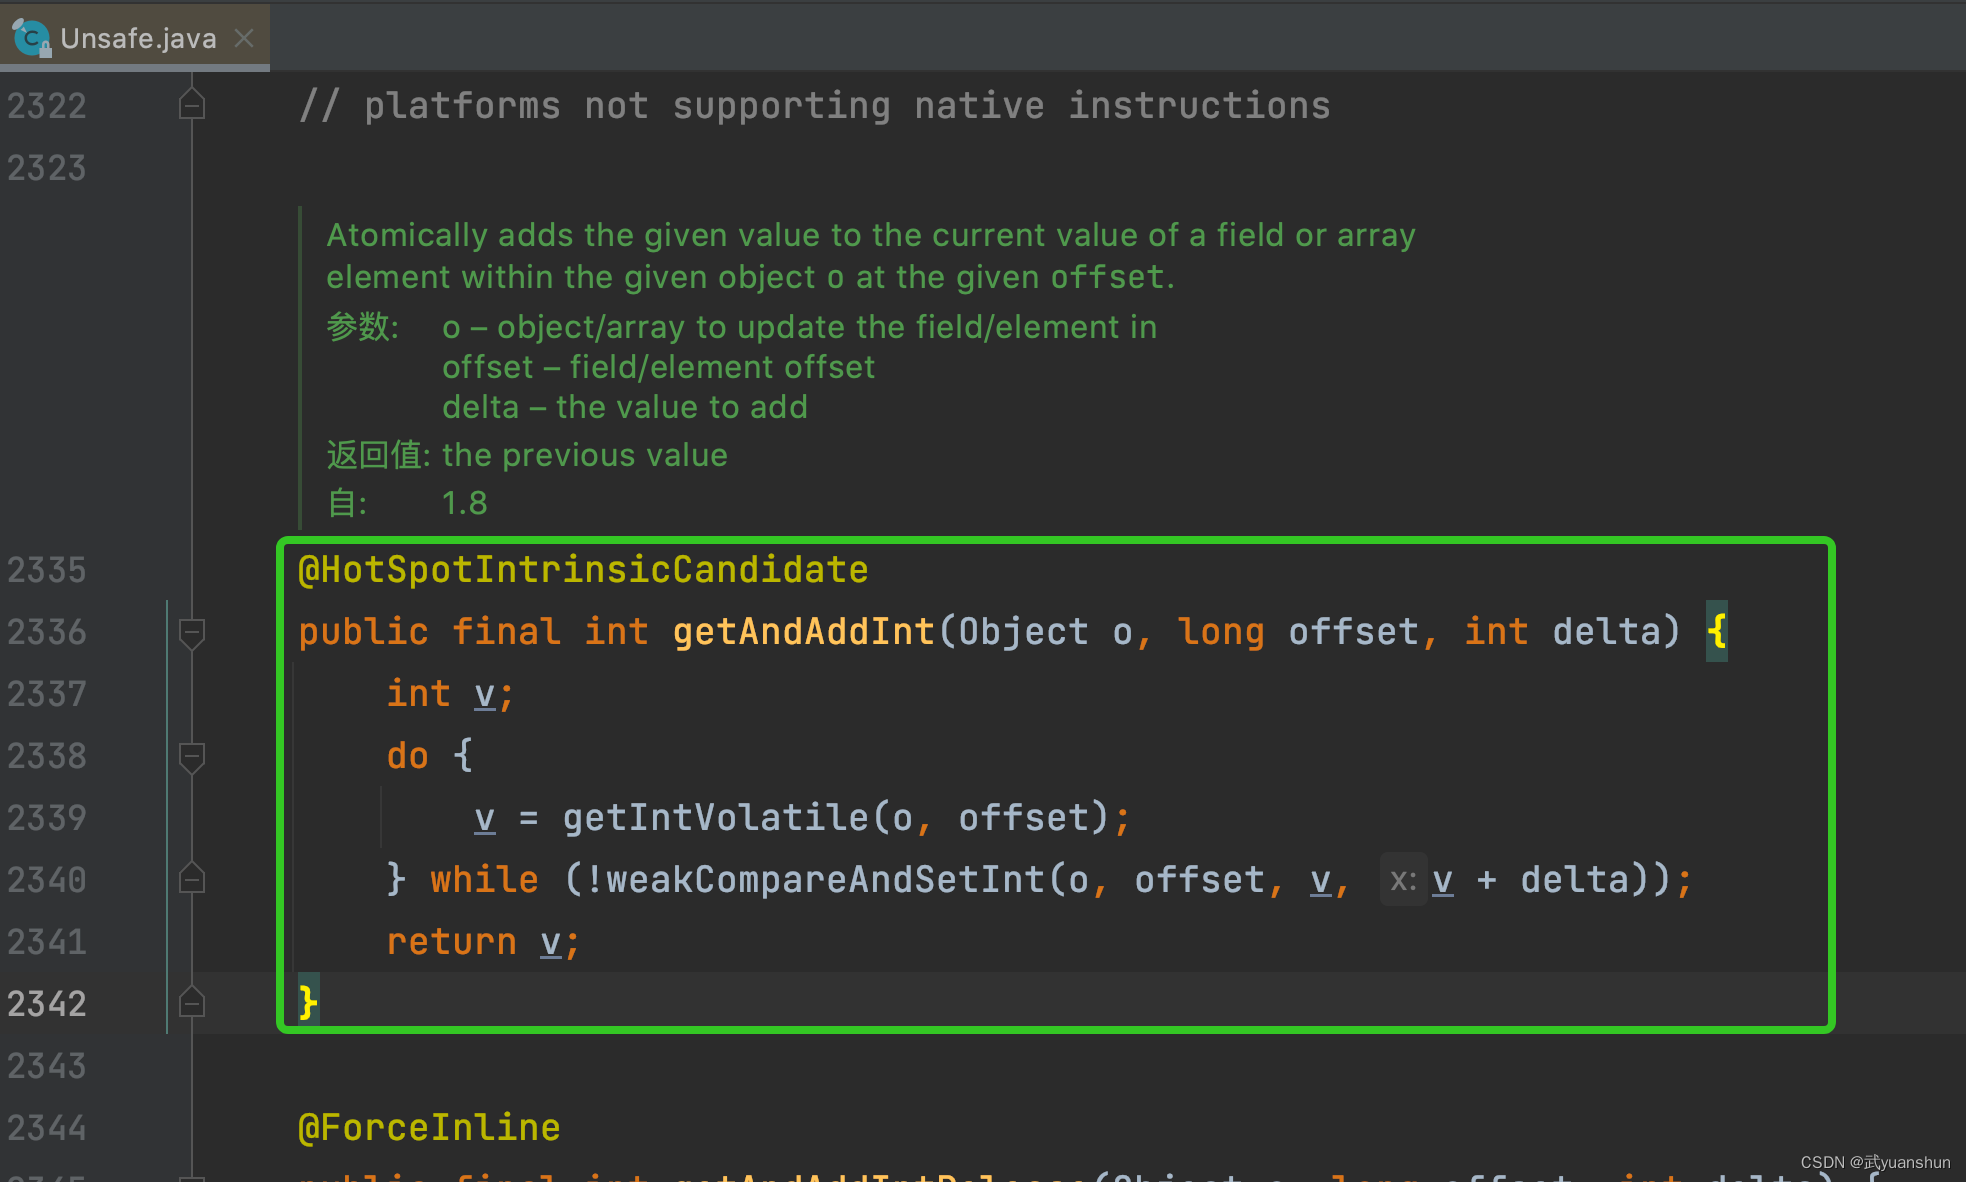
上图可以说是一段比较核心cas(compareAndSet 比较并且设置)逻辑,从代码中我们可以看出使用了do{循环执行的语句} while(是否继续循环)语句,首先执行获取当前值v
我自己用java写的代码逻辑 助于理解,不是真的底层实现!
public final int getAndAddInt(Object o, long offset, int delta) {
        int v;
        do {
            v = getIntVolatile(o, offset);
            //如果返回false 则再次获取v值。
        } while (!weakCompareAndSetInt(o, offset, v, v + delta));
        return v;
    }
/* 此方法不是源码 */
 public final  boolean compareAndSetInt(Object o, long offset, int v, int x){
        //当然 以下代码只是逻辑 在C++中一句汇编语言带代替 实现原子性。
		if (v == value) {//v=1, x=2,
            value = x;
            return true;//如value也为1 则设置成功 返回true;
        }
        return false;//如value不为1  返回false;
    }
然后进入循环判断 是否比较并设置成功了(compareAndSetInt();)
所以核心方式是compareAndSetInt ,但是这个方法是native修饰的,也就是C++语言实现的这个方法:
1)Unsafe类的C++源码追踪
首先我们定位到Unsafe.cpp类的Unsafe_CompareAndSwapInt方法:
Unsafe.cpp
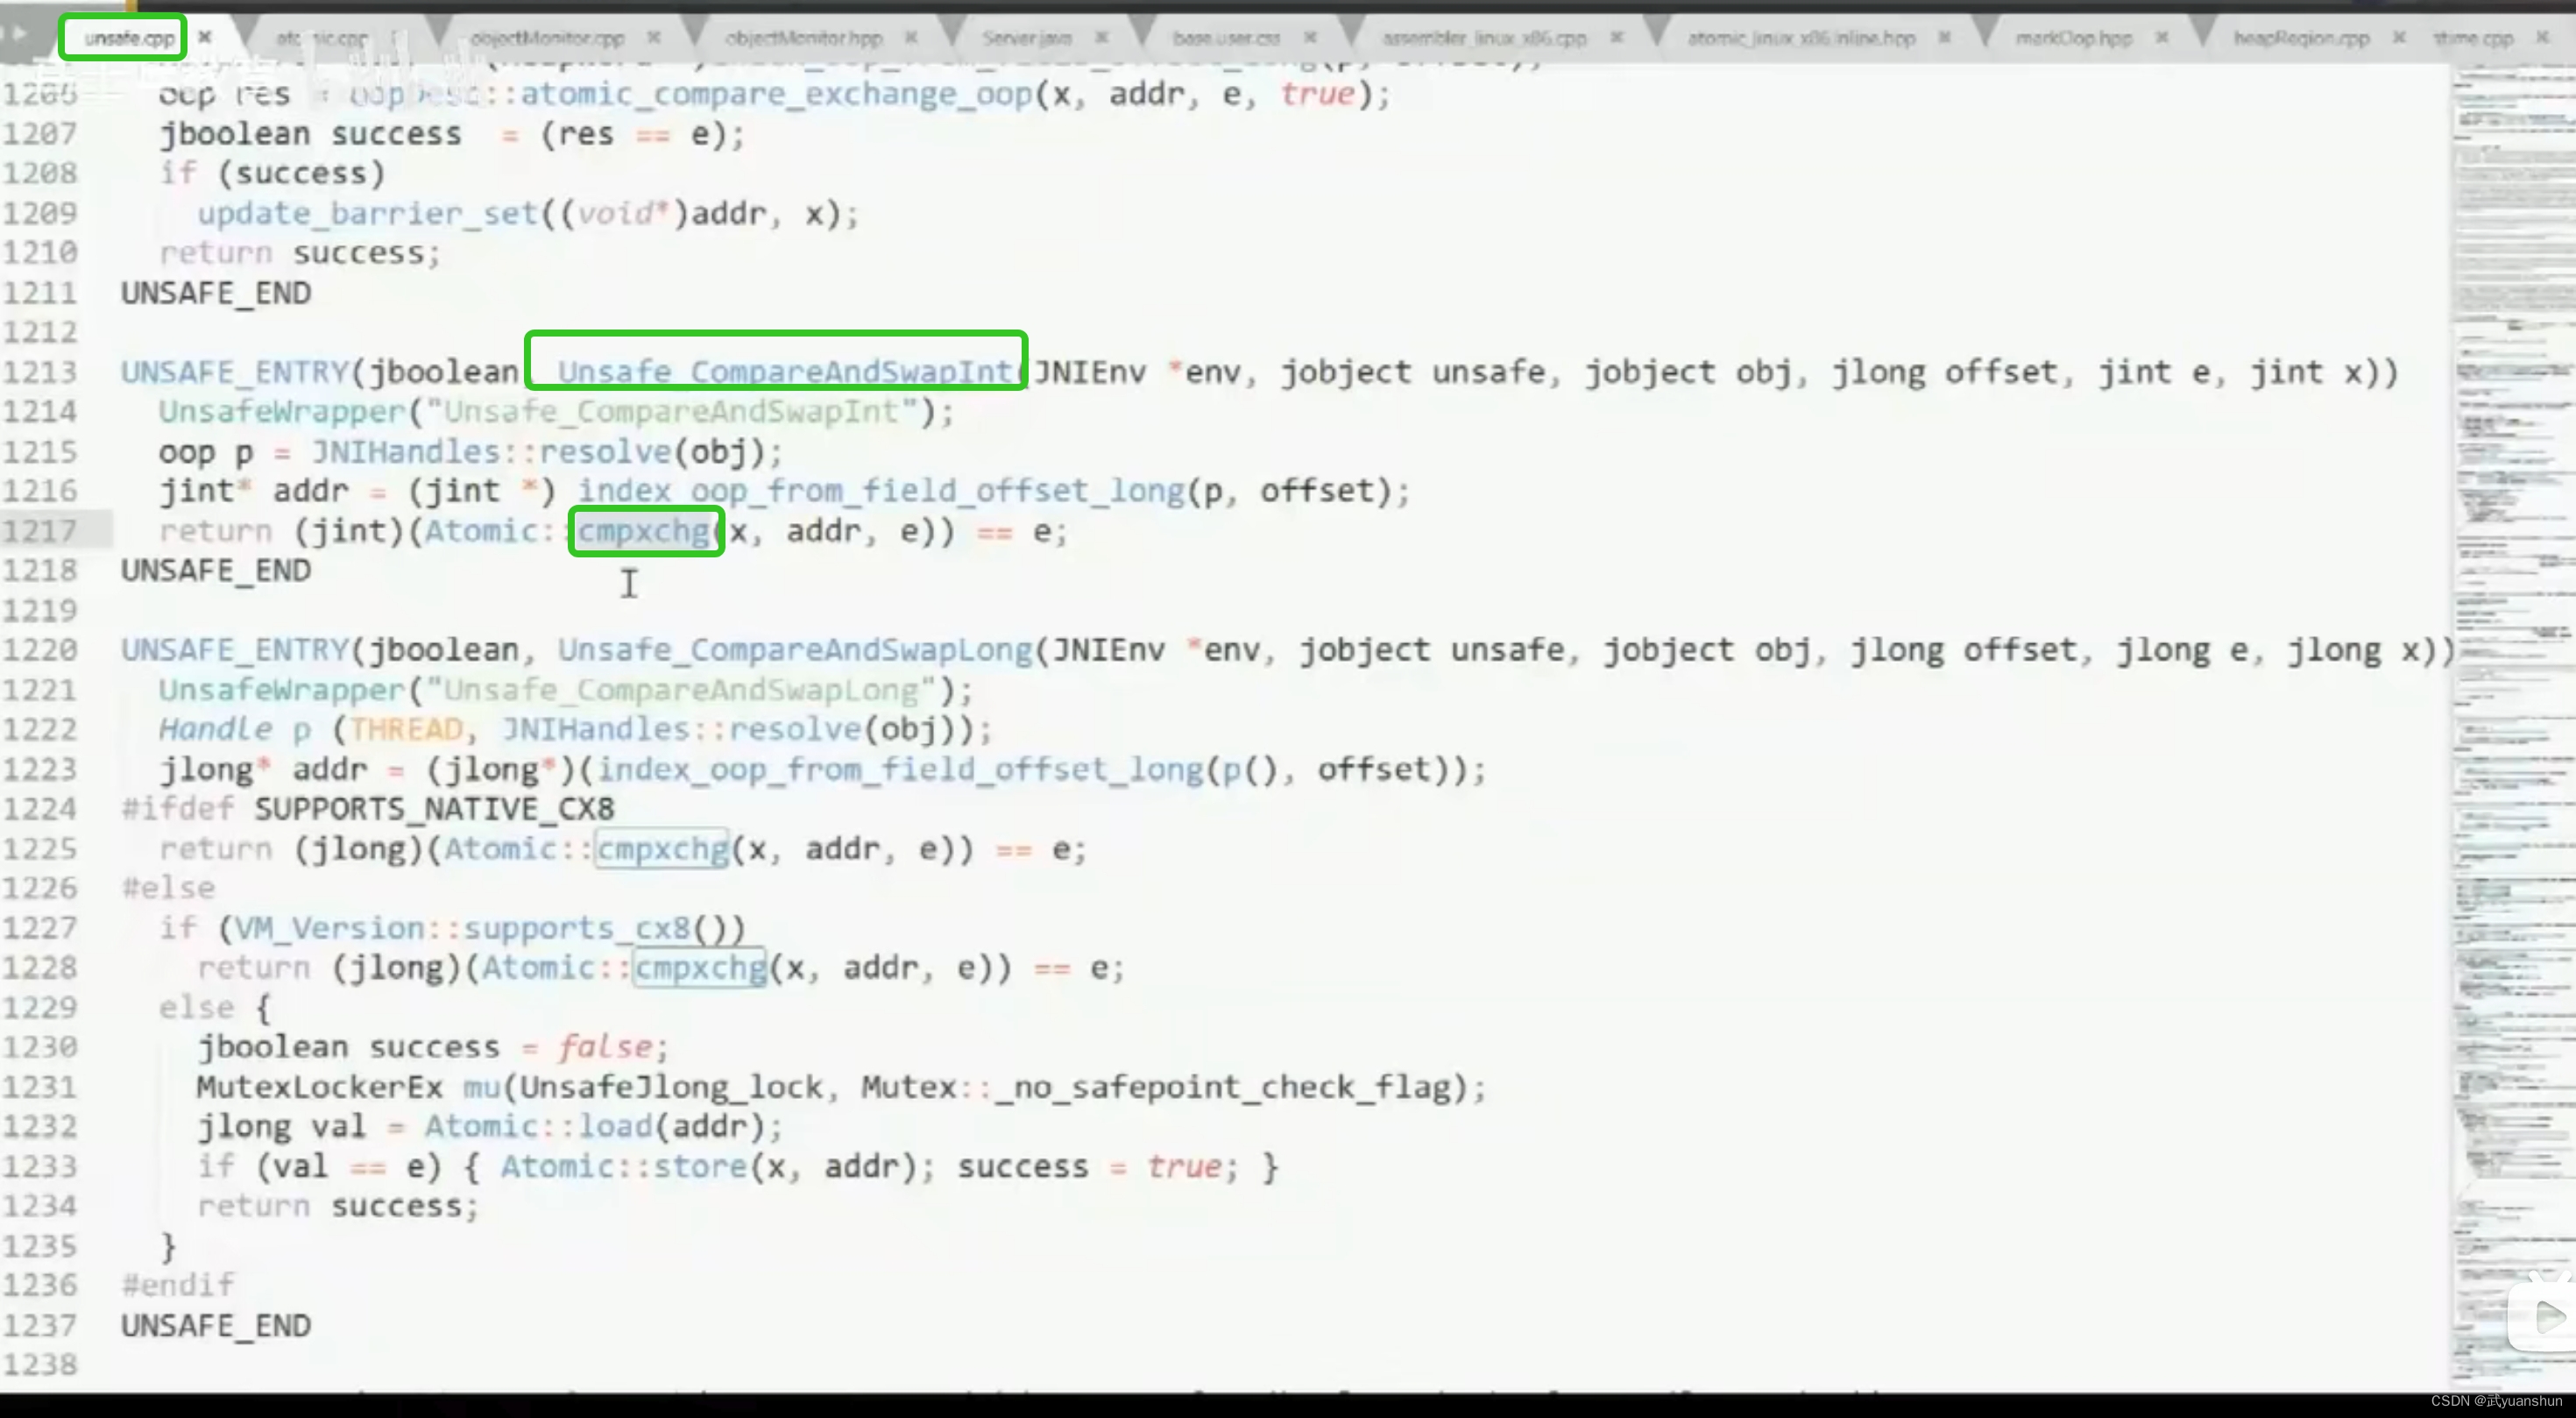
最终定位到atomtic_liunx_x86.inline.hpp文件的cmpxchg方法。
jdk8u:atomtic_liunx_x86.inline.hpp 93行:
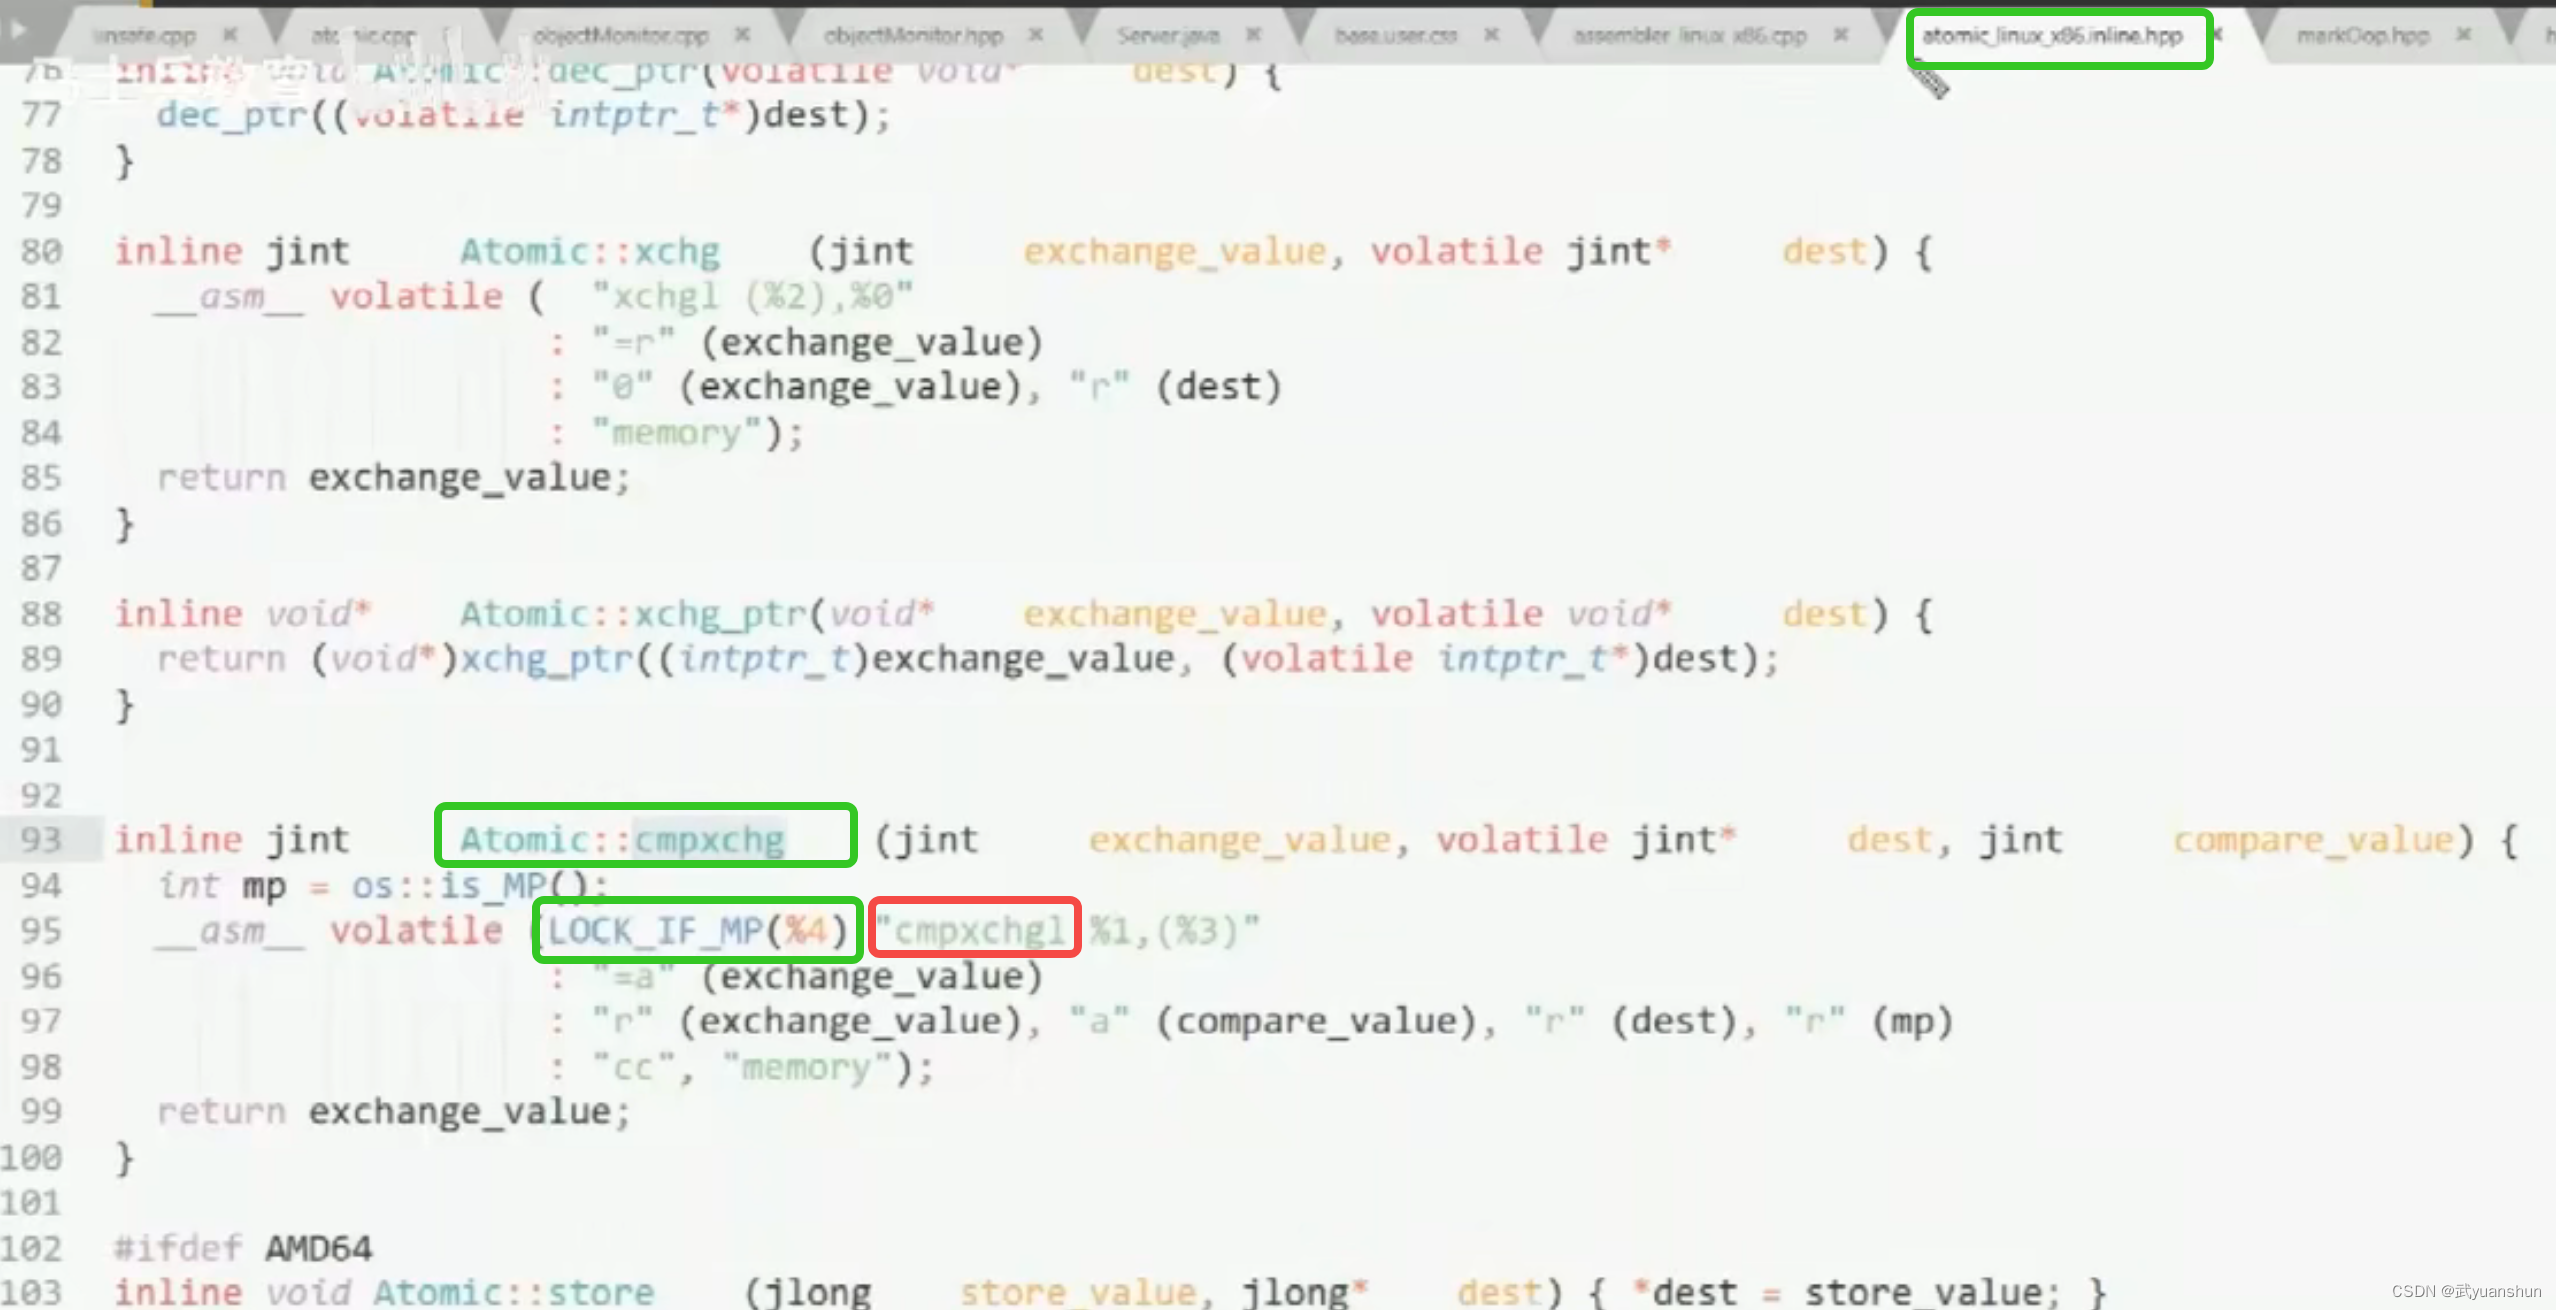
LOCK_IF_MP方法逻辑:及多cpu前加lock;

2) C++中cmpxchg方法解释
- asm : 汇编码
- LOCK_IF_MP: MP是Multi-processors(多cpu), 多个cpu情况下要加lock锁执行令,作用只允许一个cpu操作,可以保证此命令的操作原子性。
- cmpxchgl: compare and exchange(比较并交换)
所以最终执行令是 lock加cmpxchg
lock comxchg 指令
此文章链接:https://blog.csdn.net/wuyuanshun/article/details/130081812
java多线程详细讲解…
如果此篇文章对您有帮助的话点个赞吧!谢谢!


 3424
3424


 被折叠的 条评论
为什么被折叠?
被折叠的 条评论
为什么被折叠?
 到【灌水乐园】发言


