


文章目录
介绍
组件可以有以下几种关系:
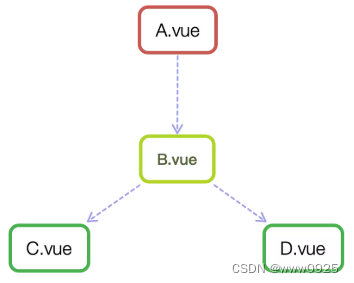
A-B、B-C、B-D 都是父子关系
C-D 是兄弟关系
A-C、A-D 是隔代关系
根据组件之间关系讨论组件通信最为清晰有效
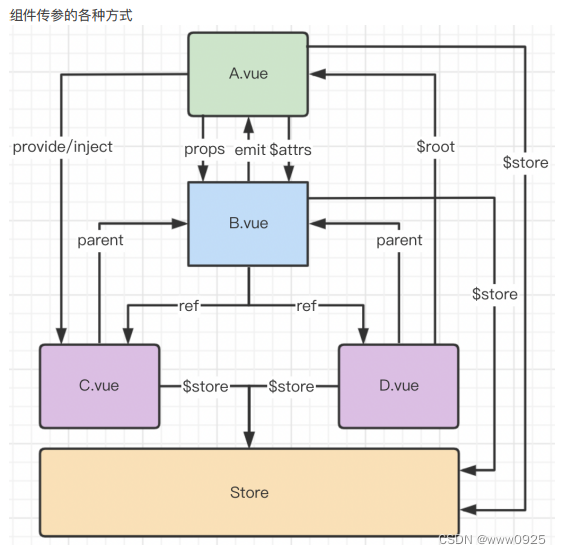
父子组件:
props: 父组件通过props向下传递数据给子组件$emit:子组件通过 emit 派发事件v-model语法糖(Vue2 和 Vue3 有区别).sync语法糖(Vue3移除)- 非 prop 特性:
$attrs(非兼容 Vue2)$listenersVue3 移除
ref/$parent/$children:都是直接得到组件实例,使用后可以直接调用组件的方法或访问数据ref获取⼦节点引⽤parent【不推荐】具有明显的耦合性$childrenVue3移除,推荐使用 ref
兄弟组件:
- 通过共同的祖辈组件搭桥:
$parent/$root【不推荐】具有明显的耦合性
跨层级:
-
provide/inject -
非 prop 特性:
$attrs/$listeners
任意两组件:
-
vuex 状态管理
- 创建唯一的全局数据管理者 store,通过它管理数据并通知组件状态变更
- 优点:一次存储数据,所有页面都可访问
-
事件总线 eventBus:(Vue3 废弃
$on),所以 eventBus 需要自己写$on -
$root【不推荐】通过共同的祖辈组件搭桥
Props
支持类型:String、Number、Boolean、Array、Object、Date、Function、Symbol、Promise 或任何其他构造函数
单向数据流原则:
父级 prop 发生变更时,子组件中所有的 prop 都将会刷新为最新的值。
子组件内部不能改变 Prop 的值。
注意: 在 JavaScript 中对象和数组是通过引用传入的,所以对于一个数组或对象类型的 prop 来说,在子组件中变更这个对象或数组本身将会影响到父组件的状态
防止从子组件意外变更父级组件的状态,从而导致你的应用的数据流向难以理解。
注意项
- 如果父组件不传递,子组件不设置默认值,值为 undefined
- 如果父组件传递 undefined,子组件设置默认值为 100,值为 100
- Boolean 类型
- 如果父组件未传递,子组件 props 会被转换为 false,值为 false
- 如果父组件未传递,子组件设置默认值为 undefined,则值为 undefined
命名
推荐 kebab-case 传递, camelCase 接收。
HTML 中的 attribute 名是大小写不敏感的,所以浏览器会把所有大写字符解释为小写字符。这意味着当你使用 DOM 中的模板时,camelCase (驼峰命名法) 的 prop 名需要使用其等价的 kebab-case (短横线分隔命名) 命名:
props: ['postTitle'],

<!-- kebab-case in HTML -->
<blog-post post-title="hello!"></blog-post>
重申一次,如果你使用字符串模板,那么这个限制就不存在了。
使用
父组件:传递静态值
可省略 v-bind 指令
<blog-post title="My journey with Vue"></blog-post>
注意:
- 未使用
v-bind指令,值类型都为 String。例如<blog-post likes="2"></blog-post>2不是数字是字符串。 - 没有值的情况,意味着值
true:<blog-post is-publish></blog-post> - 传递值为
false,需要v-bind指令来绑定false值:<blog-post :is-published="false"></blog-post>
父组件:传递动态值
传递一个动态值:
<blog-post :title="post.title"></blog-post>
传递一个动态表达式:
<blog-post :title="post.title + ' by ' + post.author.name"></blog-post>
<blog-post :title="`${post.title}by${post.author.name}`"></blog-post>
传入一个对象的所有 property:
<template>
  <blog-post v-bind="post"></blog-post>

  <!-- 等价于: -->
  <blog-post :="post"></blog-post>

  <!-- 等价于: -->
  <blog-post v-bind:id="post.id" v-bind:title="post.title"></blog-post>
</template>

<script setup lang="ts">
  import {reactive} from 'vue'
  const post = reactive({
    id: 1,
    title: 'My Journey with Vue'
  })
</script>
子组件:接收props
setup 语法糖, defineProps
写法一:字符串数组
<template>
  <p>{{id}}</p>
</template>

<script setup lang="ts">
  const props = defineProps(["id"]);
  console.log(props)
</script>
写法二:对象形式 + 数据类型
<script setup lang="ts">
  defineProps({
    id: String,  // 类型必须为string
    count: Number
  });
</script>
写法三:对象形式 + 数据类型 + 默认值
<script setup lang="ts">
  defineProps({
    id: {
      type: String, // 类型必须为string
      default: "", // 默认值为空字符串
    },
  });
</script>
写法四:setup 语法糖 + withDefaults(TS)
<script setup lang="ts">
  const props = withDefaults(
    defineProps<{
      count: number; // 类型必须为 number
      name?: string; // 可选,类型必须为 string
      type: "a" | "b"; // 类型必须为 'a' | 'b' 的 type,可结合ts使用
    }>(),
    {
      name: "", // 默认值为空字符串
    }
  );
</script>
选项式:
<template>
  <p>{{id}}</p>
</template>

<script>
  export default {
    props: {
      id: { type: string },
    },
    setup(props) {
      console.log(props.id);
    },
  };
</script>
改变 props 方式
这里有两种常见的试图变更一个 prop 的情形:
-
props 作为子组件响应式数据:子组件定义新变量,赋值 prop 初始值,并通过 watch 监听 prop 值变化
<script setup lang="ts"> import {ref} from 'vue' const props = withDefaults(defineProps<{ count: number }>(), {}) const countChild = ref(props.count) watch(() => props.count, (newVal) => { if (countChild.value !== newVal) { countChild.value = newVal } }) <script> -
转换 props 格式:通过计算属性转换
<script setup lang="ts">
import {computed} from 'vue'
const props = withDefaults(defineProps<{
  count: number
}>(), {})

const countChild = computed(() => props.count + 2)
<script>
emit 自定义事件(非兼容 Vue2)
使用:
- 子组件通过
$emit向父组件派发事件,并传递数据 - 父组件通过
v-on:myEvent或@myEvent监听子组件实例的任意事件,并处理数据
非兼容 Vue2:
- Vue3 需要定义自定义事件。
- Vue2 无需定义自定义事件,直接在使用位置触发事件即可
命名
与组件和 prop 一样,事件名提供了自动的大小写转换。推荐 kebab-case 监听, camelCase 触发。
this.$emit('myEvent')

<!-- kebab-case in HTML -->
<my-component @my-event="doSomething"></my-component>
重申一次,如果你使用字符串模板,那么这个限制就不存在了。
Vue2 未提供自动的大小写转换,事件名不会被用作一个 JavaScript 变量名或 property 名,所以就没有理由使用 camelCase 或 PascalCase 了。并且
v-on事件监听器在 DOM 模板中会被自动转换为全小写 (因为 HTML 是大小写不敏感的),所以v-on:myEvent将会变成v-on:myevent——导致myEvent不可能被监听到。因此,我们推荐你始终使用 kebab-case 的事件名。
使用
子组件:Child.vue
<template>
  <button @click="onSubmite">submit</button>
</template>

<script setup lang="ts">
  const emit = defineEmits<{
    (e: "submit", name: string): void
  }>();

  const onSubmite = (e) => {
    emit('submit', e, '这是内容')
  }
</script>
父组件:Parent.vue
<template>
  <Child v-on:submit="onSubmit"></Child>

  <!-- 等价于 -->
  <Child @:submit="onSubmit"></Child>
</template>

<script setup lang="ts">
  const onSubmit= (e, val: stirng) => {
    console.log(e, val)
  }
</script>
子组件:定义事件写法
setup 语法糖:defineEmits
写法一:字符串数组
<script setup lang="ts">
  const emit = defineEmits(["submit", 'blur']);
</script>
写法二:对象形式 + 事件校验,emit是否允许通过
<script setup lang="ts">
  const emit = defineEmits({
    submit(name: string) {
      // 通过返回值为 `true` 还是为 `false` 来判断
      // 验证是否通过
      if (name) {
        return true
      }
      return false
    }
  })
</script>
写法三:setup 语法糖 + withDefaults(TS)
<script setup lang="ts">
  const emit = defineEmits<{
    (e: "submit", name: string): void
    (e: "blur", name: string): void
  }>();

  const onSubmite = (e) => {
    emit('submit', 'name的内容')
  }
</script>
选项式:
写法一:字符串数组
<script>
  export default {
    emits: ['click', 'submit'],
    setup(props, { emit }) {
      emit('submit')
    },
    methods: {
      submitForm(email, password) {
        this.$emit("submit", { email, password });
      },
    },
  };
</script>
写法二:对象形式 + 事件校验,emit是否允许通过
<script>
  export default {
    emits: {
      click: null, // 没有验证

      submit: ({ email, password }) => {
        if (email && password) {
          return true;
        }
        console.warn("Invalid submit event payload!");
        return false;
      },
    },
  };
</script>
ref 模板引用
虽然 Vue 的声明性渲染模型为你抽象了大部分对 DOM 的直接操作,但在某些情况下,我们仍然需要直接访问底层 DOM 元素。要实现这一点,我们可以使用特殊的 ref attribute:
-
如果在普通的 DOM 元素上使用,引用指向的就是 DOM 元素;
-
如果用在子组件上,引用就指向组件实例,通过实例直接调用组件的方法或访问数据
-
v-for结合 ref
获取DOM对象
<template>
	<input ref="input" />
</template>

<script setup lang="ts">
  // 获取DOM对象:声明一个 ref 来存放该元素的引用
  // 注意:必须和模板里的 ref 同名
  const input = ref(null)

  onMounted(() => {
    input.value.focus()
  })
</script>
获取组件实例(非兼容 Vue2)
<template>
	<child ref="childRef" /></child>
</template>

<script setup lang="ts">
  import Child from './components/Child.vue'

  // 获取组件实例
  const childRef = ref<InstanceType<typeof Child>>()
  // childRef.value // 是 <Child /> 组件的实例
</script>
如果一个子组件使用的是选项式 API 或 没有使用 <script setup>,则 ref 得到的组件实例含有组件的每一个属性和方法。这使得在父组件和子组件之间创建紧密耦合的实现细节变得很容易,当然也因此,应该只在绝对需要时才使用组件引用。大多数情况下,你应该首先使用标准的 props 和 emit 接口来实现父子组件交互。
v-for 中的模板引用
Vue3:需要 v3.2.25 及以上版本
当在 v-for 中使用模板引用时,对应的 ref 中包含的值是一个数组,它将在元素被挂载后包含对应整个列表的所有元素:
<template>
  <ul>
    <li v-for="item in list" ref="itemRefs">{{ item }}</li>
  </ul>
</template>

<script setup>
	import { ref, onMounted } from 'vue'

	const list = ref([1,2,3,4])

	const itemRefs = ref([])
	onMounted(() => console.log(itemRefs.value))
</script>
注意:ref 数组并不保证与源数组相同的顺序。
监听 ref
注意,你只可以在组件挂载后才能访问模板引用。如果你想在模板中的表达式上访问 input,在初次渲染时会是 null。这是因为在初次渲染前这个元素还不存在呢!
如果你需要侦听一个模板引用 ref 的变化,确保考虑到其值为 null 的情况:
watchEffect(() => {
  if (input.value) {
    input.value.focus()
  } else {
    // 此时还未挂载,或此元素已经被卸载(例如通过 v-if 控制)
  }
})
函数模板引用
除了使用字符串值作名字,ref attribute 还可以绑定为一个函数,会在每次组件更新时都被调用。该函数会收到元素引用作为其第一个参数:
<template>
    <input :ref="inputFn">
</template>

<script setup lang="ts">
import { ref } from "vue"

const inputFn= (el: HTMLInputElement) => {
    console.log(el)  // 得到input元素标签节点
}
</script>
注意:当绑定的元素被卸载时,函数也会被调用一次,此时的 el 参数会是 null。
defineExpose(Vue3 新增)
使用了 <script setup> 的组件是 默认私有 的:一个父组件无法访问到一个使用了 <script setup> 的子组件中的任何东西,除非子组件在其中通过 defineExpose 宏显式暴露:
<script setup>
import { ref } from 'vue'

const a = 1
const b = ref(2)

// 像 defineExpose 这样的编译器宏不需要导入
defineExpose({ a, b })
</script>
当父组件通过模板引用获取到了该组件的实例时,得到的实例类型为 { a: number, b: number } (ref 都会自动解包,和一般的实例一样)。
v-model
表单绑定 v-model
用 v-model 指令在表单 <input>、<textarea> 及 <select> 元素上创建双向数据绑定
注意:
v-model会忽略所有表单元素的value、checked、selectedattribute 的初始值而总是将当前活动实例的数据作为数据来源。你应该通过 JavaScript 在组件的data选项中声明初始值。- 对于需要使用输入法 (如中文、日文、韩文等) 的语言,你会发现
v-model不会在输入法组织文字过程中得到更新。如果你也想响应这些更新,请使用input事件监听器和value绑定,而不是使用v-model。
使用:
-
文本 (Text):
<input v-model="message" /> -
多行文本 (Textarea):
<textarea v-model="message"></textarea> -
单选框 (Radio):
<input type="radio" v-model="picked" /> -
复选框 (Checkbox):
-
单个复选框,绑定到布尔值:
<input type="checkbox" id="jack" v-model="checked" /> <label for="jack">Jack</label> <script setup lang="ts"> import { ref } from "vue"; const checked = ref(true); </script> -
多个复选框,绑定到同一个数组:
<input type="checkbox" id="jack" value="Jack" v-model="checkedNames" /> <label for="jack">Jack</label> <input type="checkbox" id="john" value="John" v-model="checkedNames" /> <label for="john">John</label> <script setup lang="ts"> import { reactive } from "vue"; const checkedNames = reactive(["Jack"]); </script> -
绑定值:
<input
  type="checkbox"
  v-model="checked"
  true-value="yes"
  false-value="no"
/>

<script setup lang="ts">
  import { ref } from "vue";
  const checked = ref(true);

  // when checked: checked.value === 'yes'
  // when unchecked: checked.value === 'no'
</script>
-
-
选择框 (Select):
-
单选时:
<select v-model="selected"> <option disabled value="">Please select one</option> <option>A</option> <option>B</option> </select> <script setup lang="ts"> import { ref } from "vue"; const selected = ref(""); </script> -
多选时 (绑定到一个数组):
<select v-model="selected" multiple>
  <option>A</option>
  <option>B</option>
</select>

<script setup lang="ts">
  import { reactive } from "vue";
  const selected = reactive([]);
</script>
-
内置修饰符
.lazy:在“change”时而非“input”时更新。在默认情况下,v-model在每次input事件触发后将输入框的值与数据进行同步<input v-model.lazy="msg" />- 仅直接在 input 上生效,组件上不生效
.number:自动将用户的输入值转为数值类型,如果这个值无法被 parseFloat()解析,则会返回原始的值。<input v-model.number="age" />
.trim:自动过滤用户输入的首尾空白字符<input v-model.trim="msg" />
修改属性名(Vue3 新增)
默认情况下,组件上的 v-model 使用 modelValue 作为 prop 和 update:modelValue 作为事件。我们可以通过向 v-model 传递参数来修改这些名称:
<my-component v-model:title="bookTitle"></my-component>
在本例中,子组件将需要一个 title prop 并发出 update:title 要同步的事件:
app.component("my-component", {
  props: {
    title: String,
  },
  emits: ["update:title"],
  template: `
    <input
      type="text"
      :value="title"
      @input="$emit('update:title', $event.target.value)">
  `,
});
多个 v-model 绑定(Vue3 新增)
<user-name
  v-model:first-name="firstName"
  v-model:last-name="lastName"
></user-name>
<input
  type="text"
  :value="firstName"
  @input="$emit('update:firstName', $event.target.value)"
/>
<input
  type="text"
  :value="lastName"
  @input="$emit('update:lastName', $event.target.value)"
/>

<script setup lang="ts">
  const props = withDefaults(
    defineProps<{
      firstName: string;
      lastName: string;
    }>(),
    {}
  );

  const emit = defineEmits(["update:firstName", "update:lastName"]);
</script>
v-model 自定义修饰符(Vue3 新增)
详细参考 处理 v-model 修饰符
除了像 .trim 这样的 2.x 硬编码的 v-model 修饰符外,现在 3.x 还支持自定义修饰符:
<ChildComponent v-model.capitalize="pageTitle" />
例子:首字母大写
<my-component v-model.capitalize="myText"></my-component>
<input type="text" :value="modelValue" @input="onInput" />

<script setup lang="ts">
  const props = withDefaults(
    defineProps<{
      modelValue: string;
    }>(),
    {
      modelModifiers: () => {},
    }
  );

  const emit = defineEmits(["update:modelValue"]);

  const onInput = (e) => {
    let value = e.target.value;
    if (props.modelModifiers.capitalize) {
      value = value.charAt(0).toUpperCase() + value.slice(1);
    }
    this.$emit("update:modelValue", value);
  };
</script>
例子:v-model 参数 结合 自定义修饰符
<my-component v-model:description.capitalize="myText"></my-component>
<input type="text" :value="description" @input="onInput" />

<script setup lang="ts">
  const props = withDefaults(
    defineProps<{
      description: string;
    }>(),
    {
      descriptionModifiers: () => {},
    }
  );

  const emit = defineEmits(["update:description"]);

  const onInput = (e) => {
    let value = e.target.value;
    if (props.descriptionModifiers.capitalize) {
      value = value.charAt(0).toUpperCase() + value.slice(1);
    }
    this.$emit("update:description", value);
  };
</script>
表单上 v-model 原理
v-model 其实就是一个语法糖
- text 和 textarea 元素使用
valueproperty 和input事件; - checkbox 和 radio 使用
checkedproperty 和change事件; - select 字段将
value作为 prop 并将change作为事件。
<input v-model="searchText" />
等价于:
<input :value="searchText" @input="searchText = $event.target.value" />
组件上 v-model 原理(非兼容Vue2)
父组件:
<child v-model="msg" />

<!-- 等价于: -->
<child :model-value="searchText" @update:model-value="searchText = $event" />
子组件:
<div>
  <input v-model="modelValue" @input="onInput" />
</div>

<script setup lang="ts">
  withDefaults(
    defineProps<{
      modelValue: string;
    }>(),
    {}
  );

  const emit = defineEmits(["update:modelValue"]);

  const onInput = (e) => {
    emit("update:modelValue", e.target.value);
  };
</script>
或 使用 computed property 的功能来定义 getter 和 setter。get 方法应返回 modelValue property,set 方法应该触发相应的事件。
<div>
  <input v-model="value" />
</div>

<script setup lang="ts">
  import { ref } from "vue";
  const props = withDefaults(
    defineProps<{
      modelValue: string;
    }>(),
    {}
  );

  const emit = defineEmits(["update:modelValue"]);

  const value = computed({
    get() {
      return props.modelValue;
    },
    set() {
      emit("update:modelValue", value.value);
    },
  });
</script>
defineModel 宏(Vue3 新增)
本质:对 v-model 原理的封装
使用
父组件:
<template>
	<Child v-model="message"></Child>
</template>

<script setup lang="ts">
import {ref} from 'vue'
import Child from './Child.vue'

const message = ref('')
</script>
子组件:
<script setup>
  const model = defineModel()
</script>
设置必传
<script setup>
  const model = defineModel({
    required: true
  })
</script>
如果父组件不传入 v-model 属性,会看见警告信息:

设置默认值
<script setup>
  const model = defineModel({
    default: 'default value'
  })
</script>
修改属性名
父组件:
<template>
	<Child v-model:age="age"></Child>
</template>
子组件:
<script setup>
  const age = defineModel('age', {
    required: true,
    default: '18'
  })
</script>
多个 v-model 绑定
<script setup>
  const age = defineModel('age', {
    required: true,
    default: '18'
  })
  const name = defineModel('name')
</script>
v-model 修饰符
父组件:
<template>
	<Child v-model:name.upper="name"></Child>
</template>
子组件:
<script setup>
  const [model, modifiers] = defineModel('name', {
    set(value) {
      if (modifiers.upper) {
        return value.toUpperCase()
      }
      return value
    }
  })
</script>
非 Prop 的 Attribute(非兼容 Vue2)
一个非 prop 的 attribute 是指传向一个组件,但是该组件并没有相应 props 或 emits 定义的 attribute。
Vue2、Vue3 共同:
-
$attrs表示没有继承数据的对象,格式为{属性名:属性值} -
透传 attribute 不会包含声明的 props 以及 emit 事件。
-
这些 attribute 可以通过
$attr获取。 -
父组件和子组件都存在相同事件,则都会触发。
-
单个根节点:默认根元素透传;非 prop attribute 将自动添加到根节点的 attribute 中
父组件
<Child type="text" placeholder="请输入"></Child>子组件
<div>
  <input />
</div>
渲染结果
<div type="text" placeholder="请输入">
  <input />
</div>
$attr
非兼容 Vue2:
- Vue3:
$attrs包含class、style、v-on监听器等(不包含props/emits定义的 attribute)- 注意:未声明的 emit 事件也会被包含到
$attrs中
- 注意:未声明的 emit 事件也会被包含到
$listeners合并到$attrs
- Vue2:
$attrs不包含class、style、props定义的 attribute,且父组件存在class、style会与子组件根元素的class、style合并$listeners不包含emits定义的 监听器
Fragments 片段:多跟节点
Vue3 支持单文件组件多个根节点写法。
注意: 多根元素不具有自动 attribute 回退行为。如果未显式绑定 $attrs,将发出运行时警告
app.component("custom-layout", {
  template: `
    <header>...</header>
    <main>...</main>
    <footer>...</footer>
  `,
});
下面使用没有警告,$attrs 被传递到 <main>元素
app.component("custom-layout", {
  template: `
    <header>...</header>
    <main v-bind="$attrs">...</main>
    <footer>...</footer>
  `,
});
注意: 自定义指令v-directive 透传在多根元素上会被忽略且抛出一个警告;且不能通过 $attrs 进行继承传递给不同的元素。总之不推荐组件上使用自定义指令v-directive
禁用 Attribute 继承(非兼容 Vue2)
如果你不希望组件的根元素继承 attribute,你可以在组件的选项中设置 inheritAttrs: false,并结合 v-bind="$attrs" 指定元素继承。
注意:设置 inheritAttrs: false 禁止继承后:
-
Vue3:
class和style属于 a t t r s , ‘ attrs,` attrs,‘attrs` 中的 attribute 将不再被自动添加到根元素中 -
Vue2:
class和style不属于 $attrs,它们仍然会被应用到组件的根元素中
使用:
父组件
<Child type="text" placeholder="请输入"></Child>
子组件
<template>
  <div>
    <input v-bind="$attrs" />

    <!-- 等价于 -->
    <input :type="$attrs.type" :placeholder="$attrs.placeholder" />
  </div>
</template>

<script>
export default {
  // 避免顶层容器继承属性,可以关闭自动挂载到组件根元素上的没有在props声明的属性
  inheritAttrs: false
}
</script>
渲染结果
<div>
  <input type="text" placeholder="请输入" />
</div>
注意:内部组件传递。如果元素为组件,则将传入组件
<div>
  <OtherChild v-bind="$attrs"></OtherChild>
</div>
provide/inject
2.2.0 新增
provide 和 inject 主要解决了跨级组件间的通信问题,在跨级组件间建立了一种主动提供与依赖注入的关系。
特性:祖先组件有一个 provide 选项来提供数据,子孙组件有一个 inject 选项来开始使用这些数据
缺点:不是响应式,但是有方法可以将数据处理成响应式
注意:provide 传递引用数据类型,
- 祖先组件修改数据,会影响子孙组件数据。
- 解决:传递时深拷贝数据传递
- 子孙组件修改数据,会影响祖先组件数据。
- 解决:Vue3 通过
readonly不让子孙组件修改值,Vue2 通过冻结数据
- 解决:Vue3 通过
传递非响应式数据
注意:
-
如果是简单数据类型,无论子孙组件使用响应式接收还是直接接收, 父组件和子组件的数据是隔离的,修改互不影响。
-
如果是引用类型,无论子孙组件使用响应式接收还是直接接收, 修改数据会相互影响。
祖先组件
<script setup lang="ts">
  import { provide, ref } from 'vue'

  const name = ref('hello')
  provide('about', name.value)
</script>
子孙组件
<script setup lang="ts">
  import { inject } from 'vue'
  const data = inject('about')
  // const data = ref(inject('about')) // 响应式接收
</script>
传递响应式数据
如果你传入了一个可监听的对象,那么其对象的属性还是可响应的
祖先组件:
<script setup lang="ts">
	import { provide, ref, computed } from 'vue'

  const name = ref('hello')

  // 方式一:将ref对象传入
  provide('about', name)

  // 方式二:使用 computed 包裹,传入的是一个新变量
  provide(
    'about',
    computed(() => name.value),
  )

  setTimeout(() => {
    name.value = 'www' // 子组件更新
  }, 3000)
</script>
子孙组件:
<template>
	<p>{{ data }}</p>
</template>
<script setup lang="ts">
  import { inject } from 'vue'
  const data = inject('about')
  console.log(data) // hello
</script>
结合 readonly 禁止修改 provide 传递的数据
如果不想让子孙组件修改provide的值,可以在传递时使用 readonly 将数据设置为只读。
<script setup lang="ts">
	import { provide, ref, readonly } from 'vue'
  const name = ref([1,2,3])
  provide('about', readonly(name))
</script>
$root
**Vue3:**由于 Vue3 已废弃$on,所以无法使用 $on 进行监听
parent
访问父组件实例,通过实例直接调用组件的方法或访问数据
<template>
  <div>
    <button @click="sayHello">Say Hello to Parent</button>
  </div>
</template>

<script setup lang="ts">
import { getCurrentInstance } from 'vue';

 const instance = getCurrentInstance();
 const parentInstance = instance.parent;
</script>
事件总线 eventBus
原理:JS 设计模式-发布订阅模式
tiny-emitter/instance
// eventBus.js
import emitter from "tiny-emitter/instance";

export default {
  $on: (...args) => emitter.on(...args),
  $once: (...args) => emitter.once(...args),
  $off: (...args) => emitter.off(...args),
  $emit: (...args) => emitter.emit(...args),
};
自定义:
type BusClass<T> = {
  emit: (name: T) => void
  on: (name: T, callback: Function) => void
}

type BusParams = string | number | symbol

type List = {
  [key: BusParams]: Array<Function>
}

class Bus<T extends BusParams> implements BusClass<T> {
  list: List
  constructor() {
    this.list = {}
  }
  emit(name: T, ...args: Array<any>) {
    let eventName: Array<Function> = this.list[name]
    eventName.forEach(ev => {
      ev.apply(this, args)
    })
  }
  on(name: T, callback: Function) {
    let fn: Array<Function> = this.list[name] || [];
    fn.push(callback)
    this.list[name] = fn
  }
}

export default new Bus<number>()
避坑
隐性的父子组件通信 :应该优先 prop 和事件,而不是 this.$parent或变更 prop
一个理想的 Vue 应用是 prop 向下传递,事件向上传递的。遵循这一约定会让你的组件更易于理解。然而,在一些边界情况下 prop 的变更或 this.$parent 能够简化两个深度耦合的组件。
问题在于,这种做法在很多简单的场景下可能会更方便。但请当心,不要为了一时方便 (少写代码) 而牺牲数据流向的简洁性 (易于理解)。
非 Flux 的全局状态管理 :应该优先 Vuex,而不是通过 this.$root或一个全局事件总线 bus
通过 this.$root 或 全局事件总线 管理状态在很多简单的情况下都是很方便的,但是并不适用于绝大多数的应用。
Vuex 是 Vue 的 官方类 flux 实现,其提供的不仅是一个管理状态的中心区域,还是组织、追踪和调试状态变更的好工具。它很好地集成在了 Vue 生态系统之中 (包括完整的 Vue DevTools 支持)


 1270
1270


 被折叠的 条评论
为什么被折叠?
被折叠的 条评论
为什么被折叠?
 到【灌水乐园】发言


